This page introduces the Simulator object and its rollouts.
Overview
A simulator is a Phoenix object that controls the simulation, and enables you to create fluids like liquids and gasses that interact with the surrounding environment.
You can think of a Phoenix Simulator as a 3D box, inside which simulations of fluids and Rigid Body Dynamics are performed. The box is divided into small cells, called voxels, which is why the box is referred to as a Simulation Grid. The voxels inside the grid can be filled with just about any type of gas or liquid, and contain the fluid's properties at a position and given time.
For each frame in your simulation, Phoenix looks at each voxel and calculates whether there is any fluid there, based on the settings you give the Phoenix sim. The simulator will also account for obstacles, such as geometry, as well as participating forces in the scene, and so forth.
Although Chaos Phoenix for Maya uses a single Simulator node for both, Phoenix simulations can generally be divided into two types:
- Fire/Smoke simulations, which include gaseous effects like fire, smoke and explosions, as well as sparks or embers and so forth.
- Liquid simulations, which can create pouring or flowing liquids, or any simulation that needs foam or mist, such as coffee or waterfalls.
Since Liquid simulations have peculiar properties that differ from those of Fire and Smoke simulations, the simulator contains a separate Liquid rollout. There are also separate rollouts for controlling when Foam, Splash and Mist Particles should be born, and how they should behave.
![]()
To actually create a simulation, three different components must be combined:
A Simulator node
A Source node
An Emitter
This is the minimum requirement for just about any simulation setup.
Note that in addition to the manual creation of a simulator using the UI paths shown below, a simulator is automatically created when any of the Quick Simulation Setup buttons are used.
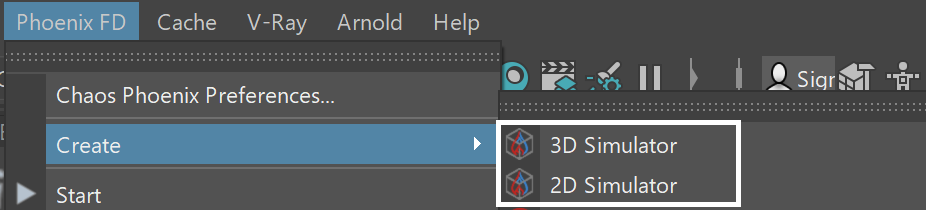
UI Paths: ||Phoenix FD menu|| > Create > 3D or 2D Simulator
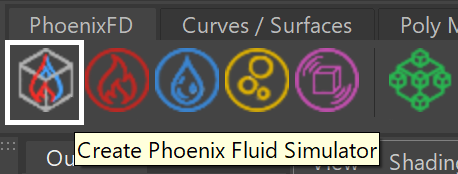
||Phoenix FD Shelf|| > Create Phoenix FD Fluid Simulator button
The workflow for Phoenix fluids and Active Bodies is split into two main parts – simulating and rendering.
Simulating Fire and Smoke
Simulations of fire and smoke are grid-based, meaning they consist of an array of voxels that contain the fluid's properties at a position and given time, such as the fluid’s Temperature, its Velocity, its Color, and so forth. These fluid properties are written inside what are called Grid Channels.
Each channel stores a type of value, such as Temperature or Smoke, or for Liquid Simulations it could be Liquid, Velocity, Viscosity, and so forth. Each channel has its own Grid Channel Range of possible values that is most efficient for that specific channel type, and Phoenix determines the fluid’s behavior at a given time, based on the content of these Grid Channels.
Simulating Liquids
Liquid simulations also generate particles for liquids that drive the simulation, by writing simulation data inside each voxel’s Grid Channels, so that the Grid Data is built from those particles.
Since Phoenix 3.0, Liquid Simulations have used a hybrid solver under the hood, called FLIP, which provides more realistic and faster simulations, with no stepping artifacts. In essence, the FLIP solver combines a Grid simulator with Particles, in order to take advantage of the benefits of both.
Besides liquid, the simulator provides built-in helper simulators for Foam, Wetmap, Splash, and Mist Particles. In certain cases, the splash and mist can be considered as part of the liquid simulation, because liquid, splash and mist can be converted to each other during the simulation process. You can go through the FLIP Particles Life Cycle page for an in-depth explanation of this process.
Cache Files
When running a simulation, the simulator will typically output an entire animation sequence. That sequence is saved as individual files, called caches, which contain raw simulation data for each timeline frame. In essence, the cache data contains grids and particles, which describe the fluid’s behavior.
Rendering
Sim cache files containing either Fire/Smoke simulations or Liquid simulations can be previewed in the viewport. The cache files can also be rendered to convert the raw simulation data into captivating and realistic images.
When rendering, the Phoenix Simulator offers multiple render modes. The mesh render mode is typically used for rendering Liquids, and the volumetric render modes are typically used for rendering Fire/Smoke simulations. Phoenix offers a lot of flexibility though, so there is the option to render Fire/Smoke sims as meshes and Liquids as volumes, in order to achieve even more diverse effects.
When rendering other particle types besides Phoenix Liquid Particles, Phoenix has a separate Particle Shader geometry type, which is used to shade particles.
Rollouts
After creating a Phoenix Simulator object, the following rollouts can be accessed in the Attribute Editor:
- Simulation - Controls the simulation and displays statistics such as simulation times, as well as information about the data contained in the sim for the current frame.
- Resimulation - Uses a base simulated cache sequence with exported velocity to drive a new simulation, in order to enhance details, increase its resolution, or slow down or speed up the simulation. For liquid simulations, it modifies an existing cache sequence to improve features or change specified particle systems.
- Grid - Controls the boundaries, size and resolution of the simulation grid.
- Dynamics - Offers parameters to affect fire/smoke dynamics when simulating, such as cooling, smoke dissipation, vorticity, advection, etc.
- Fuel - Controls the simulation of burning when Fuel is present in the simulation, which is useful for creating gasoline explosions or propagating fire effects.
- Liquid - Controls liquid dynamics such as viscosity, surface tension, drying time, etc.
- Foam - Controls the simulation of bubbles and foam.
- Splash and Mist - Controls the simulation of splash and mist.
- Scene Interaction - Specifies how the simulator interacts with other objects in the scene.
- Output - Specifies how and where the simulation cache files are saved.
- Input - Determines the path of the input files for rendering and previewing, and offers settings and controls for playback.
- Preview - Controls how the simulation is displayed in the viewport.
- Rendering - Controls how the simulation is rendered, and includes additional volumetric options for shading Fire/Smoke simulations.
Simulation in 2D
The Phoenix simulator has the ability to perform a 2D simulation if one of the grid dimensions is set to 1. The main application of this feature is to create very wide fires that would otherwise be difficult with 3D simulation. See the Grid rollout for more information.
Upgrading from Previous Versions of Phoenix
Due to many improvements to the Phoenix solver, recreating simulations the same way you did in older versions of Phoenix may not be possible because of changes to the solvers and the UI. Here are some things to be aware of when upgrading from older versions of Phoenix.
If you have a scene created with Phoenix version 3 and you open it with version 4, it will keep all the old settings for you, including some which are not visible to newer versions, in order for the results to be roughly the same.
If you try to manually replicate an older simulation setup with a new Phoenix simulator using Phoenix version 4, and set all the parameters with the same values as the older version, you may not obtain the same result as in Phoenix version 3 or older.
Since the release of Phoenix version 3, Phoenix started using a new solver for liquids and fire/smoke simulations, so simulation results will be different between Phoenix version 3 and version 2.