This page provides information on the Output rollout.
Overview
The Output rollout holds the controls for the simulation result.
When you start a simulation, the simulator will typically output an entire animation sequence, which is saved onto your hard drive by default. That sequence is saved as individual files, called caches, which contain raw simulation data for each timeline frame.
The Output rollout lets you set the save path for the cache files, manage what data is written to those cache files, and determine their compression.
Specifically, the cache data consists of grids and particles, which describe the fluid’s behavior. Grid Channels and Particle Channels are written to each cache file, which represent the properties of the simulated fluid at that frame.
In the Output rollout, you can choose which Grid Channels and Particle Channels to export to the cache files, based on your needs. The values for those exported channels will then be contained in each of the voxels in the simulation grid.
When simulating fire or smoke, you could export Grid Channels such as Smoke, Temperature/Liquid, Velocity, RGB and so forth.
For example, to simulate multiple colors of smoke, you would want to export the Grid RGB Channel. That way, if each of your Fire Sources emits a different color of smoke, each Source's RGB color information would be saved to the simulator's cache files.
Meanwhile, for Liquid simulations, Phoenix can simulate several particle system types: Liquid, Foam, Splash, Mist and Wetmap particles.
Each of these particle systems contains Particle Channels, or fluid properties, for each particle. These channels include Position, Size, Age, ID, Velocity and so forth, which you can choose to write to the cache files, depending on your needs.
Grid Channels such as Temperature/Liquid and Velocity are then built from the simulated particles, and exported to the cache files in the form of a voxel grid.
Exporting the Grid Temperature/Liquid Channel will automatically convert Liquid particles to a grid during export, which is why they can be rendered as a mesh and shaded using standard materials. In addition, the Liquid mesh can also be previewed in the viewport.
Note that only Liquid particles can be automatically converted to a grid. The other particle systems (e.g. Foam, Splash, Mist etc.) are exported only as particles, and must be shaded using the Particle Shader.
UI Path: ||Select PhoenixFDSim|| > Attribute Editor > Output rollout
Parameters
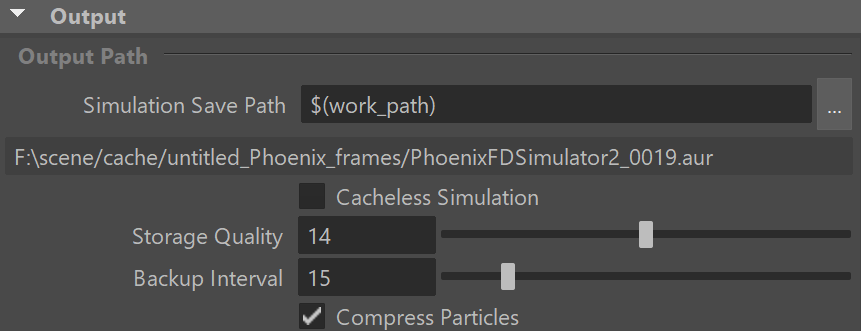
Output Path
Simulation Save Path | outPath, outPathResolved – This is the directory and the name template for the output cache files. It uses the $(scene_path) macro by default, and there are also other available macros as listed below. To set up rendering and simulation cache paths manually, see How to change the default Phoenix paths on the Tips and Tricks page.
Since version 3.00.02, Phoenix can export VDB grid data. Check the How to export PhoenixFD simulation to OpenVDB format video.
Appending a .vdb extension after the Output Path tells Phoenix to write its data in the OpenVDB format. Particle data can also be exported using the .aur or the .vdb format.
Note that due to the difference between the compression algorithms used by Phoenix's Aura format and the OpenVDB format, exported VDB caches may produce a slightly different result at render time compared to Aura caches when the Storage Quality is set to a value lower than 20 (i.e. Lossless).

Clicking the "..." button will open a menu with the following options:
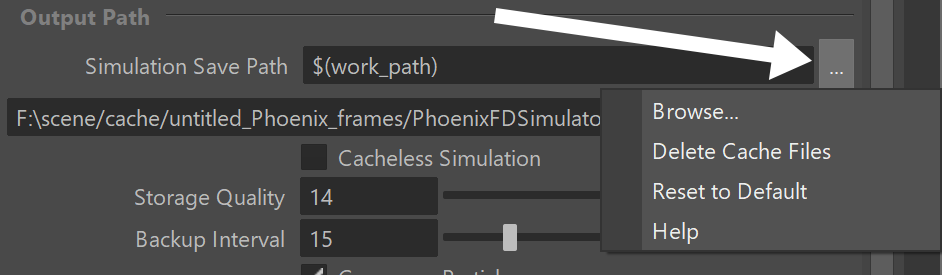
Browse - Opens a dialog where you can select where the simulation caches will be written to. The filename you type in must contain # signs so each simulation frame will be written to a differently numbered file. Also, you can choose between two file formats - AUR and VDB cache files. In order to write the simulation caches to VDB in the default simulation path, you can just edit the Simulation Save Path to $(work_path).vdb.
Delete Cache Files - Clears the cache files matching the provided Simulation Save Path pattern.
Reset to Default - Resets the Simulation Save Path to default.
Help - Opens this Help page.
Cacheless Simulation | cacheless – Only the last simulated frame will remain in RAM and no caches will be written to the storage. This will speed up simulations which are bound by slow reading or writing to the hard disk or by compression and decompression of the grid or particle data. You can use this option when iterating on the simulation settings in order to speed up your iterations. It can also be combined with the Render On Each Sim Frame option under the Simulation rollout, or the Save Images During Simulation option of the GPU Preview, so you will get a ready image sequence if you leave the simulation unattended and then return to check it.
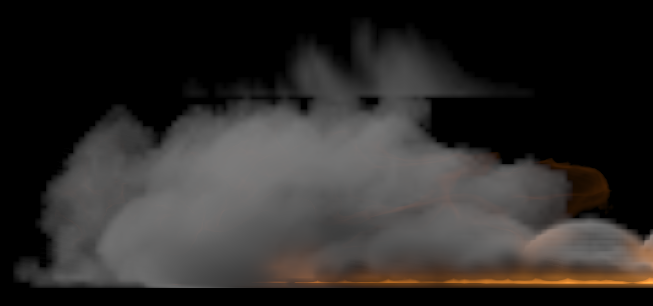
Storage Quality | storageQuality – The output grid and particle channels are compressed by default in order to increase the performance (faster cache loading) and to avoid excessive memory consumption. This parameter can range from 8 to 20 - 8 is the smallest size, while 20 is the best quality and is uncompressed. If this value is set too low, different artifacts may start appearing depending on the type of scene. For grid channels, artifacts shaped like horizontal slices may appear in preview and rendering, such as in the following image:
Example: Fire/Smoke compression artifacts
Backup Interval | backupInterval – The frame interval between two backups of the full simulation state. You can later continue a stopped simulation from such frames (see the Restore button in the Simulation rollout). To make a Restore possible at every frame, set this parameter to 1. A value of 0 means no backup frames will be exported.
Compress Particles | prtcompress – Enables compression of the simulated particle systems when they are written to AUR cache files. VDB cache files exported from Phoenix do not support particle compression. Simulations with very high particle counts, such as 50 million or more, will produce large caches, so particle compression will help reduce the cache sizes significantly. If you are writing or reading the cache files over the network or to a disk drive, this could significantly speed up simulation and rendering. However, if you are writing the simulation caches to an SSD drive or other fast storage, and you can afford to have large cache files, then disabling the compression could actually speed up the simulation.
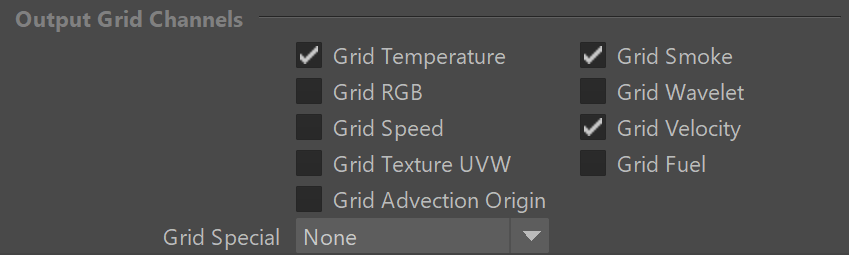
Output Grid Channels
Fluid properties are written inside Grid Channels. Here you can choose which Grid Channels will be exported to the cache files when running a simulation.
Each channel stores a type of value, such as Temperature/Liquid, Smoke, RGB, Velocity and so forth, with its own range of possible values that is most efficient for that specific channel type (see the Grid Channel Ranges). Phoenix determines the fluid’s behavior at a given time, based on the content of these Grid Channels.
Note that the more channels are used, the slower the simulation runs and the larger the output files are. While scrolling the timeline, you can check which channels are present in the loaded cache file for the current frame, from the Cache File Content section in the Simulation rollout.
Also note that in the case of FLIP / Liquid simulations, currently only Liquid particles can be automatically converted to a grid during export, while all the other systems (e.g. Foam, Splash, etc.) are exported only as particles.
Grid Temperature | outTemp – Exports the Temperature channel.
Grid Smoke | outSmoke – Export the smoke density.
Grid RGB | outUVW – Export the RGB color. You can use this for simulations where you are mixing different liquid colors or materials through a Phoenix Grid Texture.
Grid Wavelet | outWavelet – Export the wavelet data of a fire/smoke simulation. You need this if you are going to resimulate a fire/smoke simulation in order to increase the resolution and add more detail using wavelet turbulence.
Grid Speed | outSpeed – Export the speed of the simulation. You can use this for coloring the simulation at render time based on how fast different parts of the fluid move.
Grid Velocity | outVel – Export the velocity of the simulation. The difference between the Speed and Velocity channels is that Velocity is a vector and takes 3 times more space in the cache file than the Speed channel. However, Velocity has direction and is needed for Resimulation and motion blur of the fire/smoke simulation or the liquid mesh. Because Speed can be calculated from the Velocity, it is not exported separately when Velocity is exported.
Grid Texture UVW | outTexUVW – Export the Texture UVW channel. Enable this to generate texture mapping coordinates that follow the movement of the fluid. This way you can change the textures you want mapped over your fluid even after the simulation has ended, without the need to simulate again. For more information on TexUVW, please check the Texture mapping, moving textures with fire/smoke/liquid, and TexUVW page.
Grid Fuel | outFuel – Export the fuel density in the simulation.
Grid Advection Origin | outAdvPos – Export the advection origin of each voxel in the simulation. This is needed for the Precise Tracing Blend Method for retiming simulated sequences in the Input rollout, and is also needed for the Use Advection Origin for Motion Blur option in the Simulation rollout.
Grid Special | outSpecial – Export internal or special channels into the Special channel (alias to the Smoke channel) so they can be visualized using one of the volumetric shaders of the Simulator (with Mode set to Volumetric, Volumetric Geometry, or Volumetric Heat Haze). Such channels can also be read by the Grid Texture and used for rendering.
Solid Voxels – Exports the solid voxels as smoke. Voxels covered by many obstacles contain more smoke.
Divergence Symm – Exports the negative divergence of each voxel.
Divergence Smooth – Exports the blurred negative divergence of each voxel.
Vorticity – Exports the length of the curl of each voxel. Can be used for whitewater shading.
Vorticity Smooth – Exports the blurred length of the curl of each voxel. Can be used for whitewater shading.
Velocity Gradient – Exports the length of the gradient of the velocity field.
Injector – Exports the pressure term created by sources in Inject mode or formed during the simulation.
Liquid Surface – Exports the surface created by the simulation.
Solid Geom Type – Exports the internal geometry type in each voxel.
Hydrostatic Pressure – Exports the pressure of the liquid at each voxel due to the effect of gravity.
Voxelization Issues – Exports voxels where the solver would produce wrong results during simulation. Such voxels are near overlapping triangles, inverted normals, open edges or other geometry issues.
Using Environment Variables with Phoenix Paths
There are path environment variables in every OS, and they can be used with Phoenix cache file paths.
For example, to access environment variables in Windows 10 and Windows 8, follow these steps:
- In Search, search for and then select System (Control Panel).
- Click the Advanced system settings link.
- Click the Environment Variables... button.
- In the System variables section, using Edit System Variable (or New System Variable) window, specify the value of the PATH environment variable.
Using this, you can create a path (variable), give it a name, and use it for cache files in Phoenix.
For example, the path D:\PhoenixFD\Cache can be given the environment variable name "Cache". In the Phoenix Simulator Output rollout, you can specify the Output Path as the following:
$env(Cache)\cache_name###.aur
This will save the Phoenix cache files in D:\PhoenixFD\Cache.
Note that in order to reference environment variables, the following pattern must be used:
$env(<variable_name>)