
This page provides information about the Soft Box texture in V-Ray for Blender.
Overview
V-Ray Softbox is a procedural texture that can be used with a V-Ray Light to simulate the illumination coming from a Soft Box light source.
UI Path
||Node Editor|| > Add > Textures > Soft Box
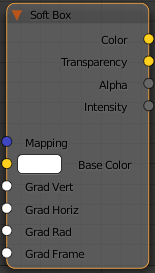
Node
Base Color – Specifies a color to use as a base.
Grad Vert – An input slot for the V vignette gradient.
Grad Rad – An input slot for the Radial Vignette gradient.
Grad Frame – An input slot for the Frame Vignette gradient.
Parameters
V Vignette – Enables the vertical gradient.
V Vignette Flip – When enabled, reverses the vertical gradient.
U Vignette – Enables the horizontal gradient.
U Vignette Flip – When enabled, reverses the horizontal gradient.
Radial Vignette – Enables the radial gradient.
Radial Vignette Flip – When enabled, reverses the radial gradient.
Frame Vignette – Enables the frame gradient.
Frame Vignette Flip – When enabled, reverses the frame gradient.
Frame Tint – Enables the frame tint.
Tint Color – Specifies a color to tint the frame.
Tint Strength – A multiplier that controls how strong of an effect the Tint Color has.
Base Color Mult – A multiplier for the brightness of the texture.
Gamma – A gamma correction that will be applied to the texture.
Base Tint – When enabled, the color in the Base Texture parameter is multiplied by the Base Tint Color parameter.
Strength – A multiplier that controls how strong the effect of the Base Tint Color parameter is.
Hot/Dark Spot – Enables or disables the hot/dark spot.
Mult – A multiplier for the brightness of the hot/dark spot.
Mode – Specifies how the hot/dark spot is applied.
Hot Spot – Color is added to the texture, adding brightness and creating a hot spot.
Dark Spot – Color is subtracted from the texture, removing brightness and creating a dark spot.
Spots Tint – Enables the tint color for the spots.
Strength – A multiplier that controls how strong the strength of the Tint Color parameter.
U/V Offset – Controls the position of the spots along the U or V axis.
Outer Radius – Specifies the outer radius where the hot spot ends as a fraction of the texture size.
Inner Radius – Specifies the inner radius where the hot spot begins to fade out as a fraction of the texture size.
Softness – Controls the rate at which the hot spot fades out.
U/V Tiling On – When enabled, controls the tiling of the spots along the U or V axis.
U/V Tiling – Tiling coordinates of the spots along the U/V axis.
Compatibility – Allows you to match the result of the texture in Blender to that in either 3ds Max or Maya. If Alpha From is set to Maya:
3ds Max – The resulting alpha of the texture is the intensity of the texture.
Maya – The resulting alpha of the texture is the color luminescence.
Invert – When enabled inverts the colors in final result.
Alpha From – Determines how the alpha of the result is calculated:
Force 1.0 – Alpha is always 1.
Maya – Depends on the selected Compatibility option.
Self – The calculated alpha of the texture.
Invert Alpha – Inverts the alpha channel if Invert is also enabled.
UV
Placement – Select how to place the texture.
Whole texture is valid
Crop
Place
U – U coordinate of the texture sector.
V – V coordinate of the texture sector.
W – W coordinate of the texture sector.
H – Specifies the height of the texture sector.
Tile U/ Tile V – Enable to choose between a horizontal or vertical tiling.
UV noise on – Enables the noise.
UV noise amount – Specifies the UV noise amount.
UV noise levels – Specifies the UV noise iterations.
UV noise size – Specifies the UV noise size.
UV noise phase – Specifies the UV noise phase.
Animate UV noise – If enabled, the noise is animated. Use the UV noise phase to animate the noise.
