This page provides a tutorial on creating a Procedural Ground Dust simulation in 3ds Max.
Overview
In this tutorial we explore how to create dust-like simulation using Phoenix FD smoke. We go through setting the right simulation units, appropriate geometry dimensions and scene setup suggestions. Most importantly, we guide you through how to make a realistic sand smoke coming up as the horses step on the ground using VrayDistanceTex, VRayCompTex and Smoke texture maps as a mask for the smoke emit. We compare how different values of some crucial parameters change the whole simulation's look.
Using multiple animated geometry meshes, we show how Phoenix FD handles large scale smoke simulations during animation.
Units Setup
Scale is crucial for the behavior of any simulation. The real-world size of the Simulator in units is important for the simulation dynamics. Large-scale simulations appear to move more slowly, while mid-to-small scale simulations have lots of vigorous movement. When you create your Simulator, you must check the Grid rollout where the real-world extents of the Simulator are shown. If the size of the Simulator in the scene cannot be changed, you can cheat the solver into working as if the scale is larger or smaller by changing the Scene Scale option in the Grid rollout.
The Phoenix FD solver is not affected by how you choose to view the Display Unit Scale - it is just a matter of convenience.
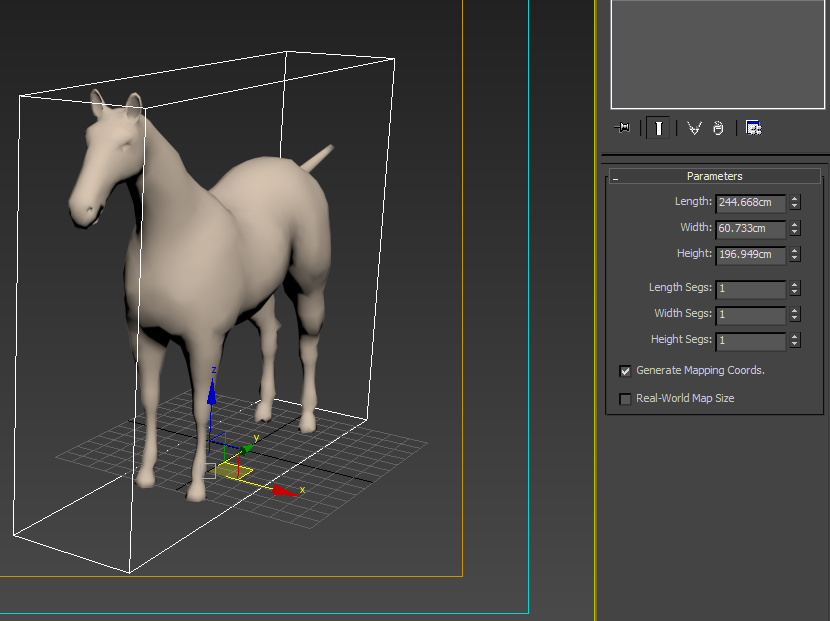
The horses used in the simulation are modeled in centimeters and throughout the fluid simulation we keep using the same unit. If you want to simulate a massive scene, then you might consider using meters.
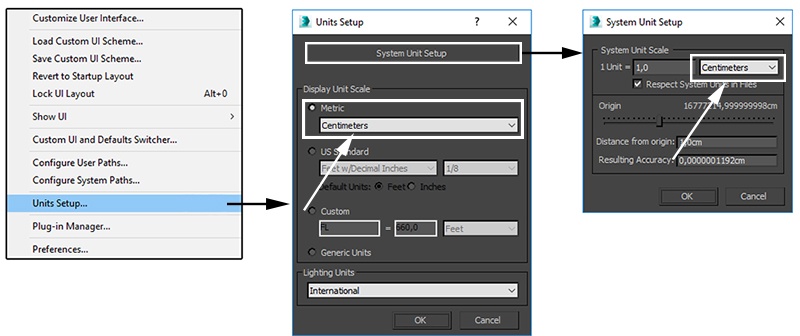
Go to Customize > Units Setup and set Display Unit Scale to Metric Centimeters.
Also, set the System Units such that 1 Unit equals 1 Centimeter.
The horse's geometry is modeled with the following dimensions - 196 cm in height, 244 cm in length and width of 60 cm.
Scene Layout
Since the simulation scene requires usage of hundreds of horses, the horses' animated geometry is firstly exported to alembic file.
There is also a single animated horse exported to an alembic file to use during the development stage.
There is only one single V-Ray Dome light to light up the scene.
A V-Ray Infinite Plane is used for easily setting the ground.
The dust emitting ground is set by a 3ds Max standard plane with dimensions covering the space under the running horses. Dimensions in this scene are 6225 cm by 2793 cm.
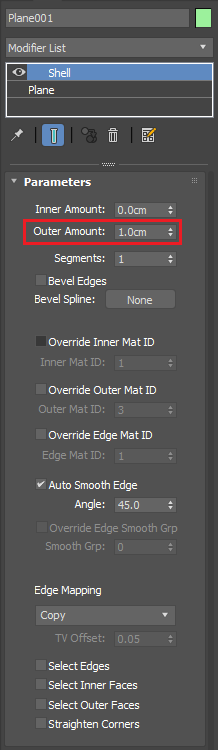
Since Phoenix FD works best with closed geometry, add a Shell modifier to the created plane.
Set the Outer Amount as little as 1.0 cm. The actual value does not have weight in the final render, as the plane will not be visible at all there.
With the plane selected, right-click on the Large-scale Smoke icon in the Phoenix FD toolbar.
This generates a simulator, a PHXSource and sets a smoke shader in the scene automatically.
Select the PhoenixSource in the viewport.
Then go to Modifiers and add a Discharge Modifier.
We want the ground to emit dust only from the top visible part and not from all sides. Thus, set the Modify Outgoing Velocity to Normal Z.
In the grid, set the values of the two points to [0,0; 1,1].
Smoke Source
Now that you have the plane as a smoke source, let's explore the right settings for a nice looking simulation.
The Outgoing Velocity is set to 1410 cm. The Smoke parameter has a value of 30.
There is a texture map set as a Mask.
Let's try to use VRayDistanceTex map as a Mask.
The VRayDistanceTex is a V-Ray specific procedural texture that returns a different color based on a point's distance to an object(s) specified in a selection list. It comes in handy here, where V-Ray will calculate the distance between the horse mesh and the plane and will generate a black-and-white mask procedurally. For that goal add your horse mesh(es) (the alembic file you created earlier) in the list of VRayDistanceTex Objects.
Distance is set to 8.0.
Swap the far and near colors, so that the far color is black and the near color is white.
Plug in the VRayDistanceTex to the Diffuse channel of a 3ds Max Standard material.
Assign it to the plane.
Render out one frame with a running horse.
Notice how VRayDistanceTex generates a white circle around the horse's hoof when touching the ground.
The mask is still too uniform, so we need to adjust the texture to make it look more organic.
Let's use the VRayCompTex in order to blend the VRayDistanceTex with a Smoke texture.
Set the Operator to Multiply (A*B).
Don't forget to assign the VRayCompTex as a Mask in the PhoenixSource after creating it.
Take a look at the settings of the Smoke texture.
Note that the Size parameter is set to a value of 10.0.
This is how the resulting composited texture looks like. The mask is subtle, thus the produced dust will look more natural.
Simulation
Moving on to the simulation grid.
Set the grid as the green box from the picture. It needs to be placed where the first two horses are positioned on the plane.
Then, with Adaptive Grid enabled, expand the red grid as shown in the image. That will be your Maximum expansion of the simulation (make sure to enable the checkbox from the Grid parameters first), which will reduce significantly the simulation time.
You could also allow the trailing end of the grid to collapse back as the smoke thins out. You can disable No Smaller Than Initial Grid from the Grid roll-out and this will help reduce RAM usage and simulation time. If the smoke gets clipped too quickly by the shrinking grid, you should decrease the Adaptive Grid threshold further.
Let's take a closer look at the Grid's parameters.
The Cell size here is set to approximately 2.4 cm.
Set the Adaptive Grid to be based on the Smoke.
We have set the Extra Margin to 50. This is important, because if left at 0, the Adaptive Grid will not expand fast enough and the horses will be running without emitting dust.
The three images here compare the differences between Scene Scale values [set from top to bottom to 1,5 and 10].
The higher the value of the Scene Scale, the slower the movement of the fluid would be. This will keep the smoke close to the ground.
Our goal here is to make the smoke look like sand, so we don't need it too diffuse or raising high from the ground. We settle here for a value of 5, but feel free to experiment with other values as well.
In the Dynamics rollout menu, switch the Smoke dissipation to 0.1 and the Smoke buoyancy to 0.0.
The Randomize Amount is given a value of 1.0.
Compare the difference in the Smoke Buoyancy values displayed in these two simulation images.
Top: value of 1 (default value);
Bottom: value of 0.
With a value of 0 we get closer to a sand similar simulation, where the dust particles stay closer to the ground. You can even set this to a negative value so the dust would subside with time.
Smoke dissipation parameter controls how fast the smoke will disappear. The maximum value of 1 will make the smoke disappear immediately after it was emitted.
Top image: default value of 0.0;
Bottom image: value of 0.1.
You might notice that with a value of 0.1 there is a lot less detail in the smoke simulation because as it becomes more transparent, sharp edges and sharp shadows are diminished. However, the simulation here is done with only one horse and we have quite more in the final scene. They will add up to the total picture and in order not to be covered completely in dust, we choose to stick to a value above 0.0.
The Randomize parameter is responsible for the random fluctuations of the fluid's velocity for each grid voxel.
Top image: value of 0 (default value);
Bottom image: value of 1.0.
We adopt the value of 1.0 for this parameter in order to break the natural fluid mushroom shapes and puffs and make the result look more chaotic.
Open the Rendering rollout menu to prepare the simulation for rendering.
The Sampler type parameter determines the blending method between adjacent grid cells. We set it to Spherical.
In those two comparison images you see the default Sampler type, that is, Linear (top).
The produced dust looks grainy, so we switch to Spherical sampling (bottom), that effectively reduces this issue.
Open the Volumetric Render Settings found by pressing the Volumetric Options button in the Rendering rollout menu.
Here you can control the smoke color and its opacity.
Set the color to be Constant. We aim at a sand-looking smoke, so we use [225, 191, 163] for Constant color, but you can tweak it further.
Simple Smoke Opacity is adjusted to 0.3.
In the previous step, when setting the dust/smoke simulation, we worked around the shelled plane and it was visible in the rendered images.
Now, we don't need this plane to be rendered in the final image. So, select the plane, right-click it and go to its Object Properties menu. Disable the Renderable option.
In this tutorial we focus mainly on the simulation, so the material used for the Infinite Plane (ground) is a V-Ray Material with the following settings:
Diffuse [197, 135, 93].
All other parameters are left to their default values.
Assign the material to the infinite plane.
Lighting in this scene relies on a V-Ray Dome light with assigned HDRI map. You can also use V-Ray Sky and Sun system. Remember to set your camera exposure to be suitable for outdoor lighting.
You are ready to run the simulation.
Here are the final render results.
In this image you can see how a large number of animated geometry creates much dust/smoke detail in the in-betweens.