This tutorial will walk you through the process of setting up and rendering images in V-Ray for Maya with DR (Distributed Rendering).
Introduction
Sometimes, rendering an image is a fast and simple process. Other times, rendering a good-quality image can take quite a bit of time. This is why breaking up the task of rendering over multiple computers can be helpful for completing long renders much faster. In this tutorial, we go over setting up and using Distributed Rendering (DR) to utilize other computers on a network (normally referred to as a render farm) to complete a rendered image faster. The workstation/computer used to start a DR job in Maya is referred to as the render client and the computers on the network that are sent rendering tasks are known as render servers.
The render client starts the rendering process in Maya, then divides the frame into small regions (called buckets), and tasks rendering these regions to available render servers. The servers calculate their part of the task and then send the finished data back to the client for assembly. Then, the servers request additional tasks to render next until the entire image is completed and the client has assembled all the image data back together for the full image. If the DR job is a sequence of frames, then this process is repeated until all frames for the job are completed.
Part 1: Installation
Standard V-Ray Installation
Similar to the process of getting V-Ray for Maya installed on your workstation, you'll need to install V-Ray for Maya on any computers to which you wish to distribute your render jobs. But instead of the Full install option, the Standalone only option works if you only plan to use that machine as a render server only.
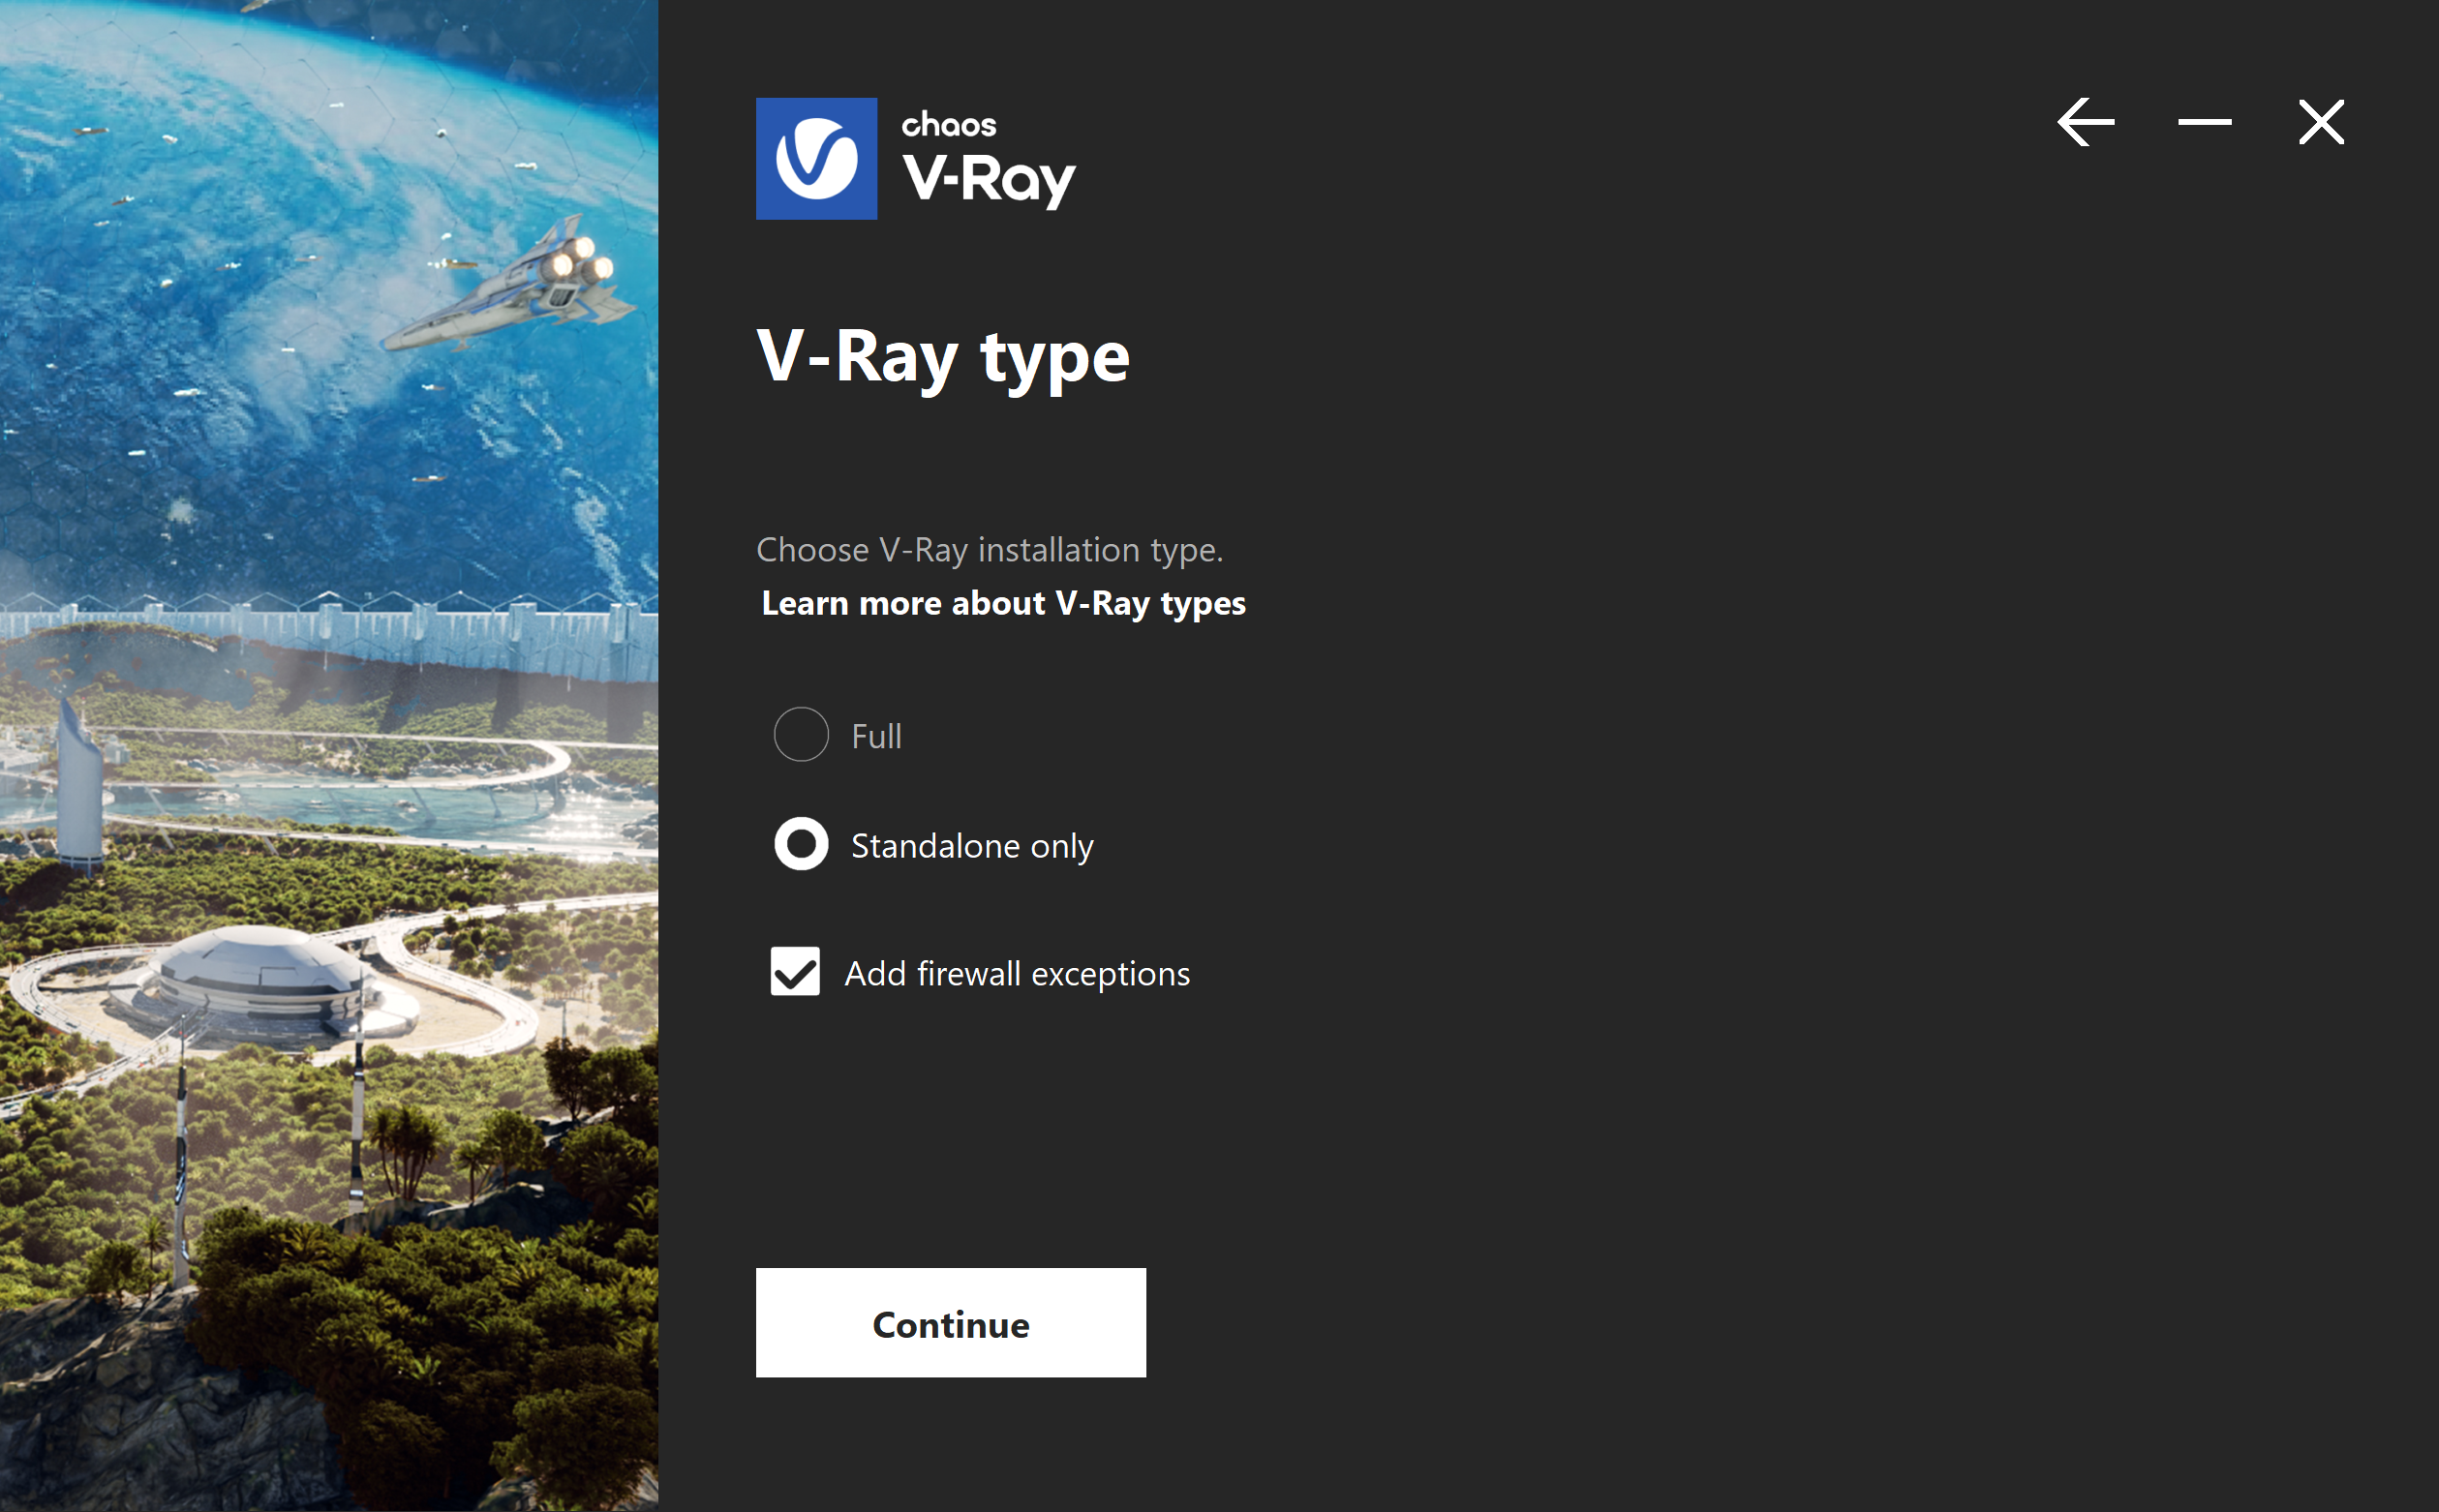
Make sure to use the same version installer as the workstation from which you plan to render. This helps ensure that the V-Ray Core is the same version used on all servers, and prevents any mismatch of supported features. V-Ray standalone can also be used on a render machine that doesn't have Maya installed.
Portable Installation
Portable Installations are very useful for installing the same V-Ray version, with the same environment, on multiple machines. Here is how to set up DR when using a Portable Installation.
- Windows:
- Set the Environment. See the Portable Installation page for more details
Enter vray_builds\vray_#####_maya####\maya_vray\bin\vray.exe -server in Command Prompt. Replace ##### with your versions of V-Ray and Maya, for example:
vray_builds\vray_60002_maya2024\maya_vray\bin\vray.exe -server
- Linux:
- Set the Environment.
Enter vray_builds/vray_#####_maya####/vray/bin/vrayserver in Terminal. Replace ##### with your versions of V-Ray and Maya, for example:
vray_builds/vray_60002_maya2024/vray/bin/vrayserver
- MacOS:
Set the Environment.
Enter vray_builds/vray_#####_maya####/vray/bin/vrayserver in Terminal. Replace ##### with your versions of V-Ray and Maya, for example:
vray_builds/vray_60002_maya2024/vray/bin/vrayserver
The [STDROOT] and [PLUGINS] tags in the script are normally replaced with their respective directories by the V-Ray installer. However, if you are using a version earlier than V-Ray 6, update 1, and performing a portable installation, it is necessary to manually replace these tags. The [STDROOT] tag needs to be replaced with the full path to the vray folder in the portable file. The [PLUGINS] tag needs to be replaced with the full path to the maya_vray folder in the portable file.
Registering the server service
If you want to make your render nodes ready to render DR jobs anytime they are online, it is recommended to register the V-Ray render server application as a service. You can register the V-Ray Standalone application as a Windows service so that it runs automatically on Windows boot from the Windows Start > All Programs > V-Ray for Maya 20xx folder > Register V-Ray render server as a service. V-Ray Standalone can now be used as a render server for Distributed Rendering, Network Rendering and rendering with IPR.
Part 2: Licensing
Next, make sure you have an active V-Ray License, by either installing the online license server on your computer, or by connecting to a license server on your network. Each render server will need access to a V-Ray Render Node license. This process is made easy with the V-Ray Online Licensing System by loading http://localhost:30304/#/ (or use the IP address of the computer running the licensing system, with the port 30304). For more details on this process, please see the Changing your License Settings page.
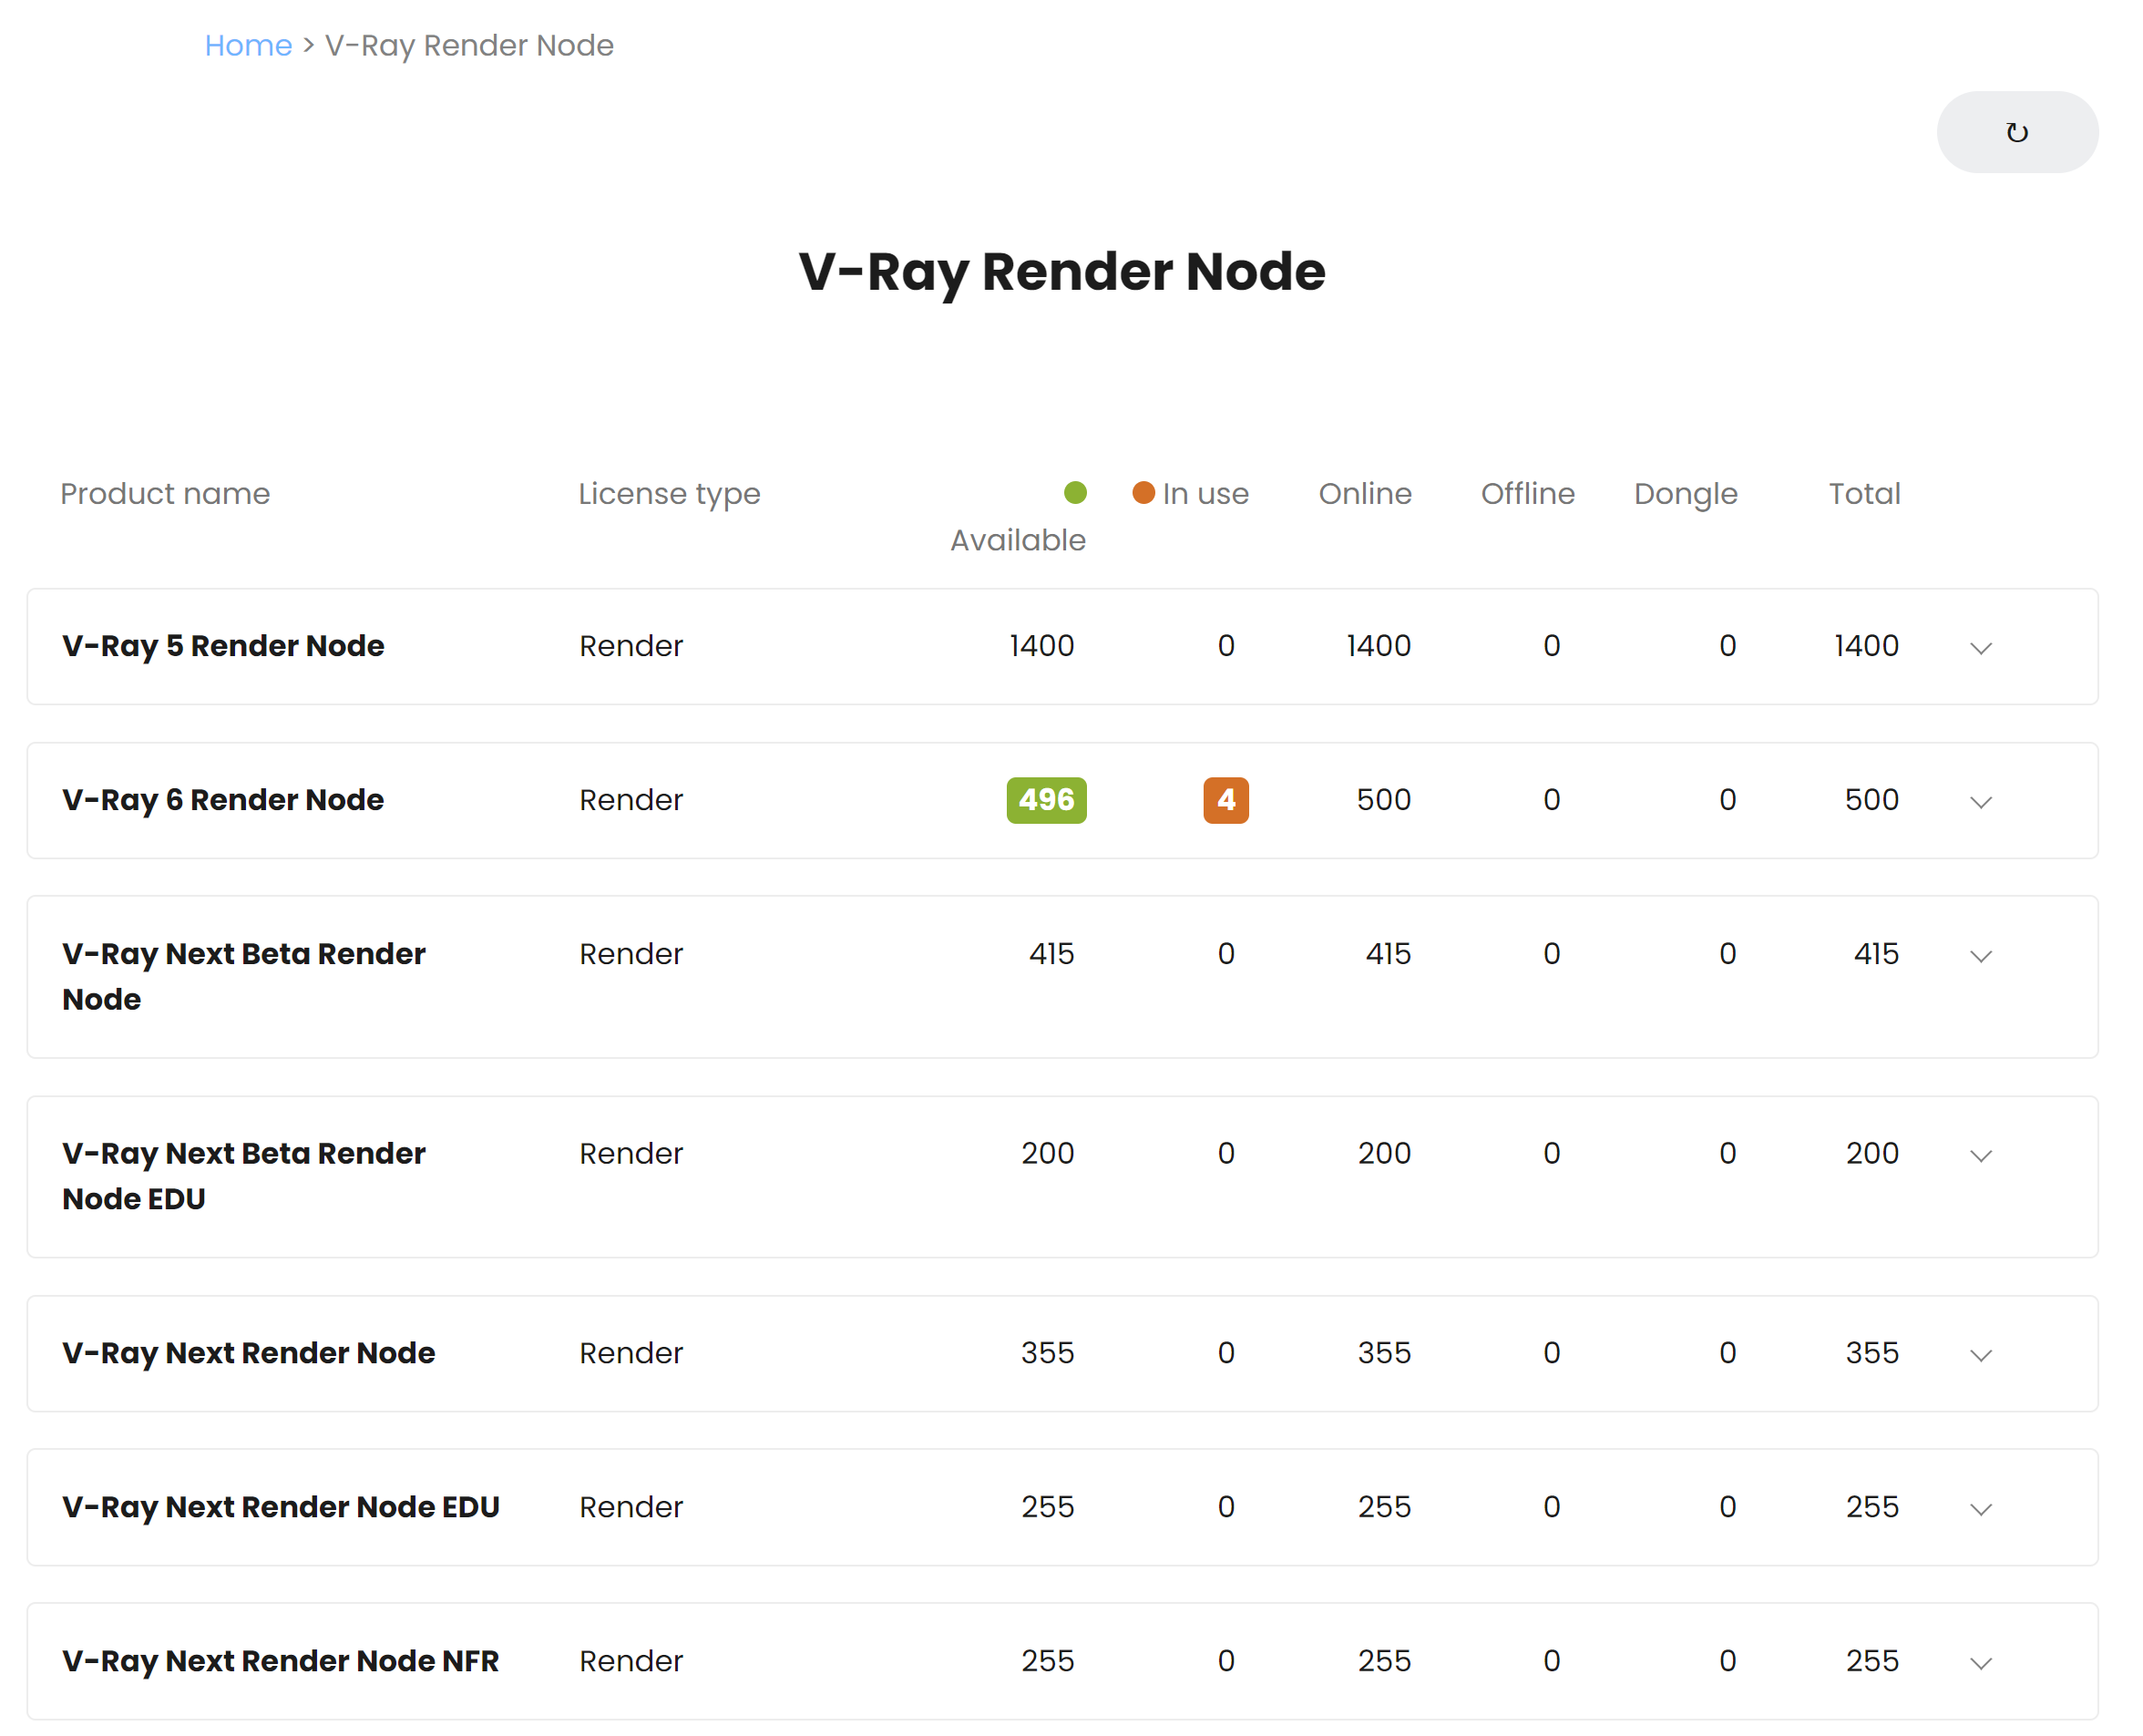
Important to note from the image above is the number of Render Node licenses that are Available.
Part 3: Running the Render Servers
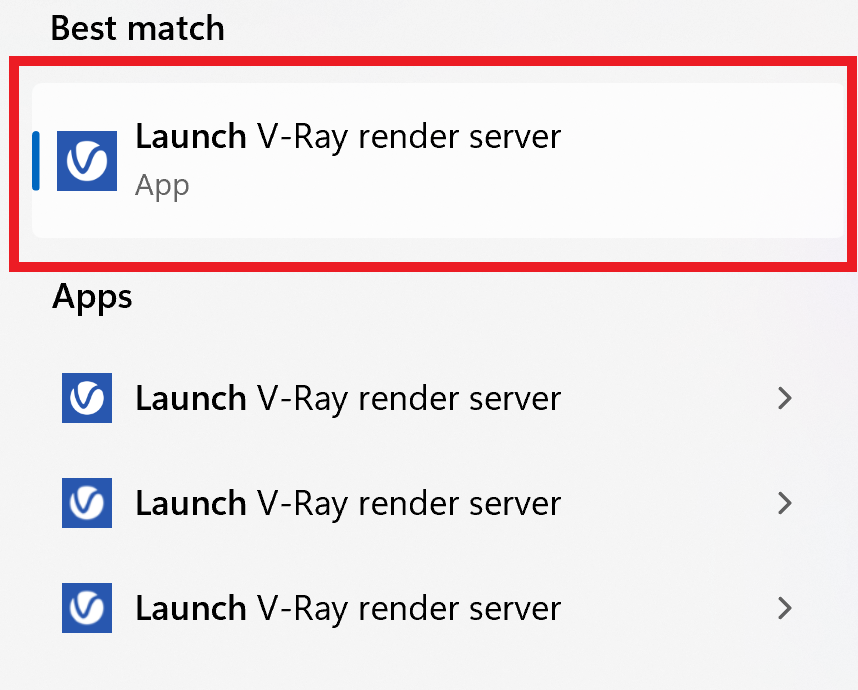
Now that everything is set and ready to go, we need to get the additional computers to start listening for render jobs on the network. Run the V-Ray Render Server application that is installed with V-Ray for Maya: Launch the V-Ray render server on all desired render machines. This is done in the Command Prompt for Windows with the following command: C:\Program Files\Chaos Group\V-Ray\Maya 2024 for x64\maya_vray\bin\vray.exe -server
For Linux and macOS, the vrayserver command is used and can be found at /usr/ChaosGroup/V-Ray/Maya20NN-x64/vray/bin/vrayserver and /Applications/ChaosGroup/V-Ray/Maya20NN/vray/bin/vrayserver
The executable is a shortcut linked to the vray.exe file with additional flags added to start the render server and open the correct communication port. This manual start process is great if you don't want the computer to render in server mode all the time. However, you'll have to remember to turn it on every time the computer starts up and you need it to render.
If you don't want to do this manually every time, simply register the server as a service either through the installation process or by registering the V-Ray render server application as a service through the OS.
Running Servers on Different OSes
Cross-platform render jobs are possible with V-Ray. For example, you can start a rendering from a Windows machine, and distribute to any combination of render servers running on Linux, macOS and/or Windows to join the rendering job, as long as they are running their respective render server application. Any OS can originate arender as the render client, or receive a render job as a render server.
Using V-Ray Standalone
Alternatively, render servers can be started by running the vray -server command from V-Ray Standalone in a command prompt.
Checking DR nodes
While it's not necessary to check that your render servers are running properly, vraydr_check is a useful tool if there's a problem with communication among them.

The proper syntax for vraydr_check is from the path C:\Program Files\Chaos Group\V-Ray\Maya 20nn for x64\vray\bin (where 20nn is the version of Maya for which V-Ray is installed), run vraydr_check -host=ip (or computer name) -port=#####. An example is: vraydr_check -host=techdocs04 -port=20207. If the computer is running the render server, the Status comes back as ready and the version of V-Ray is displayed.
The location of the vraydr_check executable is found at /usr/ChaosGroup/V-Ray/Maya 20nn-x64/vray/bin for the Linux OS, and at /Applications/ChaosGroup/V-Ray/Maya20nn/VRay.app/Contents/MacOS for the macOS. For more information on using the vraydr_check tool, please see the Distributed rendering page.
Part 4: Rendering with DR
V-Ray does not need any additional files or directory sharing set up to perform DR. However, if your Maya project is using additional bitmaps or assets, you may wish to locate everything in a shared location on your network. If not, you need to use the Transfer missing assets option so that all the render servers will have copies of the project assets transferred to them, before rendering can begin. For efficiency, enable Use cached assets to avoid re-transferring an already copied asset for the next rendering (more details on those options below).
A shared location can be a folder or drive on your workstation with sharing permissions enabled, or it can be on a network server. What's important is that all the computers rendering the scene have access to the project location and can load any required assets. Furthermore, if using mapped network drives in Windows, make sure the same drive letter is used on the workstation and all render servers to ensure access to the same shared location, unless you are using UNC paths for scene assets.
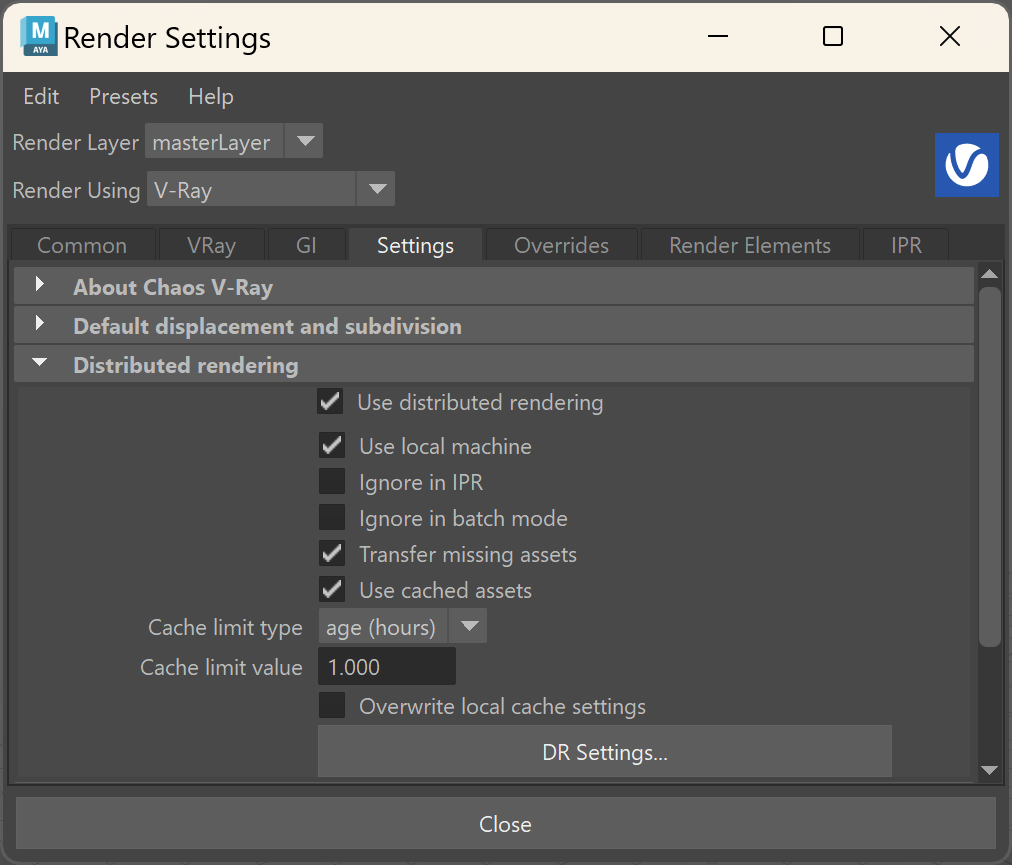
Once you have your scene in Maya ready to render, turn on Use distributed rendering from the Settings tab of the Maya Render Settings window.
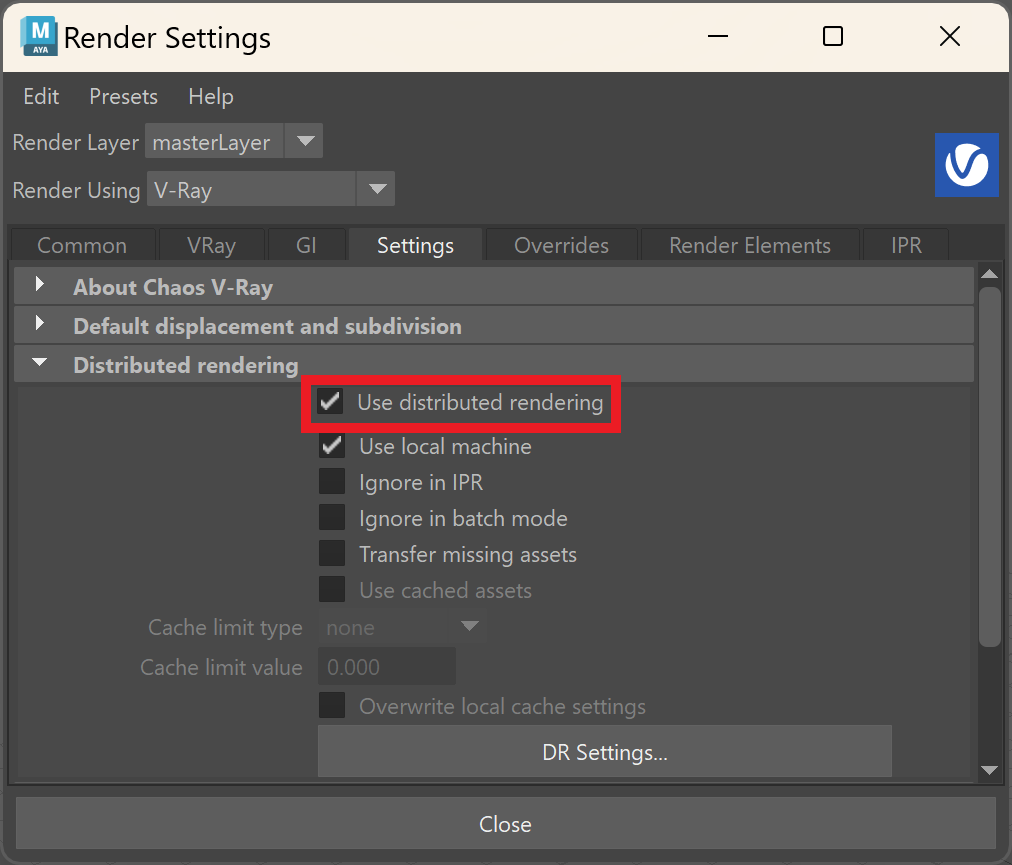
Let's first start with the DR Settings... button to make sure the nodes are set up in our Maya session.
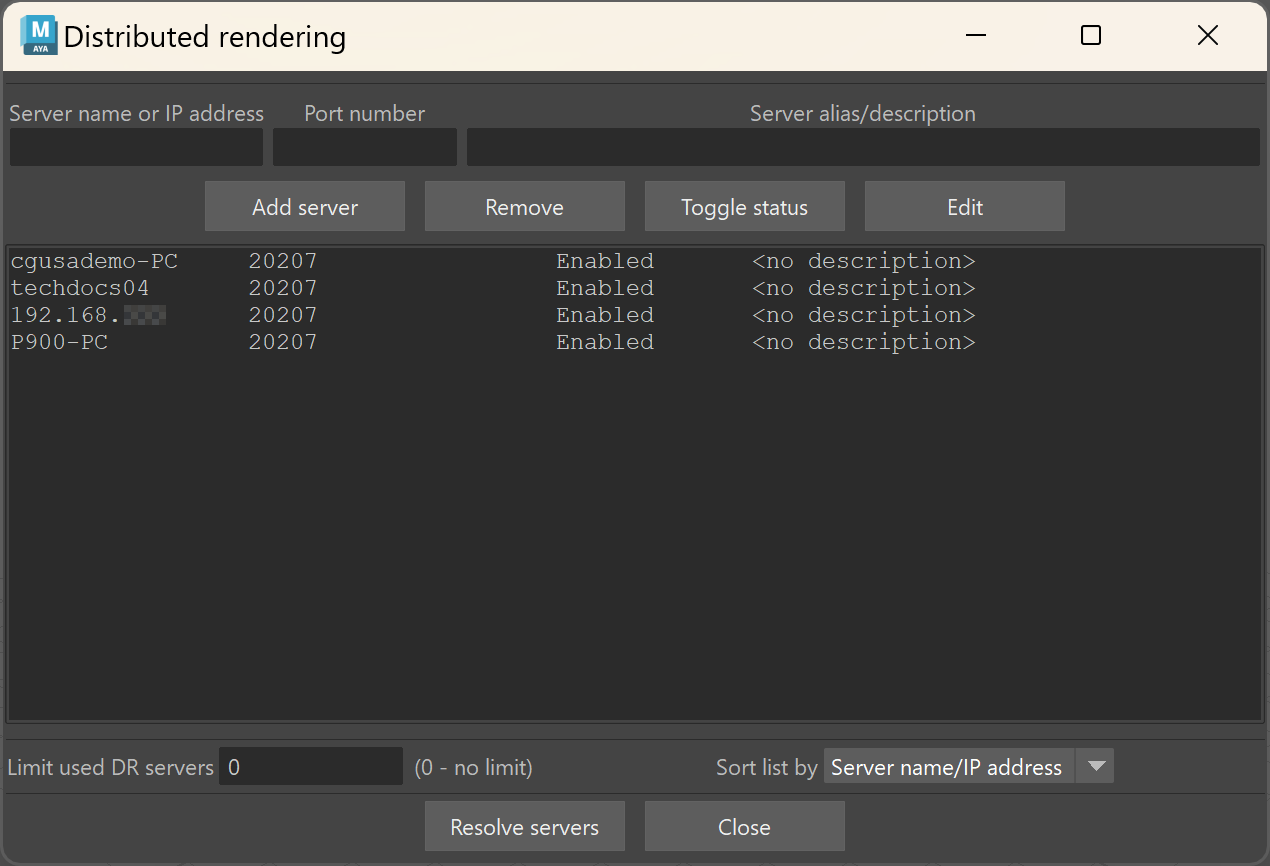
Enter the name or IP address of the render servers into the Server name or IP address box in the upper left text box of the Distributed rendering settings window. The default port should be 20207. You can include a description, which is helpful if using IP addresses to help remind you which server is which.
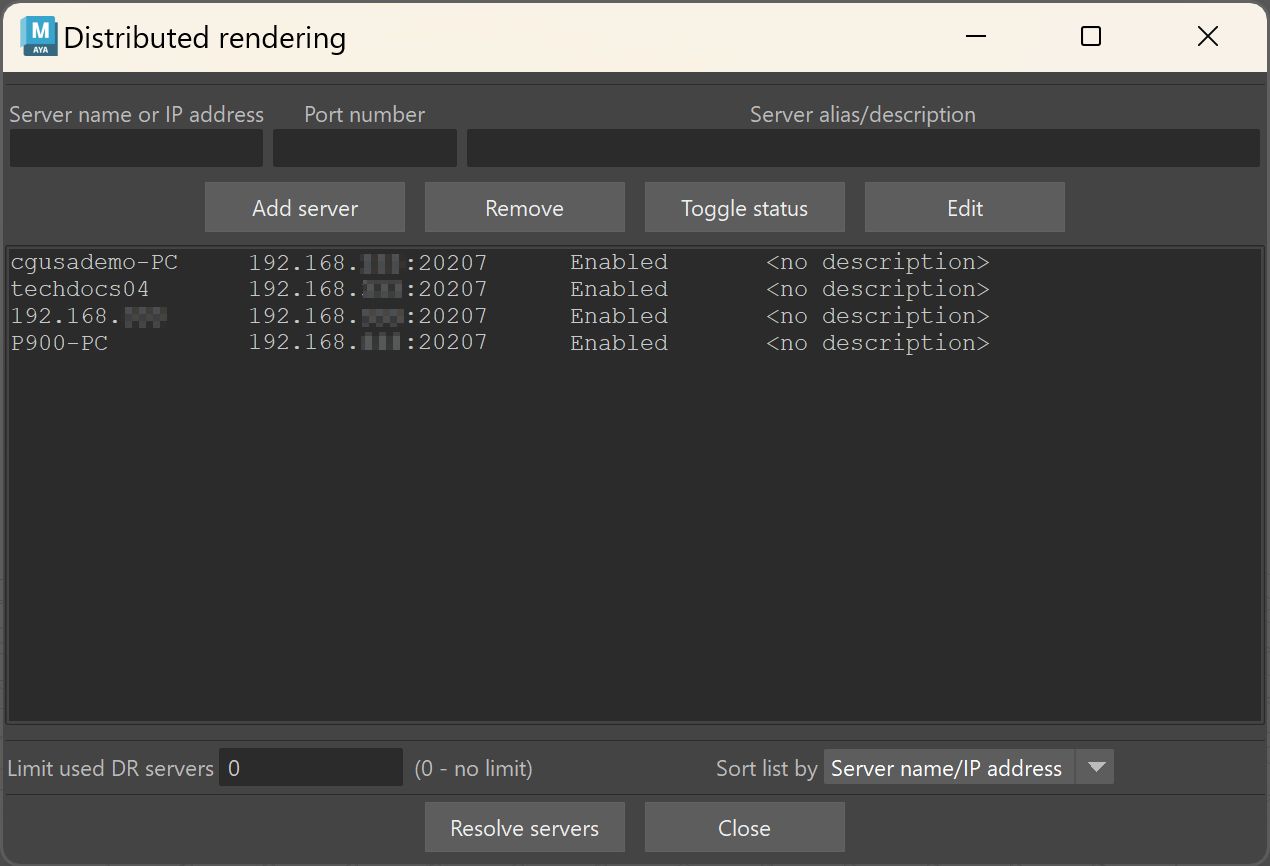
In case you entered server names instead of IP addresses, you will need to click Resolve servers to convert those entries from names to IP addresses, ensuring that your render client will be able to properly communicate with those machines. This step is not required if you have already entered IP addresses for all your render servers in this list.
Close the window and return to the Render Settings window. The rest of the settings below are optional, depending on how you want to render (or work while rendering).
If you prefer to offload the rendering to all the render servers and leave the resources on your computer more available for other tasks, disable Use local machine, so that your workstation will not help with the rendering process.
If you are using image textures, HDRI files, vray proxy objects, or any other kind of external assets, consider enabling Transfer missing assets. This makes local copies on your servers to ensure that they have access to the project's assets. This can also be used when your project is not saved in a shared location on a network. You can also enable Use cached assets if you think you need to render more jobs from the same project and don't want to have to transfer project files every time you render. Cache limits can be set based on time or size to keep the cached assets from piling up and taking up too much hard drive space on the server machines. However, the commonly preferred workflow is to keep the project and its assets stored on a shared network drive so that renders can take place without having to wait for transfers.
For more details on the render settings for DR, please see the Distributed Rendering Settings page.
Additional Tips
- The DR Bucket Render Element is a useful pass to add to your renders when using DR and the Bucket Sampler. This element provides useful information to pinpoint potential issues on specific render servers by providing details on which buckets were completed by certain machines on the farm.
- When canceling a DR job, it may take some time for the render servers to finish working, and so they might not be immediately available for another render.
- You can add and remove render servers at any time during the rendering itself. Keep in mind that when using the Progressive Sampler, only adding render servers during rendering is supported.