This page provides information about the Layered texture in V-Ray for Blender.
Overview
V-Ray Layered is a Texture utility for merging or compositing textures or images using various blend modes or texture masks.
UI Path
||Node Editor|| > Add > Textures > Layered
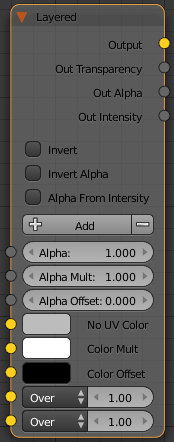
Node
Invert – When enabled inverts the colors in final result.
Invert Alpha – Inverts the alpha channel if Invert is also enabled.
Alpha from Intensity – With this option selected, V-Ray renders the material the same on both sides.
Add – Adds/removes a texture input slot.
Alpha –
Alpha Mult – Specifies a multiplier for the texture alpha.
Alpha Offset – Specifies an additional offset for the texture alpha.
No UV Color –
Color Mult – Specifies a strength multiplier for the texture color.
Color Offset – Color corrects the texture by adding the the RGB color values specified here to the RGB color values in the texture.
Blend Mode – Specifies the blending operation from a list of different blend modes.
Normal – Displays only the top layer.
Average – Displays the average result of the layers. That is, sums the layers and divides by the number of layers.
Add – Adds pixel values of one texture with the other. In case of values above 256 (when in RGB), white is displayed.
Subtract – Subtracts pixel values of the top Layer from lower Layer. In case of negative values, black is displayed.
Darken – Compares all the textures and displays only the darkest result for each pixel.
Multiply – Multiplies the numbers for each pixel of the top Layer with the corresponding pixel for the lower Layer. Because simple multiplication can get values as high as 65025, which is far higher than the maximum allowed value of 255, the result is divided by 255. The result is a darker picture.
Color burn – Darker pixels in the layer are colored with the color of the higher (in the stack) layer.
Linear burn – Applies the color of the higher layer in the stack to darker pixels in the lower layer. Unlike the Color burn option, it provides less contrast.
Lighten – Compares all the textures and displays only the lightest result for each pixel.
Screen – Makes lighter both light and dark areas.
Color dodge – Lighter pixels in the layer are colored with the color of the higher (in the stack) layer.
Linear dodge – Applies the color of the higher layer in the stack to lighter pixels in the lower layer. Unlike the Color dodge option, it provides less contrast.
Spotlite – Does the same as Multiply, but the result is brighter.
Spotlite blend – Adds ambient illumination to the lower layer in the stack, in addition to Spotlite.
Overlay – Overlays the pixels with darker or lighter color depending on the lower layer.
Soft light – Based on the top layer color: if it is lighter than mid-gray, the render is lighter; if it is darker than mid-gray, the render is darker.
Hard light – Based on the pixel color: if it is lighter than mid-gray, Screen mode is used; if it is darker than mid-gray, the Multiply mode is used.
Pin light – Changes the lower layer color based on the brightness of the top layer color. If the top layer color is lighter than mid-gray, lower layer colors darker than the top layer color, are replaced. If the top layer color is darker than mid-gray, lower layer colors lighter than the top layer color are replaced.
Hard mix – Gives black or white result, based on the similarity between the top and lower layers.
Difference – Subtracts the darker from the lighter pixel in each layer pair.
Exclusion – Does the same as Difference, but with lower contrast.
Hue – Uses the color from the top layer and the brightness and contrast from the lower layer.
Saturation – Uses the color from the top layer and the brightness and hue from the lower layer.
Color – Gets hue and saturation from the top layer and brightness from the lower layer.
Value – Gets brightness from the top layer and hue and saturation from the lower layer.