This page provides information about the Gradient Ramp texture in V-Ray for Blender.
Overview
Gradient Ramp is a texture map that can easily create and edit gradients – useful in many different situations.
UI Path
||Node Editor|| > Add > Textures > Gradient Ramp
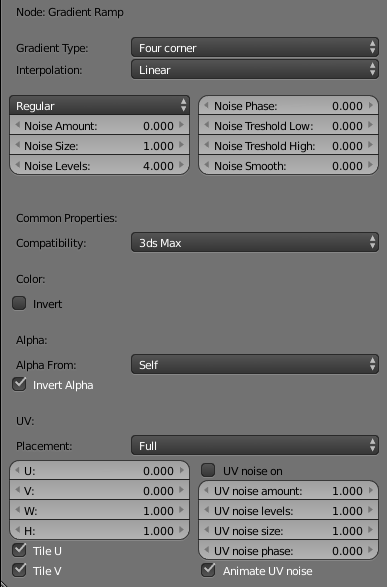
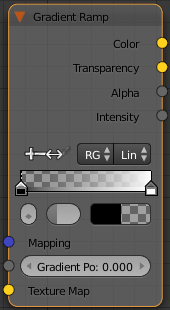
Node
Color Mode – Select a color mode for the ramp among RGB, HSV, HSL.
Interpolation – Changes the color interpolation method. Changing the option changes the color transition curve between the control points. You can choose among Constant, B-Spline, Linear, Cardinal and Ease.
Color – The color of the currently selected control point.
Color Step – Numerical option for the color step.
Gradient Position – The float position of the currently selected control point.
Texture Map – A texture map input for mapping the gradient ramp.
Parameters
Gradient Type – Specifies the type of gradient ramp to create:
Four corner – A gradient that transitions linearly between colors assigned to each corner.
Box – A gradient with a box radial transition.
Diagonal – A gradient with a diagonal transition.
Lighting – A gradient based on the light intensity.
Linear – A gradient with a simple linear transition.
Mapped – Specifies a map to use as a gradient.
Normal – A gradient based on surface normals and the camera.
Pong – A gradient with a diagonal transition that repeats in the middle.
Radial – A gradient with a radial transition.
Spiral – A gradient with a circular transition.
Sweep – A gradient with a linear sweep transition.
Tartan – Creates a gradient with a plaid pattern.
Position – Allows the user to specify a Gradient Position.
Interpolation – Changes the color interpolation method. Changing the option changes the color transition curve between the control points.
None – Disables the transition.
Linear – Values are linearly interpolated in RGB color space.
Exponential Up – Values are exponentially interpolated from left to right, each color dominating the area between it and the next one.
Exponential Down – Values are exponentially interpolated from right to left, each color dominating the area between it and the previous one.
Smooth – Values are interpolated along a bell curve, each color dominating the region around it before blending to the next color
Bump – Values are interpolated along a sin curve, based on luminosity values.
Spike – Each color dominates only its immediate area, falling off shortly after.
Noise Type – Specifies how the colors are randomly distributed across the gradient.
Regular – A plain noise with a non-fractal function.
Fractal – A fractal algorithm to generate the noise.
Turbulence – A turbulence based noise type is used.
Noise Amount – How much noise is introduced.
Noise Size – The scale of the noise.
Noise Levels – How many iterations of noise there will be.
Noise Phase – Controls the speed of the procedural noise.
Noise Low Threshold – Sets the Low threshold.
Noise High Threshold – Sets the high threshold.
Noise Smooth – The amount of smoothing of the noise.
Compatibility – Allows you to match the result of the texture in Blender to that in either 3ds Max or Maya. If Alpha From is set to Maya:
3ds Max – The resulting alpha of the texture is the intensity of the texture.
Maya – The resulting alpha of the texture is the color luminescence.
Invert – When enabled inverts the colors in final result.
Alpha From – Determines how the alpha of the result is calculated:
Force 1.0 – Alpha is always 1.
Compatibility – Depends on the selected Compatibility option.
Self – The calculated alpha of the texture.
Invert Alpha – Inverts the alpha channel if Invert is also enabled.
UV
Placement – Select how to place the texture.
Full
Crop
Place
U – U coordinate of the texture sector.
V – V coordinate of the texture sector.
W – W coordinate of the texture sector.
H – Specifies the height of the texture sector.
Tile U/ Tile V – Enable to choose between a horizontal or vertical tiling.
UV noise on – Enables the noise.
UV noise amount – Specifies the UV noise amount.
UV noise levels – Specifies the UV noise iterations.
UV noise size – Specifies the UV noise size.
UV noise phase – Specifies the UV noise phase.
Animate UV noise – If enabled, the noise is animated. Use the UV noise phase to animate the noise.