This page provides general information about the Fire sub-section of the Rendering rollout of Chaos Phoenix.
Overview
This rollout controls the emissive (fire) color of the volumetric shader and the light emitted by the simulator. From here you can control the color and intensity of the emission, and also you can gradually transition between a physically correct and artistic look of the fire.
In the volume shader, there are two types of content - diffuse and emissive. For simplicity we call the diffuse content 'Smoke' and the emissive content 'Fire', though the volume shader is flexible enough that you can render a simulation's fire as smoke and a simulation's smoke as fire.
Diffuse needs external light in order to become visible, and also casts shadows. Emissive on the other hand is visible even without being lit by lights, ignores their illumination and does not cast shadows on itself. In addition, Phoenix has different tools that help you gain more control over how fire illuminates the smoke and the scene - see the Create Fire Lights section.
Both smoke and fire have their own color and alpha (alpha is a synonym for opacity, and transparency is the opposite of opacity).
Fire color and alpha, smoke color and smoke alpha can each be mapped to a physical grid channel, coming from the simulation. Color gradients are used to remap a physical channel to render color, and the diagrams (also called ramps or curves) are used to remap a physical channel to render opacity or intensity.
Also, each of them can be mapped to a texture, or to a grid channel multiplied by a texture. Textures have infinite resolution and can increase the detail above the resolution of the grid; By default textures are static in space, but using TexUVW they can move together with the fluid.
When there are both diffuse and emissive (smoke and fire) in the same voxel, there are 3 ways to determine the resulting color and alpha in that voxel - see the Fire Opacity Mode option.
UI Path: ||Select PhoenixFDSim|| > Attribute Editor > Rendering rollout > Fire rollout
Parameters
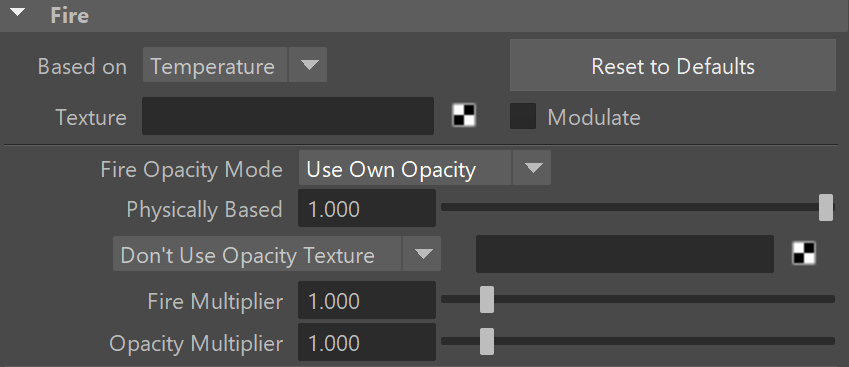
Based on | emSource – Specifies the source channel that will be rendered as fire. By default, the Temperature channel is used.
- Disabled - the emission component of the shader will be disabled
- Temperature
- Smoke
- Speed
- Fuel
- Texture - the emission will be based on the texture map specified in the Texture parameter
- RGB
Texture | emTexture – If Based on is set to Texture, this slot specifies the texture from which fire is rendered. This slot can also specify a texture to be used with the Modulate option. For more information on texture mapping in Phoenix, please check the Texture mapping, moving textures with fire/smoke/liquid, and TexUVW page.
Modulate | emModulate – Enabling this option multiplies the Based on channel by the map in the Texture slot. This is only effective when Based on is not set to Texture.
Reset to Defaults – Resets the rollout settings to their default values.
Fire Opacity Mode | emIgnoreAlpha – While smoke has its own opacity in the Smoke Opacity rollout, the Fire opacity can be determined in either one of the following three ways:
Use Smoke Opacity – Fire will use the same opacity that is set to the smoke in the Smoke Opacity rollout. This means the fire will not be visible in cells where there is no smoke.
Fully Visible – Fire will always render as if it has full opacity, but will not produce alpha. This way fire will be visible even in cells that have no opacity. This mode is intended for use with Phoenix simulations, such as simulations with sources that emit Temperature but do not emit Smoke. During rendering, Phoenix internally composes the fire with the scene using additive blending, and such blending must be used when compositing fire manually. However, this mode is not suitable for compositing fire mixed with smoke.
Use Own Opacity – Custom varying opacity for the fire using the Opacity diagram and/or using a texture.
Physically Based | emBlackBody – Transitions between an artistic look of the fire (when set to 0) and a realistic physically-based Intensity (when set to 1). The realistic mode multiplies the fire intensity by the Black Body Radiation model, which gives strong brightness to the hot parts of the fire. See the Physically Based example.
Opacity Texture Mode | emAlphaSrc – Available only when the Fire Opacity Mode is set to Use Own Opacity.
Don't Use Opacity Texture – The Fire Opacity will be based entirely on the Color and Opacity Curve below.
Multiply Opacity By Texture – The Color and Opacity Curve will be multiplied by the specified texture to produce the final Fire Opacity.
Fire Opacity From Texture – The Fire Opacity will be based entirely on the specified texture - the Color and Opacity Curve below will be ignored.
Opacity Texture | emAlphaTexture – If Opacity Texture Mode is set to Multiply Opacity By Texture or Fire Opacity From Texture, this slot specifies the texture used to modulate the Fire Opacity. For more information on texture mapping in Phoenix, please check the Texture mapping, moving textures with fire/smoke/liquid, and TexUVW page.
Fire Multiplier | emMult – General multiplier for the fire color's intensity.
Opacity Multiplier | emAlphaMult – Multiplier for the fire's own opacity when it is detached from the Smoke Opacity. Used only when the Opacity Mode is set to Use Own Opacity.
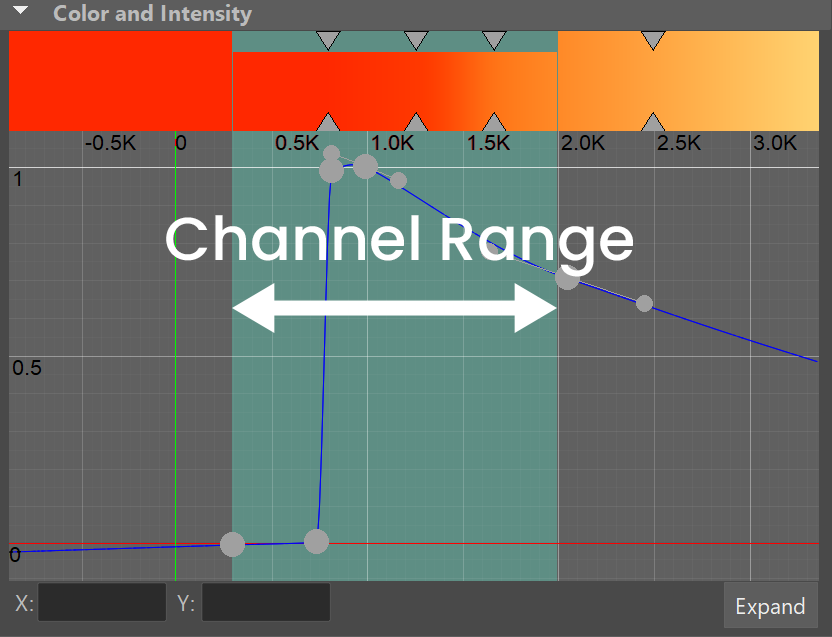
Color Gradient and Intensity/Opacity Curve
When the Based on option is set to a grid channel, this grid simulation data must be remapped to render data. The sim data channel is laid out horizontally along the X axis in the color gradient and intensity/opacity curve. The color gradient remaps the sim data from the Based on channel to fire color. The curve remaps the sim data to fire opacity (in Use Own Opacity mode), or to fire intensity otherwise. The opacity/intensity is mapped vertically on the Y axis.
The channel data range is highlighted in the curve with a light-blue range. You can find out more about Phoenix Grid Channel Ranges here.
Color | emRampColor_t, emRampColor_s, emRampColor_v, emRampColor_f – Controls the color of the light as a function of the selected channel's value. This color is multiplied by the Fire Multiplier to achieve the final value that will be used. The selected channel's data range will be highlighted in light blue.
Intensity | epower_t, epower_s, epower_v, epower_f – Visible when the Fire Opacity Mode is set to Use Smoke Opacity or Fully Visible. The luminance of the emitted light is determined by the function represented in the diagram control. Along the X axis is the value of the selected Based on source channel (Temperature, Fuel, etc.). The color of the light is set by the gradient control above. The selected channel's data range will be highlighted in light-blue.
Opacity | epower_t, epower_s, epower_v, epower_f – Visible only when the Fire Opacity Mode is set to Use Own Opacity. The opacity of the emitted light is determined by the function represented in the diagram control. Along the X axis is the value of the selected Based on source channel (Temperature, Fuel, etc.).
You can use the following controls in the color gradients and diagrams:
Double click – Creates a new point or changes an existing one.
Left button drag over a point – Moves the point. If several points were selected beforehand, they will move the same amount.
Left button drag over several points – Selects several points.
Middle button drag over the background – Drags the visible area. If the Shift key is pressed, scales the diagram in the corresponding direction.
Mouse wheel – Zooms in/out.
Mouse wheel near the borders of the control – Zooms in/out only along X or only along Y.
Right-click – Displays a drop-down menu where you can add a point, edit or delete a selected point, and fit the entire diagram or gradient into the view. If multiple points are selected, they can be edited simultaneously. Multiple selected points can also be scaled and flipped with the Scale Selection option as seen below.
Example: Physically Based
The Physically Based parameter can alter the apparent brightness of the fire to dial in a specific look for the fire. This example illustrates transitioning from a darker artistic look (0) to a photorealistic look (1).

Physically Based = 0
Physically Based = 0.1

Physically Based = 1