This page provides some details on how to get V-Ray up and running.
Overview
Setting up V-Ray for Houdini comprises of several steps: installing and licensing through your OS and then loading the V-Ray shelf and setting V-Ray as the renderer inside Houdini.
Installation can be done via a pretty straightforward and easy to follow installer as well as via a zip file. Follow the step-by-step guide below to set up the V-Ray installation.
Installing V-Ray via Installer
The V-Ray installer automatically removes any previous installations. This allows you to seamlessly upgrade from previous versions. If you experience problems you can manually uninstall the previous versions to perform a clean install.
Before running the installation, make sure your Windows account has administrative privileges.
Run the installer.
1. Upon the start of the installation, Windows may ask you for permission to run the installer with administrator privileges. Please confirm.
2. You will be presented with the V-Ray licensing agreement. Please take a moment to review the agreement. Check the I accept the Agreement checkbox and click Install to proceed with standard installation.
If you need to customize your V-Ray installation, press the Advanced button.
V-Ray type
The available installation types are:
Full – A full installation that includes V-Ray for Houdini, IPR for Houdini, V-Ray Standalone, V-Ray SDK, V-Ray Tools and Documentation. It allows you to use V-Ray in Houdini, do Distributed or Network Rendering, run IPR render server, use V-Ray SDK, and use the different V-Ray Tools.
Standalone only – An installation which includes V-Ray Standalone and IPR render server. Please choose this option if you plan to use this machine only for Distributed Rendering with V-Ray Standalone and an IPR render server.
Install Chaos Cloud Client – Enable this checkbox to install the Chaos Cloud client application. Chaos Cloud is a software as a service (SaaS) which allows you to submit and render scenes with cloud-based V-Ray. See more information on the Chaos Cloud page.
Licensing
In this step, you can specify whether the V-Ray license server runs locally or on another machine.
If you select the option Remote, you have to fill in the IP address of your V-Ray license server in the field Primary License Server. Please leave the port 30304 unchanged. An Alternate License Server is used when the primary one does not respond.
Install Directories
Here you can specify the installation paths and Python version. Please check if the default folders are correct.
Auto – The installation automatically selects the most suitable Python version for you.
Python 2 – Python 2 is used. Note that V-Ray Next supports only Python 2. Python 2 is supported for Houdini 17.5 and above.
Python 3 – Python 3 is used. Note that Python 3 is supported for Houdini 18.5.351 and above.
Material Library & Feedback
Download V-Ray Material Library – When this option is enabled, at the end of the V-Ray installation you will also download the latest version of V-Ray Material library.
Help make V-Ray even better – Participate in the improvement decisions for future version of V-Ray. No intelligence property is violated when agreeing to participate in the feedback program. We do not gather scenes, assets, materials, etc. What we receive is user preferences on just a few key render settings and the resulting render times. The point of this feature is to improve V-Ray's performance and the user experience. For more information, see the Chaos Telemetry page.
3. If you choose the Local Licensing Option, you are presented with the License Server installation.
Chaos License Server Options
At this step you can choose the license server directory.
Migrate data during installation – When enabled, transfers all of your settings made with older versions of the License Server, such as enabled dongle subsystem, proxy settings, etc. Disabling this option will install License Server with all settings at their defaults and any custom settings from the previous installation will be lost.
Add firewall exception – Enabling this option allows the default licensing port (TCP 30304) in the firewall. If you disable it at this step, you will need to manually add firewall exceptions later.
4. After you click the Install button, the installer will proceed to uninstall any previous versions and install V-Ray on your machine.
If the installer detects any applications that need to be closed, it will show an error before being able to continue. Please close them and click CONTINUE ANYWAY, or start the restart the installation.
5. Once V-Ray installation has finished, the Material Library installation starts. Note that the download process might take a while. If you abort the download, it will affect only the Material Library download and not the whole V-Ray installation.
6. Now V-Ray 5 is ready to render!
Before running the installation, make sure your macOS account has administrative privileges.
Run the installer.
1. Upon the start of the installation, macOS may ask you for permission to run the installer with administrator privileges. Please confirm.
2. You will be presented with the V-Ray licensing agreement. Please take a moment to review the agreement. Check the I accept the Agreement checkbox and click Install to proceed with standard installation.
If you need to customize your V-Ray installation, press the Advanced button.
V-Ray type
The available installation types are:
Full – A full installation that includes V-Ray for Houdini, IPR for Houdini, V-Ray Standalone, V-Ray SDK, V-Ray Tools and Documentation. It allows you to use V-Ray in Houdini, do Distributed or Network Rendering, run IPR render server, use V-Ray SDK, and use the different V-Ray Tools.
Standalone only – An installation which includes V-Ray Standalone and IPR render server. Please choose this option if you plan to use this machine only for Distributed Rendering with V-Ray Standalone and an IPR render server.
Install Chaos Cloud Client – Enable this checkbox to install the Chaos Cloud client application. Chaos Cloud is a software as a service (SaaS) which allows you to submit and render scenes with cloud-based V-Ray. See more information on the Chaos Cloud page.
Information on How to run the MacOS installer safely on macOS Catalina and later can be found on the Installation of Chaos Cloud Client App page or in Apple's How to open an app that hasn’t been notarized or is from an unidentified developer article.
Licensing
In this step, you can specify whether the V-Ray license server will run locally or on another machine.
If you select the option Remote you will have to fill in the IP address of your V-Ray license server in the field Primary License Server. Please leave the port 30304 unchanged. An Alternate License Server is used when the primary one does not respond.
Install Directories
Here you can specify the installation paths and Python version. Please check if the default folders are correct.
Auto – The installation automatically selects the most suitable Python version for you.
Python 2 – Python 2 is used. Note that V-Ray Next supports only Python 2. Python 2 is supported for Houdini 17.5 and above.
Python 3 – Python 3 is used. Note that Python 3 is supported for Houdini 18.5.351 and above.
Material Library & Feedback
Download V-Ray Material Library – When this option is enabled, at the end of the V-Ray installation you will also download the latest version of V-Ray Material library.
Help make V-Ray even better – Participate in the improvement decisions for future version of V-Ray. No intelligence property is violated when agreeing to participate in the feedback program. We do not gather scenes, assets, materials, etc. What we receive is user preferences on just a few key render settings and the resulting render times. The point of this feature is to improve V-Ray's performance and the user experience. For more information, see the Chaos Telemetry page.
3. If you choose the Local Licensing Option, you are presented with the License Server installation.
Chaos License Server Options
At this step you can choose the license server directory.
Migrate data during installation – When enabled, transfers all of your settings made with older versions of the License Server, such as enabled dongle subsystem, proxy settings, etc. Disabling this option will install License Server with all settings at their defaults and any custom settings from the previous installation will be lost.
Add firewall exception – Enabling this option allows the default licensing port (TCP 30304) in the firewall. If you disable it at this step, you will need to manually add firewall exceptions later.
4. After you click the Install button, the installer will proceed to uninstall any previous versions and install V-Ray on your machine.
If the installer detects any applications that need to be closed, it will show an error before being able to continue. Please close them and click CONTINUE ANYWAY, or start the restart the installation.
5. Once V-Ray installation has finished, the Material Library installation starts. Note that the download process might take a while. If you abort the download, it will affect only the Material Library download and not the whole V-Ray installation.
6. Now V-Ray 5 is ready to render!
Before running the installation, make sure your Linux account has administrative privileges.
Run the installer.
1. Upon the start of the installation, Linux may ask you for permission to run the installer with administrator privileges. Please confirm.
2. You will be presented with the V-Ray licensing agreement. Please take a moment to review the agreement. Check the I accept the Agreement checkbox and click Install to proceed with standard installation.
If you need to customize your V-Ray installation, press the Advanced button.
V-Ray type
The available installation types are:
Full – A full installation that includes V-Ray for Houdini, IPR for Houdini, V-Ray Standalone, V-Ray SDK, V-Ray Tools and Documentation. It allows you to use V-Ray in Houdini, do Distributed or Network Rendering, run IPR render server, use V-Ray SDK, and use the different V-Ray Tools.
Standalone only – An installation which includes V-Ray Standalone and IPR render server. Please choose this option if you plan to use this machine only for Distributed Rendering with V-Ray Standalone and an IPR render server.
Install Chaos Cloud Client – Enable this checkbox to install the Chaos Cloud client application. Chaos Cloud is a software as a service (SaaS) which allows you to submit and render scenes with cloud-based V-Ray. See more information on the Chaos Cloud page.
Licensing
In this step, you can specify whether the V-Ray license server will run locally or on another machine.
If you select the option Remote you will have to fill in the IP address of your V-Ray license server in the field Primary License Server. Please leave the port 30304 unchanged. An Alternate License Server is used when the primary one does not respond.
Install Directories
Here you can specify the installation paths and Python version. Please check if the default folders are correct.
Auto – The installation automatically selects the most suitable Python version for you.
Python 2 – Python 2 is used. Note that V-Ray Next supports only Python 2. Python 2 is supported for Houdini 17.5 and above.
Python 3 – Python 3 is used. Note that Python 3 is supported for Houdini 18.5.351 and above.
Material Library & Feedback
Download V-Ray Material Library – When this option is enabled, at the end of the V-Ray installation you will also download the latest version of V-Ray Material library.
Help make V-Ray even better – Participate in the improvement decisions for future version of V-Ray. No intelligence property is violated when agreeing to participate in the feedback program. We do not gather scenes, assets, materials, etc. What we receive is user preferences on just a few key render settings and the resulting render times. The point of this feature is to improve V-Ray's performance and the user experience. For more information, see the Chaos Telemetry page.
3. If you choose the Local Licensing Option, you are presented with the License Server installation.
Chaos License Server Options
At this step you can choose the license server directory.
Migrate data during installation – When enabled, transfers all of your settings made with older versions of the License Server, such as enabled dongle subsystem, proxy settings, etc. Disabling this option will install License Server with all settings at their defaults and any custom settings from the previous installation will be lost.
Add firewall exception – Enabling this option allows the default licensing port (TCP 30304) in the firewall. If you disable it at this step, you will need to manually add firewall exceptions later.
4. After you click the Install button, the installer will proceed to uninstall any previous versions and install V-Ray on your machine.
If the installer detects any applications that need to be closed, it will show an error before being able to continue. Please close them and click CONTINUE ANYWAY, or start the restart the installation.
5. Once V-Ray installation has finished, the Material Library installation starts. Note that the download process might take a while. If you abort the download, it will affect only the Material Library download and not the whole V-Ray installation.
6. Now V-Ray 5 is ready to render!
Licensing V-Ray
Once the installation of the License Server is done, you are directed to the License Server local host (127.0.0.1:30304) in order to sign in.
The License Server will skip its installation process for two reasons:
- If it detects a previous installation of the Online License Server on your machine.
- If you choose the option Remote V-Ray license server on the network.
For full information on the License Server options and settings, see the Licensing section of the documentation.
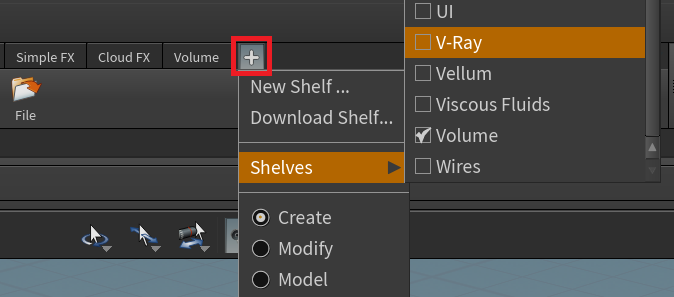
Loading the V-Ray Shelf
When starting V-Ray for Houdini for the first time, you will need to manually load the V-Ray shelf. From the Houdini shelf, click the plus + icon, navigate to Shelves, and select V-Ray from the list.
Selecting a Renderer
To render with V-Ray, simply press the Render button from the V-Ray Shelf. This will automatically create a vray_renderer node in the Network Editor (if one is not already present) and launch the V-Ray Frame Buffer.