This page provides information on the New V-Ray Frame Buffer and its features.
Overview
The resigned V-Ray Frame Buffer (VFB) is a second generation V-Ray virtual frame buffer.
New VFB is much more than a render image holder window. The new enhanced version provides a higher level of post processing adjustments and ability to modify your scene from inside the new VFB. Here is a list of old and new benefits you should know:
- Image preview:
Loads render elements channels via a dropdown list;
Works with display corrections;
Loads various 8bit and 32bit file formats, including V-Ray resumable files;
Image comparison between 2 or 4 renders;
- Image management:
Keeps the rendered image in full 32-bit floating point format;
Can store history of rendered images with their post rendering corrections;
Can save corrected output to various image formats;
- Image editing and post processing:
Set Color Corrections to rendered image and its elements;
Composite mode for Back to Beauty workflow including layers corrections;
LightMix control on lights contribution in the rendered image;
- Scene editing:
Can modify actual lights values by transferring updated intensity and color from LightMix mode;
IPR camera navigation and focus control from inside VFB;
- Render management:
Denoiser control;
Region rendering control and test resolution;
Allows you to choose the order in which the buckets are rendered;
Automatic render resolution adjustment in IPR when the new VFB window is resized;
New VFB also has some limitations which are listed in the Notes section below.
VFB Menu
The V-Ray Frame Buffer menu holds the main frame buffer commands. Some of the options are also available in the VFB toolbar for a quick access.
Menu | Menu Options |
|---|---|
File | Save current channel – Saves the currently loaded channel to an image file format. Save all image channels to separate files – Saves all the render elements to separate files. Save all image channels to single file – Saves the image to a single multi-channel EXR or .vrimg file. Load image – Opens an image file to be previewed in the V-Ray Frame Buffer. |
Render | Start interactive rendering – Starts IPR. Abort rendering – Stops the current rendering. Render – Starts rendering. |
Image | Follow mouse – Renders the closest bucket found to the mouse pointer, when using the bucket image sampler. If the progressive sampler is used, V-Ray samples the closest pixels to the mouse pointer. Follow mouse – Drag the mouse over the VFB while rendering to change what part of the image is sampled first; Copy current channel to clipboard – Copies the current channel to the clipboard. Clear image – Clears the contents of the frame buffer. This is useful when starting a new render to prevent confusion with the previous image. |
View | Display color space –Specifies the color space, in which the image is displayed. None – Does not specify a color space; Zoom VFB – Zooms in/out the rendered image in the VFB. Zoom 50% – Zooms out to 50%; Channels – Chooses which channels to see. View red channel – Displays the red channel; Color clamping – Opens the color clamping submenu options: Force color clamping – Forces color clamping; Use pixel aspect – Enables visualization of the pixel aspect ratio. Stereo – Enables stereoscopic preview. You can view the image in stereo in red/cyan or green/magenta. |
Options | VFB settings – Opens the VFB Settings window where you can adjusts settings for Render View, Render Region, History and Layers. |
VFB Toolbar
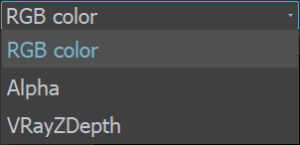
| This dropdown gives access to render elements rendered for the scene. The selected render element is displayed in the VFB. By default, the RGB color and Alpha render elements are available. Any additional render elements that have been added to the scene also appear in the drop-down. |
|---|---|
| Displays the coordinates of the mouse pointer. | |
| Specifies the sampled area size. Click on the arrow to open a context menu with the available sampled area sizes: 1x1, 3x3, 5x5, and 7x7. | |
| Specifies whether color and display corrections are applied (RGB) or not (Raw) when showing the sampled pixel values at the current mouse pointer position. | |
| Displays the RGB pixel values at the current mouse pointer position before applying any color corrections. | |
Specifies RGB values. Click on the arrow to open a context menu with the available option. None – Does not specify the RGB value. | |
| Displays the Hue, Saturation and Value of the pixel under the current mouse position when HSV is selected. |
| Displays the HEX of the pixel under the current mouse position when Web is selected. | |
| Displays the 8bit color palette of the pixel under the current mouse position when 8bit is selected. |

| Locks the mouse pointer coordinates and displays information for the selected pixel. | |
| Shows corrected colors. | |
| Shows the V-Ray log. | |
| Displays the Alpha channel. | |
| Saves the image to disk. Press and hold the icon to bring up the submenu: Save current channel – Saves the current channel to an image file format; | |
| Clears the contents of the frame buffer. This is useful when starting a new render to prevent confusion with the previous image. | |
| Renders the closest bucket found to the mouse pointer, when using the bucket image sampler. If the progressive sampler is used, V-Ray samples the closest pixels to the mouse pointer. With this option enabled, you can right-click on the image and select Lock bucket starting point to lock the bucket (or sampling) starting point. | |
Enables/disables test resolution in the VFB. Press and hold to bring up the submenu to select the percentage of the render resolution to set as the test resolution. Note: This only affects V-Ray and does not affect the native Maya test resolution setting found under Maya Render Setup dialog.
| ||
| Allows you to render regions in the VFB. See the New V-Ray Frame Buffer section for more information. | |
Enables the Debug shading/Isolate selected options in IPR. Press and hold to choose between the different modes: Isolate Selected – Renders only the selected object(s), while the rest of the scene is rendered black. You can also select material or texture nodes to isolate all objects with the assigned shader; | ||
| Starts IPR. | |
| Stops the current rendering. | |
| Starts rendering. | |
| Pauses interactive rendering. | ||