This page describes how to import a V-Ray proxy into Maya that was previously exported.
Overview
The proxy import process creates a VRayMesh node which imports geometry from a file on disk. The node can load V-Ray proxy (.vrmesh) and Alembic (.abc) files. After the V-Ray proxy is imported, its parameters appear in the Attribute Editor.
To see how to import a V-Ray Proxy using the "vrayCreateProxy" command, please refer to Scripting and Programming page.
Add some info about the difference between old and new Proxy node here.
UI Paths
Create menu > V-Ray > Import proxy
(enable Use the new VRayProxy node option)
||V-Ray Shelf|| > Import VRay proxy (enable Use the new VRayProxy node option)
A VRayProxy object can also be created by dragging and dropping a .vrmesh or .abc file directly in your active viewport.
Import V-Ray Proxy
This dialog sets basic import parameters and creates the VRayProxy node.
Default window
Importing a single file with frame formatting
Importing multiple files
Single file (frame formatting is supported) – Allows importing of one proxy file at a time. Frame formatting allows you to specify reading animated proxies where each frame is in a separate file. The formatting is displayed in the import window and it automatically sets the Animation parameters .
Multiple files – Allows importing of multiple proxy files at once. Frame formatting is not supported for this mode, and the Object path option works only if all imported proxies are Alembic files sharing the same object structure.
Node name – Name of the scene object to be created in Maya.
File(s) – File(s) to import.
Object path – Specifies which objects to import based on their starting paths in an Alembic file structure. Additional parameters are available in the Alembic proxy parameters rollout after import.
Geometry – Select the viewport preview mode from the drop down menu. This does not affect the final render. This parameter is Keyable and can be used as a driven key as Geom Type in the Channel Box.
Flip axis – When enabled, this option switches the axis being used by the proxy as the vertical axis between Y and Z. It allows the user to align the vertical axis of the proxy with the vertical axis in the scene in cases where the proxy was not exported from Maya or when loading Alembic files.
Use the new VRayProxy node – When enabled, uses the new VRayProxy node. Note that when drag-and-dropping proxies the viewport the last used state of this option is used.
Create – Imports the proxy object and closes the dialog. Additional parameters appear in the Attribute Editor after the proxy is created.
Basic Parameters
File name – The source .vrmesh file. Animated proxies can be stored either in one single file, or as a sequence of files with one file per frame. In the latter case, you can use the string <frame0n> in the file name to have it replaced with the current frame number at render time, where n is an integer number specifying the number of digits. For example, if you enter my_proxy_<frame04>.vrmesh as the file name, this will be expanded to my_proxy_0000.vrmeshfor frame 0, my_proxy_0001.vrmesh for frame 1, and so on. If you use a sequence of files, the Playback type option is ignored, as V-Ray doesn't know how many frames are in the animation. The Playback speed parameter may also work unreliably with sequences of files.
Geometry to load – Select the viewport preview mode from the drop down menu. This does not affect the final render. This parameter is Keyable and can be used as a driven key as Geom Type in the Channel Box.
Bounding box – The mesh is represented as a box scaled to fit the object in viewport.
Preview Geometry – The mesh is represented as a low poly proxy preview as defined in the .vrmesh file.
Full Geometry –
None –
Flip Axis – When enabled, this option switches the axis being used by the proxy as the vertical axis between Y and Z. It allows the user to align the vertical axis of the proxy with the vertical axis in the scene in cases where the proxy was not exported from Maya or when loading Alembic files.
Particle Render Mode – Controls how the particles in the proxy are rendered in the viewports. The available options are Point and Sphere.
Tessellate Hair – When enabled, tessellates hair strands for files containing hair.
Edge length (in pix) – Specifies hair edge length in pixels for smoothing hair strands.

Alembic Layers
The Alembic layers feature allows modification of a selected alembic proxy by adding layer files on top of it. Each layer transforms the proxy with a different set of properties. These transformations include adding properties to a shape (e.g. UV mapping of an object that has no UVs), overriding properties, adding new objects, pruning objects or properties, replacing an object's (or properties') hierarchy with a new one, etc.
You can combine different cache files. Whenever the same object is found in a layer, all of its properties are considered.
Add New Item – Adds a new layer to the stack.
Enabled – Each layer's effect can be enabled or disabled by the checkbox.
File –
Browse – Allows you to browse and open an .abc file.
Delete – Removes the layer from the stack.

Animation Parameters
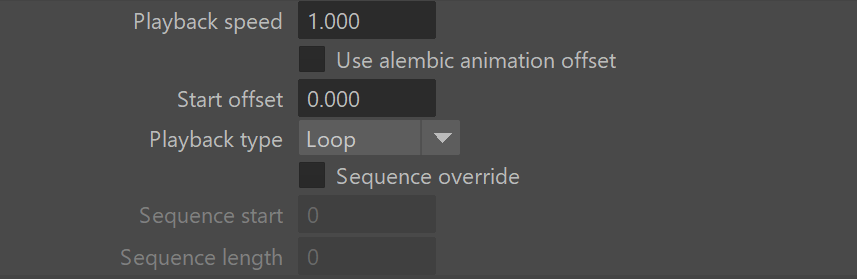
Playback speed – A multiplier for the speed of the animation. Putting negative numbers here makes the animation play backwards. This option may not work very well for sequences of .vrmesh files.
Use alembic animation offset –
Start offset – Offsets the beginning of the animation by the given number of frames. You can use positive as well as negative values here.
Playback type – Specifies a playback mode. This option is ignored if you use a sequence of separate .vrmesh files.
Loop – The animation is looped by skipping to the first frame once it has finished.
Play once – The animation is played once.
Ping-pong – The animation is looped by playing it backwards once the last frame has been reached and then playing it forward again when the first frame is reached.
Still – The animation is not played. Instead, just the Start offset frame is shown.
Sequence override – Allows you to manually override the start frame and the animation length to read (in frames) for animations stored in sequences of .vrmesh files (where each frame of the animation is stored in a separate proxy file). Importing proxy sequences requires a special format that specifies how to mach the frame padding in the file name. See the File name section of this page for more details.
Sequence start – Specifies the first frame of the animation.
Sequence length – Specifies the length of the animation to be played.
Object Hierarchy
The proxy structure is represented in a tree view where you can select individual elements and override them or control their visibility.
Override Shader – Allows to override the currently selected material node in the tree. You can also enable an override for the selected material via its icon. When an override is enabled, the icon changes to
.
Material Override – Add a material override for the currently selected material node.
Texture – Add a texture to the material override for the currently selected material node.
Delete – Deletes a material override for the currently selected material node.
Override Visibility – Allows to override the currently selected node in the tree. You can also enable an override for the selected object via its icon.
Visible – When checked, enables visibility override. When the visibility is on for the selected object node, the icon is . When the visibility is off, the icon changes to
![]()
Delete – Deletes visibility override.
You can copy a shader/object name from the tree view into the Override Shader or Override Visibility rollouts instead of writing it manually. You can do so by using the middle mouse button to drag and drop the item into the respective slot. This is useful when the name of the object/shader is very long.
Advanced Overrides
The advanced overrides (regex) have a priority over the non-regex overrides. The order of the overrides in his rollout determines their priority.
Visibility Overrides (regex)
Add New Item –Add a new visibility override.
New Item field – A field to add a visibility node to override from the tree. You can either drag-and-drop the node or copy-paste it in the field.
Visible – When checked, the override is visible.
Delete – Deletes a visibility override.
Up/Down – Moves a visibility override up/down, thus changing its priority.
Shader Overrides (regex)
Add New Item –Add a new material override.
Material field – A field to add a material node to override from the tree. You can either drag-and-drop the node or copy-paste it in the field.
New Item field – A field to add a material node to be used as an override material.
Texture – Add a texture to the material override for the currently selected material node.
Delete – Deletes a material override.
Up/Down – Moves a material override up/down, thus changing its priority.

Alembic proxy parameters
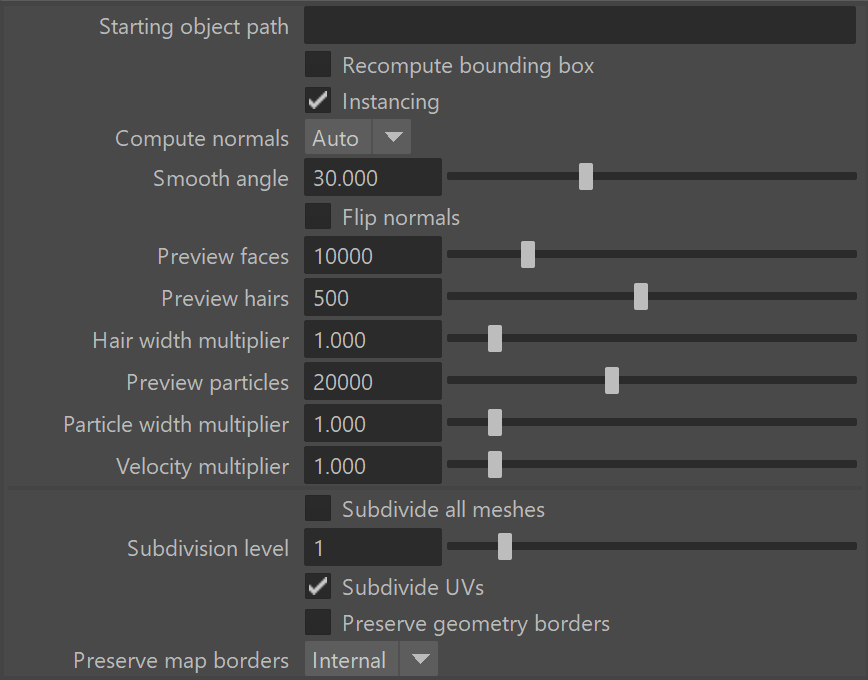
Starting object – Allows to specify a starting path in the Alembic file; only objects below that path are rendered. The path may start with ABC/ or it may be omitted.
Recompute bounding box – Enabling this check box forces V-Ray to recompute the bounding box for the geometry before rendering. When this is off, V-Ray uses the bounding box specified in the Alembic file. However, sometimes these bounding boxes are not correct, and in that case the rendering is also incorrect. To avoid such issues, enable this option. Note that this option might slow down the rendering.
Instancing –
Compute normals – This option allows you to force smooth normals on the geometry in case they were not originally smoothed.
Smooth angle – When the Compute normals option is enabled this specifies the angle below which normals are smoothed.
Flip normals – Reverses the direction of the normals.
Preview faces – Allows you specify how many faces are going to be used to show a preview of the proxy in the view port.
Preview hairs – Allows you specify how many splines are going to be used to show a preview of the proxy hair in the view port.
Hair width multiplier – This multiplier allows you to control the hair width during rendering.
Preview particles – Allows you to specify how many particles to show in the viewports.
Particle width multiplier – Controls the size of the particles when rendering.
Velocity multiplier – Controls the length of the motion blur when rendering.
Subdivide all meshes – Subdivide the meshes before rendering using the OpenSubdiv library.
Subdivision level – The number of subdivision levels.
Subdivide UVs – Allows you to choose whether or not the UVs of the object are subdivided at the borders.
Preserve geometry borders – Specifies whether geometry borders are preserved or not.
Preserve map borders – Specifies how to handle subdivisions of UV coordinates at UV seams when Subdivide UVs is enabled. The possible values are:
None – UVs are always subdivided regardless of whether they are on a UV seam or not.
Internal – Only preserve UVs if they are on an internal UV seam.
All – Does not subdivide UVs on UV seams.
Point Cloud
Use if present – Enables the usage of point cloud data if available.
Level multiplier – Determines the way point cloud levels are loaded. A value of 1.0 means that the level to load is determined exactly by the distance from the camera to the object. A value smaller than 1.0 means that the level is of greater detail than required by distance. Values greater than 1.0 mean that the resolution of the level is smaller than the one determined by distance. A value of 0.0 means that no point cloud level is loaded and the original mesh is rendered instead.

VRayMesh file info
This rollout provides information on the loaded VRayMesh including:
- Mesh filename, i.e. a path to the loaded file
- Animation contained in the proxy (when animation is in one file, not as a sequence of files)
- Number of preview faces, hair geometries and particle count.
- Bounding box information
- UV sets and their names
- Color sets and their names
- Shaders sets and their names
This can be useful in several situations. For example, when using the VRayUserColor node to read UV sets and color sets, the you can obtain the set names through this rollout. Additionally, when using animation overrides, you can easily tell what frame of the proxy animation is rendered at a given timeline frame.

Notes
- V-Ray 5.0 for Maya 2018 and above supports instancing of .vrmesh files via the Maya Instancers found in FX menu set > nParticles > Instancer.