This page provides a tutorial on creating a Burning Chair simulation with Phoenix FD in 3ds Max.
Overview
This is an Intermediate Level tutorial. Even though no previous knowledge of Phoenix FD is required to follow along, re-purposing the setup shown here to another shot may require a deeper understanding of the host platform's tools, and some modifications of the simulation settings.
Requires Phoenix FD 3.10.00 Official Release and V-Ray 3.60.04 Official Release for 3ds Max 2015+. If you notice a major difference between the results shown here and the behaviour of your setup, please send an email to support@chaosgroup.com
The instructions on this page guide you through the process of creating a Burning Chair effect using Phoenix FD and 3ds Max.
The emission of fire is modulated by a VertexPaint modifier coupled with a Vertex Color texture used as a mask for the Phoenix FD Fire Source. Many Dynamics parameters related to Fire/Smoke simulations are explained in detail, with videos showing their effect on the simulation. The simulation is then written to disk, and the resulting cache files are used for the Phoenix FD Resimulation process to slow down the movement of the flames.
The Download button below provides you with an archive containing the start and end scenes, as well as a Phoenix FD Render Settings preset that you can use to quickly set up the volumetric shading options for a basic fire simulation.
Units Setup
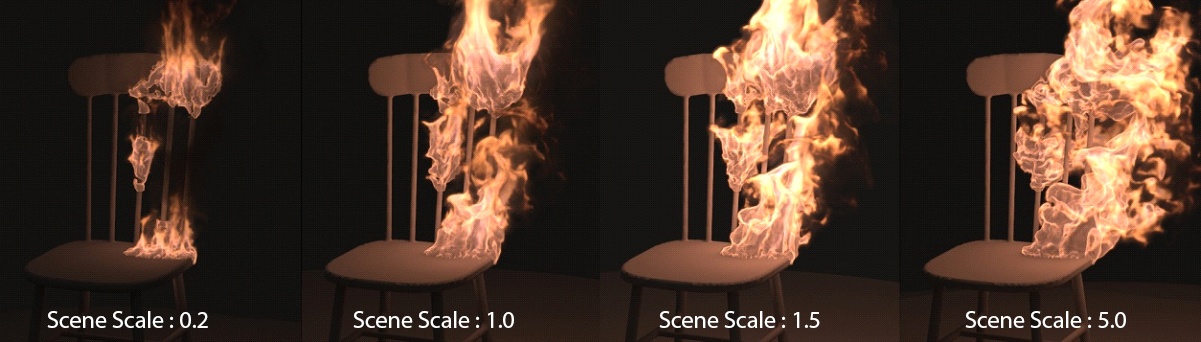
Scale is crucial for the behavior of any simulation. The real-world size of the Simulator in units is important for the simulation dynamics. Large-scale simulations appear to move more slowly, while mid-to-small scale simulations have lots of vigorous movement. When you create your Simulator, you must check the Grid rollout where the real-world extents of the Simulator are shown. If the size of the Simulator in the scene cannot be changed, you can cheat the solver into working as if the scale is larger or smaller by changing the Scene Scale option in the Grid rollout.
The Phoenix FD solver is not affected by how you choose to view the Display Unit Scale - it is just a matter of convenience.
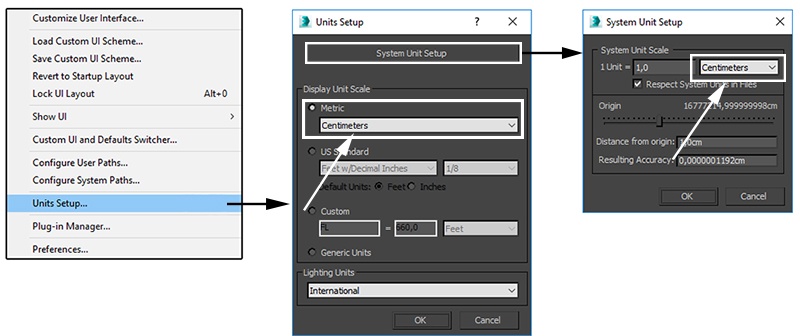
A burning piece of furniture would be considered a small-scale simulation so we will view the units as Centimeters.
Go to Customize -> Units Setup and set Display Unit Scale to Metric Centimeters.
Also, set the System Units such that 1 Unit equals 1 Centimeter.
Scene Layout
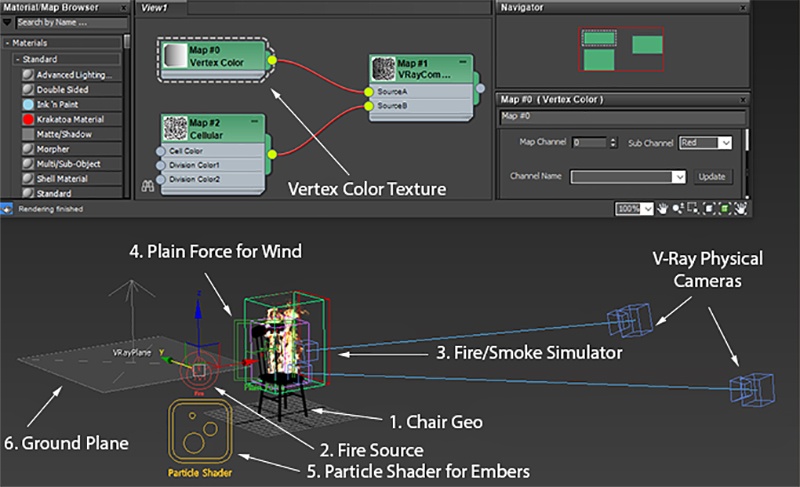
The final scene consists of the following elements:
- The chair geometry with a VertexPaint modifier
- A
Phoenix FD Fire Sourcewith the chair geometry in its Emitter Nodes list.CONTENT NOT FOUND
A Vertex Color texture is used as aMaskfor theCONTENT NOT FOUNDOutgoing Velocityparameter of the Source. The Vertex Color texture is reading the vertex data from the Vertex Paint modifier on the chair geometry.CONTENT NOT FOUND
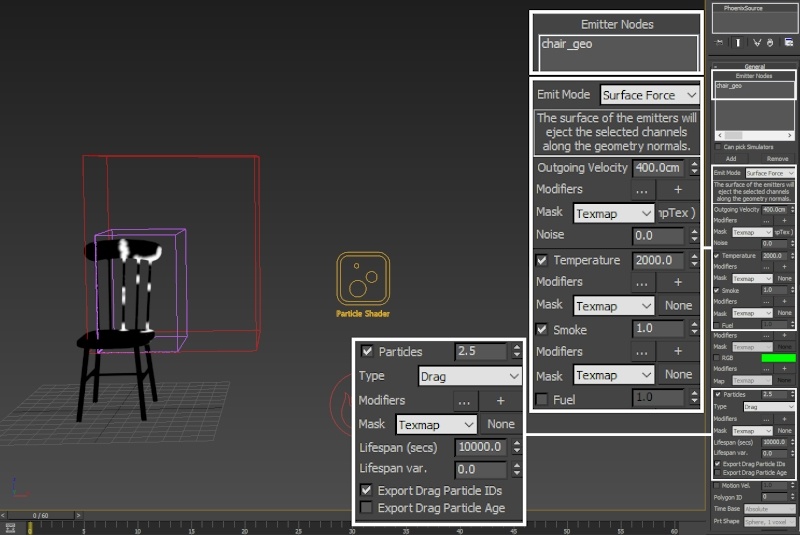
The Fire Source is also emitting Drag Particles into the simulation. The Drag particles are used to represent embers. - A
Phoenix FD Fire/Smoke Simulatorfor the fire.CONTENT NOT FOUND
- A
Phoenix FD Plain Forceused to imitate wind blowing in the positive X direction.CONTENT NOT FOUND
- A
Phoenix FD Particle Shaderto render the Drag Particles of the Fire Source as red-ish points.CONTENT NOT FOUND
- A V-Ray Infinite Plane for the ground.
Note that there are no light sources present in the scene. The only source of illumination for the final image is provided by the fire.
Scene Setup
Set the Time Configuration → Animation Length to 60 so that the Timeslider goes from 0 to 60.
If you need any geometry animation that should interact with the simulation, prepare the animation at this step. After we're done with the basic simulation, we will rescale the timeline to slow down any animation present in the scene and we will use the Resimulation option to slow down the fire simulation as well.

Phoenix FD Setup

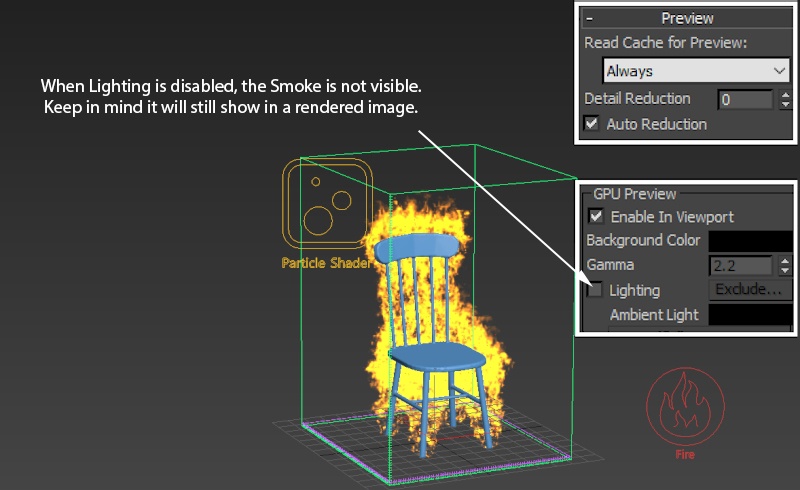
Phoenix FD provides a high-quality GPU Preview directly in the 3ds Max Viewport which should be enabled by default by the Burning Fuel preset.
You may want to disable it if you're working through a Remote Desktop connection or on a machine with integrated graphics.
To do so, go to the
The GPU Preview section of the Preview rollout also contains
You can also disable the Lighting altogether which will cause only the fire to be visible in the Viewport.
Here's how the simulation looks with the default Burning Fuel preset.
As you can see from the video to the right, there are plenty of issues to address:
- The emission is uniform - the entire chair is burning instead of only certain sections of it. We will first take care of that by using a VertexPaint modifier to specify where the emission happens.
- The fire is too choppy - we are going for a smoother / calmer look. The noisiness in the fire is caused by the low grid resolution, the Vorticity parameters in the Dynamics rollout of the Simulation, and to a lesser extent - the shading settings set up in the Rendering → Volumetric Options → Fire window. We resolve this by disabling the Vorticity parameters and tweaking the Fire rendering Color and Intensity curve of the volumetric shader.
- The fire is moving rather quickly - this would be the desired behavior when simulating a burning flammable fluid but instead we would like to achieve a smoother flame. Think of a campfire - the flames produced by the Burning Fuel preset don't resemble the calm and elongated fire produced by burning wood. We resolve this by slowing down the cached sequence from the Input panel and resimulating over the slowed-down cache files with the Time-Bend Resimulation option enabled.
Varying the Emission with Vertex Color Texture
At the moment, the entire chair geometry is used for fire/smoke emission. This produces a homogenous flame which looks unrealistic.
To break up the emission, we use a VertexPaint modifier to specify where the emission happens. We can then extract the painted information using a Vertex Color texture and apply that as a mask to the Outgoing Velocity parameter of the Phoenix FD Fire Source.
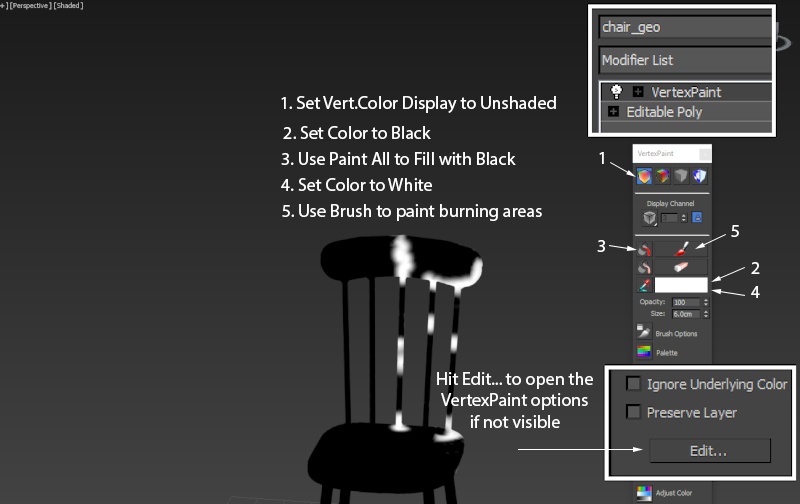
Select the chair geometry and apply a VertexPaint modifier. A VertexPaint toolbar should appear in the 3ds Max UI. If you accidentally close it, use the Edit... button under the VertexPaint modifier to bring it back.
Click the left-most icon at the top of the toolbar to set the Vertex Color display to Unshaded - this makes it easier to see what you're doing.
Then, set the Color to Black (0, 0, 0) and use the Paint Bucket icon to make the entire chair black.
Activate the Brush tool, set the Color to White (255, 255, 255) and paint the areas that you want to be burning.
When finished, click the 3-rd icon (left to right) at the top to disable the vertex color preview.
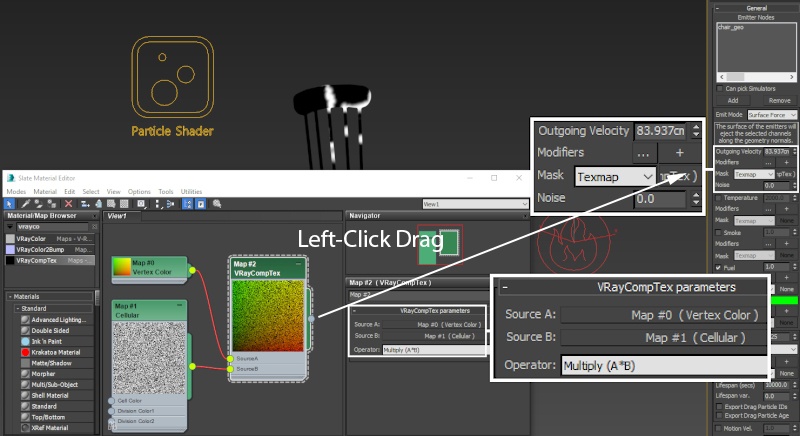
Open the Material Editor and create a Vertex Color texture. The Vertex Color texture can read the color information that we just painted on the chair geometry.
You can directly pipe its output into the
However, in this tutorial, we add additional variation by compositing the Vertex Color texture over a Cellular texture using a VRayComp texture.
Add a VRayComp texture and feed the output of the Vertex Color to the SourceA input.
Set the Operator to Multiply (A*B).
Then, add a Cellular texture and feed its output to the SourceB input of the VRayComp texture.
Left-Mouse-Button click and drag from the VRayComp texture's output to the Outgoing Velocity Mask parameter of the Phoenix FD Fire Source.
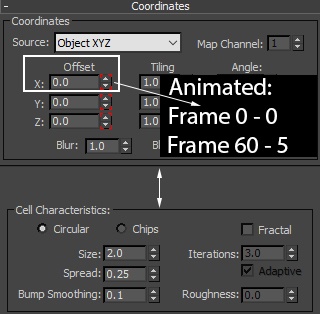
Set the Cellular type to Circular, with a Size of 2.0 and a Spread of 0.25. Those values are an artistic choice and in no way set in stone - feel free to change them if your setup requires it.
Animate the Offset X parameter to go from a value of 0 to 5 over the range of frames 0 to 60. This will cause the sampling coordinates for the Cellular noise to shift over time, adding one more layer of randomness to the emission.
Open the Curve Editor and set the tangents for the animation to Linear.
If you can't find the Cellular texture coordinates in the list, make sure to disable the Show Only filters under the View → Filters options box. You should then be able to find it under SME → Map # → Properties → Coordinates.
This is done so the animation of the Cellular noise doesn't speed up in the beginning and slow down at the end, which is the effect of the default Ease In - Ease Out tangents.
Here's how the simulation looks with the VRay Comp texture used as a mask for the Outgoing Velocity:
We still need to tweak the simulation parameters and make some speed optimizations along the way.
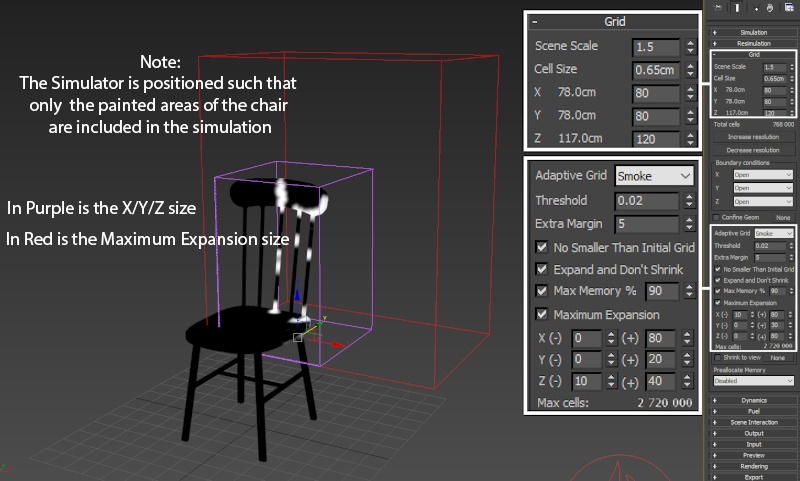
Select the Phoenix FD Simulator and open the
Set the
Set the
Set the
The Adaptive Grid option allows the container to grow in size once the content of the specified channel near the walls of the simulator reaches the Threshold value. In this case, the container will increase in size when there is smoke near the walls.
Enable the
Enable
Set the
Select the Phoenix FD Fire Source created by the Burning Fuel preset and make sure that the Chair geometry is included in the
By default, the
Set the
Disable
However, instead of relying on this, a much simpler and easier to control way to produce fire is to only emit Smoke and Temperature, and to tweak the Shading/Rendering options as necessary. Fuel and burning are better suited for explosive effects.
Set the
Drag particles are simply Phoenix FD's version of Particle Advection. As the simulation progresses, the Drag particles are carried (dragged) along by the Velocity channel together with the smoke.
Make sure to enable
Open the
Enable
If you'd like to run a Resimulation that uses the Wavelet turbulence options in the Resimulation rollout for increasing the resolution and adding extra swirls, you also need to enable the Wavelet channel export in the Output rollout.
The Backup parameter controls the interval at which Backup cache files are created and stored on disk. You can later continue a stopped simulation from such frames (see the Restore button). To make a Restore possible at every frame, set this parameter to 1. A value of 0 means no backup frames will be exported.
You may set this to 0 to save on space as the simulation is relatively short and fast.

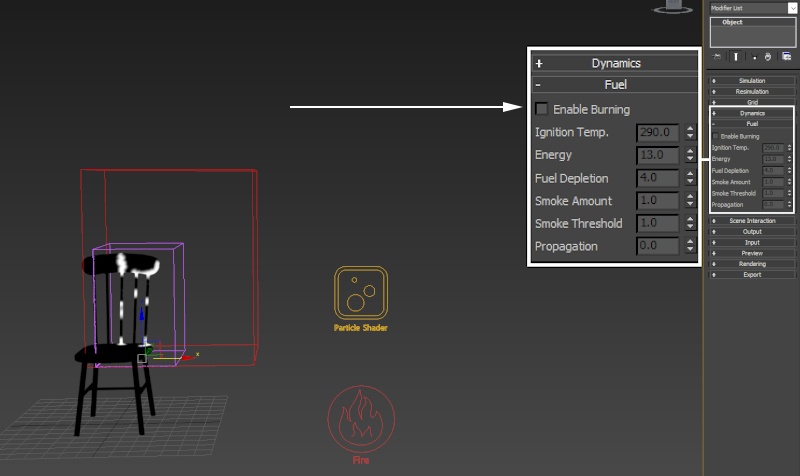
Open the
This option was enabled by the Burning Fuel with Smoke preset we used as a starting point. Since we disabled the emission of fuel, the burning process will not be utilized and keeping this enabled will only consume resources in vain.
Here's how the simulation looks with the higher Outgoing Velocity rate and reduced Cell Size:
Note that we also tweaked the Scene Scale parameter which affects all the dynamics of the Phoenix FD Simulator.
The fire is still too turbulent and noisy for our purpose so we take care of that next.
Phoenix FD Simulator Properties
Select the Phoenix FD Simulator and open the
Set the
Reduce the
Set the
Set all the
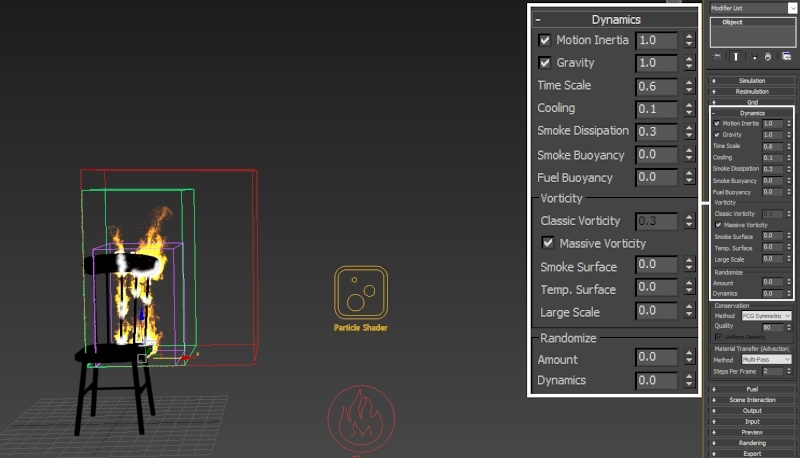
Here's the simulation with Time Scale set to 0.6.
As you can see from the video to the right, the fire is now slightly less turbulent. This is going in the right direction for us.
See the video below.
Here's how things changed after reducing the Cooling to 0.1:
The flames are now longer - as they should be with this type of burning.
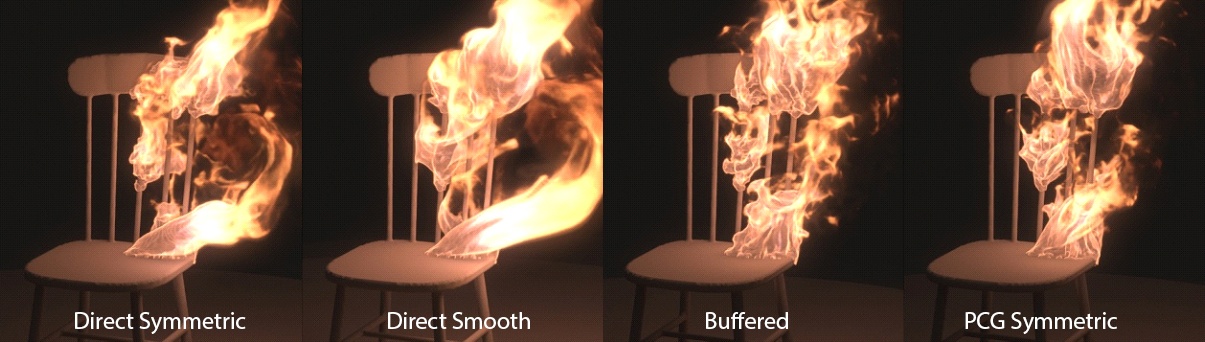
Turning off the Vorticity removed the noisiness in the simulation:
In the next step, we add some detail back into the sim by setting the Conservation method to Buffered.
Still under the Dynamics rollout, in the
You may tweak the Steps per Frame parameter if your setup requires it. A higher Steps per Frame value will produce a smoother simulation. This is usually required if the emitter object is moving quickly and producing stepping in the emission, or the outgoing velocity is so high that the fluid becomes noisy. Try to keep this parameter to a value as low as possible because it increases your simulation time linearly, i.e. increasing it twice will increase the simulation time twice.

![]()
![]()
![]()
Here's the results with the Buffered Conservation method, Quality of 40 and Uniform Density disabled.
Go to the Helpers tab → Phoenix FD and add a Phoenix FD Plain Force. The Plain Force is a simple directional force.
Rotate it so it points in the positive X direction and set the Strength to 250.
To see how a force will affect the simulation, add it to the Forces list under the Preview rollout of the Phoenix FD Simulator. Then, enable Forces.
This will generate a collection of arrows showing you the direction of the force. You can control the density of the arrows with the Detail Reduction parameter at the top of the Preview rollout.
Note: if GPU preview is enabled, the Forces preview will not show up in the viewport.
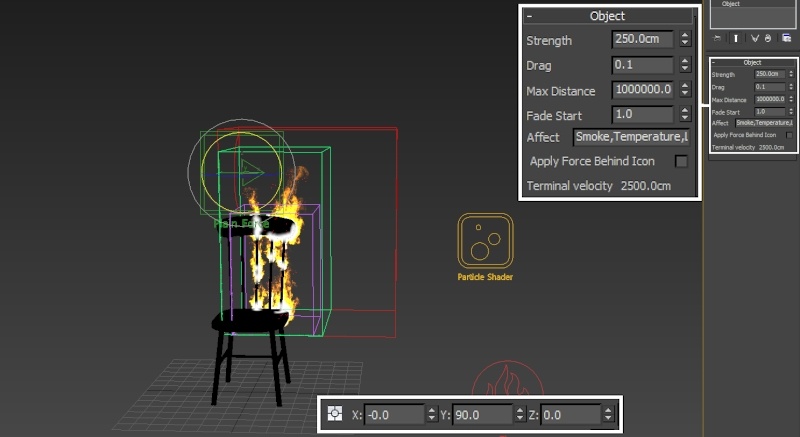
After adding the Plain Force, the fire is blown to the right instead of going straight up. Some extra detail in the flames is also revealed.
You could experiment with other forces as well. A Phoenix FD Turbulence force with a low Fractal Depth (so that the noise is not grainy) could give you a good result as well.
Phoenix FD Render Settings
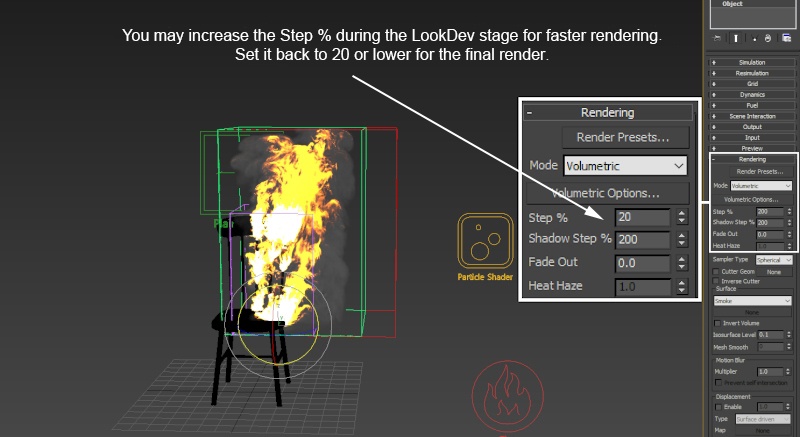
You can gain a decent rendering speed-up by increasing the Step% parameter in the Rendering rollout during the look development stage.
The Step% controls the ray marching step of the camera rays as a percentage of the cell size. As the renderer traces rays through the simulator, this value controls how often to get information from the grid. If this value is more than 100, some cells will start getting skipped and artifacts may appear but rendering will be faster. For the final render, reduce this value back to 20 as the toolbar preset set it.
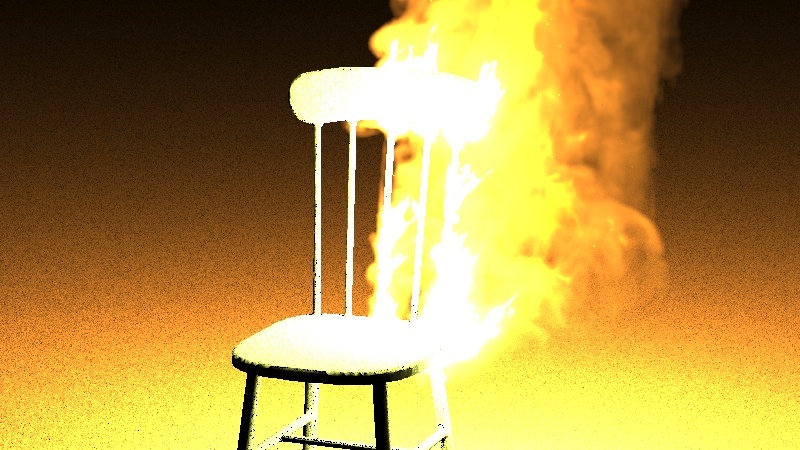
Here's how a rendered image looks before any tweaks of the volumetric shader:
As you can see, the fire is too bright, and detail in the flames can hardly be noticed.
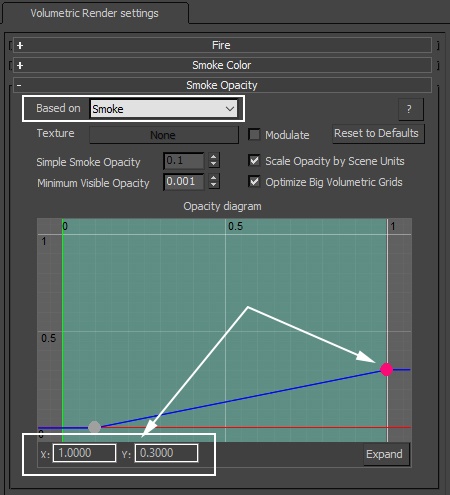
Open the
Set the second curve point in the Opacity Diagram to X: 1.0, Y: 0.3.
This will tell the volumetric shader to render the smoke such that the densest areas of the smoke channel will render with a maximum opacity of 0.3
Change the
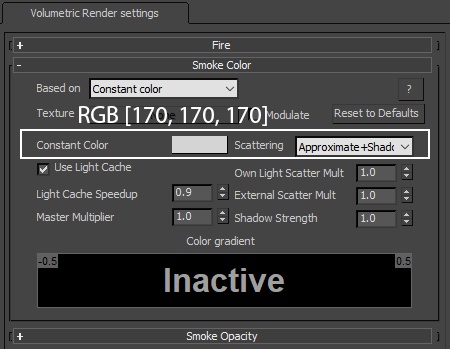
For this tutorial, the
The process of setting up the Intensity and Color Ramp will usually have the greatest impact on the shading of your fire simulation.
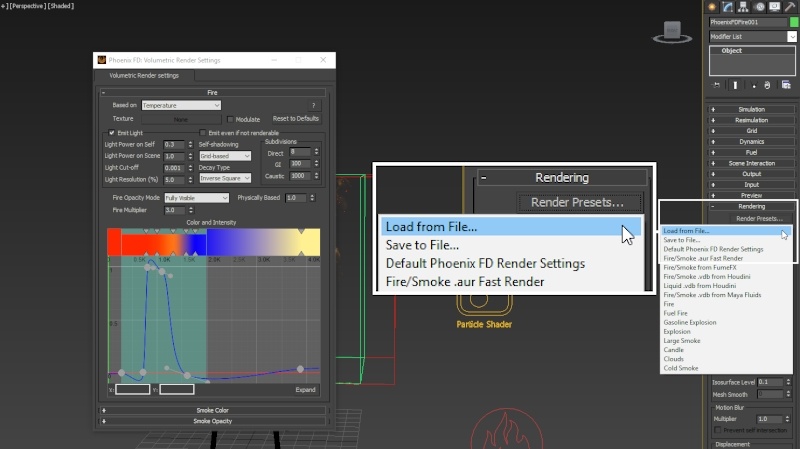
As you can see from the screenshot to the right, there are a dozen or so manually placed colors on the ramp, and the curve has been edited too. Since it's not feasible to describe this in a tutorial, we provide you with a Render Preset file that you can load in your scene to get the exact same settings.
To load the provided preset, go to the Rendering → Render Presets button and select the chair_flames_preset.tpr preset file that came with the project files for this tutorial.
Here's how a rendered image looks with the volumetric shader tweaks:
The fire still looks a bit noisy - the resimulation will take care of that.
For a nicer looking image, you can enable Bloom and Glare effects from the Lens Effects panel in the V-Ray Frame Buffer.
Retiming the Phoenix FD Simulation
Suppose you want to slow the simulation down twice.
To achieve that, you need to take care of two things:
- You need to slow down the motion of the objects in your scene
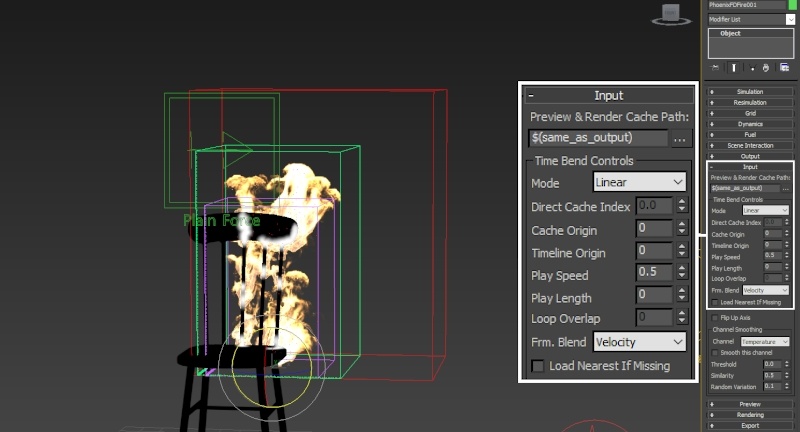
- You need to slow down the Phoenix FD simulation by reducing the Play Speed from the Input rollout of the Simulator.
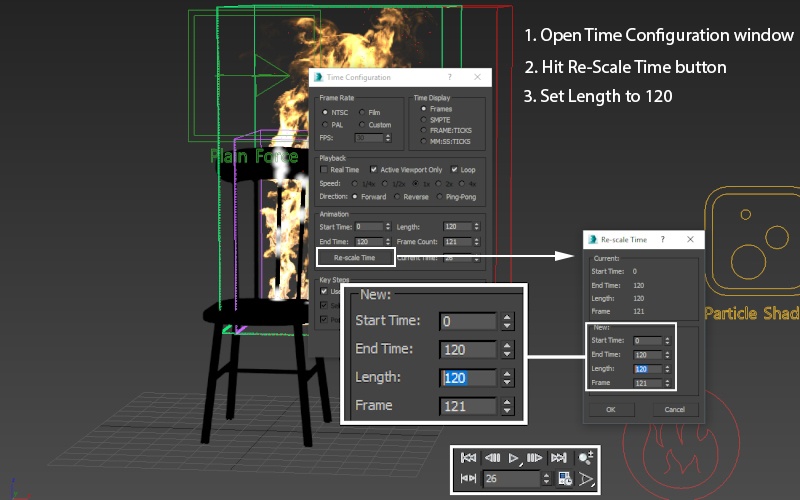
To slow down the animation of your scene objects, open the Time Configuration window, click the Re-scale Time button and set the Length to 120 (assuming you are working with the provided scene file which has a total animation length of 60).
The total length of the animation of will now be doubled.
It's very important to stress that this will not affect the Phoenix FD Simulation.
If you have 60 frames simulated, Re-Scale the timeline to 120 frames and hit the Play button, the simulation will play from frame 0 to frame 60, just like before the Re-Scaling.
The play speed of a Phoenix FD simulation can only be tweaked from the Input roll-out of the Simulator.
Now that the animation speed of the scene objects is reduced in half, we need to do the same for the Phoenix FD Simulation.
Open the
Set the
The Play Speed parameter works as a multiplier for the Playback speed. When set to 1, it reads one cache file for each corresponding timeline frame. If the value is not precisely 1, Phoenix FD generates an intermediate frame by blending the two adjacent cached frames.
This Blending process works really well with FLIP (water) simulations as FLIP particles are fixed points in space, and consequently, the in-between particle positions can be easily determined from the previous and next frames' cache files.
For Fire/Smoke simulations, however, more advanced techniques are required to achieve a slow-down effect.
Reducing the Play Speed is good enough for most Smoke simulations but attempting to blend Fire simulations tends to produce flickering in the fire intensity. The way around this issue is to slow down the simulation from the Input → Play Speed and run a Resimulation. Since the Resimulation process reads the cache files as specified in the Input panel, this will recalculate the dynamics at the reduced speed and provide you with a smoothly slowed-down simulation.
Note that when you enable Resimulation, Phoenix FD will try to read the cache files for preview and rendering from the Resimulation Output Path instead of the 'regular' Output. Don't be alarmed if the viewport goes blank - you can always go back to the original cache files by simply disabling the resimulation.
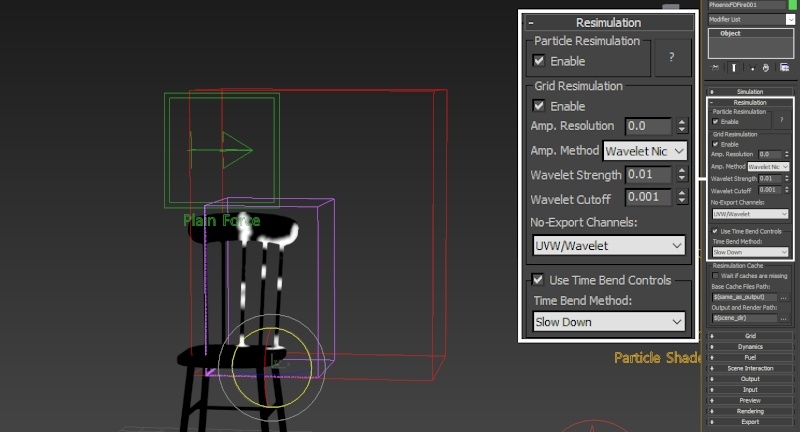
The Grid Resimulation takes care of the Temperature/Smoke/Velocity Grid Channels while the Particle Resimulation will affect the Drag particles emitted by the fire source.
Set the
Enable
Set
If you want to use Wavelet Turbulence, you need to Enable Wavelet Grid channel export from the Output rollout of the simulator. Note that it will take effect only if Amplify Resolution is above 0.
Set Simulator → Dynamics → Steps per Frame to 1 so you don't lose detail in the re-simulation process.
In general it's not recommended to change any Dynamics settings between the original simulation and Time-Bend Resimulation because all of them will affect the resimulation.
In order to get the closest match, both the original and resimulation should be run with 1 Step per Frame. Simulating continuous burning fire is one of the rare cases where we can get away with changing the Steps per Frame without dramatically changing the shape of the fluid after Time-Bend resimulation.
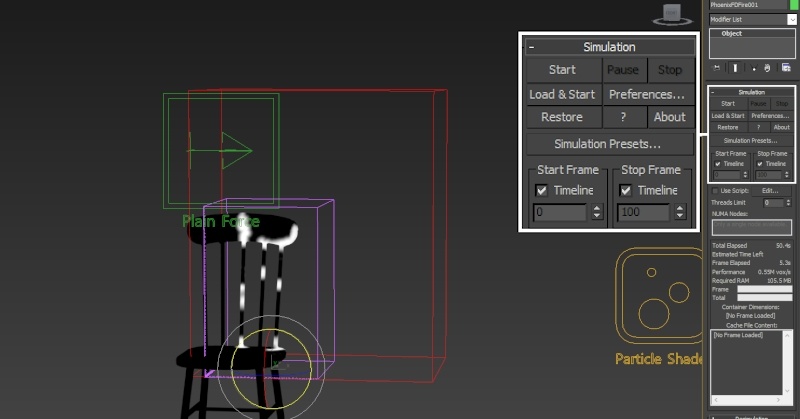
Hit Start to begin the resimulation.
before Time Bend resimulation
after Time Bend resimulation
The Amplify Resolution setting controls the number of voxels that will be used for the grid during resimulation Here's the simulation above, resimulated with Amp Resolution of 1.
resimulation with Amp Resolution 1
The painted Vertex Color on the chair geometry will heavily affect the simulation result.
You can always go back to the VertexPaint modifier and tweak the color.
Here is a simulation with a different emission pattern, and an Amp Resolution value of 1.0 for the Resimulation:
The difference between this simulation and the video above is the 'density' of the painted vertex color. The vertex paint in the simulation above is sparser while for this simulation, we used a large brush radius and painted entire sections of the chair, relying on the Cellular texture to add that extra detail in the emission.
Camera and Lighting
As mentioned in the beginning, the only illumination source for this scene is the fire itself.
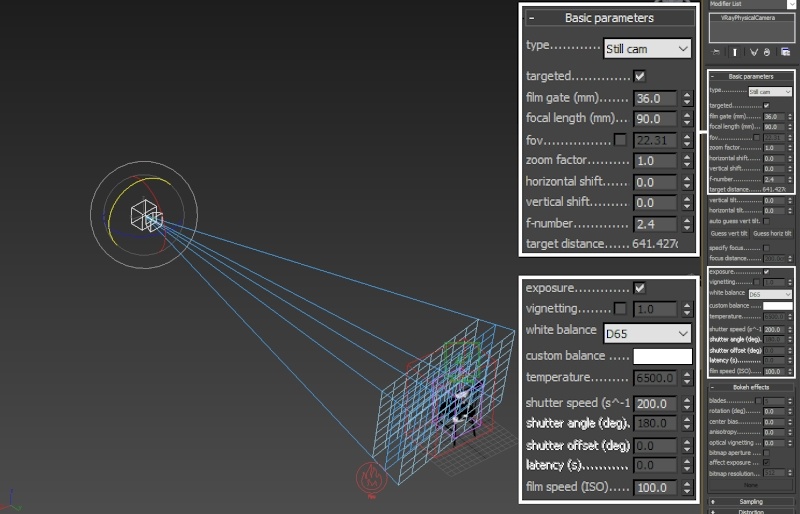
The scene file called 001_start.max already has the cameras set up for you. However, for reference, here are their properties:
A V-Ray Physical camera is used for the rendering with the following settings:
F-Number: 2.4
Shutter Speed: 200
ISO: 100
Focal Length: 90
Vignetting: Disabled.