Versions Compared

Key

  • This line was added.
  • This line was removed.
  • Formatting was changed.

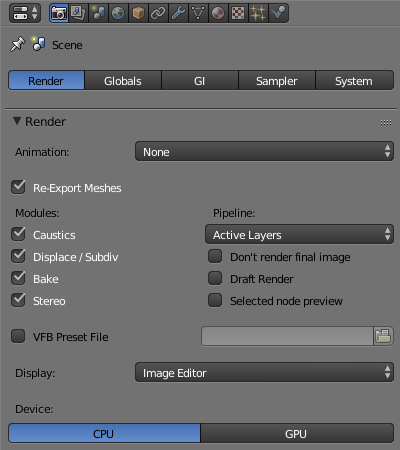
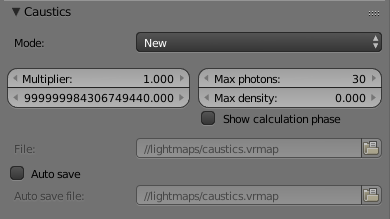
 This page provides information on the Caustics rollout under the Render tab in V-Ray's Render Settings.


Overview

...

width100%

General

V-Ray supports the rendering of caustics effects. In order to produce this effect, you must have proper caustics generators and caustics receivers in the scene.

In order to calculate the caustics effects, V-Ray uses a two-pass technique known as photon mapping

...

. The first pass consists of shooting particles (photons) from the light sources in the scene, tracing them as they bounce around the scene, and recording the places where the photons hit the object surfaces. The second pass is the final rendering, which is when the caustics are calculated by using density estimation techniques on the photon hits stored during the first pass.

UI Path

...


||Properties Editor|| > Render > Render tab > Caustics rollout
(When the Caustics module is enabled from the Render rollout)

Image Added

Parameters

...


Section
Parameters
Column
width100%
50%

Image RemovedMode - controls  – Selects the mode of the irradiance map:

 New map

 - when

 – When this option is selected, a new photon map

will be

is generated. It

will overwrite

overwrites any previous photon maps left over from previous rendering.
Save to file

 - hit this button if you want to save

 – Saves an already generated photon map

in

to a file.
From file

 - when you enable this option,

 – When enabled V-Ray

will

 does not compute the photon map but

will load

loads it from a file.

Hit

Press the Browse button on the right to specify the file name and path.

Multiplier - this multiplier controls the strength of the caustics – A multiplier for the caustics strength. It is global and applies to all light sources that generate caustics. If you want different multipliers for the different light sources, then you should use the local light settings. Note:  this This multiplier is cumulative with the multipliers in the local light settings.

Search distance - when  When V-Ray needs to render the caustics effect at a given surface point, it searches for a number photons on that surface in the area surrounding the shaded point (search area). The search area in fact is a circle with center the original photon and its radius is equal to the Search distance valuedistance value. Smaller values produce sharper, but perhaps more noisy caustics; larger values produce smoother, but blurrier caustics. For more information, see The Search Distance Parameter example below.

Max photons

 - this is

 – Specifies the maximum number of photons that

will be

are considered when rendering the caustics effect on a surface. Smaller values cause fewer photons to be used and the caustics

will be

are sharper, but noisier. Larger values produce smoother, but blurrier caustics. The special value of 0 means that V-Ray

will use

uses all the photons that it can find inside the search areaFor more information, see The Max Photons example below.

Max density - this parameter allows you to limit  Limits the resolution (and thus the memory) of the caustics photon map. Whenever V-Ray needs to store a new photon in the caustics photon map, it will first check checks if there are any other photons within a distance specified by Max density. If there is already a suitable photon in the map, V-Ray will just add adds the energy of the new photon to the one in the map. Otherwise, V-Ray will store stores the new photon in the photon map. Using this options allows you to shoot many photons (and thus get smoother results), while keeping the size of the caustics photon map manageable.

File - the  – The file name with the caustics photon map to be loaded when the Mode is set to From file.

Auto save - when When this is turned on, V-Ray will automatically save saves the caustics photon map to the provided file when rendering is completeand location upon finishing the render.

Column
width5%


Column
width45%

Image Added


Anchor
searchDistance
searchDistance

...

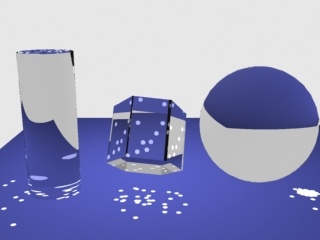
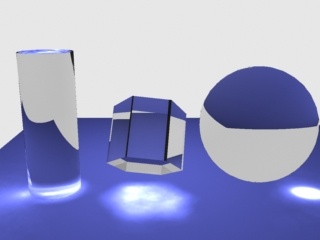
Example: The Search Distance Parameter


For this image, the Caustics subdivs parameter for the light is set to 50, so that the separate photons are more distinct; the global caustics  Multiplier  is 17000, and the Max photons are set to 60. As can be seen, the larger search distance produces blurrier caustics.


Section
bordertrue
Column
width10%


Column
width40%

Image Added
Search dist = 1


Column
width40%

Image Added
Search dist = 10


Column
width10%


Anchor
lightCaustics
lightCaustics

...

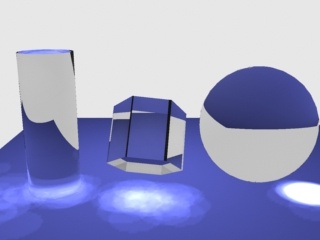
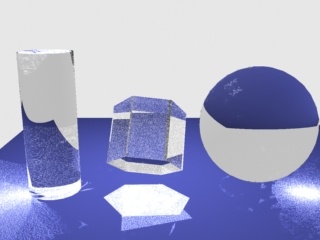
Example: The Light Caustics Subdivs


This example is similar to the previous one, but the Caustics subdivs  parameter for the light is increased to  300 . The other parameters are the same as in the previous example. As can be seen, the larger number of photons produces smoother caustics effects than in the previous example.


Section
bordertrue
Column
width10%


Column
width40%

Image Added
Search dist = 1


Column
width40%

Image Added
Search dist = 5


Column
width10%


Anchor
maxPhotons
maxPhotons

...

Example: The Max Photons Parameter


For this example, the Caustics subdivs parameter for the light was set to 4,000, the global caustics Multiplier to 17,000, and the Search distance to 0.5. As can be seen, the larger value of the Max photons parameter in the second image causes the caustics to appear much smoother. 

Section
bordertrue
Column
width10%


Column
width40%

Image Added
Max photons = 1


Column
width40%

Image Added
Max photons = 60


Column
width10%


Notes

...

Fancy Bullets
typecircle
  • Caustics also depend on the individual light settings.
  • For accurate caustic calculations, disable the VRmat's Affect Shadows parameter when using caustics. Simultaneous usage of both Caustics and Affects Shadows can be used for artistic purposes but will not produce a physically correct result.