This page provides information on the Caustics tab of the V-Ray Renderer.
Overview
V-Ray supports the rendering of caustics effects by using one of the following techniques: photon mapping or progressive.
The new Progressive caustics solver uses advanced sampling techniques, and is able to trace as many photons as required without suffering the memory constraints of traditional Photon Mapping techniques.
It is loosely based on two papers: one on Progressive Photon Mapping from Knaus and Zwicker, and another on Metropolis-guided caustics tracing from Šik and Krivánek.
The other method, Photon Mapping, is a two-pass technique. The first pass consists of shooting light particles (photons) from the light sources in the scene, tracing them as they bounce around the scene, and recording the places where the photons hit the object surfaces. The second pass is the final rendering, which is when the caustics are calculated by using density estimation techniques on the photon hits stored during the first pass.

Parameters
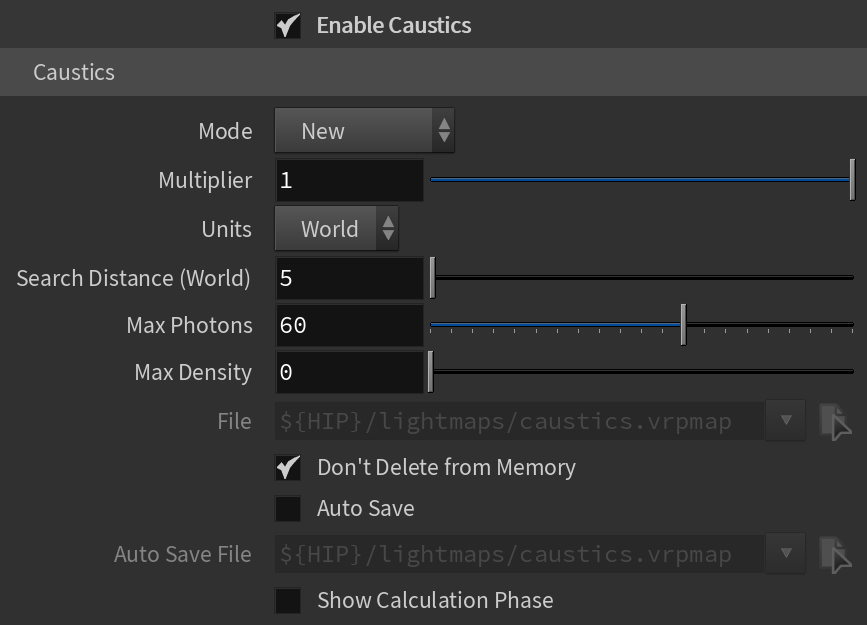
Enable Caustics – Turns the rendering of caustics on and off.
Mode – Controls the mode of the caustics photon map:
New – Causes a new photon map to be generated. The new map overwrites any previous photon map left over from a previous rendering.
From File – V-Ray does not compute the photon map but loads it from a file.
Progressive – The Progressive method doesn't need most of the controls used for traditional Photon Mapping, so the controls are grayed out.
Multiplier – [Available only for New mode] Controls the strength of the caustics. It is global and applies to all light sources that generate caustics. If you want different multipliers for the different light sources, use local light settings.
Note: This multiplier is cumulative with the multipliers in the local light settings.
Units – Determines in what units the Search Distance parameter is specified - World units or Pixels. The Progressive mode works only with Pixels.
Search Distance (World)/(Pixels) – [Available only for New mode] When Mode is set to Progressive, this parameter specifies the initial photon lookup radius in pixels. When Mode is set to New or From File, the Search Distance specifies the radius of search area circle. When V-Ray needs to render the caustics effect at a given surface point, it searches for a number photons on that surface in the area surrounding the shaded point (search area). The search area is a circle with its center at the original photon and a radius equal to the value. Smaller values produce sharper, but perhaps noisier caustics; larger values produce smoother but blurrier caustics. For more information, see the Search Distance Parameter (Progressive) and the Search Distance Parameter (Photon Map) examples below.
Max Photons – [Available only for New mode] Specifies the maximum number of photons within the search area circle that are considered when rendering the caustics effect on a surface. Smaller values cause less photons to be used and the caustics are sharper, but perhaps noisier. Larger values produce smoother but blurrier caustics. The special value of 0 means that V-Ray uses all the photons that it can find inside the search area. For more information, see the Max Photons Parameter example below or the VRaySun Photon Radius example.
Max Density – [Available only for New mode] Limits the resolution (and thus the memory) of the caustics photon map. Whenever V-Ray needs to store a new photon in the caustics photon map, it first looks if there are any other photons within a distance specified by Max density. If there is already a suitable photon in the map, V-Ray just adds the energy of the new photon to the one in the map. Otherwise, V-Ray stores the new photon in the photon map. Using this options allows you to shoot many photons (and thus get smoother results) while keeping the size of the caustics photon map manageable.
File – [Available only for From File mode] File name with the caustics photon map to be loaded when Mode is set to From File.
Don't Delete from Memory – When enabled, V-Ray keeps the photon map in memory after the scene has finished rendering. Otherwise, the map is deleted, so that the memory it takes up is freed. This option can be especially useful if you want to compute the photon map for a particular scene only once and then reuse it for further rendering.
Auto Save – [Available only for New and Progressive modes] When enabled, V-Ray automatically saves the caustics photon map to the file specified in the Auto save file field when rendering is complete.
Auto Save File – [Available only for New and Progressive modes] Specifies the file to which the caustics photon map is saved when Auto save is enabled. Click the Browse button to the right to specify the file name.
Show Calculation Phase – [Available only for New mode] When enabled, displays the calculation of the caustics map.
Tips when working with progressive caustics:
Required:
- Affect Shadows should be off in refractive materials if they are to generate caustics.
- The Affect Channels option should be set to Affect all Channels in refractive materials to ensure the Caustics render element contains also the ones fallen behind refraction.
Not doing so leaves photons fallen behind refractive surfaces inside the Refraction RE, but not inside the Caustics one. - If present, the VRaySun's photon emit radius should be set to a value large enough to encompass the relevant parts in the scene.
Optional:
- It is strongly recommended to set time limit when rendering with Progressive Caustics, rather than relying on Noise Threshold value only.
- Lower the Min. Shading Rate.
Photons are cast for each camera ray, not for the secondary ones. The more camera rays are cast, the more photon passes are achieved.
A value of 3 is fine if rendering with the rest of the scene, but a value of 1 could be used if rendering specific caustic passes (for example, a caustics pass scene prepared with the purpose of maximizing caustics' calculation speeds).
- Set a higher min AA subdivs value.
A higher min AA subdivs value (16, 24, even higher.) means there will be a longer phase of fixed sampling with no adaptation to the photon casting, so the screen coverage of samples will remain more consistent, allowing for quicker filling of, for example, big flat areas or long thin lines.
The later phase of rendering, with adaptation, will then just bring noise down to ensure Noise Threshold is respected.
Managing Expectations:
- The progressive caustic solver is fire and forget.
This means that it can be turned on in any scene, and expected to trace photons on any specular or refractive surface.
It doesn't, however, mean that doing so will result in an image converged to perfection within a short time.
The approach, novel as it is, is still photon-map based, and judgement should be used to ensure quick, noise and frustration-free results.
- It renders with the beauty.
The solver does indeed render happily alongside a beauty pass, storing caustics in the appropriate Render Element (see requirements tips above!), but that may not be the best solution as far as performance is concerned.
It's suggested to consider preparing a dedicated caustic rendering pass if the photon tracing is particularly extensive, and/or if sequences are to be rendered.
That way, it will be possible to optimize the caustics calculation separately from the requirements of the beauty pass.
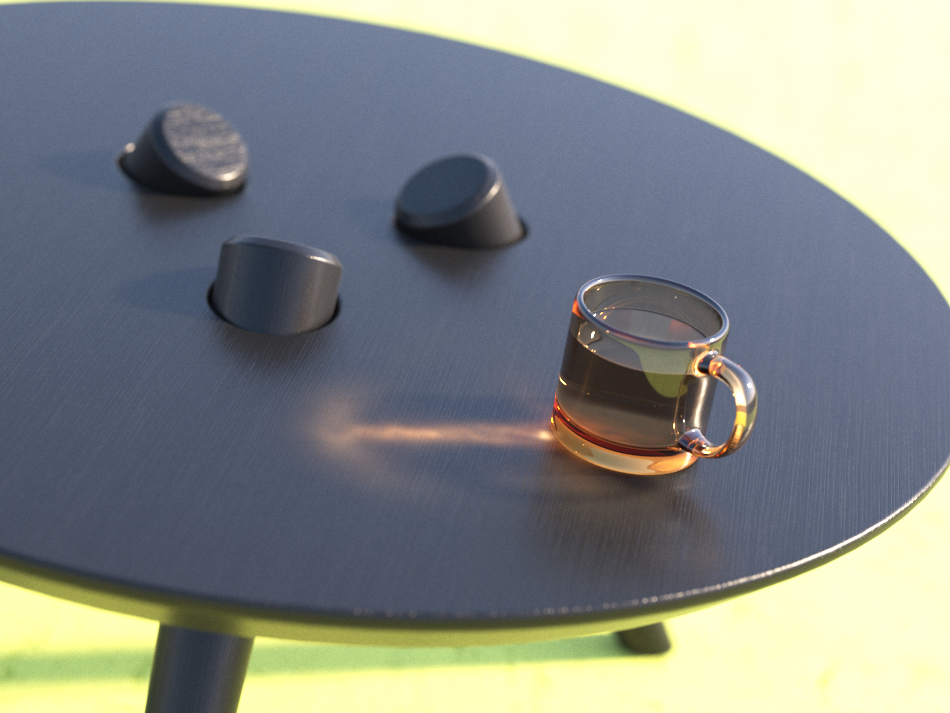
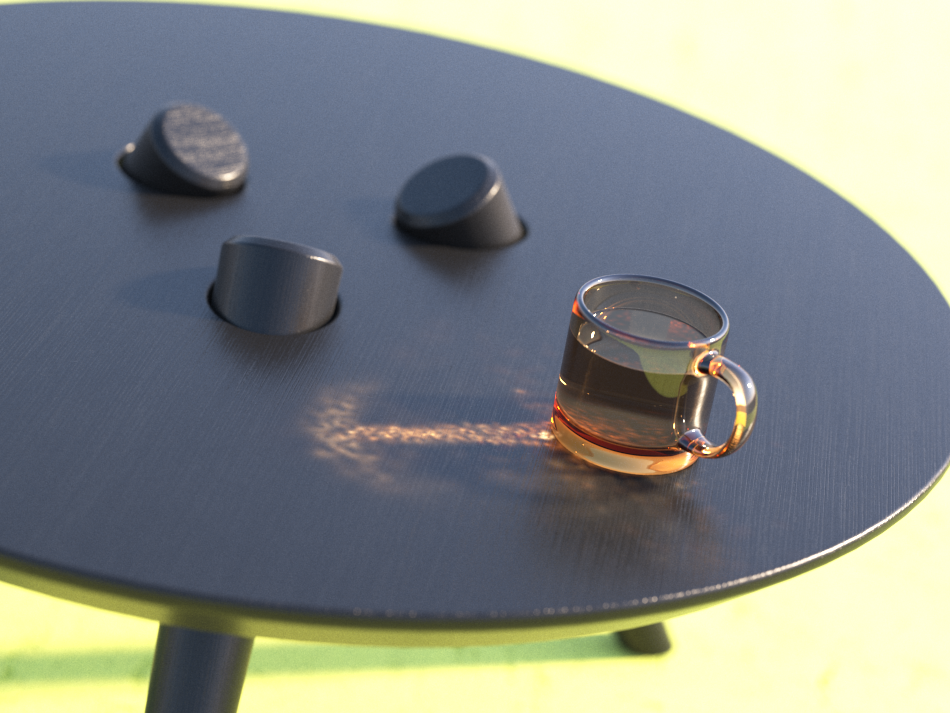
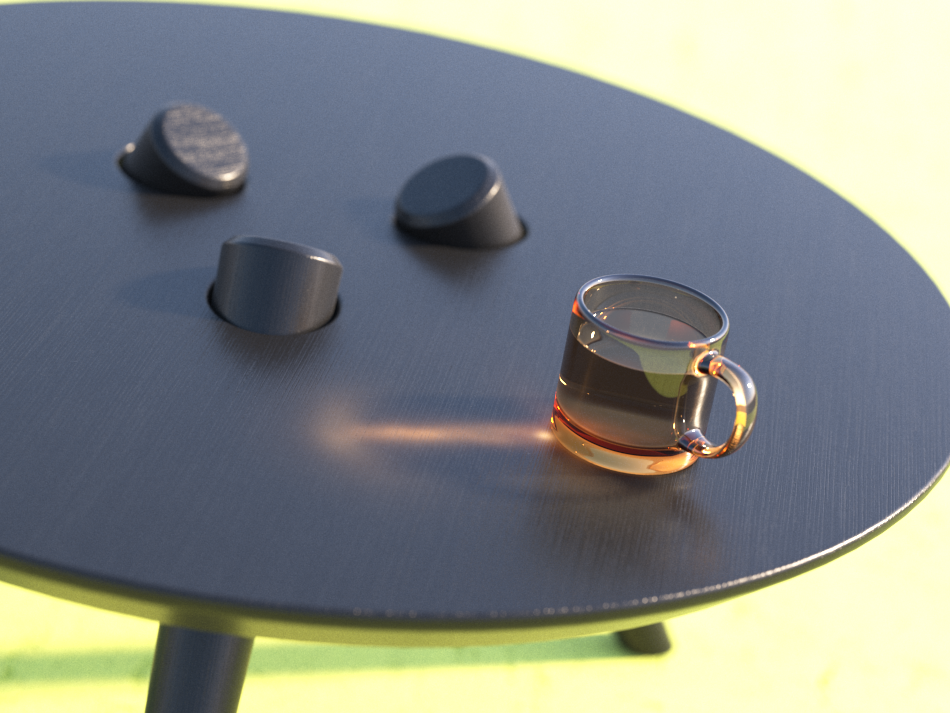
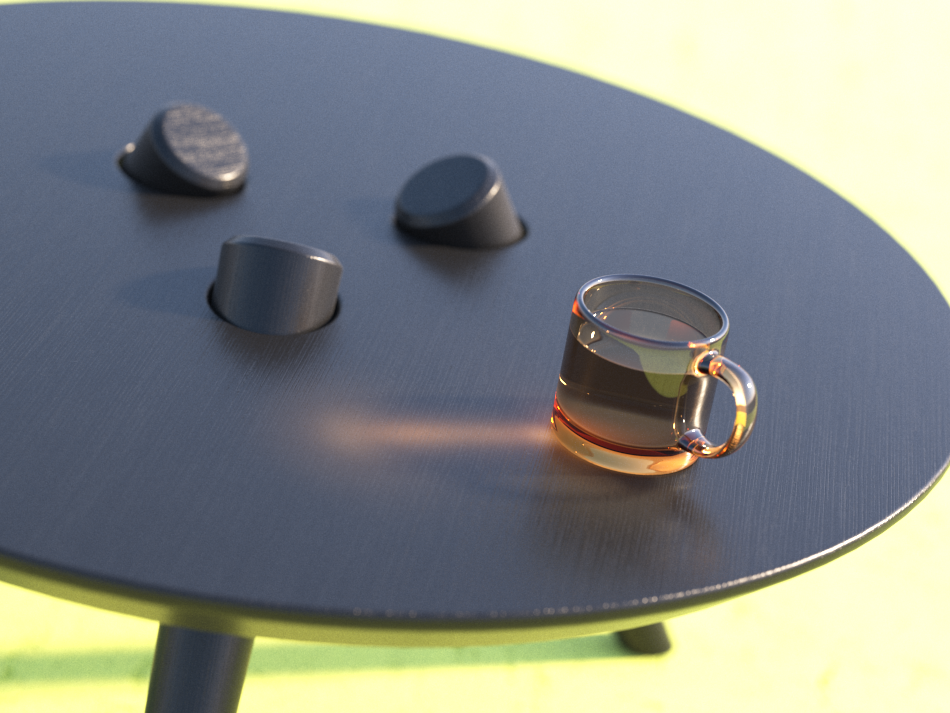
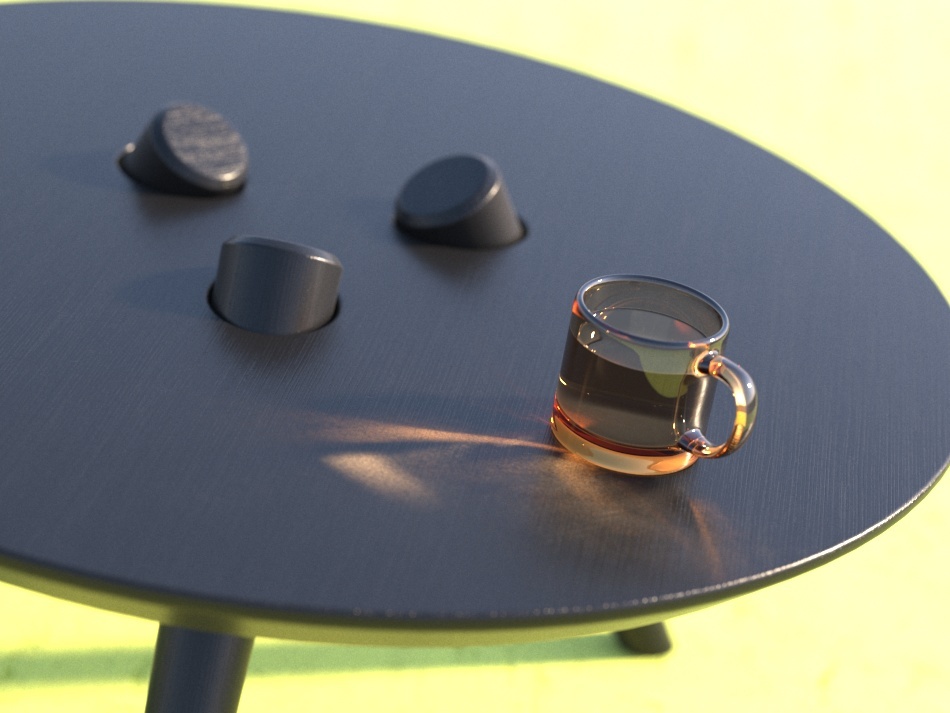
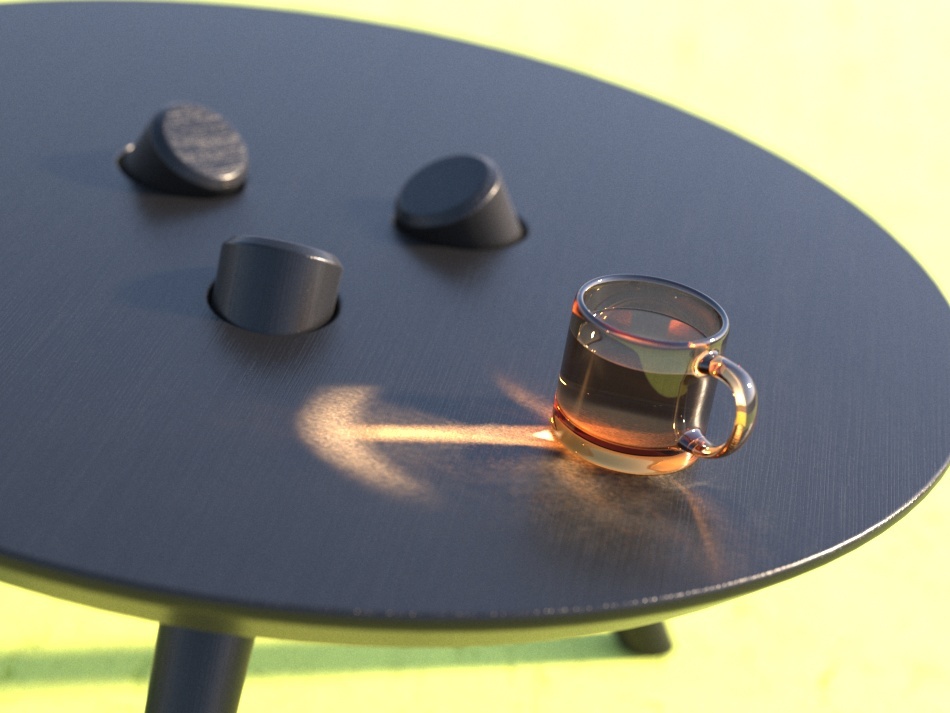
Example: The Search Distance Parameter (Progressive)
For this example, the light used in the scene is V-Ray Sun. The Caustics Mode is set to Progressive. The V-Ray Sun has its Photon emission properties adjusted as so: Caustics Subdivs are set to 1500; the Caustics Multiplier is set to 2 and the Photon Radius is set to 30 cm.

Search Distance is 1
Search Distance is 16

Search Distance is 32
Example: The Search Distance Parameter (Photon Map)
For this image, the light's Caustics Multiplier parameter (||Light|| > Advanced properties rollout > Caustics Multiplier) is set to 80 and the rest of the parameters are at their default values. As seen from the images, the larger Search Distance produces blurrier caustics.

Search Distance = 1.5
Search Distance = 2.5

Search Distance = 5
Example: The Max Photons Parameter
In this example the light's Caustics Multiplier parameter (||Light|| > Advanced properties rollout > Caustics Multiplier) is set to 80 and the rest of the parameters are at their default values. VRaySun is used in this scene. As can be seen, the larger value of the Max photons parameter causes the caustics to appear much smoother.
Max Photons is 10

Max Photons is 60
Max Photons is 100

Max Photons is 200
Max Photons is 300
Example: VRaySun Photon Radius
This example shows how a light's photon radius affects the caustics effect. Here we use a VRaySun to light the scene. The Caustics Multiplier parameter in VRaySun's Advanced parameters rollout is set to 80 and the rest of the parameters are at their default values.
Photon Radius is 5
Photon Radius is 10

Photon Radius is 20

Photon Radius is 40

Photon Radius is 50
Progressive Caustics Advantages
they require nearly no setup;
- each cast photon is more useful than those in traditional Photon Mapping;
- the number of photons castable is only limited by time, not memory;
- they can resolve tiny caustic details, compared to the scene size;
- they can resolve caustic details also when a camera is very zoomed in on them;
- statistics about the photon tracing can be found in the VFB2 stats panel;
Progressive Caustics Limitations
- they require the progressive image sampler;
- the image sampler often requires Min. subdivs values much higher than 1;
- it's non-deterministic, meaning that there could be somewhat unpredictable render times, and also tiny differences in the visual results when rendering the same frame twice;
- currently doesn't work with distributed rendering;
- currently not supported by the GPU engine;
- Depending on the scene, the performance might not scale linearly with the number of threads/cores, resulting in inefficient CPU utilization.
Notes
- Caustics also depend on the individual light settings.
- For accurate caustic calculations, disable the V-Ray Material's Affect Shadows parameter when using caustics. Simultaneous usage of both Caustics and Affects Shadows can be used for artistic purposes but will not produce a physically correct result.