VRayProxy Overview
VRayProxy allows you to import geometry from an external mesh file which can be either VRayMesh or Alembic file. The geometry is not present in the scene during modeling and does not consume any resources. This allows the rendering of scenes with very heavy geometry. At render time, V-Ray will load the actual geometry (instead of the preview) as needed.
The .vrmesh File Format
Meshes are exported to a special .vrmesh (V-Ray Mesh) file format. It contains all the geometric information for a mesh - vertices and face topology as well as texture channels, face material IDs, smoothing groups, normals - in short, everything that is needed to render the mesh. In addition, the mesh is preprocessed and subdivided into chunks for easier access. The file also contains a simplified version of the mesh used for preview purposes in the viewports. More information about the .vrmesh file format is available in the documentation of the V-Ray SDK.
It is important to realize that the mesh is in a "ready to render" format. No further modifications to the mesh are expected. You can't apply modifiers to the mesh, or animate it in any way except if you animate the position/orientation of the proxy object. There is no way to recover the original mesh from a .vrmesh file (this can be done in principle, but is currently not supported). Therefore, if you plan on doing modifications to the mesh, you should keep it in a Softimage file (which may be different from the file that gets rendered in the end).
Exporting a Mesh to a File
Before importing a mesh through a VRayProxy object, you need to create the mesh file first. This can be done either from the Softimage interface (the ExportToVRayMeshOptions menu dialog) or through the script command ExportVRayMesh (for more details see Custom Commands).
ExportToVRayMeshOptions
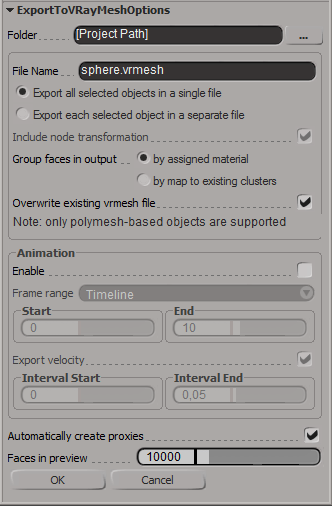 To export a .vrmesh file from the user interface, open the scene where you have the object(s) you'd like to export as VRayProxy objects, select the object(s) and from the File menu choose Export > Export to (.vrmesh). This will bring out the create proxy dialog:
Folder - this is the directory where the mesh file will be created.
File Name - this is the name of the .vrmesh file, if you have selected the Export all selected objects in a single file option. You don't need to specify a path - the Path folder will be used.
Export all selected objects in a single file - this option will take all selected objects and will merge them into one mesh file. This option also stores the transformations of the selected objects. When you import the file with a proxy object, it must be centered at the origin, if you want the objects to be in the same place.
Export each selected object in a separate file - this option will create one file for each selected object. The name of each file is derived from the name of the corresponding Softimage node. The transformation of an object is not included in its mesh file unless specified via Include node transformation option, and the corresponding proxy must have the same transformation as the original object, if it is to appear in the same place. Note that you can use this option even with a single object, which will cause the object pivot to be preserved in the exported .vrmesh file.
Include node transformation - Specifies whether geometry objects transformations should be written into the vrmesh file(s).
Group faces in output - this option allows you to group multiple faces by assigning them an unique material ID. This is useful during shading when different parts of the proxy need to be shaded differently.
- by assigned material - when this option is selected, faces that have the same material will be assigned the same Material ID
- by map to existing clusters - when the faces in the geometry have been previously divided into clusters, this options assigns the same material ID to the faces in each cluster regardless of the material assigned to individual faces.
Overwrite existing vrmesh file - when checked V-Ray will automatically overwrite any existing vrmesh files.
Animation
Enable - if the mesh is animated you can export that animation in the .vrmesh file by enabling this option.
Frame range - allows you to specify the animation interval to be exported
- Timeline - exports all the frames in the animation timeline
- Specify - manually specify the frame range to be exported by using the Start and End parameters
Start - Specifies the start animation frame when Frame range is set to Specify.
End - Specifies the end animation frame when Frame range is set to Specify.
Export velocity - checking this option will export velocity information for the moving objects. This makes it possible to add motion blur to the final animation. However exporting this extra information takes longer. If you are not going to need motion blur it makes sense to disable this option.
Interval start - this options is used when exporting velocity and represents a value between 0.0 and 1.0 with the time position within a frame for the initial vertex positions.
Interval end - this options is used when exporting velocity and represents a value between 0.0 and 1.0 with the time position within a frame for the ending vertex positions.
Automatically create proxies - on successful export this option will replace the original geometry with proxy objects. The proxies will have the correct transformations and materials derived from the original objects.
Faces in preview - allows you to specify how many faces are going to be used to show a preview of the proxy in the viewport.
Importing VRay Proxy
The import of VRay Proxy can be accomplished either from the Softimage interface (the ImportToVRayMeshOptions menu dialog) or through the script command ImportVRayMesh (for more details see Custom Commands). You can import both .vrmesh files and also alembic meshes including animation.
ImportVRayMeshOptions
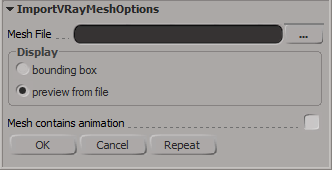
To import a .vrmesh/.abc file as a proxy from the user interface,you need to go to File>Import>Import VRay Proxy... This will bring out the import ImportVRayMeshOptions menu dialog.
Mesh File - specifies the mesh file to be loaded as a proxy
Display - this option controls how the imported mesh is displayed
- bounding box - the proxy is displayed as its bounding box
- preview from file - the information in the mesh file is used to generate a simplified preview of the geometry
Mesh contains animation - this check box allows us to specify whether or not the proxy is animated.
VRayProxyToObject
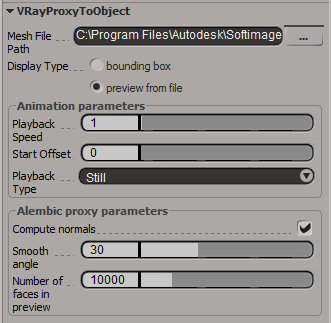
Mesh File Path - this is the source mesh file. One or more frames (animation) can be stored in the file.
Display Type - controls how the V-Ray Proxy will be displayed in the viewport.
- bounding box - when this option is on, the mesh is represented as a box in the viewports.
- preview from file - when this option is enabled the mesh is represented using a low polygonal version of the original geometry
Animation Parameters
Playback speed - this is a multiplier for the speed of the animation. Putting negative numbers here will make the animation play backwards. This option may not work very well for sequences of .vrmesh files.
Start offset - use this parameter to offset the beginning of the animation by the given number of frames. You can use positive as well as negative values here.
Playback type - select a playback mode from the drop down menu.
- Loop - the animation is looped by skipping to the first frame once it has finished
- Play once - the animation is played once;
- Ping-pong - the animation is looped by playing it backwards once the last frame has been reached and then playing it forward again when the first frame is reached;
- Still - the animation is not played. Instead just one frame of the animation is shown. You can select which that frame is with the help of the Start offset parameter.
This option will be ignored if you use a sequence of separate .vrmesh files.
Alembic Proxy Parameters
Compute normals - this option allows you to force smooth normals on the geometry in case they were not originally smoothed.
Smooth angle - when the Compute normals check box is enabled this specifies the angle (in degrees) below which normals will be smoothed.
Number of faces in preview - controls the number of faces which will be used for displaying the mesh in the viewport.
Notes
- If you need to create several proxies linked to the same .vrmesh file, it's better to make them instances - this will save memory since the .vrmesh file will be loaded only once.
- The resulting .vrmesh files can be rendered outside of Softimage - for example, by the standalone version of V-Ray, or V-Ray for Max/Maya.
- You can convert .ply, .obj, .geo and .bin files to .vrmesh files with the help of the ply2vrmesh converter tool.
- The V-Ray SDK has methods for reading and writing of .vrmesh files.