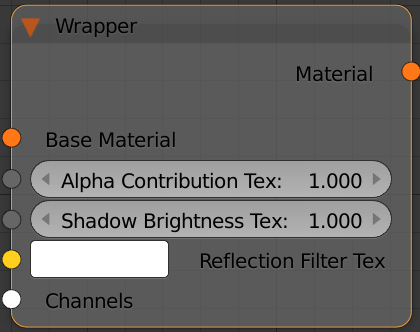
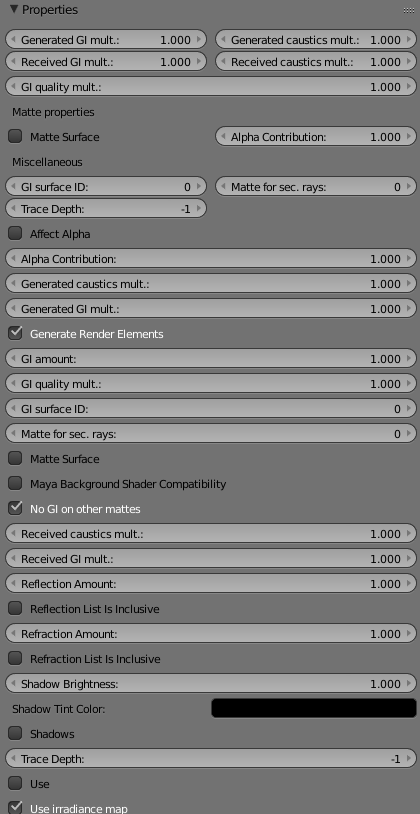
This page provides information on the Wrapper Node in V-Ray for Blender.
Overview
This node can be used to specify additional surface properties per material.
UI Path
||Node Editor|| > Add > Material > Wrapper
Node
Base Material - An input for the surface material.
Alpha contribution - Determines the appearance of the object in the alpha channel of the rendered image. A value of 1.0 means the alpha channel will be derived from the transparency of the base material. A value of 0.0 means the object will not appear in the alpha channel at all and will show the alpha of the objects behind it. A value of -1.0 means that the transparency of the base material will cut out from the alpha of the objects behind. Matte objects are typically given an alpha contribution of -1.0. Note that this option is independent of the Matte surface option (i.e. a surface can have an alpha contribution of -1.0 without being a matte surface).
Shadow Brightness - An optional brightness parameter for the shadows on the matte surface. A value of 0.0 will make the shadows completely invisible, while a value of 1.0 will show the full shadows.
Reflection Filter Tex -
Parameters
Generate GI - A multiplier for the amount GI generated by the material.
Receive GI - A multiplier for the amount GI received by the material.
Generate Caustics - A multiplier for the amount of Caustics generated by the material.
Receive Caustics - A multiplier for the amount Caustics received by the material.
GI Quality Multiplier - A multiplier that allows you to control the GI sampling of the current material. Values bigger than 1 increase the sampling for the particular material while values smaller than 1 decrease it.
Matte surface - Makes the material appear as a matte material, which shows the background, instead of the base material, when viewed directly. Note that the base material is still used for things like GI, caustics, reflections etc.
Alpha contribution - Determines the appearance of the object in the alpha channel of the rendered image. A value of 1.0 means the alpha channel will be derived from the transparency of the base material. A value of 0.0 means the object will not appear in the alpha channel at all and will show the alpha of the objects behind it. A value of -1.0 means that the transparency of the base material will cut out from the alpha of the objects behind. Matte objects are typically given an alpha contribution of -1.0. Note that this option is independent of the Matte surface option (i.e. a surface can have an alpha contribution of -1.0 without being a matte surface).
GI surface ID - This number can be used to prevent the blending of light cache samples across different surfaces. If two objects have different GI surface IDs, the light cache samples of the two objects will not be blended. This can be useful to prevent light leaks between objects of vastly different illumination.
Matte for all secondary rays - Normally the base material will be used when an object with a Wrapper is seen through reflections/refractions. Turn this option on, if you want the VRayMtlWrapper to show the environment when seen through reflections/refractions. V-Ray can also do projection mapping to increase the realism.
Affect alpha - Turn this on to make shadows affect the alpha contribution of the matte surface. Areas in perfect shadow will produce white alpha, while completely unoccluded areas will produce black alpha. Note that GI shadows (from skylight) are also computed, however GI shadows on matte objects are not supported by the photon map and the light map GI engines, when used as primary engines. You can safely use those with matte surfaces as secondary engines.
Generate Render Elements - When enabled V-Ray will generate zDepth, velocity, extra tex and multi matte render element for matte objects. When this check box is disabled V-Ray will not generate any render elements for matte objects
No GI on other mattes - Causes the object to appear as a matte object in reflections, refractions, GI etc for other matte objects. Note that if this is on, refractions for the matte object might not be calculated (the object will appear a matte object to itself and will not be able to "see" the refractions on the other side).
Reflection Amount - Shows the reflections from the base material.
Refraction Amount - Shows the refractions from the base material.
Shadow Tint Color - An optional tint for the shadows on the matte surface.
Shadows - Turn this on to make shadow visible on the matte surface.
Trace Depth - This number controls how many times a ray will be reflected and/or refracted by the material.
When creating a matte object with Wrapper material and using the V-Ray CUDA engine, please note the following:
- Alpha Contribution should be set to -1.0;
- The Matte Surface, Affect Alpha and Shadows options should be enabled.


