
This page provides information on the Lens Effects rollout under the System tab in V-Ray's Render Settings.
Overview
The V-Ray Lens Effects is a render effect plugin used to simulate bloom and glare lens effects by filtering the rendered image with a filter kernel. It uses fast multi-threaded technique to compute the result.
UI Path
||Properties editor|| > Render > System tab > Lens Effects rollout
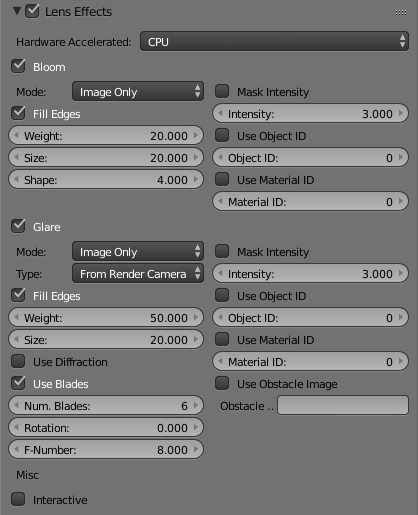
(when Lens Effects is enabled from the System tab)
Parameters
Lens Effects - Enables lens effects.
Bloom Effect
Bloom – Turns on the bloom lens effect.
Mode – Determines if bloom is applied to the RGB image, stored in a separate render element, or both.
Fill edges – Enabling this option adds pixel data outside the edges of the original image. This removes the darkening around the edges.
Weight – Specifies the strength of the interpolation between the filtered image and the original image.
Size – Specifies the size of the filter as percentage of the image's width.
Shape – Specifies the fall off of the filter.
Mask Intensity / Intensity – When enabled, the bloom effect is applied only around pixels that have a value larger than the number specified in the field below.
Use Object ID/ Object ID – When enabled, bloom is applied only to objects with the specified ID.
Use Material ID / Material ID – When enabled, bloom is applied only to materials with the specified ID.
Glare Effect
Glare – Turns on the glare lens effect.
Mode – Determines if the glare effect is applied to the final image, stored into a separate render element, or both.
Type – This parameter specifies how the glare is computed. The possible options are:
From image – Takes the image specified in Glare Image as filter kernel.
From render camera – Takes the necessary parameters from the camera used to perform the rendering and automatically generates the filter kernel.
From camera parameters – Takes the camera parameters specified in the VRayLensEffects render effect itself and automatically generates the filter kernel.
Fill edges – Enabling this option adds pixel data outside the edges of the original image. This removes the darkening around the edges.
Weight – Specifies the strength of the interpolation between the filtered image and the original image.
Size – Specifies the size of the filter as percentage of the image's width.
Use diffraction – This option turns the diffraction on, producing colored patterns in the glare.
Use blades – When enabled, the shape of the glare effect depends on the aperture shape of the camera used. This shape can be controlled with the Num. Blades, Rotation and F-Number parameters below or you can use an image to specify the aperture shape with the Use Obstacle Image parameter.
Num. Blades – Controls whether the camera aperture has any blades and if so how many they are. This effect directly controls the number of "rays" of the glare.
Rotation – Controls the rotation of the of the camera aperture blades.
F-number – The f-number used to calculate the glare. Larger values produce smaller camera aperture and stronger glare effects.
Image Path – Path to the filter kernel. Available if From Image option is selected. You can create filters using the Filter generator tool which comes with the V-Ray's installation.
Use Obstacle Image – Enables the use of an obstacle image, the path to which is specified in the field below. The obstacle image allows you to draw the aperture shape as well as any dirt or scratches on the lens which affects the glare.
Mask Intensity / Intensity – When enabled, the glare effect is applied only around pixels that have a value larger than the number specified in the field below.
Use Object ID / Object ID – When enabled, glare is applied only to objects with the specified ID.
Use Material ID / Material ID – When enabled, glare is applied only to materials with the specified ID.
Misc
Interactive – When enabled, the bloom and glare effects are automatically recalculated and applied to the image each time an option is changed.
Notes
- These options can also be accessed directly from the VFB.