
This page gives an overview and explanation of Indirect Illumination. For direct instructions on using GI in a scene, please see the GI tab page.
Section Contents
Page Contents
Overview
Indirect Illumination is the illumination in a scene that effectively comes from reflected (or bounced) light as opposed to coming directly from a light source. There are a few different approaches for computing indirect light within V-Ray for Blender, however using a combination of Light Cache and Brute Force for interior scenes or Brute Force and Brute Force for exterior scenes is recommended in most circumstances for the Primary and Secondary Bounces respectively.
Indirect Lighting settings are found in the Blender Render Settings window in the GI tab.
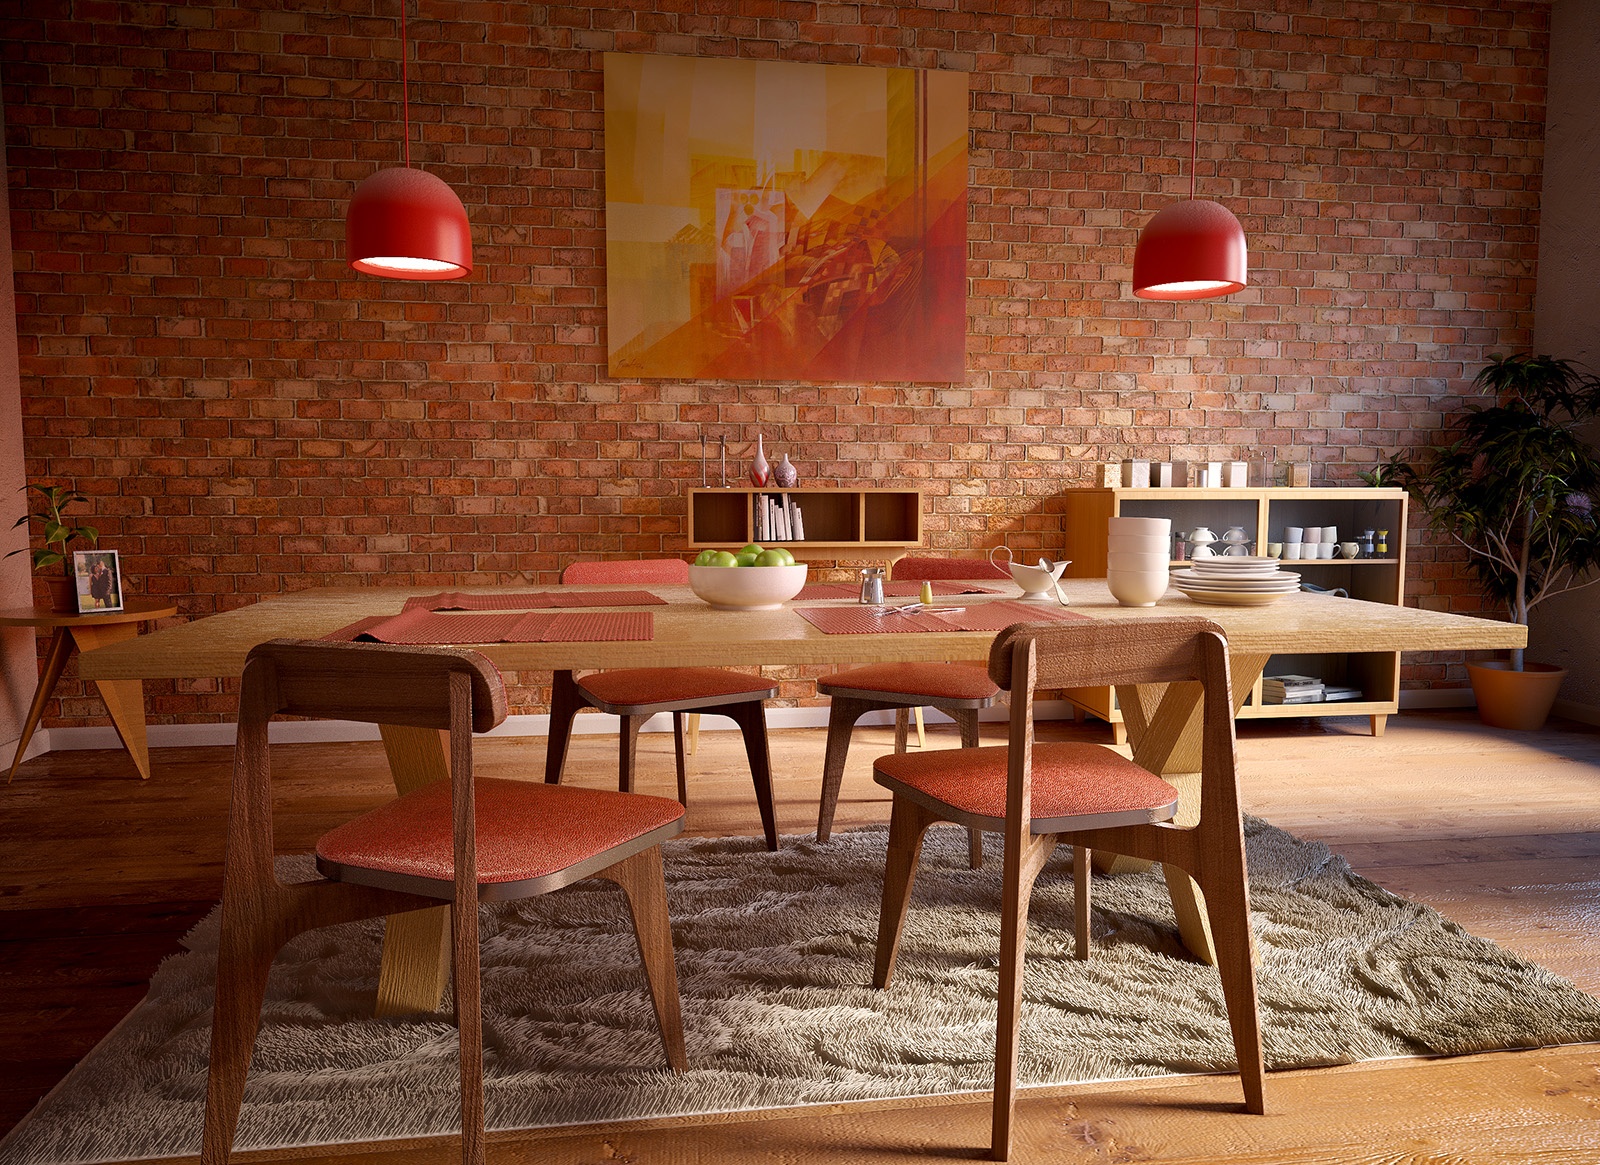
Image courtesy of Spencer Fitch
Primary and Secondary Bounces
The indirect illumination controls in V-Ray are divided into two large sections: controls concerning primary diffuse bounces, and controls concerning secondary diffuse bounces. A primary diffuse bounce occurs when a shaded point is directly visible by the camera, or through specular reflective or refractive surfaces. A secondary bounce occurs when a shaded point is used in GI calculations.
Approaches to Indirect Illumination
V-Ray implements several approaches for computing indirect illumination with different trade-offs between quality and speed:
Brute Force – This is the simplest approach; indirect illumination is computed independently for each shaded surface point by tracing a number of rays in different directions on the hemisphere above that point.
For direct usage information in a scene, click here for Brute Force Settings.
Advantages:
– This approach preserves all the detail (e.g. small and sharp shadows) in the indirect lighting.
– It is free from defects like flickering in animations.
– No additional memory is required.
– Indirect illumination in the case of motion-blurred moving objects is computed correctly.
Disadvantages :
– Might be slow for complex images (e.g. interior lighting).
– It tends to produce noise in the images, which can be avoided only by shooting a larger number of rays, thus slowing it even more.
Light Cache – Light caching (or light mapping) is a technique for approximating the global illumination in a scene. It is very similar to photon mapping, but without many of its limitations. The light map is built by tracing many, many eye paths from the camera. Each of the bounces in the path stores the illumination from the rest of the path in a 3D structure. The light map is a universal GI solution that can be used for both interior or exterior scenes, either directly or as a secondary bounce approximation when used with the Irradiance map or Brute Force GI methods.
For direct usage information in a scene, click here for Light Cache Settings.
Advantages:
– In many cases the light cache can be used as-is for direct visualization of very fast and smooth previews of the lighting in the scene.
Disadvantages:
– The resulting light cache is view-dependent and is generated for a particular position of the camera. However, it generates an approximation for indirectly visible parts of the scene as well. For example, one light cache can approximate all the GI in a closed room.
– The light cache is not adaptive. The irradiance is computed at a fixed resolution set by the user.
– Lighting involving motion-blurred moving objects is not entirely correct, but is very smooth since the light cache blurs GI in time as well (as opposed to the irradiance map, where each sample is computed at a particular instant of time).
– Requires additional memory.
Irradiance Map – This approach is based on irradiance caching; the basic idea is to compute the indirect illumination only at some points in the scene, and interpolate for the rest of the points.
For direct usage information in a scene, click here for Irradiance Map Settings.
Advantages:
– The irradiance map is very fast compared to direct computation, especially for scenes with large flat areas.
– The noise inherent to direct computation is greatly reduced.
– The irradiance map can be saved and re-used to speed up calculations of different views for the same scene and of fly-through animations.
– The irradiance map can also be used to accelerate direct diffuse lighting from area light sources.
Disadvantages:
– Some details in indirect lighting can be lost or blurred due to the interpolation.
– If low settings are used, flickering may occur when rendering animations.
– Requires additional memory.
– The resulting irradiance map is view-dependent.
– Indirect illumination with motion-blurred moving objects is not entirely correct and may lead to noise (although in most cases this is not noticeable).
Photon Map – This approach traces particles starting from light sources and bouncing around the scene. This approach is useful for interior or semi-interior scenes with lots of lights or small windows. This approach usually does not produce good enough results to be used directly; however it can be used as a rough approximation of the lighting in the scene to speed the calculation of GI when used in conjunction with the Brute Force or Irradiance map methods.
For direct usage information in a scene, click here for Photon Map Settings.
Advantages:
– Can produce a rough approximation of the lighting in the scene very quickly.
– The photon map generated by this approach can be saved and re-used to speed up calculation of different views for the same scene and of fly-through animations.
– The photon map generated by this approach is view-independent.
Disadvantages:
– The photon map usually is not suitable for direct visualization of lighting in the scene.
– Usually requires separate setup for each light.
– Requires additional memory.
– In V-Ray's implementation, illumination involving motion-blurred moving objects is not entirely correct (although this is not a problem in most cases).
– The photon map needs actual lights in order to work; it cannot be used to produce indirect illumination caused by environment lights (skylight).
– Not adaptive; irradiance is computed at a fixed resolution set by the user.
Spherical Harmonics – This approach is based on rendering light information, already precomputed in a .vrsh file by the spherical harmonics baking engine. This method is suitable for fly-through animations or animations with a changing environment. It is applicable to open scenes only.
For direct usage information in a scene, click here for Spherical Harmonics Settings.
Advantages:
– This method produces a smooth, noise-free result.
– Spherical harmonics are saved to a file, and thus could be used to speed up the calculations in fly-through animations and animations with a per-frame changing environment.
– This method is view-independent.
Disadvantages:
– This method is not suitable for high frequency lighting.
– This method cannot be used for closed scenes.
– Can sometimes produce unwanted artifacts on closely placed surfaces, due to their coarse subdivision.
– Captures diffuse indirect illumination only.
– Requires additional memory.
The choice of method to use depends on the task at hand. See the examples below.
For more information about the render settings and parameters for GI and Bounce Engines, please see the GI tab page.
Example: Comparisons of Different GI Methods
Here is a scene rendered with different GI algorithms in V-Ray. Combining the different GI engines allows great flexibility in balancing time versus quality of the final image.
 Brute force GI, 4 bounces.
The image is darker because only 4 light bounces are computed.
Notice the grain and the long render time.
Render time: 25m 3.9s
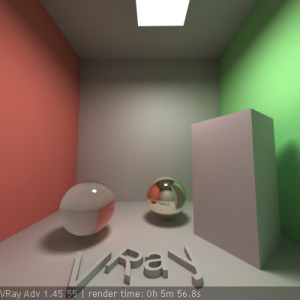 Irradiance map + brute force GI, 4 bounces
The image is darker because only 4 light bounces are computed.
The grain is gone, although the GI is a little blurry.
(see the GI caustics below the glass sphere).
Render time: 5m 56.8s
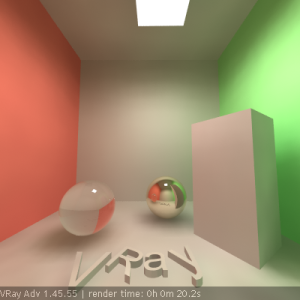 Light cache only
Very fast, but shadows are blurry
( Store direct light for the light map is on).
Render time: 0m 20.2s
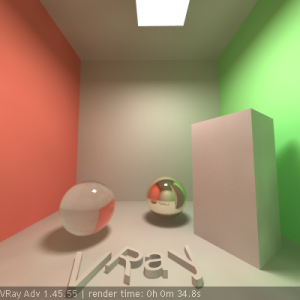 Light cache and direct lighting
( Store direct light is off).
Render time: 0m 34.8s
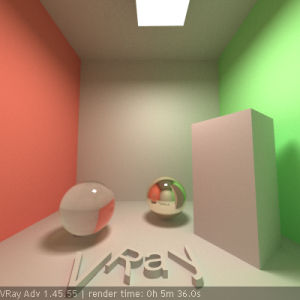 Brute force GI + light cache
There is some grain in the GI but is a lot faster than brute force GI alone.
Render time: 5m 36.0s

Irradiance map + light cache;
probably the best quality/speed ratio.
Render time: 1m 39s
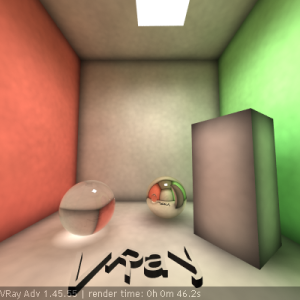
Photon map only
Notice the caustics from the glass sphere, as well as the dark corners.
Render time: 0m 46.2s
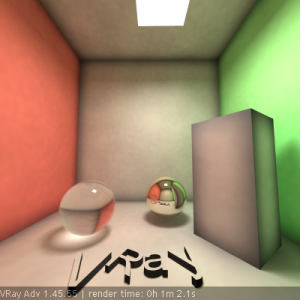 Photon map and direct lighting
Render time: 1m 2.1s
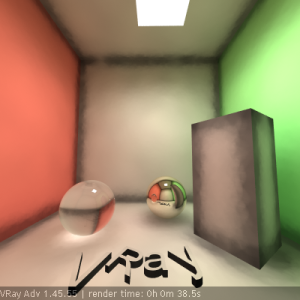 Photon map with precomputed irradiance only
Splotchy, but faster than a raw photon map.
Render time: 0m 38.5s
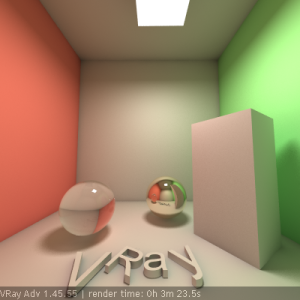 Irradiance map + photon map
Notice the dark corners and incorrect shading on the letters.
Render time: 3m 23.5s
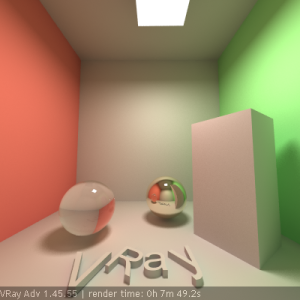 Irradiance map + photon map with retracing of corners
Corners are better although still a little dark.
Render time: 7m 49.2s
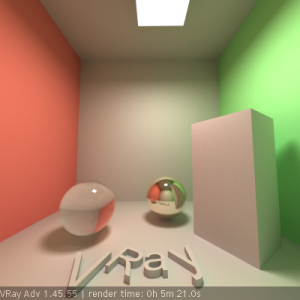 Irradiance map + photon map
with precomputed irradiance, with corner retracing
Render time: 5m 21.0s
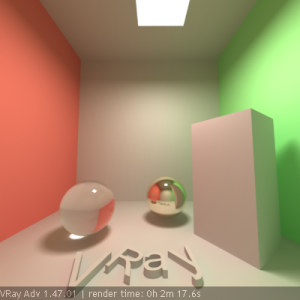 Irradiance map + light cache with GI caustics enabled
Notice the slowdown due to the caustics.
Render time: 2m 17.6s
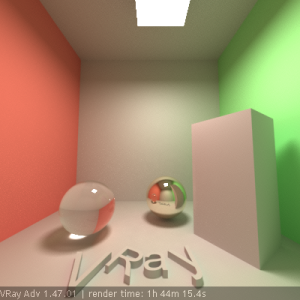 Light cache in Progressive path tracing Mode with photon-mapped caustics
Render time is quite high.
Render time: 1h 44m 15.4s