This page provides information on the import and export of a V-Ray Proxy in Cinema 4D.
Overview
Meshes are exported to a special .vrmesh file format. This file contains all geometric information for a mesh such as vertices and face topology as well as texture channels, face material IDs, smoothing groups, and normals. In short, everything that is needed to render the mesh is included in the file. In addition, the mesh is preprocessed and subdivided into chunks for easier access. The file also contains a simplified version of the mesh used for preview purposes in the viewports.
It is important to note that the mesh is in a "ready-to-render" format. No further modifications to the mesh are expected. You can't change the mesh, or animate it in any way other than animating the position/orientation of the proxy object. There is no way to recover the original mesh from a .vrmesh file (this can be done in principle, but with some limitations). Therefore, if you plan on doing modifications to the mesh, you should keep it in a Cinema 4D file (which may be different from the file that gets rendered in the end).
The proxy import process creates a VRayProxy node, which references geometry from a file on disk. The node can load V-Ray proxy (.vrmesh) and Alembic (.abc) files. After the V-Ray proxy is imported, its parameters are accessible in the V-Ray Proxy Manager.
Before you can import a mesh through a proxy object, you need to save (export) the mesh to file first. This can be done either from the Cinema 4D user interface.
Export V-Ray Proxy
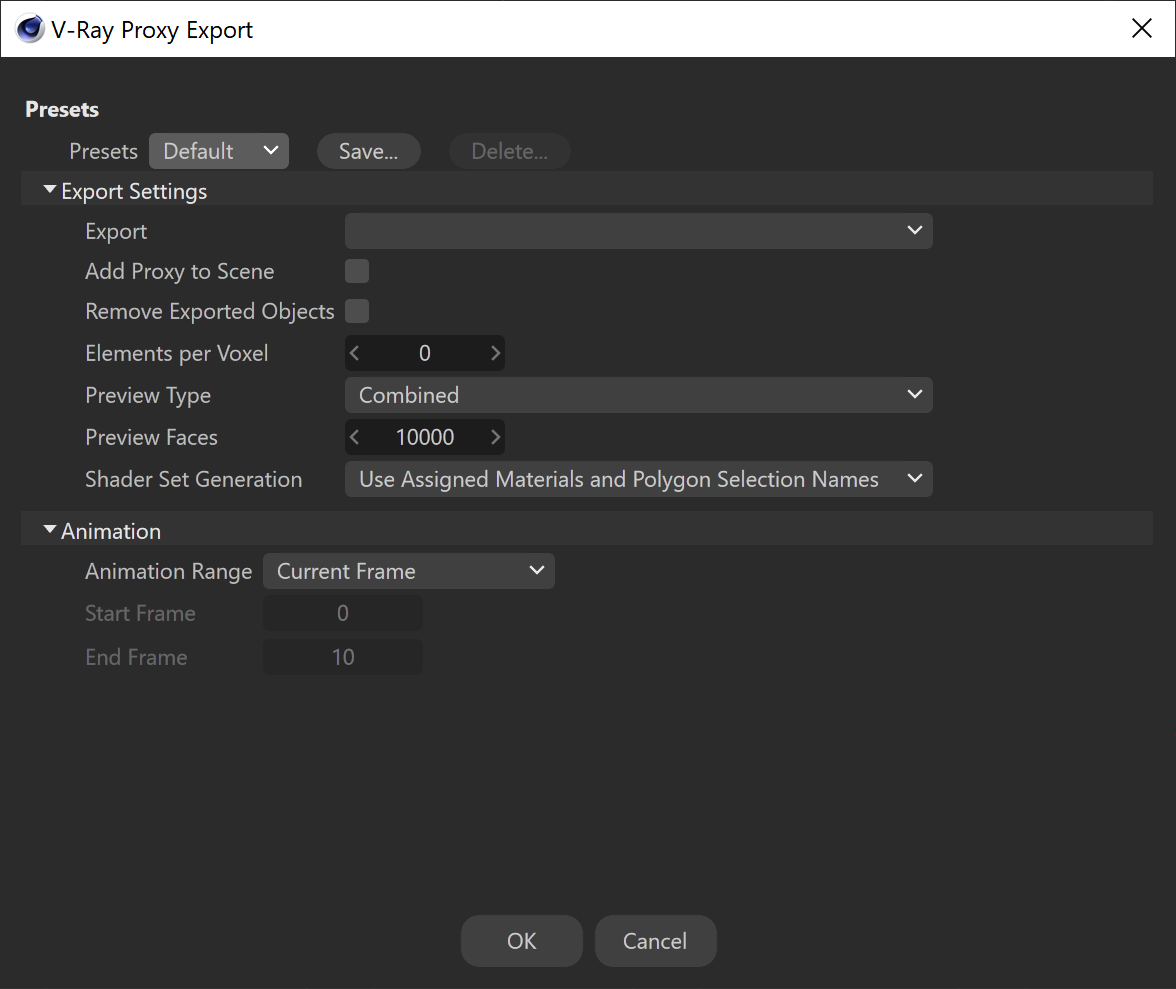
To export a geometry object as a proxy, go to File > Export and select the V-Ray Proxy (*.vrmesh) option.
From the export window select the proper options and press OK. Select the directory and name of the file and save it.
V-Ray Proxy Export Options
Export – Specifies which objects from the scene to be included in the exported proxy.
All Objects
Selected
Selected Including Children
Add Proxy to Scene – When enabled, creates proxy objects for the exported meshes. The proxies have the correct transformations and materials derived from the original objects. The original objects are then deleted.
Remove Exported Objects – When enabled, removes the exported objects from the scene after the export.
Elements per Voxel – Specifies the maximum number of faces in a voxel after voxel subdivision.
Preview Type – Specifies the method for producing a preview mesh from the original geometry.
Face Sampling
Clustering
Edge Collapse
Combined
Preview Faces – Specifies how many faces are going to be used to show a preview of the proxy in the viewport.
Shader Set Generation – Allows saving the material and/or the selection polygon tags and their future replacement with materials.
Use Assigned Materials and Polygon Selection Names – The proxy is exported with both material and polygon selection "Combined Materials and Polygon Selections" tag.
Use Assigned Materials – The proxy is exported with a combined "Materials Only" material tag.
Use Polygon Selection Names – The proxy is exported with a combined "Polygon Selection Only" polygon selection tag.
Animation
Animation Range – Specifies an animation range to be exported to the .vrmesh file.
Current Frame – Exports only the current frame.
Use Render Settings – The Animation Range, is determined by the Output rollout of the Cinema 4D Render Settings.
Custom – The Animation Range is determined by the Start Frame/End Frame options, which can be set manually.
Start Frame/End Frame – Specifies a frame range to export.
Import V-Ray Proxy
To import a proxy, go to the V-Ray menu > Geometry and select V-Ray Proxy.
In the Attributes tab (or alternatively from the V-Ray Proxy Manager), choose the proxy file.
It loads in the viewport. For better control, use the V-Ray Proxy Manager.