The instructions on this page guide you through the process of creating a thin smoke using Chaos Phoenix 4.30.
Overview
This is an Intermediate Level tutorial. Even though no previous knowledge of Phoenix is required to follow along, re-purposing the setup shown here to another shot may require a deeper understanding of the host platform's tools, and some modifications of the simulation settings.
Phoenix 4.30 offers a feature called TexUVW that allows fluids to transport UVW information along with the moving fluid. Before that, mapping the fluid's color or opacity for rendering had the texture maps fixed in one place as the fluid flows through them. In this tutorial, we are going to use this new grid data for controlling the rendering opacity of smoke.
Although Phoenix already provides a Cigarette Smoke Quick Preset, it uses a particle-based method that requires a large number of particles small enough to produce smooth thin smoke. This could require a lot of memory and could be quite slow to simulate if you need to render it in high resolution. In this tutorial, we show you an alternative method. First, we simulate regular smoke (non-particle based) and then use a Noise texture to modulate the opacity of the smoke. In the end, we can have convincing thin, wispy, cigarette-type smoke results.
This simulation requires Phoenix FD 4.30 Nightly Build from 19 January 2021 and V-Ray Next Official Release at the least. You can download nightlies from https://nightlies.chaos.com or get the latest official Phoenix and V-Ray from https://download.chaos.com. If you notice a major difference between the results shown here and the behavior of your setup, please reach us using the Support Form.
The Download button below provides you with an archive containing the start and end scenes.
Units Setup
Scale is crucial for the behavior of any simulation. The real-world size of the Simulator in units is important for the simulation dynamics. Large-scale simulations appear to move more slowly, while mid-to-small scale simulations have lots of vigorous movement. When you create your Simulator, you must check the Grid rollout where the real-world extents of the Simulator are shown. If the size of the Simulator in the scene cannot be changed, you can cheat the solver into working as if the scale is larger or smaller by changing the Scene Scale option in the Grid rollout.
The Phoenix solver is not affected by how you choose to view the Display Unit Scale - it is just a matter of convenience.
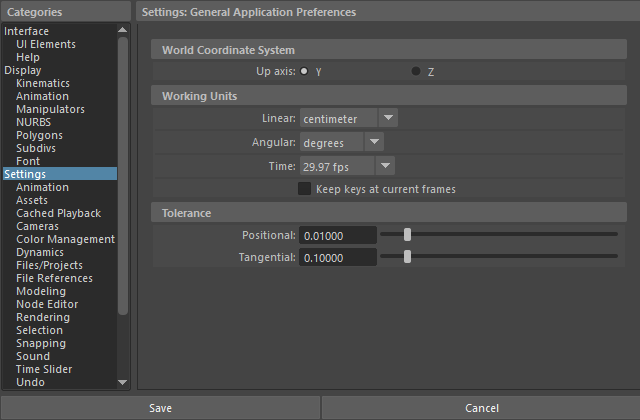
The thin smoke effect we're creating is about 1 meter in height so we choose to view the units as Centimeters.
Go to Windows → Settings and Preferences → Preferences → Settings and set the Working Units to Centimeters.
Scene Layout
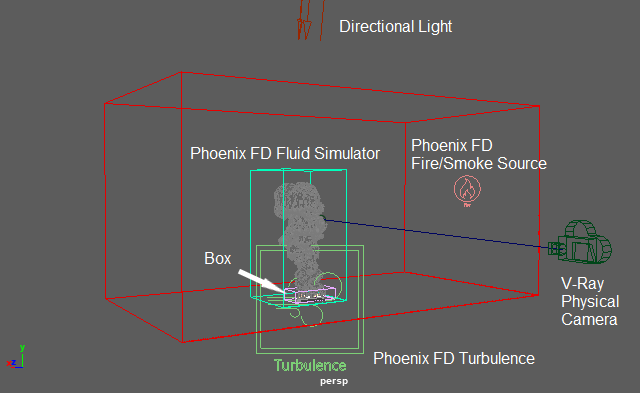
The final scene consists of the following elements:
- A Poly Model → Box used as the smoke source.
- Phoenix Fluid Simulator.
- Phoenix Fire/Smoke Source emitting smoke from the Box geometry.
- Directional Light for lighting.
- V-Ray Physical Camera for rendering.
- Phoenix Turbulence for disturbing the smoke motion.
Scene Setup
Set the Windows → Settings/Preferences → Preferences → Time Slider from 0 to 200 so that the Timeline goes from 0 to 200.

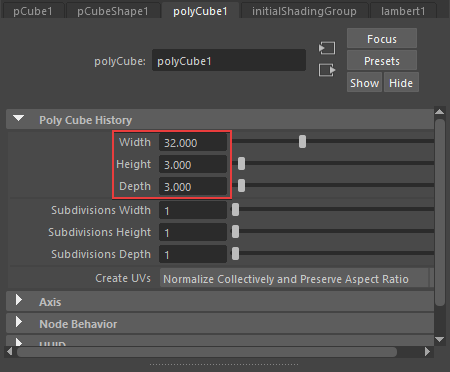
Create a Poly Modeling → Box. The box is used as an emission object for the smoke.
Set its Width / Height / Depth to 32.0 cm / 3.0 cm / 3.0 cm.
Set its Width / Height / Depth Subdivisions to 1.
Position it to (X, Y, Z): (0, 0, 0).
We simulate an effect looking like cigarette smoke. The size of this box is larger than a regular cigarette. We deliberately make it bigger (but not extremely large) because a slightly larger scale simulation is less chaotic and slower moving than the real effect thus creating a better cinematic feel.
The Phoenix Source nodes can use an Emit Material assigned only on those faces which will be used for emission of fluid.
Select the Box geometry and go into Face Selection mode.
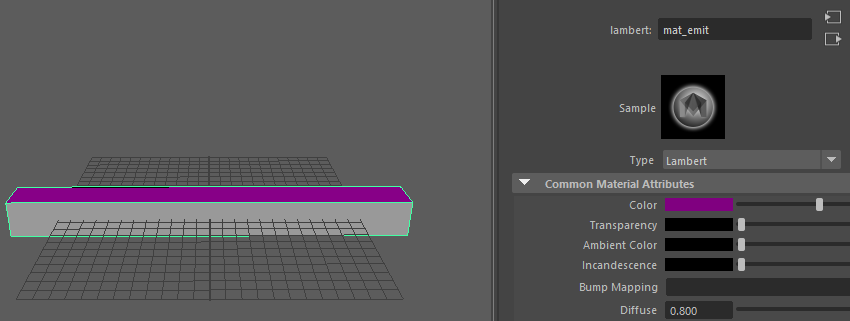
Select only the top faces which will be used for the emission and assign them a new Lambert material. Change its name to mat_emit.
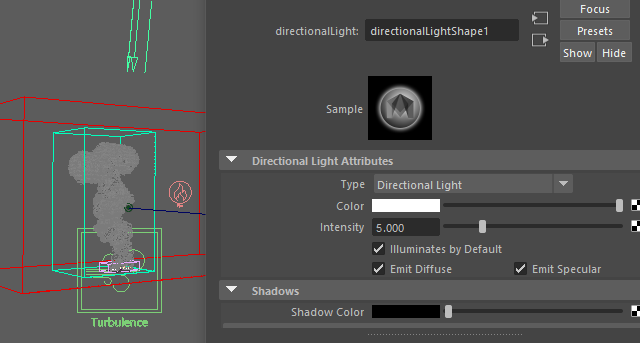
Create Light
Go to Create Panel → Lights → Directional Light in the scene.
Exact position of the light is (X, Y, Z): (0, 300, -41).
Set the Intensity to 5.
To save you some time, both the light and the camera are already included in the "PhoenixFD_Thin_Smoke_Maya_START.ma" file.
Setup a Simulation
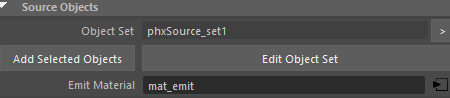
Add a Phoenix FD → Create → Fire/Smoke Source. The Fire/Smoke Source is a Phoenix helper node used to tell the Simulator which objects in the scene will emit, how strong the emission will be, etc.
Add the Box primitive into the Fire Source's Object Set.
The Object Set of the Source is used to specify the geometry in the scene that will be used to emit fluid into the Simulator.
With the Phoenix Source selected add the mat_emit material to the Emit Material slot.
Create a Phoenix Fluid Simulator.
The exact position of the Phoenix Simulator in the scene is (X, Y, Z): (0, 0, 0).
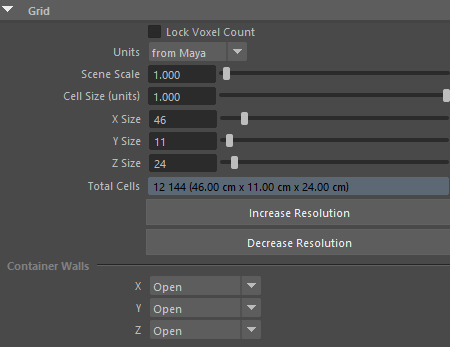
Open the Grid rollout and set the following values:
- Cell Size: 1.0 cm.
- Size (X, Y, Z): (46, 11, 24).
- Container Walls → all Open.
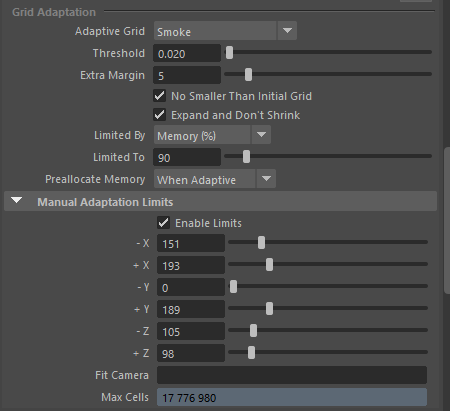
- Adaptive Grid: Smoke.
The Adaptive Grid algorithm allows the bounding box of the simulation to dynamically expand when needed. With a Threshold of 0.02, the Simulator expands when the cells near the walls of the simulation bounding box reach a Smoke value of 0.02 or greater. - Extra Margin: 5.
The Extra Margin option is useful when the Adaptive Grid algorithm is unable to expand fast enough to accommodate quick movement in the simulation (e.g. an explosion). The Extra Margin attempts to remedy this by expanding the grid preemptively with the specified number of voxels on each side. - Enable Expand and Don't Shrink, so the grid does not shrink in case empty space appears near the Simulator borders. This may cause clipping issues for very thin smoke, in our case - below 0.02.
- Enable the Manual Adaptation Limits and set the limits to: X: (151, 193), Y: (0, 189), Z: (105, 98) to save memory and simulation time by limiting the Maximum Size of the simulation grid.
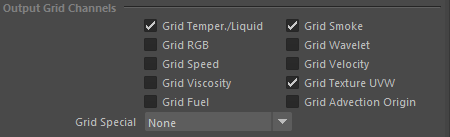
We want to Modulate the Smoke Opacity with Grid Texture UVW, so let's go to the Phoenix Simulator → Output rollout and enable the Texture UVW.
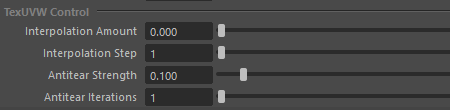
Under the Dynamics rollout of the Simulator, there is a Texture UVW section. Here you have four parameters to control how Phoenix deals with Grid UVW data during simulation. In this special case, we don't need to change anything, so just leave them at their default values.
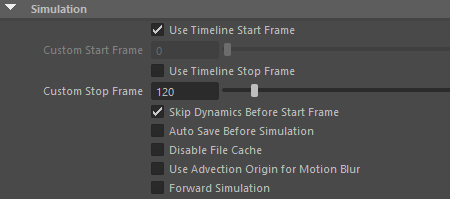
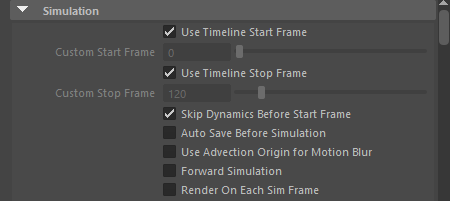
Go to the Phoenix Simulator → Simulation rollout and disable the Use Timeline Stop Frame. Set the Custom Stop Frame to 120. Press the Start button to simulate.
Though the animation length is set to 200, we can use an earlier Stop Frame to save some simulation time while iterating on the simulation setup.
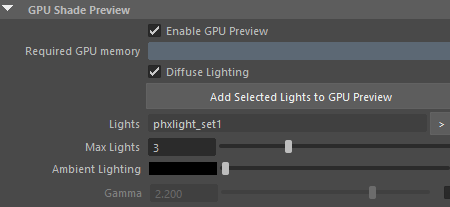
To enable the GPU Preview as seen in the video, select the Phoenix Simulator → Preview rollout → GPU Shade Preview → Enable GPU Preview.
Start the simulation. To the right is a Viewport Preview showing the result of the simulation so far.
As you can see in the preview animation, we have unwanted fire in the smoke.
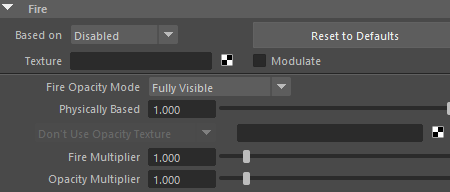
Keep the simulation unchanged. Go to Simulator → Rendering rollout → Fire.
We still need to simulate the Temperature so it would make the smoke rise up, so we don't disable it from the simulation via the Output rollout, but instead just turn it off for rendering.
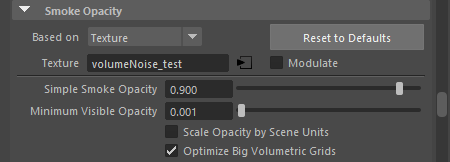
Set the Smoke Color to light gray color (RGB = 245, 245, 245). Also, disable the Scattering.
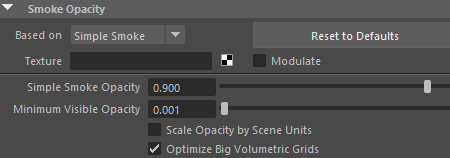
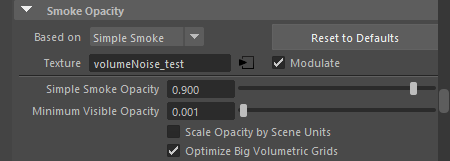
Now the smoke appears too thin, so let's increase the Simple Smoke Opacity to 0.9 (found in the Smoke Opacity rollout).

Without re-running the simulation, here is the Viewport Preview showing the result of the simulation so far.
If you don't see any smoke in the viewport, please make sure you have selected the correct viewport. By default, the Preview rollout's Active View Only option is enabled, so only the selected viewport shows the GPU Preview.
Slow Down the Smoke
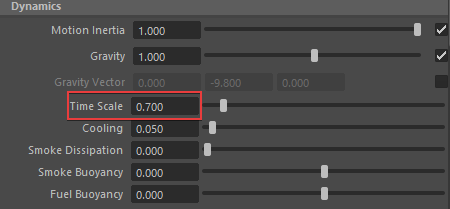
Our final goal for the simulation is a smooth, natural-swirling, cigarette smoke look. So all of the following steps aim at this goal. Now the smoke appears to be running too fast.
To slow it down, change the Time Scale from 1.0 to 0.7.
Here is how the simulation looks so far.
Adding Phoenix Turbulence for Smoke Swirls
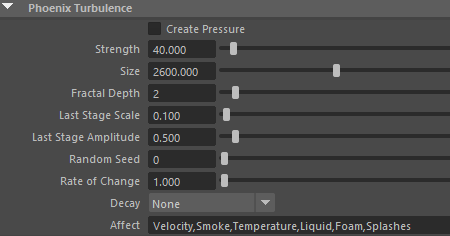
Create Phoenix FD → Create → Turbulence.
Position to (X, Y, Z): (0, 0, 0).
Set the Strength to 40.0 and the Size to 2600.
Reduce the Fractal Depth to 2.
The Turbulence is used to bring more swirls in the smoke. You can use the Preview rollout's Force preview in order to see what velocities the Turbulence adds to the simulation. Note that you have to turn off the GPU preview in order to see the forces.
Then, go to the Phoenix Simulator and run the simulation again.
Here is a Viewport Preview showing the result of the simulation so far.
Smoke Opacity Modulation
To preview exactly how the TexUVW mapping looks like, go to the Simulator → Rendering rollout and click on the Volumetric Options. In the Smoke Opacity rollout change the Based on to Texture.
Plug a Volume Noise Texture in the Texture slot. Change its name to "volumeNoise_test".
You can set up the Volume Noise Texture from scratch, or you can find this texture in the "PhoenixFD_Thin_Smoke_Maya_END.ma" scene file, in the Hypershade. It is called "volumeNoise_test".
Next, go to the Hypershade and select the volumeNoise_test texture.
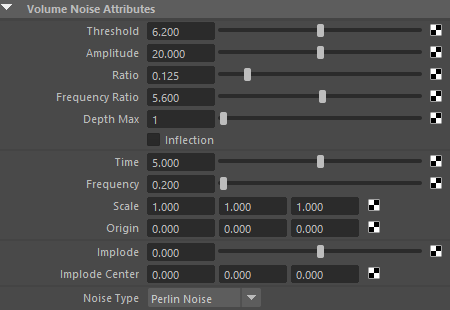
Set the Noise Type to Perlin Noise.
Threshold to 6.2.
Amplitude to 20.0.
Ratio to 0.125.
Frequency Ratio to 5.6.
Depth Max to 1.
Time to 5.0.
Frequency to 0.2.
Then, scroll to the Effects rollout and enable Invert.
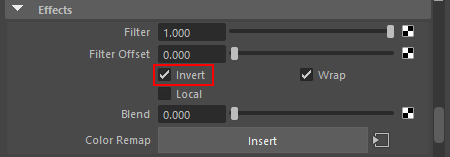
All of these Volume Noise Texture settings are for demonstration purposes, so we can clearly see how the growing smoke distorts the Texture UVW and affects the applied Volume Noise Texture.
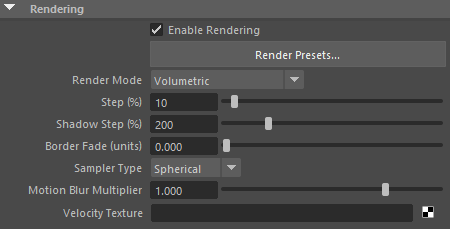
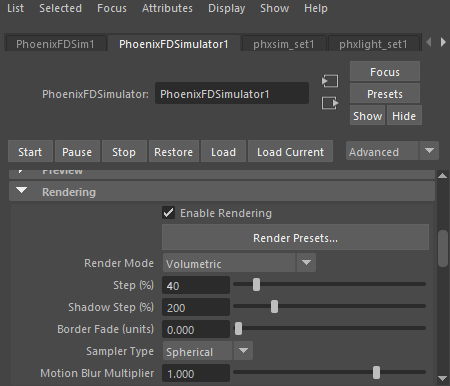
To alleviate grid artifacts during render time, set the Sampler Type to Spherical (found in the Rendering rollout).
Here the Rendering Step % is set to 10. This parameter specifies the ray marching step of the camera rays as a percentage of the cell size. In this step we set the Noise texture to be in contrast, so it tends to render out a noisy image. Because of that, we have to lower the value of Step % to reduce the noise and be able to capture all of the fine details of the smoke. A larger step size skips over some texture details. For a less contrast Noise texture, you can increase the value of Step % to save rendering time.
Smaller Step % could increase render time dramatically. The default value is 90% of the voxel size. You should lower this parameter only if you get unacceptably noisy images.
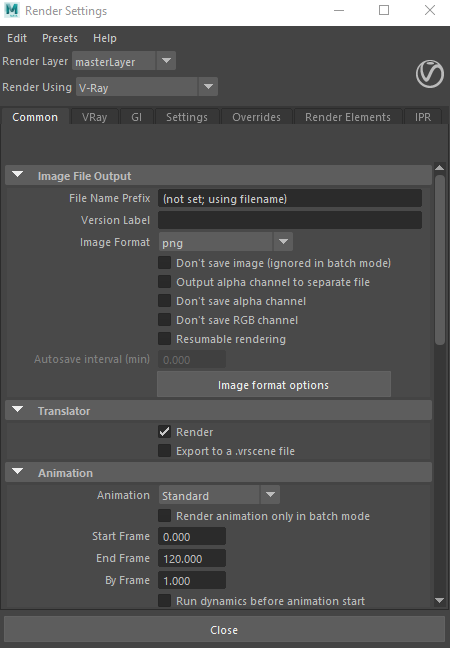
During the scene setup we use V-Ray 5, Hotfix 2 Official Release.
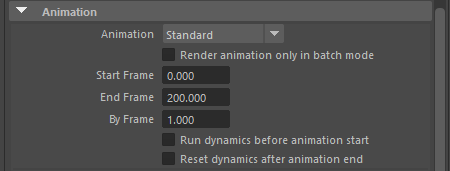
Set the Animation from 0 to 120. Press the Render button to render the animation.
Here's a rendered animation so far.
Notice how the cloudy texture is stretched horizontally - the noise spots in it are wide and thin. This is because the initial Simulator size at frame 0 (before the Adaptive Grid starts expanding) is a wide box, and the Volume Noise is stretched over it.
Note how the uniformly scattered white spots ("islands") get dragged as the smoke is floating up and are stretched into thin wisps. This effect is the product of fluid advection. This is a part of the look of the effect we are aiming at.
Now, let's Modulate the Smoke Opacity.
Set the Smoke Opacity to be Based on Simple Smoke.
Enable the Modulate option.
Keep the Volume Noise texture that we used in the previous step and change the following settings:
Threshold to 6.0.
Ratio to 0.5.
Depth Max to 2.
Time to 1.0.
Frequency to 0.3.
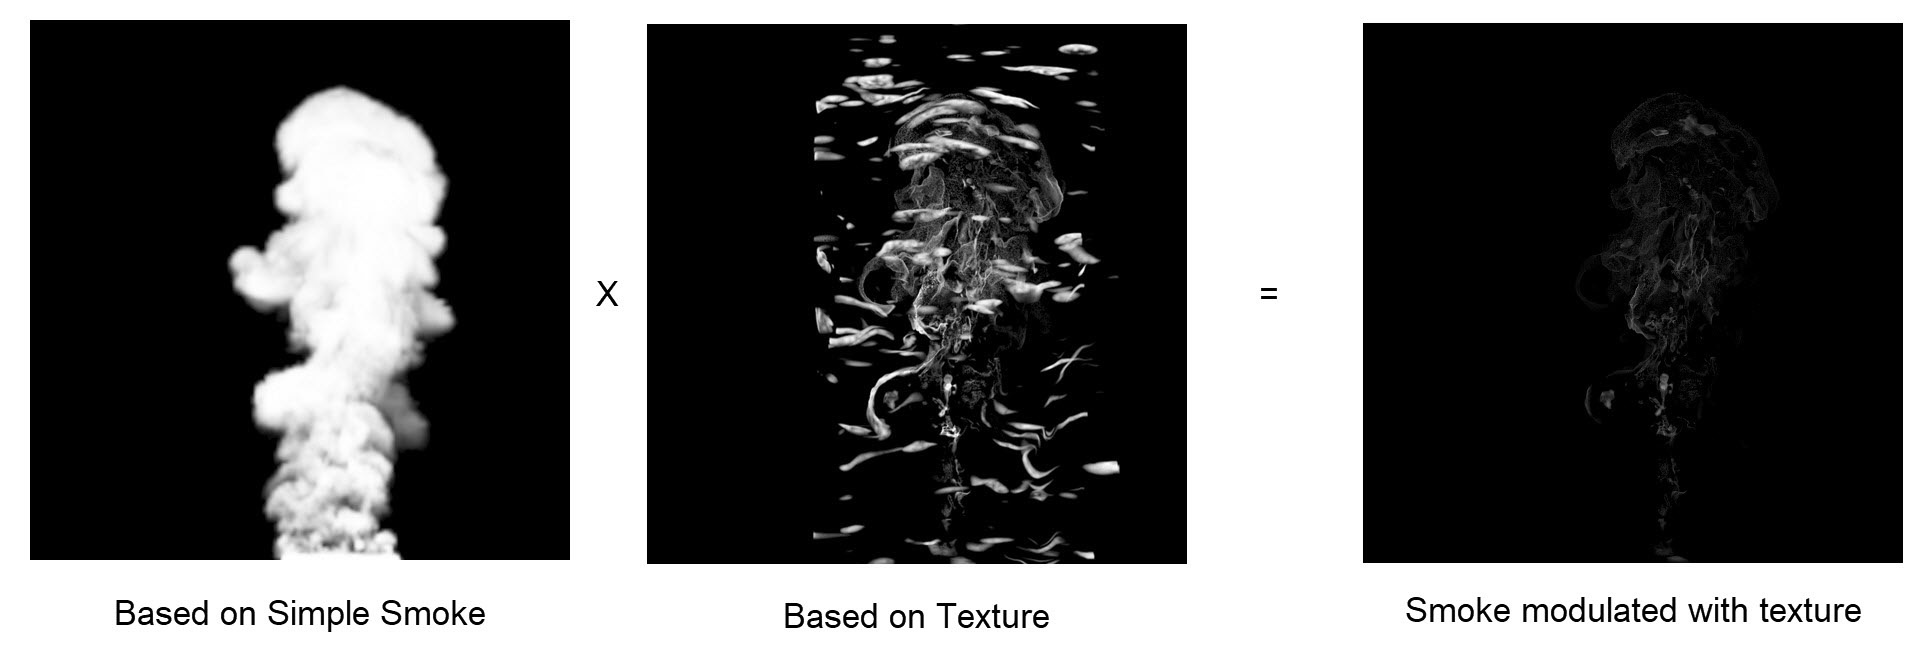
The images illustrate what the Modulation does when you modulate smoke with a Volume Noise Texture. On the left, we have smoke's opacity Based on Simple Smoke channel data. When Modulate option is enabled, and there is a Volume Noise Texture in the Texture slot, it multiplies the Noise texture to create the final image on the right. You can think of it as if we are using a mask over the Volume Noise Texture in order to keep only the "islands" inside the smoke volume and remove the ones which are outside the simulated smoke. This is how you get this wispy smoke result. The key is having most of the Volume Noise Texture black and keeping only these high contrast spots in it, which are dragged along and stretched by the fluid.
Here is a Viewport Preview showing the result of the simulation so far. You can see that currently there is an issue in the video. Some smoke areas are appearing out of nothing during the animation. This is because as the fluid travels through space, it meets new "islands" of opacity and starts dragging them along, which makes parts of the fluid suddenly appear.
Now you understand how this technique works and its possible side effects.
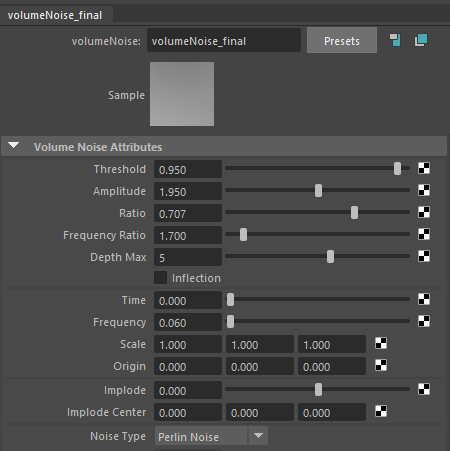
Let's adjust the final Volume Noise Texture for the Texture slot of the Smoke Opacity. The settings for the texture are now optimized in order to minimize the unnatural look of suddenly appearing/disappearing islands of smoke.
Plug a Volume Noise Texture in the Texture slot. Change its name to "volumeNoise_final".
You can set up the Volume Noise Texture from scratch or you can find this texture in the "PhoenixFD_Thin_Smoke_Maya_END.ma" scene file, in the Hypershade. It is called "volumeNoise_final".
As shown, set the Noise Type to Perlin Noise.
Threshold to 0.95.
Amplitude to 1.95.
Ratio to 0.707.
Frequency Ratio to 1.700.
Depth Max to 5.
Time to 0.0.
Frequency to 0.06.
We increase Rendering Step % from 10 to 40 because the Volume Noise Texture we used here does not need such a small render step in order to capture the detail.
Here is a rendered animation of the simulation so far.
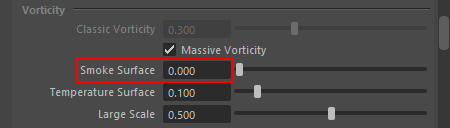
The smoke looks quite choppy, but we are going for a smoother look. The noise in the smoke is caused by the Vorticity parameters in the Dynamics rollout of the Simulator. We can resolve this by reducing the Smoke Surface Vorticity to 0.
Go to the Fire/Smoke Simulator and run the simulation again.
Now we have smoother simulation results.
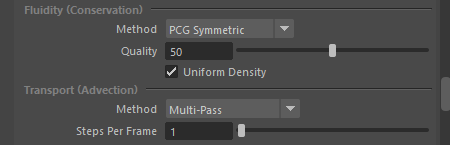
To achieve a better swirling motion in the simulation, we can change the conservation mode and increase the Conservation Quality parameter under the Dynamics rollout. Set the Conservation Mode to PCG Symmetric, Quality to 50.
The PCG Symmetric conservation mode is ideal for smoke simulations or explosions because it tends to produce strong conservation which needs less conservation quality in order to look realistic. This method is also used for the Cigarette Smoke quick preset. So we choose this mode.
Go to the Fire/Smoke Simulator, and run the simulation again.
Beware that increasing the Quality would make the simulation take longer time. You can adjust the value depending on your preferences.
Here is an animation showing what we've achieved so far. You can see the better swirling and rolling of the smoke. The behavior is now more like that of a thin smoke.
Bullet-time effect
Now, in order to make our animation more interesting, we can animate the Time Scale. This section of the tutorial is optional – you may skip to the Rendering section below.
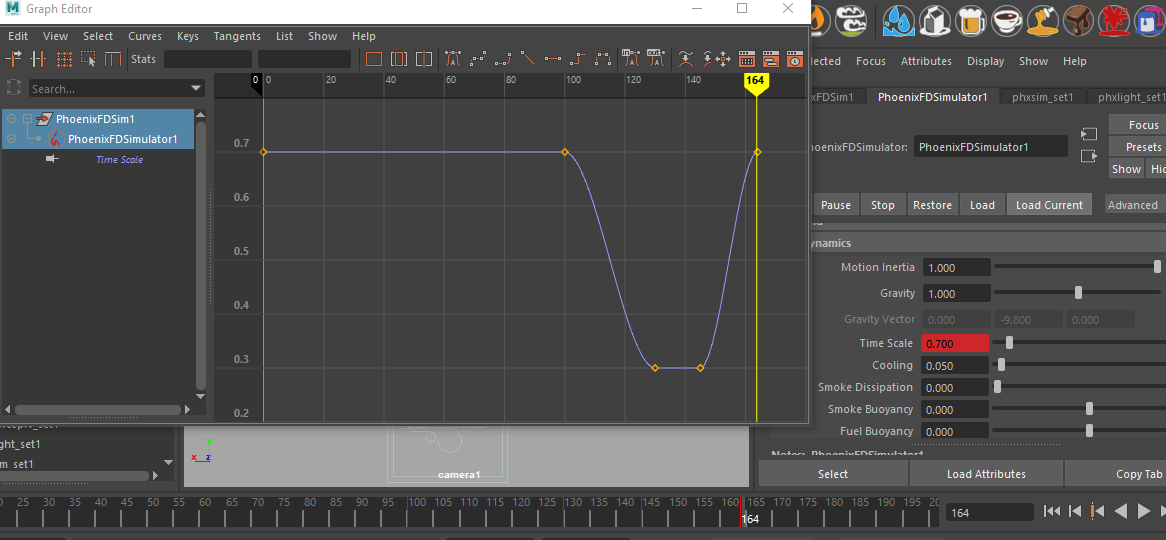
To create the bullet-time effect, open the Dynamics rollout of the Phoenix Simulator and animate the Time Scale parameter as follows:
Frame 0: 0.7
Frame 100: 0.7
Frame 130: 0.3
Frame 145: 0.3
Frame 164: 0.7
The Time Scale is a global multiplier for the dynamics of the Simulator. Reducing it uniformly scales down all sources of velocity in the simulation.
Final Simulation / Rendering
Now we are ready for the final simulation. Go to the Phoenix Simulator → Simulation rollout and enable the Use Timeline Stop Frame. Press the Start button to run the simulation.
Now that our simulation is ready, let's render the full sequence from frame 0 to 200.
And this is our final animation.
The Cigarette Smoke Quick Preset
We have already finished this tutorial. But since Phoenix comes with a Cigarette Smoke Quick Preset, let's see the same settings as shown in this tutorial but using the Quick Preset.
The Cigarette Smoke Quick Preset is a particle-based method, which emits a large amount of particles from Fire/Smoke source and renders with the help of the Particle Shader. Because of the nature of this method, you need lots of particles in the scene. Furthermore, the particle size has to be small enough to alleviate grainy look. See the rendered clip of the Cigarette Smoke Quick Preset simulation.
You can find the finished Particle-based scene in the Downloadable project file "PhoenixFD_Thin_Smoke_Particle_Maya_END.ma".

Here we summarized the pros and cons of the two methods.
The technique we demonstrate in this tutorial creates softer and smoother results. The simulation and rendering are very fast compared to the particle-based ones. However, you can get more accurate results when using the Cigarette Smoke Quick Preset.
Feel free to use whichever method suits you best for a project.
Cigarette Smoke Quick Preset | |
|---|---|
Texture UVW Based | Particle Based |
Very smooth results even with low grid resolution | Requires tons of small particles for smoother results, otherwise looks grainy |
Soft but less accurate | Sharp and accurate |
Fast simulation | Takes more time for simulation |
Fast rendering | Slower rendering |
Requires Grid Texture UVW channel data | Emitting particles is necessary |
| Once the simulation is set up, only the Noise texture can be adjusted without simulating again | Most changes in the look of the effect require simulating again |