This page provides a tutorial on using the Phoenix Particle Texture to shade a particle simulation with Chaos Phoenix in Maya.
Overview
This is an Intermediate Level tutorial. Even though no previous knowledge of Phoenix is required to follow along, re-purposing the setup shown here to another shot may require a deeper understanding of the host platform's tools, and some modifications of the simulation settings.
Requires Phoenix FD 3.11.00 Official Release and V-Ray Next Official Release for Maya 2015.
In order to get proper results with Phoenix 4, make sure to use Phoenix 4.41.02 Nightly build from 12 Feb 2022 Build ID 31255 or newer. You can download nightlies from https://nightlies.chaos.com or get the latest official Phoenix and V-Ray from https://download.chaos.com. If you notice a major difference between the results shown here and the behavior of your setup, please reach us using the Support Form.
The instructions on this page guide you through the process of using the Phoenix Particle Texture to shade a particle simulation with Phoenix in Maya.
The Download button below provides you with an archive containing the scene file.
Units Setup
Scale is crucial for the behavior of any simulation. The real-world size of the Simulator in units is important for the simulation dynamics. Large-scale simulations appear to move more slowly, while mid-to-small scale simulations have lots of vigorous movement. When you create your Simulator, you must check the Grid rollout where the real-world extents of the Simulator are shown. If the size of the Simulator in the scene cannot be changed, you can cheat the solver into working as if the scale is larger or smaller by changing the Scene Scale option in the Grid rollout.
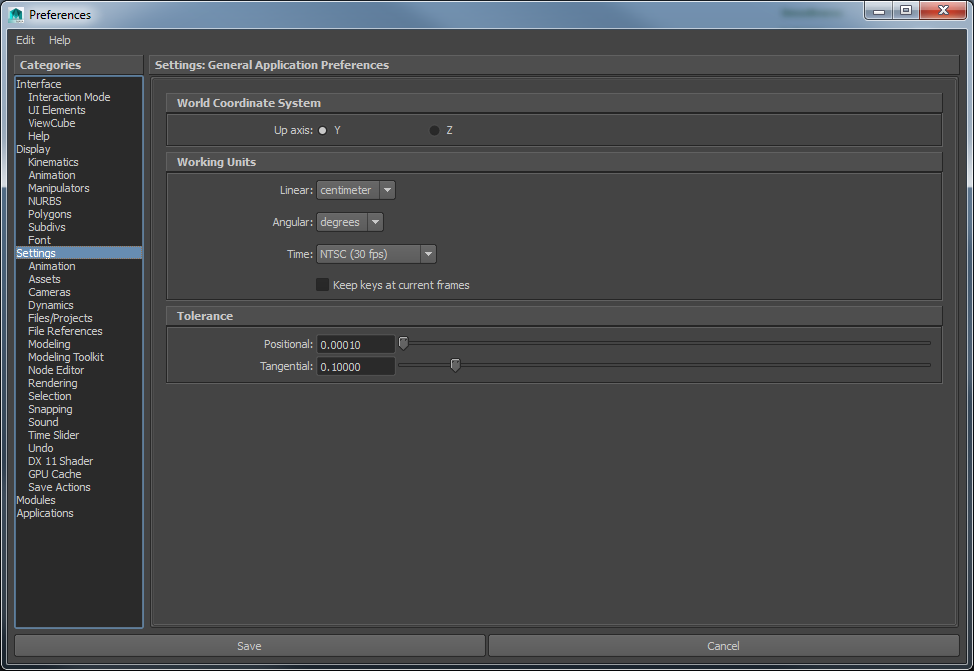
Go to Window -> Settings and Preferences -> Preferences.
On the Settings tab, set the Working Units to centimeter.
Maya defaults to 24 frames per second.
Note that the Time is set to NTSC (30 fps) in this example.
This is done for the sake of consistency with the 3ds Max version of this tutorial (3ds Max defaults to 30 fps).
Scene Layout
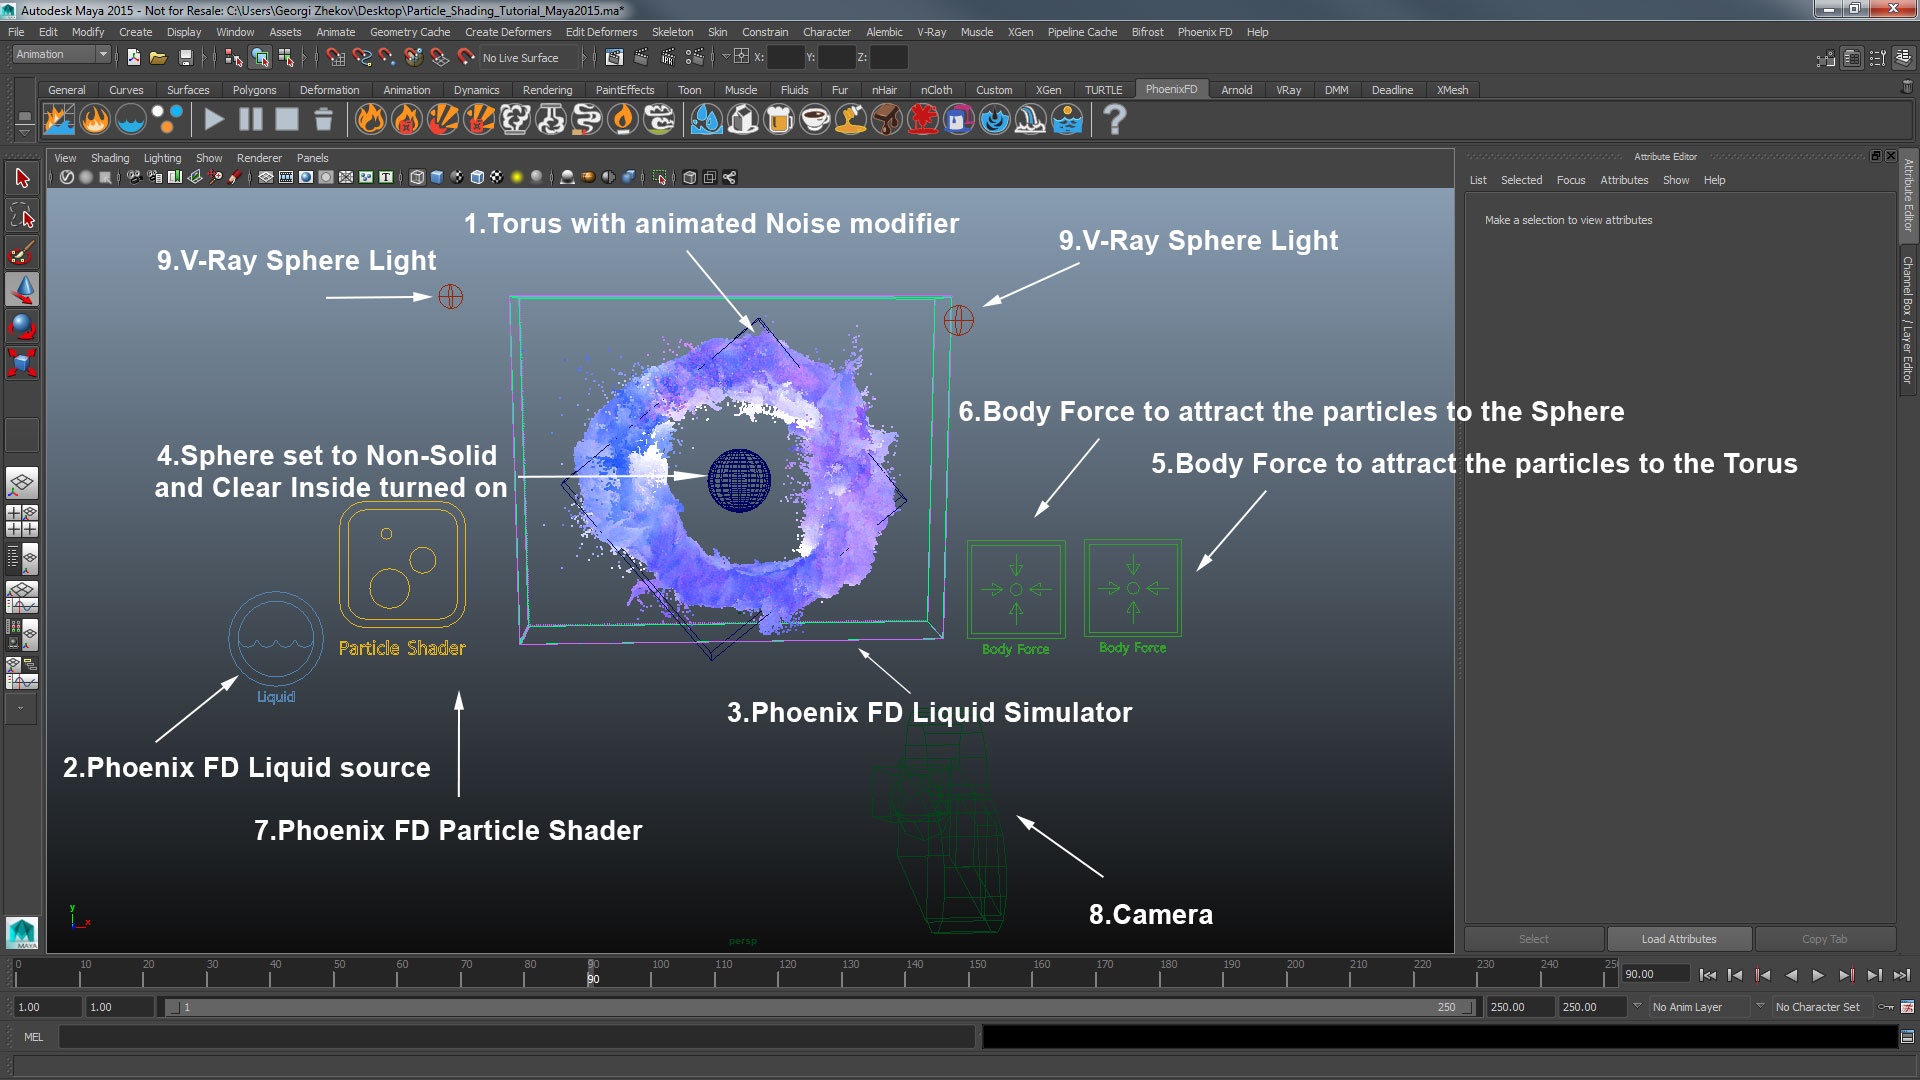
The final scene consists of the following elements:
- A Torus used as the source geometry for Liquid particles. An animated Noise modifier is applied to the torus to break-up the motion of the liquid and produce interesting swirls.
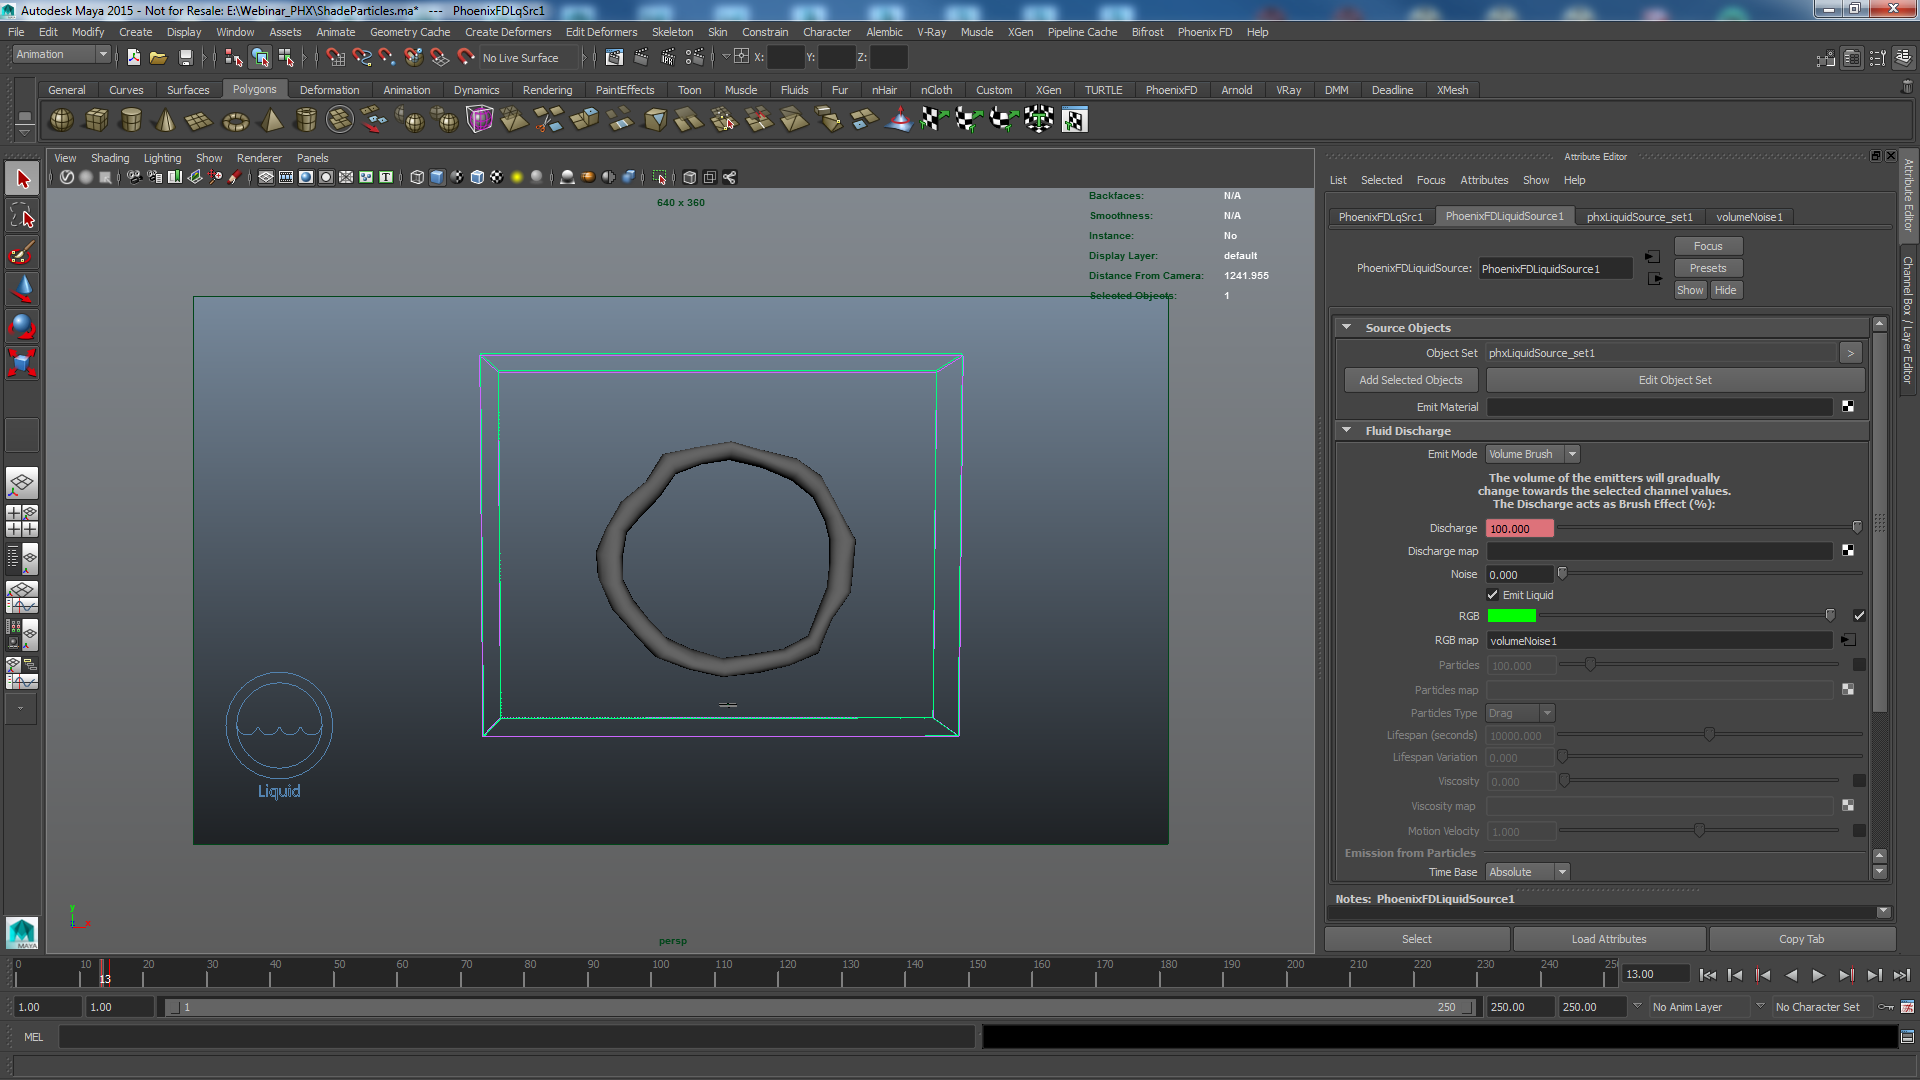
- A Phoenix Liquid Source with the Torus in its Emitter Nodes list. The Source is in Volume Brush mode and is animated from 100% at frame 13 to 0% at frame 14.
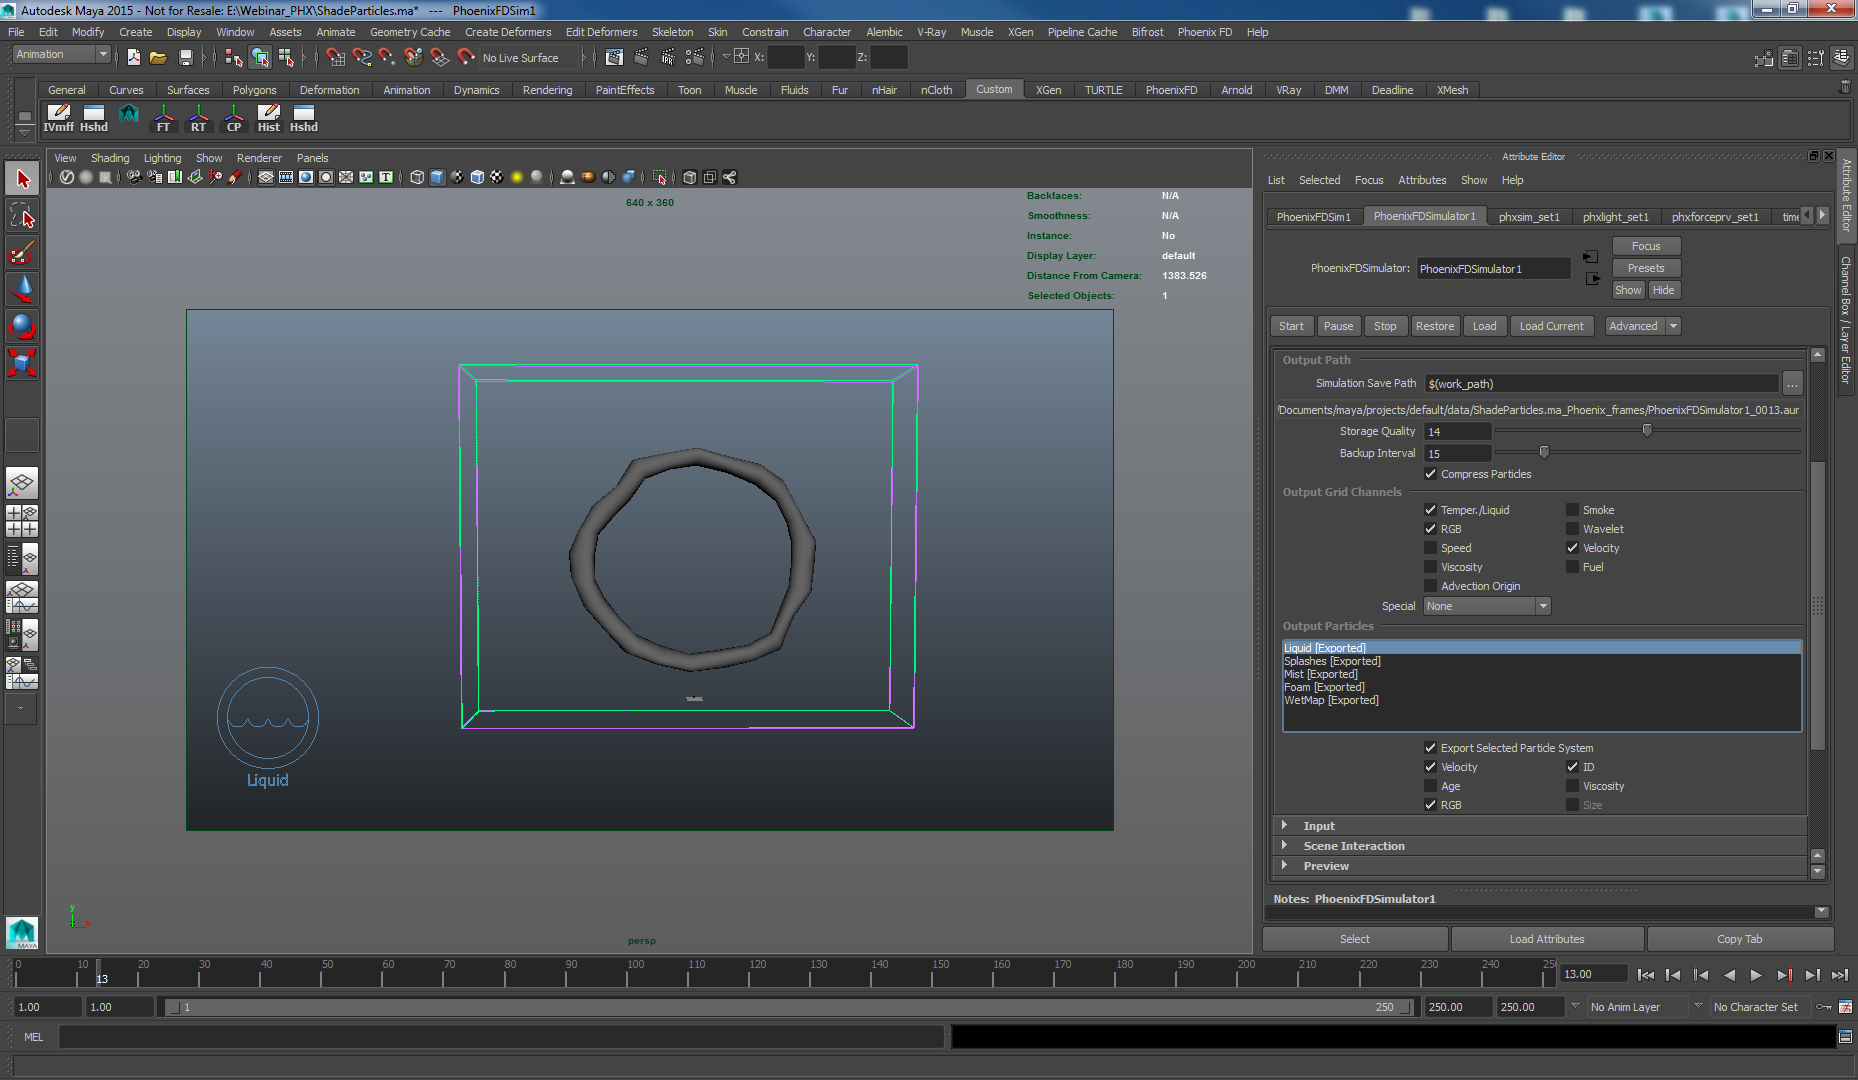
- A Phoenix Simulator with some tweaks in the Grid and Dynamics rollouts.
- A Sphere set to Non-solid object from the Phoenix FD Properties and with Clear Inside turned on in order to delete all the particles that get inside of its volume.
- A Phoenix Body Force used to attract the liquid particles to the Torus. The Strength is animated from 300 at frame 140 to 100 at frame 145.
- A Phoenix Body Force to attract the liquid particles to the Sphere. The Strength is animated from 0 at frame 140 to 800 at frame 145.
- A Phoenix Particle Shader used to render the liquid particles.
- Camera.
- V-Ray Sphere Lights for lighting the scene.
Scene Setup
Set the End Time for the Playback and Animation ranges to 250 so that the Timeslider goes from 0 to 250.
Go to Preferences > Settings and set the Time to (NTSC) 30 fps.
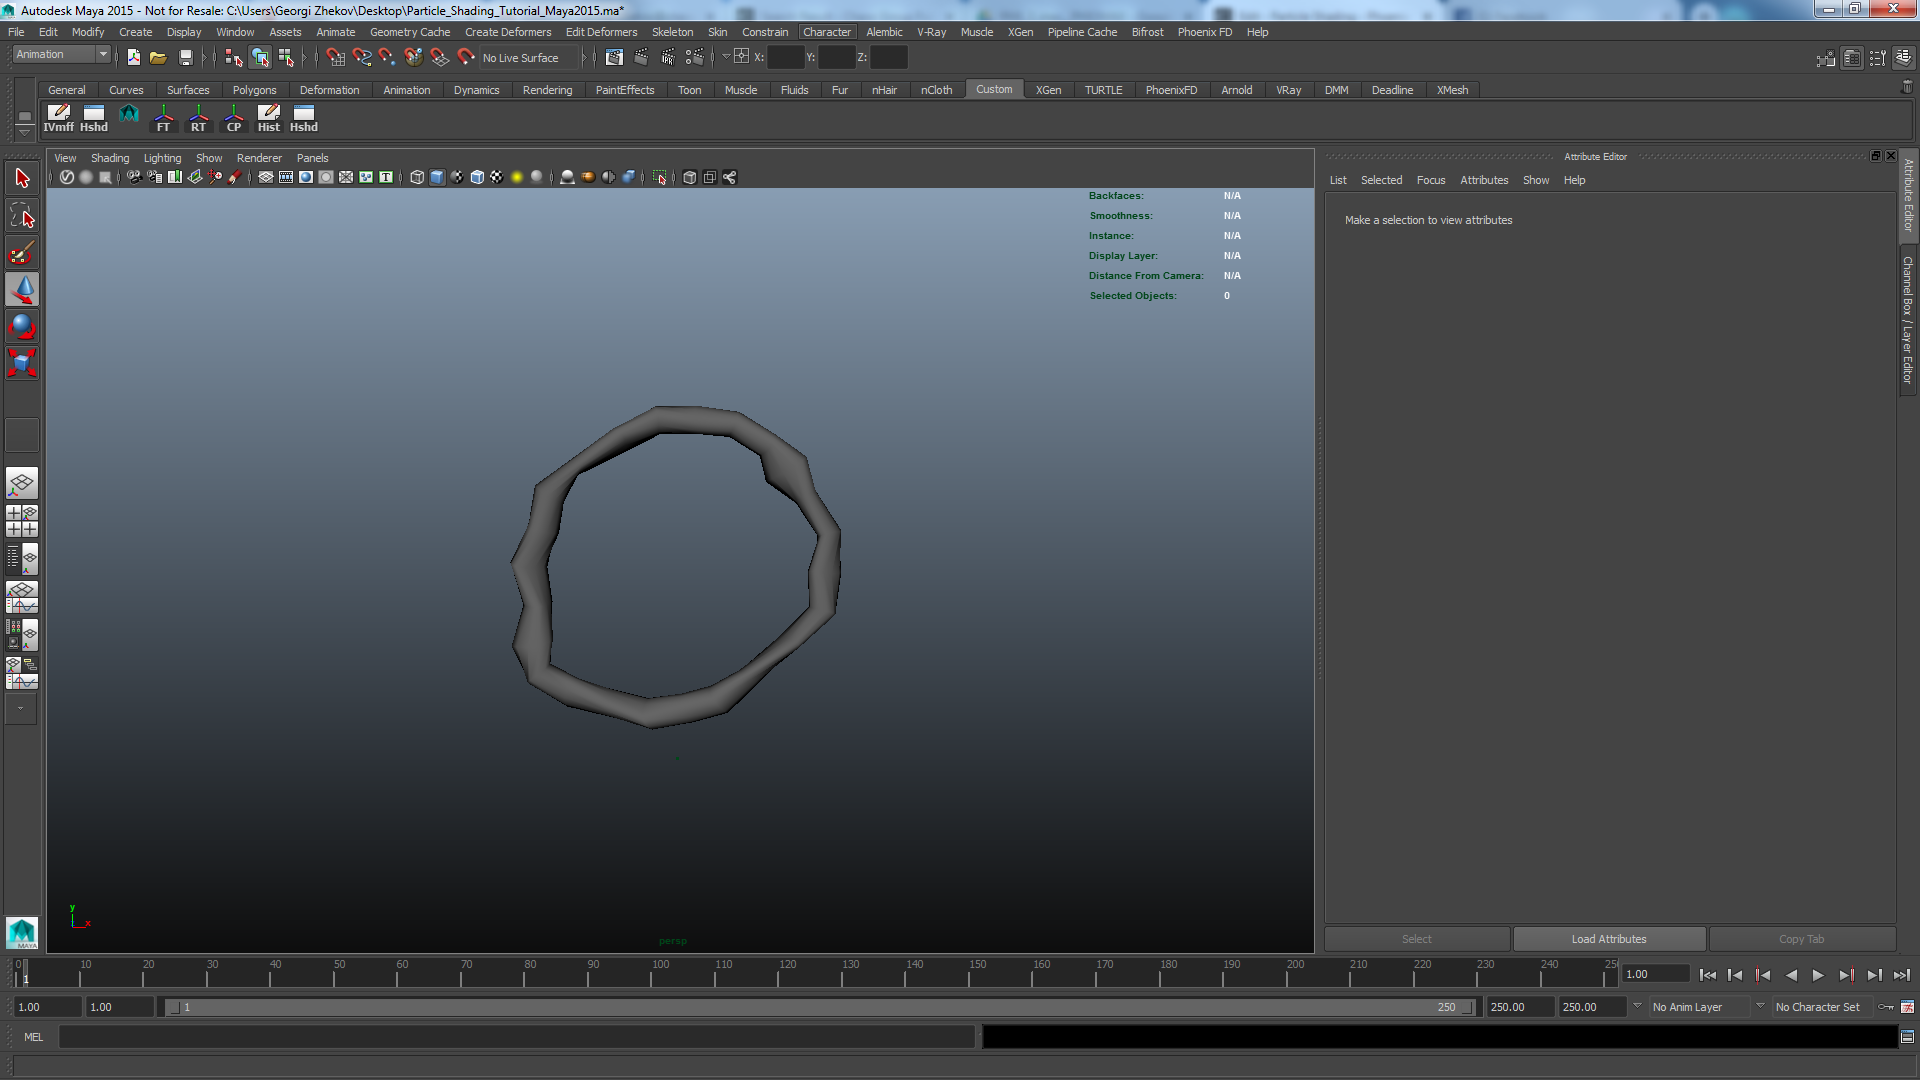
For the scene we will be using already animated Torus, exported as an alembic file.
To import the file go to Cache > Alembic Cache > Import Alembic and select the AnimatedTorus.ABC file from the scene files.
Phoenix Setup
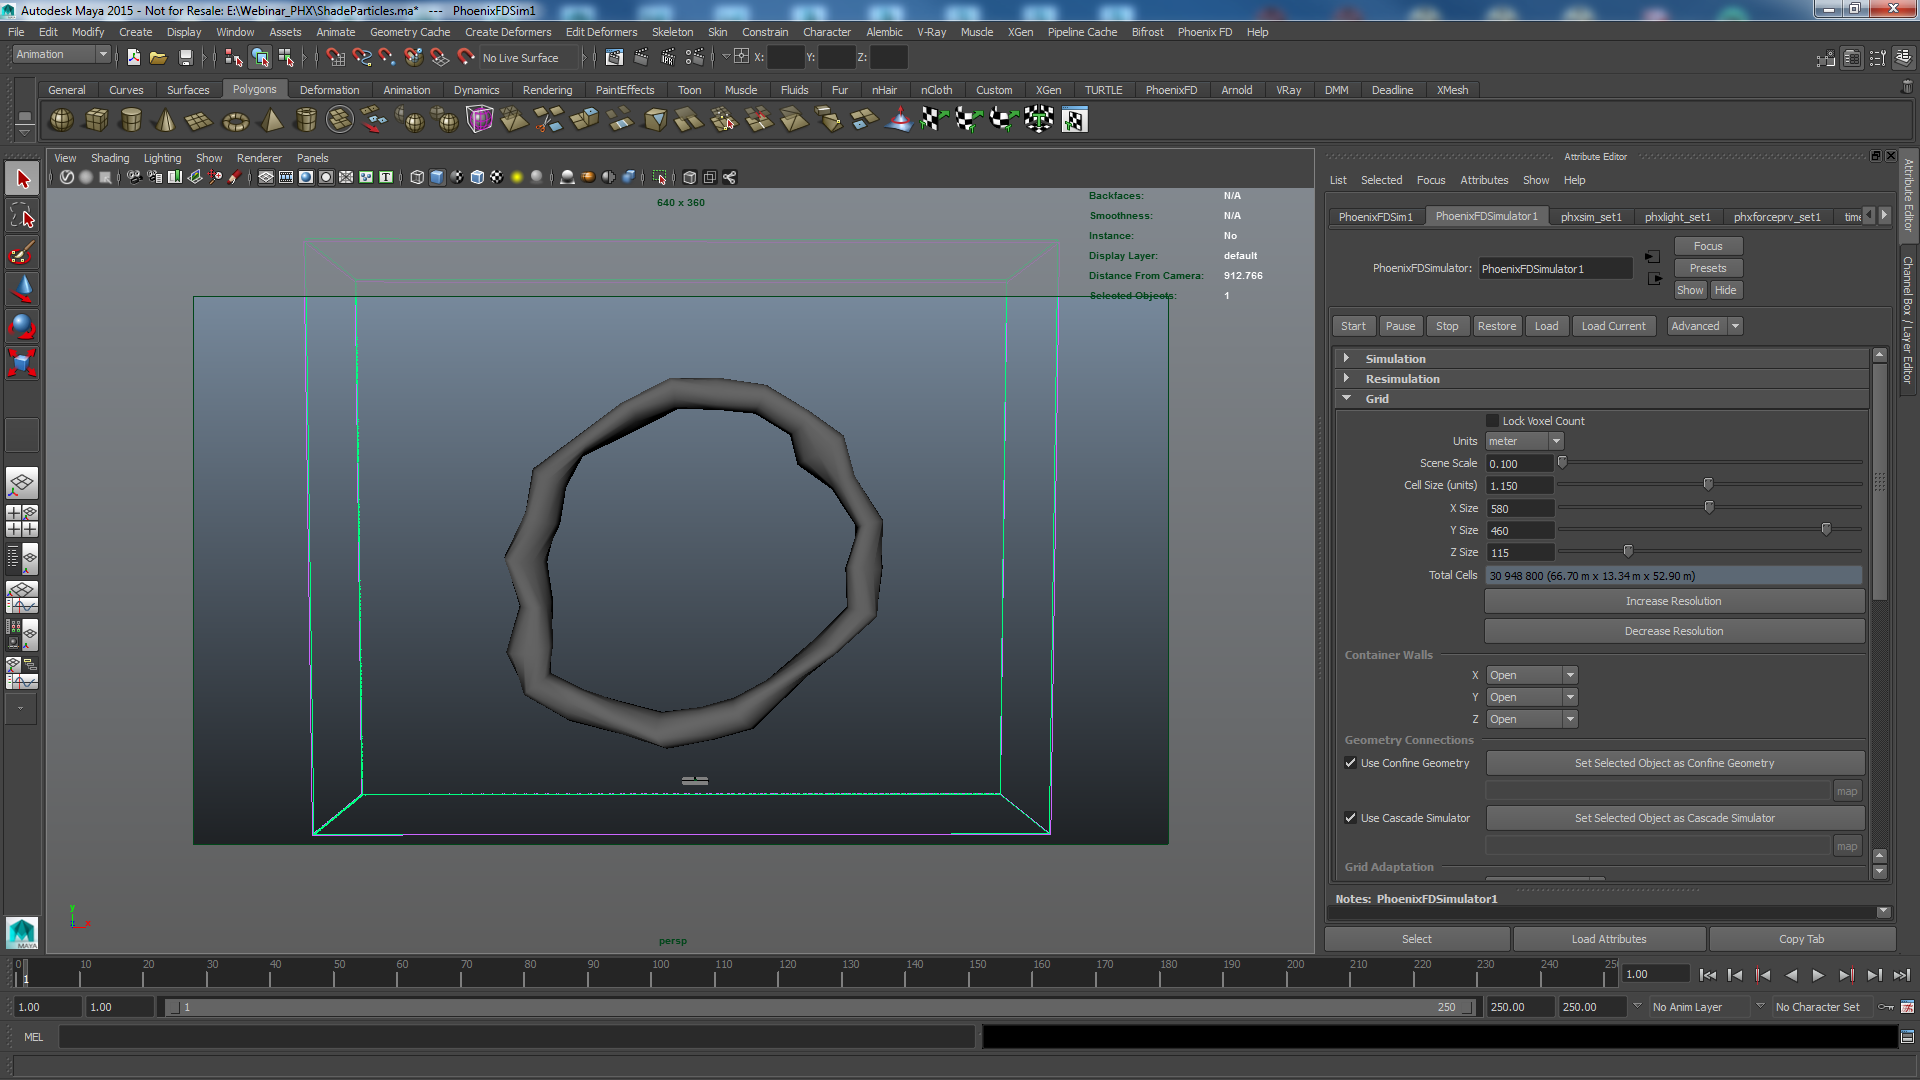
Create a Phoenix Simulator and set the Grid → Cell Size to 1.15.
Set the Size X / Y / Z to 580 / 460 / 115 respectively.
Set the Units to meter.
Set the Scene Scale to 0.1 - this would make our liquid swirls move a bit slower.
Go to the Liquid rollout and turn on Enabled.
Create a Phoenix Liquid Source and add the torus to the Emitter Nodes list by using the Add button.
Set the Emit mode to Volume Brush (you will be prompted with a message box letting you know that in order for the Volume Brush mode to work you need to set the object to Non-Solid, click on the Make Non-Solid button) and animate the Brush Effect from 100% at frame 13 to 0% at frame 14. Using the Volume Brush mode the volume of the emitter object will be gradually filled with liquid and in this way giving us a lot more particles to work with.
Turn on the RGB channel and plug a Volume Noise texture in the map slot.
For the Volume Noise texture set the Threshold to 0.288. Set the Amplitude to 5, Ratio to 0.626, Frequency Ratio to 1.00, Depth Max to 8.
Set the Frequency to 0.005, Scale to 0.5, 0.5, 0.5 and Noise Type to Perlin Noise.
In the Color Balance rollout of the Volume Noise texture set the:
Color Gain to R: 0.923 G: 0 B: 1.00 for RGB 0 to 1.00;
Color Offset to R: 0.00 G:0.27 B: 1.00.
Turn on the checkbox for Alpha is Luminance.
In the Effects rollout turn on Invert.
Now that all the required elements for a liquid simulation are present ((1) Emission Geometry, (2) Source and (3) Simulator), we can run the simulation to see what we've got.
Here's how the simulation looks at the moment. The liquid starts falling down and doesn't stick to the animated Torus geometry.
We need to disable the Gravity and add a Body Force that will pull the liquid towards the Torus.
Phoenix Simulator Setup
Select the Phoenix Simulator and from the Dynamics rollout disable the Gravity checkbox. This way once the liquid is emitted it won't start falling down due to the gravity.
As later we would want to shade our particles based on the liquid channels we need to set those for export to the cache files.
In the Output rollout tick the checkboxes for Velocity and RGB for both the Output Particles and the Output Grid channels.
Adding the Body Forces
Now that our liquid is emitted and is no longer falling down we want it to follow the movement of the animated torus.
Create a Phoenix Body Force and set the Torus for the Body Object.
Set the Strength to 300 and animate its value from 300 at frame 140 to 100 at frame 145.

Now the particles are rotating and follow the Torus, but that gets a bit boring after a while so we will create another object to attract the particles and make them disappear.
Create a Polygon Primitives → Sphere. Set the Radius to 50.
Move the sphere up in the +Y direction to [ 0, 215, 0 ].
Select the Sphere shape node and from Attributes menu add Phoenix FD > Phoenix FD Properties and remove the checkbox for Solid so that particles can get inside of it.
Then Turn on the Clear Inside option - this way all the particles that get inside of the sphere's volume will be killed.
The only thing left is to add another Body Force that will pull the particles inside of the sphere.
Create a Phoenix Body Force and set the Sphere for the Body Object. As we don't want this force affecting the simulation from the start we will need to animate its Strength value.
Animate the Strength from 0 at frame 140 to 800 at frame 145.
Set the Suppress Orb. to 1 - this way the particles won't orbit so much around the sphere.
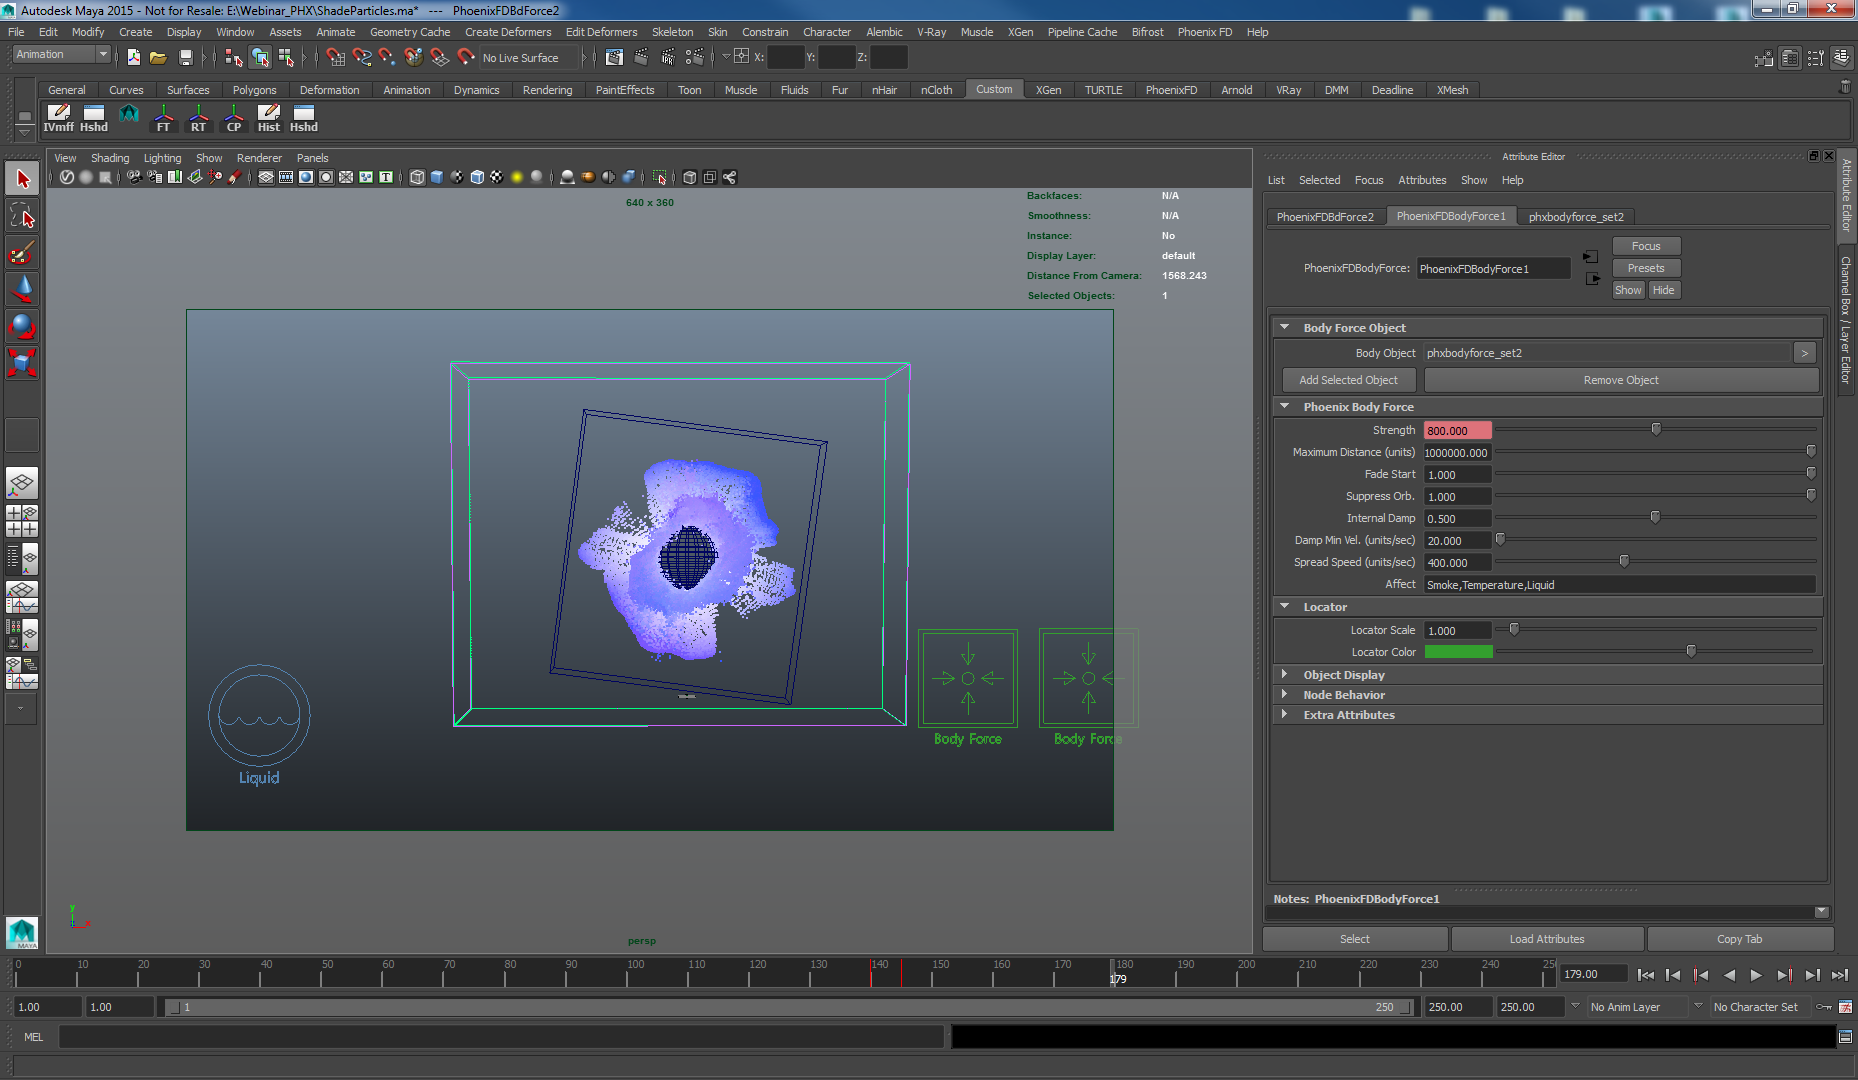
Here's the result with the both Body Forces affecting the simulation.
Particle Shading
Now that we have the scene setup we need to render it out. By default the Phoenix Simulator will be rendered as mesh, though in this case we would like to render out the simulation as particles.
Select the Simulator and from the Rendering rollout disable the checkbox for Enable Rendering.
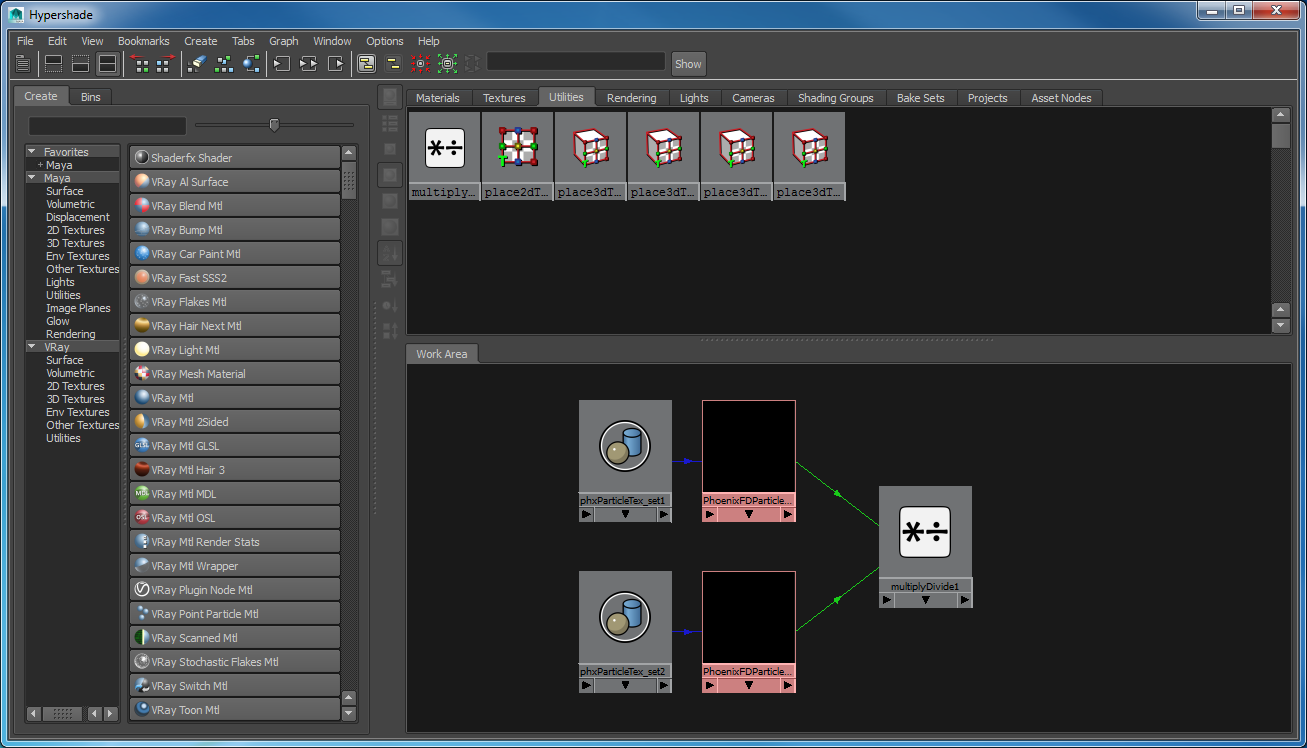
Create a Phoenix Particle Shader. A new phxParticle_set1 node will appear in the Outliner. This set is used to specify what particles will the Particle Shader be used to render.
Right-mouse-button click in the Outliner and disable the Show DAG Objects Only checkbox.
Middle-mouse-button drag the PG_PhoenixFDSimulator1_Liquid_0 node into the phxParticle_set1 set. This node holds the liquid particles generated by the simulator.
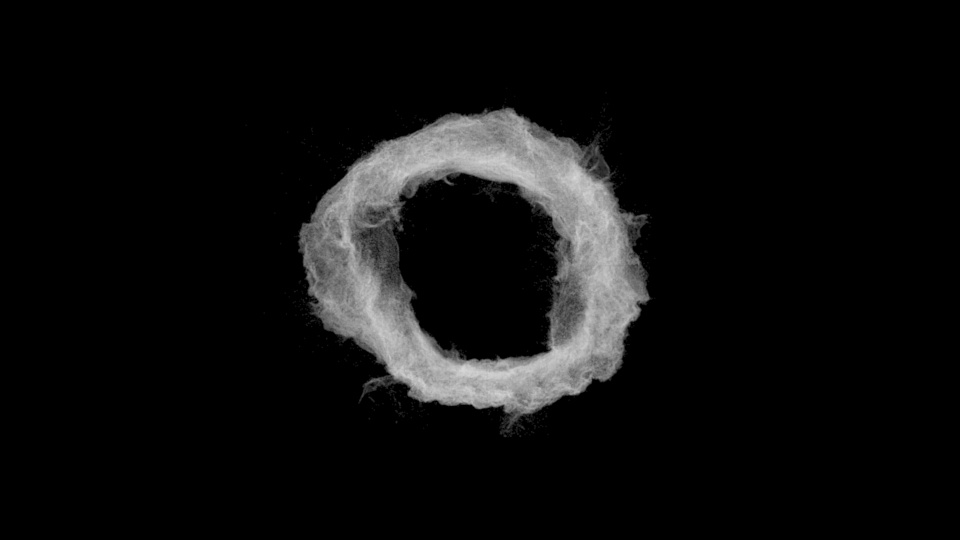
If we hit the render button now you will get something similar.
You will notice that the particles look too dense and burn out. In order to bring back some of the detail let's select the Particle Shader and set the Point Alpha to 0.01 and the Shadow Strength to 0.
As we have already simulated the particles' RGB channel - we would want to use that for the color of our particles. In order to do that we would need a way to read this channel and tell the Particle Shader to use it.
Select the Particle Shader, enable the Color Map checkbox and in the map slot plug a Phoenix Particle Texture.
From the Particle Texture options click on the button for the Particle Systems and connect the ParticleTex set to the Liquid Particle group.
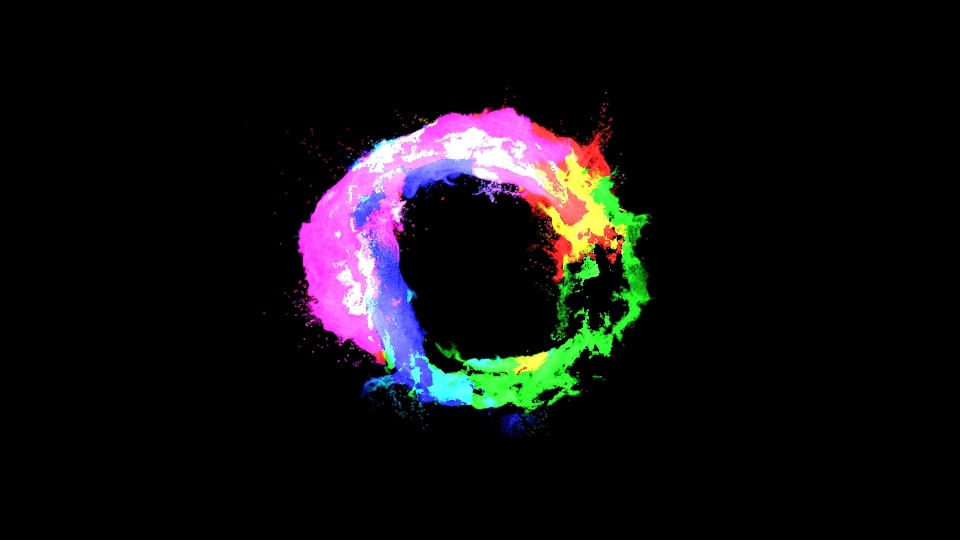
Turn on Use Color From Particle Channel and select the RGB channel. If we render out the result looks like this.
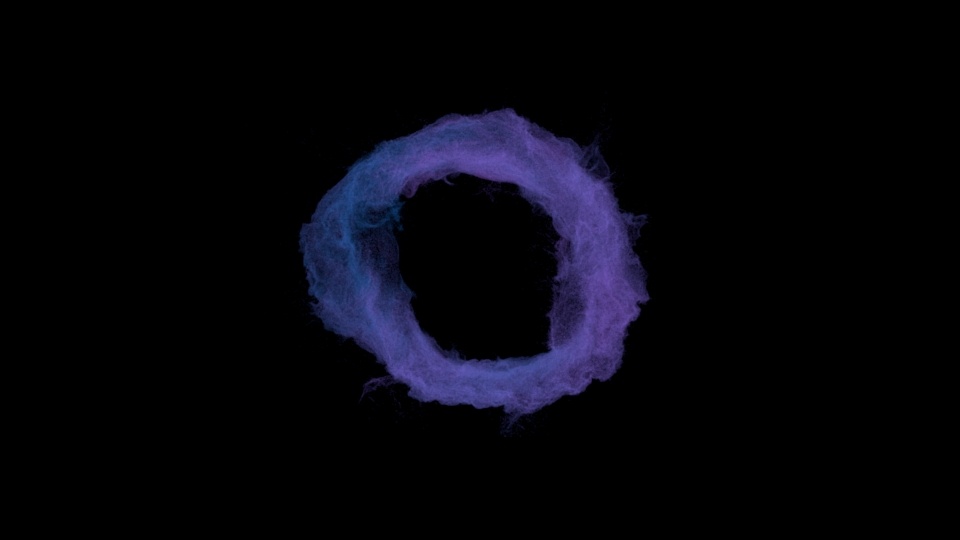
The particles are shaded by the RGB channel, though the color looks a bit pale. We can fix that by increasing the Color Intensity inside the Phoenix Particle Texture.
Set the Color Intensity to 5 and render again.
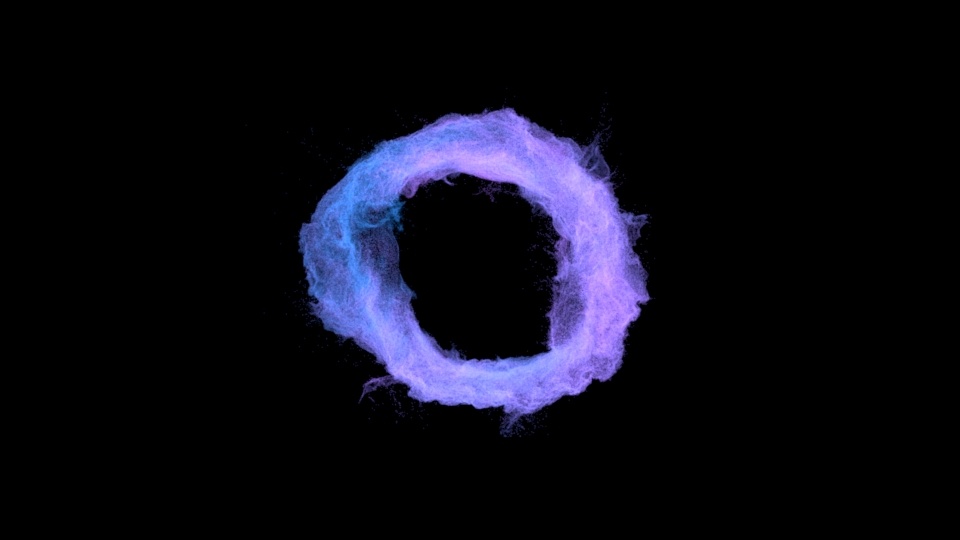
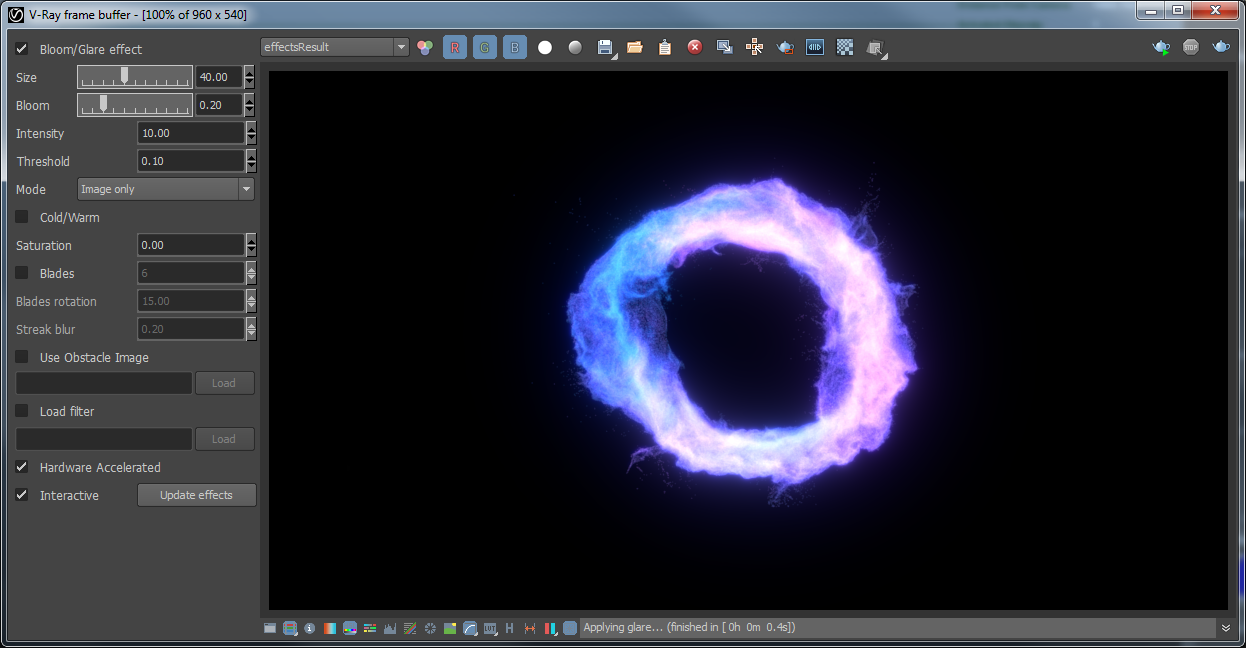
Now the particles look much better but still look too ordinary. Let's add some Bloom and Glare from the VFB Settings and spice up those particles.
Open the Bloom/Glare effect options and set the Size to 40, Bloom to 0.20, Intensity to 10 and the Threshold to 0.10.
Here's how the result looks in motion.
Particle Shading By Speed
Let's say we want to shade the particle color by speed. How do we do that?
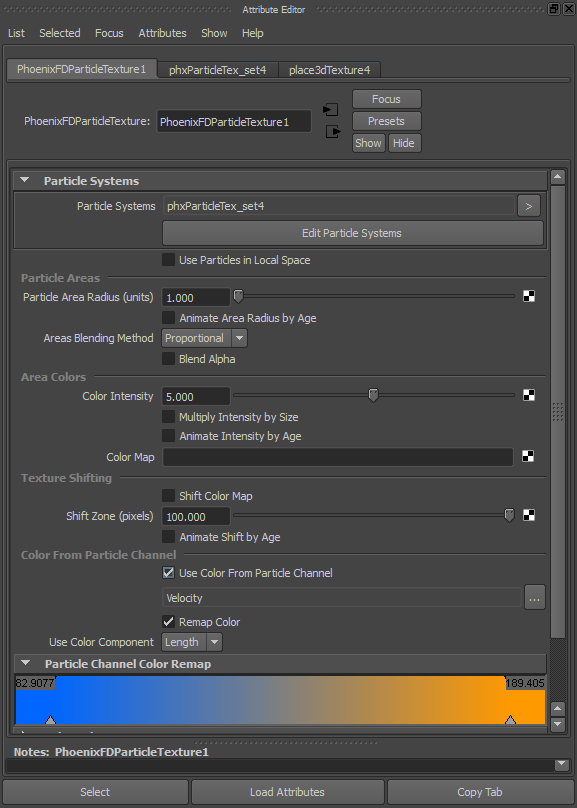
From the Phoenix Particle Texture option set the Use Color From Particle Channel to use the Velocity channel.
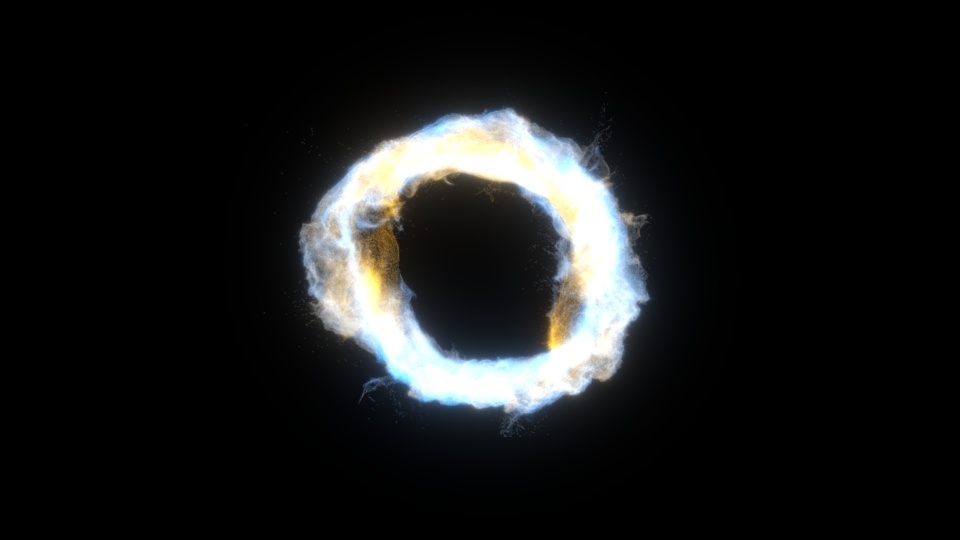
Rendering the result looks like this - not quite what we're after. It currently colors the particles using the velocity vector and the result is similar to what you will see in a 'Normals' render element.
Turn on Remap Color from the Particle Texture options and set the Use Color Component to Length. This way the texture will use the speed of the particles, which is the length of the velocity vector.
Double click on the first color point to set its color and use R: 0, G: 0.4, B: 1 for RGB 0 to 1.0.
Double click on the second color point and set the color to R: 1, G: 0.6, B: 0 for RGB 0 to 1.0.
Moving the points, we can control how to colors are remapped based on the speed.
In order to figure out what the real velocity range is you can open the Simulation rollout of the Liquid Simulator and inside the Cache File Content check the range values for the Velocity channel. In this case it's from 0 to 389.70.
Move the first color point to position of 86 and the second one to 198. This way the gradient will tighten up and give the result a bit contrast look. Note that the numbers displayed on the color gradient are the leftmost and rightmost points on the gradient, and not the positions of the color markers.
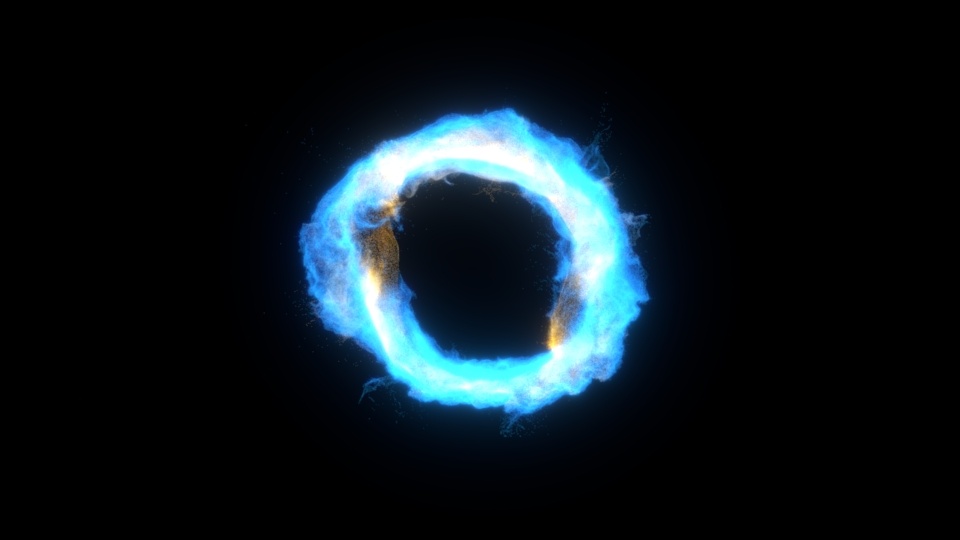
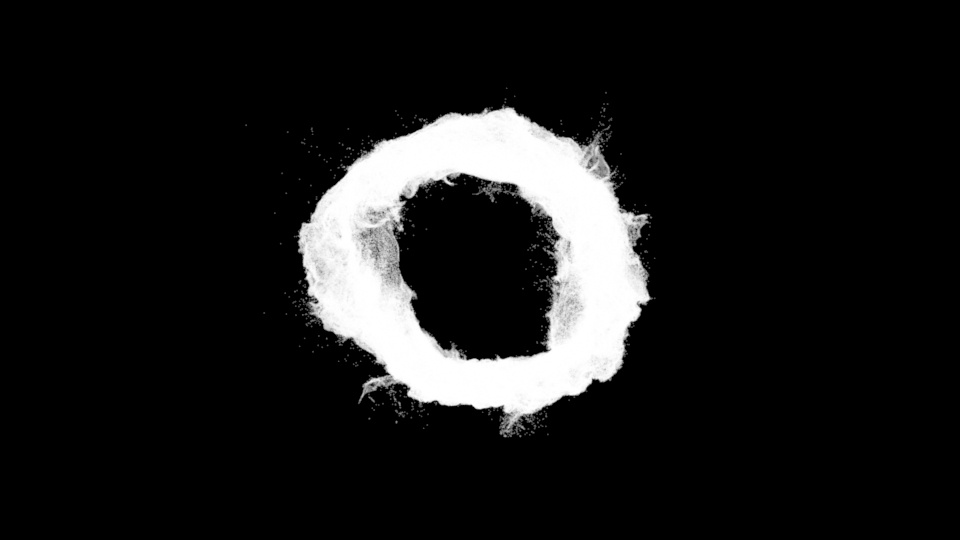
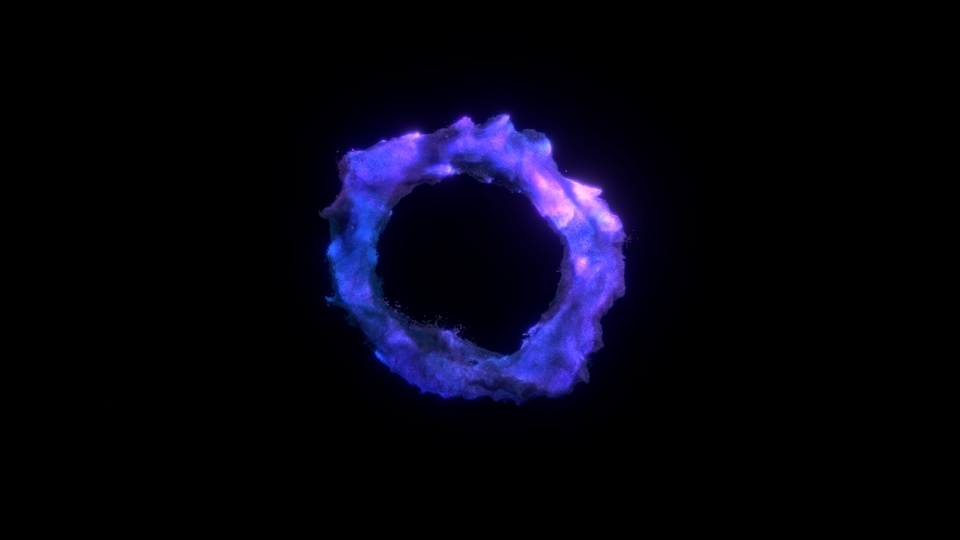
Here's how the result looks in motion.
Another really cool thing that you can do with this approach is to combine both methods we have shown above.
So you can take the Particle Texture that reads the RGB channel and multiply it by the Particle Texture that reads the Speed of the Particles.
Duplicate the Particle Texture that we used for the Speed example above, set the Use Color from Particle Channel to RGB and turn off the color remapping.
In order to get a bit different result let's change the Color Remap gradient for the Speed Texture.
Set the Color Intensity to 2.
Set the first point to R: 0.05, G: 0.05, B: 0.05 and move its position to 80. This sets the color to a dark gray and when we later multiply this color by the RGB texture some of the color will get through, but with a lower value.
Set the second point to R: 0.5, G: 0.5, B: 0.5 and move its position to 120.
Create a Multiply/Divide Texture and connect the Speed and RGB particle textures to it.
Then set the Operation to Multiply and set the Multiply/Divide Texture as a Color map for the Particle Shader.
This way we do get the colors from the RGB channel but the fastest moving particles will be a lot brighter.
Let's modify the overall look and make the particles a bit denser.
Select the Particle Shader and set the Point Alpha to 0.11 - this will bring the particles' opacity back up.
Set the Shadow Strength to 5 - this way we'll get stronger and darker shadows.
Now let's add some V-Ray Lights.
Create a V-Ray Sphere Light and position it at X: 287, Y:463, Z:276. Set its Intensity Multiplier to 500.
Create another V-Ray Sphere Light and position it at X: -483, Y:507, Z: -264. Set its Intensity Multiplier to 400.
Set the Radius of both Sphere Lights to 20.
And this is how the final result looks like.