This page provides information on the Blending Panel in the Property Panel.
Page Contents
Overview
The Blending Panel is part of Pdplayer's Property Panel and allows you to control the color blending, alpha and depth for the current layer. You can also assign channels from other layers to be used as an alpha channel in the current layer.
UI Path: ||Property Panel|| > Blending panel
Properties
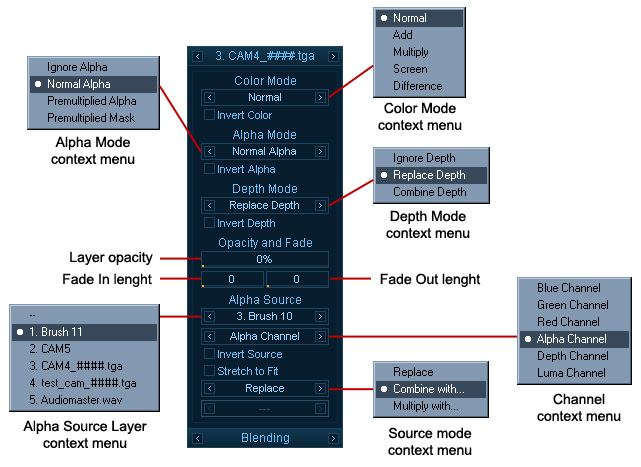
Color Mode – Allows you to choose from the five different color blending modes below. You can cycle through them with the Previous Mode and Next Mode buttons or you can right click and choose a mode from the context menu.
Normal – This is the standard blend mode which simply takes each pixel from the top layer if present. Otherwise the bottom layer is used.
Add – This blend mode simply adds pixel values of one layer with the other. In case of values above 256 (in the case of RGB), white is displayed.
Multiply– Multiply blend mode multiplies the RGB numbers for each pixel of the top layer with the RRB number for the corresponding pixel from the bottom layer. As a simple multiplication can get values as high as 65025, which is far higher than the maximum allowed value, 255, the result is divided by 255. The result is a darker picture.
Screen – With Screen blend mode the values of the pixels in the two layers are inverted, multiplied, and then inverted again. This is in some way the opposite of multiply. The result is a brighter picture.
Difference – Difference subtracts the top layer from the bottom layer or the other way round, to always get a positive value. Blending with black produces no change, as values for all colors are equal to 0. (The RGB value for black is 0,0,0). Blending with white inverts the picture
Invert Color – Inverts the layer colors.
Alpha Mode – Controls how the Alpha channel is applied. You can choose from several modes. You can cycle through them with the Previous Mode and Next Mode buttons or you can right click and choose a mode from the context menu. The different alpha modes will yield different results when applied. The following explanations assume a Normal blending mode. For more information, see the Alpha Mode Comparisons example below.
Ignore Alpha – The image is treated as fully opaque. The existing alpha channel (if any) is ignored. The alpha channel of the result will show a white rectangle.
Normal Alpha – The foreground color is mixed with the background color. This is suited for images with independent color and alpha channels.
Premultiplied Alpha – Assumes that the foreground color has been multiplied by the alpha channel and mixes it with the background color.
Premultiplied Mask – Similar to Premultiplied Alpha, except that it clamps the color value to the alpha value, effectively constraining the colors into the safe 0.0 - 1.0 range.
Invert Alpha – Inverts the layer's alpha channel.
Depth Mode – Specifies from three blending modes for the depth channel. They are Ignore Depth, Replace Depth and Combine Depth. You can cycle through them with the Previous Mode and Next Mode buttons or you can right click and choose a mode from the context menu.
Opacity and Fade – Controls the opacity of the current layer and allows for fade in and out effects
Layer opacity – Controls the Opacity of the current layer. You can drag it to change the opacity or right click and reset its value from the context menu.
Fade In length / Fade Out length – These sliders allow you to animate the opacity of the layer in order to achieve Fade-in and Fade-out effects. The opacity will always be animated from 0% to its current value or vice versa. A value of 30 for the left slider means that the opacity of the layer will be animated from 0% to its current value for 30 frames. The animation will start at the beginning of the sequence or at the In point if there is one. A value of 30 for the right slider means that the Opacity of the layer will be animated from its current value to 0% for 30 frames. The animation will start 30 frames before the end of the sequence or the Out point if there is one.
Alpha Source – Assigns any channel from any layer in the scene to act as alpha channel for the current channel.
Alpha Source Layer – Specifies a layer to act as a source. You can do that by cycling through the available layers with the right and left arrow or by right clicking on the layer chooser and picking a layer from the Alpha Source context menu.
Channel — Selects a channel from the Alpha Source Layer to be used as Alpha source. Again you can cycle through the different channels in the layer or right click on the channel chooser and select a channel from the Channel context menu.
Invert Source – When enabled, inverts the Alpha Source channel.
Stretch to Fit – When enabled, stretches the Alpha Source layer to fit the current layer.
Source Mode – Specifies a blending mode for the source channel. The available options are Replace, Combine with and Multiply with.
Layer Channel – Choose with which channel from the current layer you’d like the source channel to blend. You can choose either by cycling through the options within the layer chooser with the left and right arrow or by right clicking on it and choosing a channel from the Channel context menu.
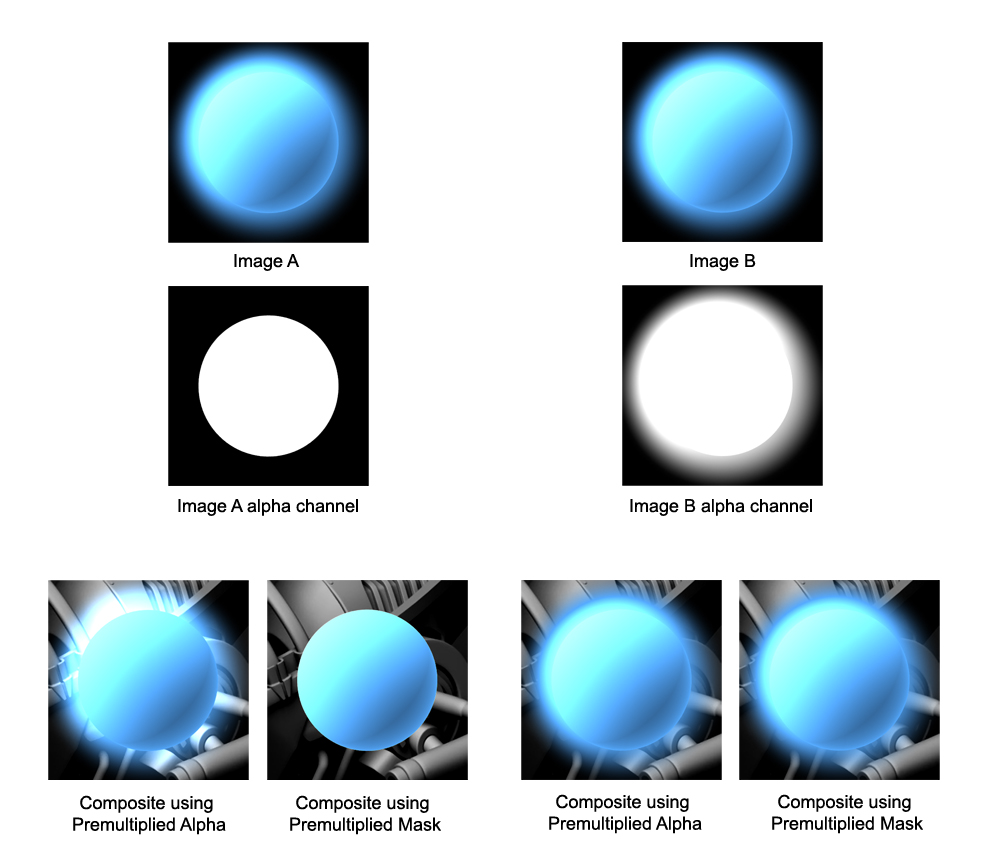
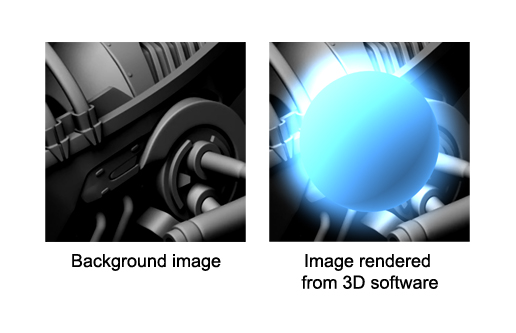
Example: Alpha Mode Comparisons
Ignore Alpha – The image is treated as fully opaque. The existing alpha channel (if any) is ignored. The alpha channel of the result will show a white rectangle.
Normal Alpha– The foreground color is mixed with the background color according to the formula:
foreground * alpha + background * ( 1 - alpha )
As an example, a 70% opaque red foreground - (R:1.0, G:0.0, B:0.0, A:0.7) - and a green background - (R:0.0, G:1.0, B:0.0) - will be combined to form the color (R:0.7, G:0.3, B:0.0).
This blend mode is suited for images with independent color and alpha channels. These images can be color-corrected without running into problems with their transparent portions (such as antialiased edges) no longer blending correctly.
Premultiplied Alpha - The first portion of blend formula above - foreground * alpha - does not depend on the background color, so it's possible to perform it beforehand. This is known as pre-multiplication - the image color is pre-multiplied by the alpha channel. Such images are mixed with the background according to the modified formula:
foreground + background * (1 - alpha )
Since the foreground has already been multiplied by the alpha, this produces the same results as the "Normal Alpha" formula when applied to the original, non-premultiplied image data.
Getting back to our example, the premultiplied equivalent of our foreground color (R:1.0, G:0.0, B:0.0, A:0.7) will be (R:0.7, G:0.0, B:0.0, A:0.7) and the result of its composition over a background color (R:0.0, G:1.0, B:0.0) will again be (R:0.7, G:0.3, B:0.0).
If a non-premultiplied image is composed over a black background - a color of (0.0, 0.0, 0.0) - the Normal Alpha formula gives us:
foreground * alpha + 0 * (1 - alpha )
which is the same as:
foreground * alpha
In other words, the result of a non-premultiplied image composed over black is a premultiplied image.
The reverse operation - obtaining a non-premultiplied image from one that has already been premultiplied - can be accomplished in an image editing package by using the "Remove Black Matte" command.
(Note that the accepted terminology in this case - Normal Alpha and Premultiplied Alpha - is a bit confusing as it is the image color being premultiplied, not the image alpha.)
Premultiplied Mask – In a standard dynamic range image, the values of the color channels are between 0.0 and 1.0 (inclusive). This means that a premultiplied image would never have a color value bigger than the corresponding alpha value (because the maximum color value of 1.0, multiplied by an alpha value A, yields A).
Not all images conform to this rule, though. It is not uncommon to come across a premultiplied image in which some pixels have a color value bigger than the alpha value.
This may be intentional and can represent high dynamic range (color values higher than 1.0) or an additive glow (non-zero color values in areas where the alpha is zero).
Sometimes the image data is not intended to contain such color values. Using Premultiplied Alpha with such images can lead to compositing artifacts. In these cases, one can use the Premultiplied Mask mode, which is the same as Premultiplied Alpha, except that it clamps the color value to the alpha value, effectively constraining the colors into the safe 0.0 - 1.0 range.
The next two pictures illustrate the difference between Premultiplied Alpha and Premultiplied Mask.