0. Who this is for
These guidelines are for users of the App SDK who want to use it to create a scene for rendering with V-Ray from the data in their host application scene. We will not discuss details on how to write code with the App SDK here - there are separate docs and examples for this included in the SDK package. Rather we will cover what V-Ray plugins to add to the scene, how to link them and what parameters to set.
Note: This document will be updated and extended over time.
1. Introduction
1.1. A note on terminology
- plugin: We use the term plugin a lot. Technically it could mean a plugin DLL for V-Ray (even V-Ray itself is a kind of plugin) or the type defined in it, which is for example a class in the programming sense, or finally an instance of this class which resides in memory and can be saved to a scene file. We will be using the term plugin to refer to plugin instances.
- exporter/translator: We call the piece of software that translates some native scene format to the V-Ray scene format an exporter or a translator, interchangeably. Basically what it does is creating a bunch of V-Ray plugins and setting their parameters. Note that we also use the verb "to export" sometimes in reference to the act of saving out the scene (which was already translated) to a *.vrscene file.
1.2. V-Ray scene contents
We could informally define three kinds of plugins that build up a V-Ray scene.
One would be the so called "top-level" plugins, which can exist on their own, without being part of some plugin tree. Lights are top-level plugins for example. They can also receive input from other plugins of course, but they do not output values to other plugins.
The plugins which are not top-level serve as input for parameter slots which require a plugin of certain type. For example a material plugin may require an optional texture input and you'd reference a texture plugin there. The texture plugin may receive input from a UVW generator and so on.
The third kind would be a special type of top-level plugins which only have one instance. These are basically settings plugins. Most of them have "Settings" in their name, but a few don't. The V-Ray camera is also defined by such a singleton settings plugin.
There is an example tiny scene in section 7. Its contents should become understandable by reading the following sections.
1.3. Parameter types
The following are the types recognized in a V-Ray scene (think .vrscene file). They have corresponding types in the different AppSDK language bindings. The SDK uses the respective basic language types wherever possible and defines custom type classes for the rest.
- Basic types:
int, bool, float, Color(3floatRGB),AColor(4floatARGB),Vector(3float),string(UTF-8),Matrix(3Vectors),Transform(aMatrixand aVectorfor translation) - Objects: references to other plugin instances
- Typed lists: The typed lists in App SDK are
IntList, FloatList, ColorListandVectorList. - Generic heterogeneous lists: The App SDK uses a generic type class called
Valuefor items in a generic list. Note that generic lists can be nested. - Output parameters
These are additional values generated by a given plugin which may be used as input by others. For example theTexAColorOpplugin (described in section 5.2) can be referenced directly as a texture, resulting in its default color texture output, but you can also refer to any of its other outputs, likesum, difference, maximumetc. for different results (Note: in some cases connecting an output parameter to an input parameter may not work directly, so you'd have to make the connection through a wrapper plugin likeTexAColororTexFloat).
Parameter polymorphism is an important feature of V-Ray. Texture parameters accept simple (basic) values, so instead of creating an additional texture plugin which generates a single color you just set a Color value to the texture slot. Same goes for float textures and single float values etc. You can also set the value of a texture parameter to an output parameter as described above.
1.4. V-Ray scene file format
V-Ray uses a text based scene file format (.vrscene). It is quite simple which makes it convenient to debug and modify by hand. The format is case-sensitive and a little similar to JSON. Large data values, such as geometry definitions can be compressed (and text encoded). The file contains consecutive plugin instance definitions: type, instance name, parameter list. Nesting is not supported.
The main rules are:
- Each plugin instance is defined on a new line starting with its type name followed by a space, an instance name, another space and an opening curly brace.
- Each parameter is written on a new line with its name, an equals sign with no whitespace on both sides and a value. The line ends with a semicolon. A parameter definition line may be split into multiple lines for long values such as lists.
- References to other plugins are defined by writing out their instance names without quotation. Output parameters are specified the same way with additional double colon and parameter name (
instance_name::out_param_name). - The end of the plugin definition is marked with a closing brace on a new line.
- C++ style single line comments are supported.
- Files can be stitched together with an
#include "another.vrscene"directive like in C. - References can be made to plugins which will be defined further down the file.
- The parser is indifferent to indentation and empty lines. The only whitespace rule is no whitespace around the value assignment operator (=) for parameters.
Scene files are supposed to be created by V-Ray. You shouldn't try to write them yourself, but you are of course free to modify them by hand.
It is important to note that the order of definition of plugin instances generally does not matter. This also applies to a scene created in memory, even when you don't export it to a file. There are a few exceptions such as camera related settings plugins, which may not work correctly if V-Ray doesn't process them in a particular order.
1.5. Default values
Every parameter has a default value, so even after you create an "empty" plugin instance it is actually fully functional. Of course it might need data, as for example with geometry plugins, but a light will work right away (placed at 0 coordinates). That being said, some plugins have inconvenient default values, which almost always need to be changed (for example some settings plugins, such as the image sampler settings or some shadow parameters). We usually can't fix the defaults, because it would break existing user scenes. Nevertheless, unless you know what you're doing, it is recommended to stick to the default values. You are free to experiment, of course, but don't use values which you don't understand as they may have performance implications or quality implications or they may even break physical plausibility.
Note that when you export (save) a vrscene file it will always contain a bunch of settings plugins, even if you didn't create them. They will have default parameter values. This is how V-Ray always saves files.
1.6. Debugging and help
Apart from documentation included with the App SDK and this guide, the help pages for 3dsMax and Maya on docs.chaos.com are a good source of parameter information and examples, although they use the user-friendly UI names for things and not the actual scene parameter names.
A very useful tool for basic parameter information is plgparams.exe included in the binary folder of the SDK. It lists all parameters for the specified plugin (or all plugins with -list) and their types, default values and text comments. Similar information can be obtained using the ListAllPluginsAndProperties example in the C++ folder (or equivalent code for another language).
It is often useful to save out your scene to a file to inspect if you did everything properly. For example you may have failed to set some parameter properly and you will see this in the file as a missing or incorrect value, although you can also check the result of the set operation in your code. You can try to pinpoint problems by deleting parts of the scene (parameters or whole plugins) and re-rendering.
It can be very helpful if you have a V-Ray for 3dsMax or Maya and use it to export vrscene files to see what plugins and parameters are written out. The exporters for 3dsMax and Maya can be considered "ground truth" (even though they may have an occasional bug or missing feature).
If you're getting a black render make sure your camera is positioned and oriented properly and not inside an object. Keep in mind the default up-axis is Z, but it can be set to something else, usually Y. You might also get invisible or black objects if something is wrong with the attached material. In this case you can still the object in the alpha channel, especially if there is nothing behind it.
Another thing to watch out for is V-Ray's errors and warnings, so always implement the DumpMessage callback.
Information on all V-Ray plugins is available in the header file of the C++ vrayplugins.hpp and for C# in the VRayPlugins.cs file.
If renderer is a VRayRenderer instance in Python or Node.js, information about a plugin can be obtained by calling:
renderer.getDescription()- shows the plugin descriptionrenderer.getMeta()- shows info about all plugin properties/parametersrenderer.getCategories()- gets the category to which the plugin belongs
1.7. "subdivs" parameters
You will see subdivs (subdivisions) parameters on many light and BRDF plugins. They control the number of new rays spawned for calculating glossy and diffuse effects on materials or the number of light and shadow evaluations and so on. The number of actual rays is proportional to the square of the parameter value. These can be used to increase or decrease sampling for the respective light or material, but we highly recommend leaving these at default values. We also recommend disabling local subdivs values altogether - see the DMC sampler section for details. Some of the settings plugins also have subdivs parameters which are ok to change, like the Irradiance Map and Light Cache for example.
Note: The reason the renderer uses the square of the parameter value is the property of the Monte Carlo integration method that to reduce noise (variance) by half (1/2 noise), you need four times as many samples (4x), to get 1/10 the variance you need 100x more samples... This way we get linear results from linear increases in the subdivs parameters.
2. Defining camera position
One of the first things you'd want to do is control your camera. This is done through the RenderView plugin. You will always want to create and setup this plugin, exactly one, in your scenes. (The exception is when you are baking textures - then you'd use BakeView.)
The main parameters are:
fov- The horizontal field of view in radians.orthographic- Enable to have orthographic projection instead of perspective (RenderView::fovdoesn’t matter in this case, in favor ofRenderView::orthographicWidth).transform- A transformation (rotation + translation) which defines where the camera is and how it is rotated. The matrix is in column-major format and you will need to calculate it yourself. You can't set rotation angles as in most 3D software. The default camera orientation with identity matrix is so that +Y is pointing up and -Z is the view direction. If your scene uses +Y for up-axis, you will need to set V-Ray's scene up-axis accordingly - see the Units subsection in the settings section below.
For advanced camera effects, such as DoF, exposure, distortion, vignetting, etc. you will need to enable the physical camera in addition to RenderView. See the Physical camera subsection in the settings section below for details. You can also use SettingsCameraDof instead, if you only need depth of field (see 6.11. Miscellaneous).
3. Creating lights
Good lighting is the most important thing for getting good photorealistic renders. It also affects image noise and performance. Some lights (generally the simpler ones, especially the first four in the list) render faster and with less noise than others. Things that may affect noise and performance of lights are: having a texture instead of flat color; having a complex mesh; being an area light with small relative size.
Listed below are V-Ray's light plugins, ordered roughly by increasing photorealism. Common parameters are at the end and some specific parameters are described in the Reference at the end of this document. There are even more parameters that we will not mention here.
LightAmbient- Do not use this one. Ambient lighting is a fake effect.LightOmni- A point light source. Has parameters for the rate of decay and casting soft shadows (shadowRadiusbelow).LightDirect- Infinite parallel light. Does not originate from its position, so only the rotation matrix matters.LightSpot- Conical spot light, such as the light coming from a flashlight.LightRectangle- Rectangular area light. Option for rounding to a disc shape. Can be textured.LightSphere- Spherical area light. The geometric detail is parametrized by number of segments.LightMesh- Turn a geometry plugin into a light source. Can be textured.LightDome- A light emitting dome encompassing the scene at infinity. Usually used for HDR image based lighting (IBL) with a spherical texture file.LightIES- Measured real world lights defined through an .IES file. Shape can be overriden.SunLight- Mathematically approximated model of our Sun. The light varies according to its elevation. Usually coupled with aTexSkyenvironment texture. See the Environment settings section below for details.
Some of these plugins have versions from 3dsMax with additional parameters, such as LightOmniMax, LightSpotMax etc.
Common light parameters:
enabled- Enabled by default. Use to turn lights on/off without having to recreate and reset parameters.transform- Position and orientation. See notes on camera position above. Some lights can also be scaled.color- The color of emitted light. Default is white (1.0, 1.0, 1.0). The value can be above 1 for larger intensity, but most lights have a separateintensityparameter for this. Some lights such as rectangular and mesh lights can have textured color through additional parameters. For example you can make a stained glass window this way. The Sun light doesn't have this parameter, but it has others for color control.shadows- Enabled by default. Set to false to cast no shadows. Not recommended.
Other parameters common to many, but not all of the lights (check respective parameter lists):
shadowRadius- Can be used to make simple light sources like omni, spot, direct behave as area lights, casting soft shadows.intensity(intensity_tex) - Multiplier for the intensity of the light.invisible- False by default. Enable to make the area light invisible to the camera. This includes the back side of rectangle lights for example.units- Physical units for the intensity of photometric lights. Possible values are: 0 - default, 1 - lumens, 2 - lm/m/m/sr, 3 - Watts, 4 - W/m/m/sr
The rectangle, mesh and dome lights can be textured. Keep in mind that the texture files are re-sampled at a resolution controlled by a tex_resolution parameter which has a default value of 512 for dome and rectangle and 256 for mesh lights. So if the light texture looks too pixelated, especially on the dome environment, try increasing this resolution. This will of course increase memory usage and render time slightly.
4. Creating geometry
4.1. The Node plugin
Before we get to defining your actual geometry data, there is a top-level plugin for non-light-emitting objects called Node. It links the geometry data (geometry parameter) with a material plugin (material parameter) and positions it in the world (transform parameter). You could reference the same geometry in different nodes with different positions.
4.2. Geometry sources
Lets look at the main geometry source plugins (we will ignore some others):
GeomStaticMesh- The basic fixed geometry descriptor that you will use in most cases. Requires vertex and normal data plus optional UVW texture mapping coordinates.
V-Ray static meshes work with triangular geometry only, so if you have larger polygons, you will have to triangulate them. The simplest way would be the ear clipping method for convex polygons. The triangle vertex indices are specified in counter-clockwise order in the geometry arrays for V-Ray if you're looking at the front face of the triangle.GeomStaticNURBS- Defines a smooth NURBS surface using control vertices and weights.GeomStaticSmoothedMesh- References another mesh plugin (usuallyGeomStaticMesh) and generates a smooth, subdivided version.GeomDisplacedMesh- References another mesh plugin (usuallyGeomStaticMesh) and generates a displaced version using a texture map.GeomHair- References another mesh plugin (usuallyGeomStaticMesh) and generates hair (can be tweaked for fur, grass, shaggy rug etc.) on it. Has many parameters for the size, shape and distribution of strands. This corresponds to VRayFur in 3dsMax and Maya.GeomMeshFile- Loads geometry from a file, a so-called geometry Proxy. The geometry is only loaded on-demand as a ray hits it, so in some cases such as distributed bucket rendering it may prevent unnecessary calculations and memory usage. The currently supported formats are V-Ray's.vrmeshand Alembic.abc. If you have a file in another format, i.e. .obj, you need to convert it with theply2vrmeshtool.GeomParticleSystem- Generates many (usually small) particles.
4.3. Instancing
Instancer and Instancer2 plugins can be used to efficiently instantiate a high number of objects in the scene from other geom source plugins. Often used for particles and vegetation.
Instancer => N * Node (invisible) => GeomSomething
Instncer2 is also a geometry source and can be connected to a Node plugin:
Node => Instancer2 => N * Node (invisible) -> GeomSomething
and evenNode => Instancer2 => Nodes => Instancer2 => etc.
5. Creating materials
Exporting materials is probably the most complicated part, because it may involve complex shader networks, especially in apps with high artistic control, such as the popular DCC tools from Autodesk. Nevertheless, you can get good results even by using only a few plugins.
There are two types of plugins involved - material (names start with "Mtl") and BRDF (names start with "BRDF") plugins. BRDFs describe what happens with light when it interacts with the surface, like refraction, diffuse scattering, etc. BRDFs get plugged into material plugins, which may extend their behavior or combine them. Finally the material plugin gets plugged into a Node that links it to a geometric object in the scene.
You should always connect a MtlSingleBRDF instance to the Node::material slot. Despite its name, the MtlSingleBRDF::brdf parameter accepts other Mtl plugins, so there is no problem with using any material before finally adding MtlSingleBRDF (see note at the end of this section).
The workhorse of your material setups should be BRDFVRayMtl. It combines three types of effects in one plugin - diffuse, reflection and refraction (we have them in separate plugins as BRDFDiffuse, BRDFMirror and BRDFGlass respectively). You can use only one of the layers, though, by setting the colors of the others to black. The plugin splits the incoming light energy according to the colors for the three layers. For example, by default the reflection and refraction have black color, so these layers are skipped. If you set a white reflection color you will get a mirror. If you set a white refraction color you will get glass. The layers are evaluated in this order: reflection, refraction, diffuse. The amount of energy that passes to the next layer is the complementary color to the color of the layer. If you have a (0.2, 0.2, 0.2) reflection color, 20% of light the energy will go into the specular reflection and 80% will pass on to the refraction layer. If your refraction layer has color (1.0, 1.0, 1.0) all of the remaining energy will continue as refracted light, so you will get the effect of a glass material (a little reflection and full refraction of the rest). If the refraction color is (0.5, 0.5, 0.5) instead, 50% of the remaining energy will refract and 50% will scatter off from the diffuse layer. If the diffuse color is white, all of that remaining energy is scattered around the scene and if it's black all of it is absorbed (that would heat the object in the real world). So lets summarize what happens with the incoming energy with a few examples:
- reflection=(0.1, 0.1, 0.1), refraction=(1.0, 1.0, 1.0), diffuse=(1.0, 0.0, 0.0) => 10% reflection, 90% refraction and 0% diffuse, so you won't see that red color anywhere
- reflection=(0.1, 0.1, 0.1), refraction=(0.5, 0.5, 0.5), diffuse=(1.0, 0.0, 0.0) => 10% reflection, 45% refraction and 15% diffuse, so you will see a semi-transparent object with some red. Note that 1/3 of the last 45% of the energy is red scattering, so actually 15% of the original energy is scattered, only in the red channel, and 30% is absorbed in the other channels.
- reflection=(1.0, 1.0, 1.0), refraction=(0.5, 0.5, 0.5), diffuse=(1.0, 0.0, 0.0) => 100% reflection, 0% refraction and 0% diffuse, so you will see a perfect mirror - nothing is seen through it and no red
- reflection=(0.1, 0.1, 0.1), refraction=(0.0, 0.0, 0.0), diffuse=(0.5, 1.0, 0.5) => 10% reflection, 0% refraction, 60% diffuse and 30% absorbed (no energy is absorbed in the green channel)
The absorption of energy in the diffuse layer matters for GI (global illumination). Having a closed room with pure white diffuse walls is like having a room of mirrors. V-Ray will bounce light around until it reaches its maximum GI depth and this may slow rendering down. If the walls were 88% white instead, only 7% of the original energy will remain after 20 bounces. At some point V-Ray will decide that the ray is too weak and insignificant and it will stop tracing it. V-Ray makes a lot of decisions based on light intensity, so this matters. Samples with intense light are considered more important than weak ones.
An important aspect of BRDFVRayMtl is the Fresnel reflection parameter (which is off by default when you create an instance, while it's on by default in V-Ray for 3dsMax). When it's enabled reflection amount depends on the angle of incidence. Glazing angles produce more reflection than looking head-on at the surface. This changes the conclusions we made above about how energy is distributed in the layers of the material. Even with 100% reflection (white color) some of the energy will go through to the refraction and diffuse layer. Fresnel reflections are a must for physically plausible materials. For Fresnel you need to set a correct index of refraction (IOR), even if the material doesn't refract any light. For example metals have very high IORs.
BRDFVRayMtl also has a translucency option, but you should use BRDFSSS2 instead for subsurface scattering.
Important note on opacity: Many materials, including BRDFVRayMtl, have a separate opacity parameter slot (a value also known as "alpha", the inverse of transparency). Even if i.e. the diffuse parameter has some alpha values below 1.0, they will not have an effect. You need to separately connect for example TexBitmap::out_alpha to opacity. Also keep in mind that a material may look transparent even without any opacity set, because of the refraction layer.
Note: There are some material and BRDF plugins that still exist for compatibility reasons, but we don't recommend you use them. For example instead of connecting MtlDiffuse to a Node, you should create BRDFDiffuse -> MtlSingleBRDF::brdf -> Node::material. Plugins with names ending with "_ASGVIS" can also be ignored. We don't have an exhaustive list of deprecated plugins at the moment.
5.1. Material and BRDF plugins
MtlSingleBRDF- The main material type that needs to be connected toNode::material.Mtl2Sided- Defines a (possibly different) material for the back side of triangles, as well as the front sides.MtlMulti- Use this together withGeomStaticMesh::face_mtlIDsto set different materials for subsets of triangles on one geometric object.MtlVRmat- Load a V-Ray shader from a .vrmat (formerly .vismat) file. Also supports loadingMtlSingleBRDFmaterials from vrscene files. This is used for transferring materials between different host applications.MtlGLSL- Loads a GLSL shader from file and provides some parameters for it.MtlOSL- Loads an OSL shader from file and provides some parameters for it.MtlRoundEdges- Smooths sharp edges within a given radius by modifying normals.
Some advanced materials:
MtlMaterialID- Can be used to define a unique color for a specific base material to be used in compositing from a dedicated render channel.MtlOverride- Allows you to override the base material for any of the following: reflections, refractions, GI, shadows, environment.MtlRenderStats- Overrides visibility and shadow settings for the object using a base material. This material is not to be used nested in bump, wrapper, two-sided or blend materials.MtlWrapper- (really advanced) Can be used to specify additional surface properties per material related to GI, render elements etc.
Below is a list of BRDF plugins for the materials. The difference between the Blinn, Phong, Ward, Cook-Torrance and GGX models is in how the specular highlight behaves and what parameters you have to control it. The respective BRDF plugins combine a diffuse and a glossy reflection component, while VRayMtl provides more options, like a Fresnel term, refraction, etc.
BRDFVRayMtl- The one BRDF plugin to rule them all. Combines all of the following except Cook-Torrance (not all at the same time - you choose a type). This is the preferred choice for most cases.See VRayMtl page for info on the different BRDF types.
BRDFBlinn- The Blinn BRDF model for glossy highlights. See Wikipedia article.BRDFCookTorrance- The Cook-Torrance BRDF model for glossy highlights. See Wikipedia.BRDFGGX- The new GGX (microfacet GTR) BRDF model for glossy highlights.BRDFPhong- The Phong BRDF model for glossy highlights. See Wikipedia article.BRDFWard- The Ward BRDF model for glossy highlights. See Wikipedia.BRDFDiffuse- A basic diffuse BRDF.BRDFGlass- A basic refractive BRDF.BRDFGlassGlossy- An extension of BRDFGlass that enables glossy refraction, meaning that rays with equal incoming angle refract at slightly different angles.BRDFLight- Self-illumination BRDF. Consider usingLightMeshinstead.BRDFMirror- A basic specular reflection BRDF.BRDFLayered- A weighted combination of any number of BRDF plugins. (This is also known as Blend material in the UI of V-Ray for 3dsMax and Maya.)
Some BRDFs simulating specific real world materials:
BRDFCarPaint- Simulation of metallic paint with base color, random metallic flakes and a coating layer.BRDFFlakes- Only the flake part of the car paint BRDF.BRDFHair3- A BRDF optimized for hair. Use withGeomHair.BRDFSSS2- Subsurface scattering for materials like wax, milk, resin, marble, etc. UseBRDFSkinComplexinstead for skin.BRDFSSS2Complex- SSS with even more parameters.BRDFScanned- This loads a real world material sample scanned to a file by our custom hardware. Email us for details.BRDFSkinComplex- A skin-specific SSS plugin.BRDFStochasticFlakes- A new plugin for randomly generated tiny sparkly particles. This produces a glittery material like ones found on some clothing and footwear.
And bump maps:
BRDFBump- Applies a bump map to some base BRDF.BRDFMultiBump- Combines up to 4 bump maps.
5.2. Textures and UVW generators
The BRDFs (and some lights) have many Color, AColor and Float parameter slots that can be textured. You will usually just load texture files, but V-Ray also offers many procedural textures, as well as texture plugins that serve as modifiers (i.e. apply some simple function, combine textures, extract data from one of the channels etc.). There are over 200 texture plugins, so we will only look at the most important ones. Many of the plugins are made for specific host applications. Apart from the texture data itself, V-Ray uses UVW generator plugins to generate UVW mapping coordinates or modify the original data from the geometry source. Using a UVWGen plugin is not obligatory.
For texture files:
TexBitmap- Uses the data from a bitmap buffer (see next two points) with some additional parameters, like color multipliers, tiling etc.BitmapBuffer- Loads an image file. A large number of formats are supported - lossy/lossless, from 8-bit to 32-bit. This is not a texture plugin and its only purpose is to feed data toTexBitmap. It has some options for filtering and gamma.RawBitmapBuffer- Same asBitmapBuffer, but uses uncompressed data from memory, instead of a file on disk.TexPtex- Texture loaded from a PTex file. This doesn't useBitmapBuffer.
Textures that modify and combine colors:
TexAColorOp- One of the most used combination plugins. It has two input AColor textures, two optional multiplier textures, an optional separate alpha channel input texture and a lot of output textures: sum, difference, product, division, min, max, intensity, power and single color channel outputs.TexBlend- Blend two input AColor textures using another float texture for weighting (or a constant value, of course).TexClamp- Clamp an input texture between some min and max values.TexCondition- Switch between two AColor textures depending on some type of comparison between two float textures.TexFloatOp- Similar to TexAColorOp for floats.TexGradient, TexGradRamp, TexRamp- Gradient textures.TexHSVToRGB- Convert HSV input texture to RGB.TexInvert- Returns the input texture's complementary color.TexLayered- Combine an unlimited number of textures.TexLuminance- Returns a single float luminance (0.3R + 0.59G + 0.11B) from input color texture. Note that in V-Ray terms this is different from the "intensity" term, which is (0.33R + 0.33G + 0.33B).TexMulti- Similarly toMtlMulti, choose a texture from a list by indexing with face material ID or object ID or randomized.TexRaySwitch- Use a different texture for different types of rays: shadow, GI, reflection, refraction and default.TexRemap- Remap an input texture color through some kind of user-defined curve.TexUserColorandTexUserScalar- Advanced usage with user attributes.
Some procedural textures:
TexChecker- A checkerboard pattern. The two alternating colors are also texturable.TexCloth- A weaved cloth pattern (as the one in Autodesk Maya)TexCellular- Procedural cellular noise pattern. Different types of cells are supported, including fractal.TexCurvature- A value proportional to local curvature at shading point.TexDirt- An ambient occlusion effect around concave edges and dents in the geometry (with an inversion option).TexDistance- Generates a color gradient according to distance from a specified list of objects.TexEdges- Generates wireframe color along polygon edges.TexFalloff- Generates a falloff gradient depending on the angle between surface normal and camera view direction or some other axis.TexFresnel- Used to generate Fresnel reflection color if you're not usingBRDFVRayMtl.TexLeather- Procedural leather imitation.TexMarble- Procedural marble imitation.TexNoise, TexNoiseMax, TexNoiseMaya- Different types of configurable procedural noise.TexRock- Procedural stone imitation.TexSmoke- Procedural 2d smoke texture.TexSnow- Procedural snow imitation. Covers surface in snow color down to some normal vector threshold.TexSoftbox- Specialized for use with rectangular lights to simulate real world "softbox" professional lighting.TexTiles- Procedural tiles with different layout options.TexWater- Procedural wave texture.TexWood- Procedural wood imitation.
Finally, the UVW generators:
UVWGenChannel- Modifier for UVW data coming from the geometry source. The main parameter isuvw_channel- the index of the mapping channel data to use (i.e.GeomStaticMesh::map_channels). The default is 1 as in 3dsMax where indexing starts from 1, but in your application this may be 0 or something else. If you set an index of -1 V-Ray will take the first available channel. This plugin also has transform, wrap and crop parameters as well as the option to get UVW data from another UVWGen plugin.UVWGenEnvironment- Used to map spherical, cube, etc. textures on the environment color slot or on dome lights.UVWGenExplicit- Define explicit UVW data from a texture.UVWGenMayaPlace2dTexture- Similar toUVWGenChannel, but with more options.UVWGenObject-UVWGenPlanarWorld-
6. Scene and render settings
A general note on settings plugins: when you create a new Renderer object there are no instances of them, so you will need to create them before changing parameters. If you start rendering the AppSDK will create a SettingsOutput and if the render mode is RT it will create SettingsRTEngine. On the other hand, if you're loading a scene from file, it will have instances of most (but not all) settings plugins and you need to use them. This is because every time V-Ray exports a vrscene file it automatically writes out the settings even if they are at default values.
Recommended settings API
Starting with version 1.09 nightly builds after June 14th 2016, the VRayRenderer class includes the method setImprovedDefaults(). It creates (if necessary) some settings plugin instances and sets several parameters to values different from the plugin defaults. These values match the defaults used in our main products, such as V-Ray for 3dsMax and Maya. The plugin defaults couldn't be changed for compatibility reasons (keep old scenes working as they were). But the UI default values have changed over time. Many of the parameters and respective values that are set by setImprovedDefaults() are mentioned in the paragraphs below. These are just good initial values. Feel free to use them or not, or to overwrite some of them, for example reducing quality to get faster renders.
6.1. Image and region size
These are controlled from the SettingsOutput plugin, but it is one of the few exceptions where you should not touch the plugin directly. The AppSDK has APIs for setting image and region size (i.e. renderer.setRenderRegion, depends on language).
6.2. Image sampling and filtering
V-Ray has several types of image samplers. These are algorithms that determine how many samples to take for each pixel. This is combined with an image filter, which can soften or sharpen the final image.
The image sampler is controlled from SettingsImageSampler. These are the four types for its type parameter:
type=0, Fixed sampler - It simply uses a fixed number of samples for each pixel. This is controlled by thefixed_subdivsparameter. This sampler type is not recommended.type=1, Adaptive samplertype=2, Adaptive subdivision sampler. This sampler type is deprecated.type=3, Progressive sampler
The progressive sampler produces whole images iteratively, refining them with each pass. The other samplers work on small "buckets" and only return an image when it is complete.
For details on the adaptive and progressive sampler see this page. You can also see what our CTO has to say about sampling: https://www.youtube.com/watch?v=tKaKvWqTFlw.
Some of the default values when you create (or if you don't) the SettingsImageSampler plugin are not optimal. They are currently kept for compatibility reasons. Here are some guidelines for changing them:
min_shade_rate- Use a value between 6 and 8.
For Adaptive sampler:dmc_minSubdivs- In general, keep at value 1 to avoid unnecessary sampling. There may be some exception cases (such as fog) where 1 is not enough and leads to visual artifacts.dmc_maxSubdivs- Start with 24 and increase if noise doesn't go away.dmc_threshold- Start with 0.005 and decrease it if increasingdmc_maxSubdivsdoesn't help with noise. You could keep it higher like 0.01 of course, if you want fast renders.
Progressive sampler:progressive_minSubdivs- Keep at value 1.progressive_maxSubdivs- Use between 60 and 100.progressive_threshold- Similarly todmc_threshold, start at 0.005 and reduce if noise persists. Don't go below 0.001.progressive_maxTime- This is a render time limit in minutes, so unless you want a safety limit, leave it at 0.
Most filters have just one size parameter for the kernel radius. Catmull-Rom has no parameters. The available filter plugins are:
FilterBox- All samples within a box with sides2*sizeare taken with equal weight.FilterArea- All samples within a circle with radiussizeare taken with equal weight.FilterTriangle- Sample weight falls off as a triangular function of off-center distance.FilterGaussian- The classical blur filter.FilterSinc- Less blurry low-pass filter. See Wikipedia.FilterLanczos(currently default in V-Ray for 3dsMax and Maya) - See Wikipedia.FilterCatmullRom- A cubic edge-enhancing filter.FilterCookVariableFilterMitNet- Mitchell-Netravali cubic filter with subjectively optimized compromise of blurring and detail in the additionalblurandringingparameters which correspond to B and C from the original paper.
To apply a filter, just create an instance of one of those plugins. You can use only one at a time.
Note: Do not create a SettingsImageFilter. It is deprecated. Use the plugins described above.
6.3. DMC sampler
We recommend leaving the parameters of SettingsDMCSampler at their default values, with the exception of use_local_subdivs. Set this to 0, so that only the global subdivs settings are used.
6.4. Global illumination
See this page for details on the different GI engines.
By default global illumination (GI) is disabled in an empty scene (with the exception of RT GPU mode where you can't disable GI). You need to set SettingsGI::on to 1 to enable tracing of secondary rays. Any photorealistic render needs GI, so apart from some kind of debugging, you will always want to enable GI.
Other SettingsGI parameters of interest are:
primary_engine- The primary GI bounce engine. We don't recommend using Photon Map for either primary or secondary. The possible values are 0=Irradiance Map, 1=Photon Map, 2=Brute Force, 3=Light Cache.secondary_engine- The secondary bounce GI engine. The possible values are the same as for primary engine, with the exception of Irradiance Map - if you set this to 0 it will disable secondary bounces.ao_on, ao_amount, ao_radius- Keep in mind that ambient occlusion (AO) is not a physically correct/accurate way to get shadows. If you enable ambient occlusion withao_on, ao_amountis a multiplier for the strength of the effect between 0.0 and 1.0 andao_radiusdefines the hemisphere that is evaluated for occlusion.
We don't recommend changing the contrast and saturation parameters.
The choice of GI engines and their parameters is paramount, especially for interiors where most of the illumination is indirect. Bad choices can lead to too much noise or artifacts and/or disproportionate render time for certain image quality. The common setup for interiors is Irradiance Map with Light Cache secondary and for exterior scenes it is often Brute Force primary with BF or LC secondary.
6.4.1. Brute force
The settings for Brute force are in SettingsDMCGI. There are only two parameters:
subdivs- Controls the number of new rays spawned at each intersection point. We recommend using the default value.depth- The number of secondary bounces to trace before stopping. Larger values may increase the brightness of indirect illumination at the cost of render time. The default is 3.
6.4.2. Irradiance map
The Irradiance map is configured through SettingsIrradianceMap.
The main two parameters are:
subdivs- The default is 50. Higher values can fix spot-like artifacts and lower values should improve render times.interp_samples- The default is 20. Setting a lower value may help if surfaces seem too blurry.
6.4.3. Light cache
The Light cache is configured through SettingsLightCache.
There are a lot of parameters for fine tuning and fixing specific problems but the main parameter is:
subdivs- The default is 1000. Higher values can fix spot-like artifacts and lower values should improve render times.
6.5. Environment
You can define environment background, lighting (GI), reflection, refraction colors or textures through the SettingsEnvironment plugin. Usually all slots have the same value. Environment textures use UVWGenEnvironment for spherical, cube etc. mapping.
You can also add scene-wide volumetric effects through the environment_volume list.
A special case is the Sun-Sky system. V-Ray has a special procedural texture, TexSky, for these environment slots that is coupled with SunLight. The color of the environment depends on the position of the Sun.
TexSky takes its parameters from SunLight if TexSky::sun is set. You can also use a TexSky without a Sun. For parameter details see the reference section at the bottom.
6.6. Units (scale)
Some calculations in V-Ray based on physics require accurate scaling of scene units to real world units like meters, Watts, seconds, etc. This is controlled through the SettingsUnitsInfo plugin with the properties listed below. This affects the physical camera, IES lights, volumetric effects, etc.
meters_scale- Multiplying scene sizes by this value should yield object sizes in meters.photometric_scale- Scale for photometric lights.seconds_scale- When doing animation, this is the reciprocal of the frameratescene_upDir- This needs to be set if the scene has an up-axis different from the default, which is +Z. This parameter is meaningful only for some plugins, if the client wants to implement rotation, for example.rgb_color_space- Affects Sun/Sky color, color temperatures and dispersion in refractive materials.
6.7. Physical camera
Although the name doesn't hint at it, the CameraPhysical plugin is a settings plugin (singleton). It modifies the way camera rays are shot for effects like DoF (depth of field) and distortion and how they are integrated into the image - exposure. The position and orientation of the camera is still defined by RenderView. Many of the parameters are exactly the same as on a real world DSLR or video/movie camera.
type- 0=still camera, 1=movie camera, 2=video camera Some parameters only apply for one of these types, because of the different types of shutter mechanism.fov- To use the value set here, also setspecify_fov=1. Otherwise thefovfromSettingsCameraandRenderViewis used.vignetting- Note that the default value is 1.0. You may want to set to 0.0 to have a uniformly exposed frame.white_balance- This color tint may be counter-intuitive. If you set it to blue, you'll get a warm image and so on.blades_enable- Set to true to enable bokeh effects.bmpaperture_enable- Set to 1 to use thebmpaperture_textexture.use_dof- Disabled by default. Set to 1 for ray-traced DoF. Note that just like in DSLRs the depth of the in-focus field depends on aperture and focus distance.use_moblur- Disabled by default. Set to 1 to enable camera motion blur.distortion_type- 0=quadratic, 1=cubic, 2=lens file fromlens_fileparameter; 3=texture fromdistortion_texparameter
6.8. Color mapping
This is controlled by SettingsColorMapping.
The default values when you create a SettingsColorMapping plugin are different from the recommended values in 3dsMax and Maya for legacy reasons. These are the values you should use for new scenes:
type=6// 6=Reinhard mapping (plugin default is 0=linear)dark_mult=1// don't change dark colors additionallybright_mult=1// don't change bright colors additionallygamma=2.2// close to sRGB (plugin default is 1.0)subpixel_mapping=0clamp_output=0clamp_level=1adaptation_only=2// 2=only apply color mapping (plugin default is 0=apply both color mapping and gamma)linearWorkflow=0// this is important - this option exists only for legacy scenes
6.8.1. Linear workflow
In order for V-Ray to perform mathematically correct calculations, input and output color data should be linear. The results should only be converted to a non-linear color space (such as sRGB) for display. This is called linear workflow.
For proper linear workflow, you need to set the SettingsColorMapping parameters gamma, adaptation_only and linearWorkflow to the values listed above. The parameter linearWorkflow is intended only for compatiblity with old vrscene files and should not be set to 1, despite its misleading name.
By default the VFB (V-Ray Frame Buffer) has its sRGB option enabled, so you will see the original linear image with sRGB applied as a post-process. The actual files you save from the VFB or with VRayRenderer::saveImage() will be linear like the actual data if saved in a floating point format like EXR or VRIMG. On the other hand, most 8/16-bit integer formats implicitly save their data gamma-encoded (e.g. JPEG applies ~2.2 gamma for dynamic range compression. Applications that read JPEG handle that and display the data in the required color space, gamma-encoded or linear). Saving to such integer file formats with saveImage() or from the VFB button also bakes any color corrections done in the VFB, including the sRGB conversion. So these files will look exactly like you see them in the VFB. This does not apply to EXR and VRIMG.
6.8.2. Bitmaps
There is one more place to control color mapping - BitmapBuffer - for texture file assets. It has two parameters for converting the image file colors - gamma and color_space. The gamma parameter is considered only when color_space=1 and makes texture reads apply inverse gamma to decode gamma-compressed values to linear. Most integer formats will require setting color_space=1 and gamma=0.454545. When color_space=2, sRGB decoding is performed (similar, but not identical to color_space=1 & gamma=0.4545).
6.9. Stereo and panorama rendering
For spherical panorama rendering you need to:
- Change the
typeparameter ofSettingsCamerato 9. (Note thattype=1is spherical, but not for panoramas.) - Set the field of view to 360 degrees or rather
2*pi, because thefovparameter is in radians. You need to do this with theRenderViewplugin and withSettingsCamera- both have anfovparameter. Also if you're usingCameraPhysicalwithspecify_fov=1, setfovthere too. - Set the vertical field of view to 180 degrees. This may be a bit confusing: it is set through the
heightparameter ofSettingsCamera. Also the value is not in radians, but in degrees.
For cubic (6x1) panorama rendering you need to:
- Change the
typeparameter ofSettingsCamerato 10. - Set a resolution with aspect ratio 6:1 (or 12:1 if you are doing stereo). So for a stereo cubic panorama with 1000x1000 pixel cube sides you will render at 12000x1000.
For stereo rendering:
- For CPU (Production or RT) rendering you need to create a
VRayStereoscopicSettingsplugin. It has to be created afterSettingsCameraandSettingsOutput or it won't work!It's recommended to change theVRayStereoscopicSettings::focus_methodparameter to 1 for panorama or 2 for normal camera. - For GPU rendering you need to set
RenderView::stereo_onto 1. You might also want to setRenderView::stereo_eye_distanceto something like 6.5 (average human), instead of the default 1.0. It's recommended to change theRenderView::stereo_focus_methodparameter to 1 for panorama or 2 for normal camera.
Also remember to set a double horizontal resolution for stereo. So if your normal render resolution is 640x480, make that 1280x480. The left half of the image will be the left eye view and the right half is the right eye.
6.10. RT Engine
If your renderer object was created with RT CPU or RT GPU mode parameter, you can control RT-specific parameters with SettingsRTEngine. Note that GI is always enabled when rendering on the GPU and cannot be disabled.
trace_depth- The maximum depth for tracing reflection and refraction rays. Defaults to 5.gi_depth- The maximum depth for tracing diffuse GI rays. Defaults to 3. Lower if you need faster rendering and the scene is exterior. For interiors you may need to increase to get enough lighting, otherwise the scene may remain too dark.coherent_tracing- Experimental grouping of rays for coherency (disabled by default). This can improve performance on GPUs because they handle non-divergent code better. The first few sampling passes will have lots of artifacts, because entire groups of rays move together. Over time this should disappear and the final result should converge to the same image as when this is turned off. This option is only useful for interiors with lots of GI on GPU.cpu_bundle_size- A performance-related parameter. This is the number of rays that get processed together. The default value of 64 for CPU is good.cpu_samples_per_pixel- Number of samples to take for each pixel at one sampling pass. If you set lower, you will get images more often, which is good for interactivity. If you set it higher, you may reach final quality a tiny bit faster, because of the fewer back-and-forth sampling passes, but you will have to wait more between images and it may feel unresponsive when trying to change something in the scene.gpu_bundle_size- Analogous tocpu_bundle_size, but for GPU mode. The default is 256 and changing it may improve performance. The optimal value depends on GPU architecture and model, so you need to experiment. It may be below or above 256, but the default shouldn't be too far from the optimal performance.gpu_samples_per_pixel- Analogous tocpu_samples_per_pixel, but values can be set higher, because GPUs have better performance. You can still set it to 1 for maximum interactivity.progressive_samples_per_pixel- If set to true, set the samples per pixel to 1 for the first pass and double that number on each consecutive pass untilcpu/gpu_samples_per_pixelis reached. This lets you get some faster feedback initially, because the image difference between the first passes is larger.undersampling- When set above 0, start rendering at 1/(2^undersampling) resolution. So for example if the value is 4, sampling will start at 1/16 of the original resolution. When one pass is made at this resolution, the resolution is doubled and this repeats until the full resolution is reached. In our example this will return images sampled at 1:16 resolution and then 1:8, 1:4 and 1:2 (The images have the full resolution, but values are repeated for pixels that haven't been sampled). This is for faster feedback, but the images are highly pixelated.max_sample_level- If set above zero, stop rendering when this amount of samples per pixels is reached. This is set through the renderer object's constructor.max_render_time- If set above zero, stop after this many minutes (float number) have passed. This is set through the renderer object's constructor.noise_threshold- If set above zero, stop rendering when the noise difference between neighboring pixels falls below this threshold for all pixels. The unit used is defined by the internal noise-calculating algorithm (same as the thresholds inSettingsImageSampler). Values are usually between 0.001 and 0.1. This is set through the renderer object's constructor.max_draw_interval- Controls partial image updates if set above (the default) zero. This is the maximum time in milliseconds between image updates. So you get a potentially partial image update every time this time elapses. This lets the user see preliminary results earlier. The value in V-Ray for 3dsMax and Maya is 150.min_draw_interval- This is the minimum time between image updates. Set above zero if you want to limit the amount of drawing in the VFB or your own viewport. This may help with CPU and memory utilization when the rendering is very fast. The value in V-Ray for 3dsMax and Maya is 50.opencl_texsize- Despite the name, applies to both OpenCL and CUDA mode. This is the resolution to which textures are re-sampled ifopencl_resizeTexturesis true and the texture is larger than that. This is intended to help with limited GPU memory, but you may increase it from the default 512 to avoid losing detail if you have enough memory.opencl_resizeTextures- If true, applyopencl_texsize.opencl_textureFormat- Determines bit-depth of textures after reading into memory. 0=32-bit float, 1=16-bit float, 2=8-bit. Default is 16-bit.disable_render_elements- False by default. If set to true, no render elements will be calculated, which may save some computation and memory.
The render stops when any one of max_sample_level, max_render_time or noise_threshold is reached. If all are zero, the sampling goes on indefinitely.
6.11. Miscellaneous
The SettingsRaycaster plugin has one main parameter of interest:
embreeUse- You'd want to set this to 1 (default is 0), because it increases raytracing performance.
SettingsRegionsGenerator controls the size and order of generation of buckets in production mode.
xcandyc- Horizontal and vertical size of the buckets.seqtype- The order of generation of new buckets - 0=Top-Bottom; 1=Left-Right; 2=Checker; 3=Spiral; 4=Triangulation; 5=Hilbert curvedynbuckets- This is enabled by default. It lets V-Ray create smaller buckets toward the end of the rendering to improve load balancing. Set to 0 if you want your buckets to always have the same size.
SettingsOptions holds many miscellaneous options, some of which are:
gi_dontRenderImage- Set to 1 if you're baking a GI prepass (Irradiance Map or Light Cache) file and want to skip the actual rendering.mtl_maxDepth- The maximum number of bounces to trace for reflections and refractions. Defaults to 5. Only increase if you need to. In RT mode setSettingsRTEngine::trace_depthinstead.misc_transferAssets- Try to transfer missing assets in distributed rendering (DR) from the client to the render server. Disabled by default.misc_abortOnMissingAsset- Fail DR if an asset can't be found. Disabled by default.ray_max_intensityandray_max_intensity_on- If you enable it withray_max_intensity_on,ray_max_intensityclamps the values of some very bright samples to avoid the hard to clean up "firefly" artefacts at the cost of slightly wrong overall image brightness.num_probabilistic_lightsandprobabilistic_lights_on- (experimental) The number of lights to sample for probabilistic lighting ifprobabilistic_lights_onis true. Probabilistic lighting improves render speeds with hundreds and thousands of lights by only sampling a few of the "important" light sources.misc_lowThreadPriority- Render with low thread priority to improve multitasking. Disabled by default.
See this page for more SettingsOptions parameters.
If you save the rendered image from the VFB and not from an AppSDK API, the corresponding Settings{JPEG|PNG|EXR|TIFF} plugin controls compression quality and bits per channel. You may need to change these according to your needs.
If you want to enable motion blur, set the SettingsMotionBlur plugin on parameter to 1. It also has the geom_samples parameter that affect quality, but may cost a lot of render time if increased. It should equal the number of geometry samples in the geometry data if it is non-static. Note that this plugin (SettingsMotionBlur) conflicts with CameraPhysical.
The SettingsLightLinker plugin allows you to define include or exclude lists for lights and objects, so that for example specific lights do not affect some objects etc. Refer to the plugin parameter metadata for explanations.
SettingsCaustics can enable improved rendering of caustic effects with photon mapping. This also requires setting some material parameters to make it work.
If you are not using CameraPhysical for depth of field, you can use SettingsCameraDof instead. Note that this plugin (SettingsCameraDof) conflicts with CameraPhysical.
on- Set to true to enable DoF.aperture- The size of the camera aperture in scene units. Note that increasing this number corresponds to decreasing the physical camera's F-number.focal_dist- Distance from the camera to the focus plane in scene units.
The .vrscene can store multiple cameras, where only one can be set as ‘renderable’ at a time. The rest of the cameras can be chosen for rendering, for example in V-Ray Standalone, by using the -camera command flag. This is useful, as oftentimes a project requires rendering different sequences from different cameras, while nothing else changes in the scene - a simple example would be to render two different views of the same visualization and in this way, the same scene can be rendered twice with V-Ray Standalone. An example scene with two cameras would have one them to render by default while the other will have dont_affect_settings flag raised.
In shading setups, textures can be projected from cameras. This can either be the same camera used for rendering, or another camera in the scene, used only for projecting a texture. In both cases, an extra SettingsCamera and RenderView plugin is exported for the camera projection with the dont_affect_settings flag raised. This is similar to the Multiple Cameras setup. In all cases, it’s a good idea to export one camera for rendering, and another one for the texture projection, even if it’s the same camera, as different properties apply for each.
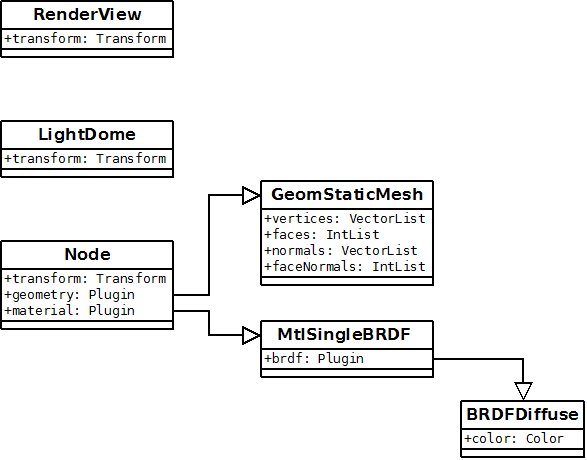
7. Minimal renderable scene
This is a diagram of the most simple possible scene that will render an object. These are the plugins and parameters you will need to create and set.
A. Brief plugin reference
This reference does not list all of V-Ray's plugins, but most users will rarely need the ones that are not mentioned here.
Also only some of the parameters are explained here. As a general rule, follow the advice in Debugging and help when looking for info on plugins.
A.1. Common plugins
Light plugins (see also section 3 above)
LightOmni
decay- The exponent for intensity decay. Default value is 2.0 which corresponds to the inverse square law.
LightSpot
coneAngle- Full cone angle in radians.penumbraAngle- The size of an additional partly lit area around the cone in radians. If negative it's inside the cone.dropOff- Attenuation proportional to off-axis angle. Larger values dim the light toward the wide angles of the cone.falloffType- The type of transition in the penumbra region. 0 - linear; 1 - smooth cubicdecay- The exponent for intensity decay. Default value is 2.0 which corresponds to the inverse square law.
LightRectangle
noDecay- If set to true, light intensity will not fall off with distance. By default the inverse square law applies.doubleSided- Whether to emit light from the back sides of the rectangle.u_size- Width of the light in scene units.v_size- Length of the light in scene units.directional- Larger values make the light more concentrated along the +W axis in local UVW space.is_disc- True to round the rectangle to a disc (ellipse).rect_tex- A texture plugin to map onto the rectangle for light color.use_rect_tex- You also have to set this to true to actually use therect_texparameter.tex_resolution- The texture is actually resampled at this resolution. The default is 512, so even if you have a high resolution image, it may look pixelated if you don't increase this. This will consume more memory.
LightSphere
noDecay- If set to true, light intensity will not fall off with distance. By default the inverse square law applies.radius- Radius of the generated sphere in scene units.sphere_segments- Number of flat segments composing the sphere. Increase from the default 20 if you want a smoother shape.
LightMesh
noDecay- If set to true, light intensity will not fall off with distance. By default the inverse square law applies.doubleSided- Whether to emit light from the back sides of the triangles.geometry- A geometry plugin that will define the shape of the light. Note that complex geometries may make mesh lights slower and noisier.tex- A texture plugin to map onto the geometry for light color. This requires that the geometry plugin has valid UV data.use_tex- You also have to set this to true to actually use thetexparameter.tex_resolution- The texture is actually resampled at this resolution. The default is 256, so even if you have a high resolution image, it may look pixelated if you don't increase this. This will consume more memory.
LightDome
dome_spherical- Set to true to extend the dome to a full sphere. By default it is only a half-dome centered at the scene zenith.SettingsUnitsInfo::scene_upDirneeds to be properly set.dome_tex- A texture plugin to use for IBL. Note that this usually requires spherical mapping.use_dome_tex- You also have to set this to true to use thedome_tex.tex_resolution- The texture is actually resampled at this resolution. The default is 512, so even if you have a high resolution image, it may look pixelated if you don't increase this. This will consume more memory.
LightIES
ies_file- Path to the file describing the light sourcefilter_color- Use to tint the light. The default is white (1.0, 1.0, 1.0). Light color is defined by color temperature in the IES file.soft_shadows- Set to 0 (default) to cast hard shadows as point light; 1 to use the shape of the light for shadows; 2 to also use the shape for illuminationpower- Overrides the power specified in the file if > 0. The unit is lumens.ies_light_shape- Overrides the shape in the file if set to >= 0. Possible enumerated values: see table below.ies_light_width- Used ifies_light_shapeoverride is on.ies_light_length- Used ifies_light_shapeoverride is on.ies_light_height- Used ifies_light_shapeoverride is on.ies_light_diameter- Used ifies_light_shapeoverride is on.shape width length height diameter 0=point 0 0 0 0 1=rectangle >= 0 >= 0 0 0 2=circle 0 0 0 < 0 3=sphere 0 0 0 < 0 4=vertical cylinder 0 0 > 0 < 0 5=horizontal cylinder (length) 0 > 0 0 < 0 6=horizontal cylinder (width) > 0 0 0 < 0 7=ellipse (length) < 0 > 0 0 0 8=ellipse (width) > 0 < 0 0 0 9=ellipsoid (length) < 0 > 0 < 0 0 10=ellipsoid (width) > 0 < 0 < 0 0
SunLight
transform- Similarly to the direct light plugin, the position doesn't matter as the light comes from infinity. The rotation matrix has to be set correctly, even though in theory the Sun is omnidirectional. The identity matrix results in light directed along the -Z axis, thus a noon Sun.target_transform- Currently doesn't make a difference. Don't leave uninitialized - set an identity transform.turbidity- See VRaySunozone- See VRaySunwater_vapour- See VRaySunsize_multiplier- See VRaySuncolor_mode- See VRaySun. Values are 0, 1, 2 respectively for Filter, Direct, Override mode.intensity_multiplier- Relative intensity of the Sun (default 1.0). Try setting correct scales in SettingsUnitsInfo first.filter_color- Force a color tint. It's probably better to leave this white. See also thecolor_modeparameter.ground_albedo- Sky parameter, unused if there is no sky attached. Account for light reflected off an imaginary ground and scattered back in the sky. Default is (0.2, 0.2, 0.2).horiz_illum- Sky parameter, unused if there is no sky attached. Specifies the intensity (in lx) of the illumination on horizontal surfaces coming from the sky ifsky_modelis 1 or 2.sky_model- Sky parameter, unused if there is no sky attached. Selects the mathematical model approximating sky illumination. Values: 0=Preetham et al; 1=CIE Clear; 2=CIE Overcast; 3=Hosek et al.up_vector- Set to (0.0, 1.0, 0.0) if your scene up-axis is +Y to have correct lighting.- invisible - Makes the Sun invisible to the camera and in reflections.
Geometry plugins
Node
transform- World transformation applied to the geometry vertices which are defined in object space.geometry- Reference to a geometry source plugin, such asGeomStaticMeshfor example.material- Reference to a material plugin. This should always be aMtlSingleBRDF. (Note that you can plug other Mtl plugins in thebrdfslot ofMtlSingleBRDF)visible- Set to false to disable the object. It will not be included in the raytracing intersection tree.
GeomStaticMesh
vertices- VectorList with the vertex coordinates in object space.faces- IntList with indices in theverticesarray. Every three indices make a triangle. The same vertex index may be used multiple times (for the different triangles it is part of).normals- VectorList with normal vectors in object space. These can have a different count fromvertices.faceNormals- IntList with indices in thenormalsarray. Every index defines the normal for the corresponding vertex in thefacesarray.map_channels- An optional list of lists, where each inner list is generic and has three elements. The first element is the channel index (usually starting from 1), followed by a VectorList with UVW coordinates (leave W at 0.0 when you're only mapping 2D). The third element is an IntList with indices in the UVW array. Each index corresponds to a vertex defined in thefacesarray.map_channels_names- An optional list of strings with names for the corresponding elements of themap_channelslist.face_mtlIDs- An optional IntList with material indices for each triangle. The number of indices is equal to the length of thefacesarray divided by 3.dynamic_geometry- If set to true, the geometry will not become part of the static intersection tree. Only its bounding box will be used and if that's intersected a separate local tree will be intersected. This may boost performance for real-time rendering of moving objects.
GeomStaticNURBS
cvs- List of lists of Vectors. Each inner lists contains the control vertices for one NURBSweights- Lists of lists of floats with weights for each CV in the correspondingcvslist.uKnots- List of floats with knot values in the U direction.vKnots- List of floats with knot values in the V direction.generateStatic- Set to true to generate explicit static triangles in memory instead of the implicit NURBS surface.
GeomStaticSmoothedMesh
mesh- The base mesh, usually aGeomStaticMesh.static_subdiv- If set to true, the new generated triangles will be saved in the static rayserver tree. This will increase memory usage.use_globals- Whether to use the global settings fromSettingsDefaultDisplacement. Default is true.view_dep- Ifuse_globalsis false, whether the amount of tesselation is view-dependent. The global default is true.edge_length- If the view-dependent option is on (globally or locally), this is the target edge size to subdivide to in pixels. Otherwise it is in scene units.max_subdivs- Ifuse_globalsis false, the maximum number of triangle subdivisions for this mesh.
GeomDisplacedMesh
mesh- The base mesh, usually aGeomStaticMesh.static_displacement- If set to true, the new generated triangles will be saved in the static rayserver tree. This will increase memory usage.use_globals- Whether to use the global settings fromSettingsDefaultDisplacement. Default is true.view_dep- Ifuse_globalsis false, whether the amount of tesselation is view-dependent. The global default is true.edge_length- If the view-dependent option is on (globally or locally), this is the target edge size of the generated triangles in pixels. Otherwise it is in scene units.max_subdivs- Ifuse_globalsis false, the maximum number of triangle subdivisions for one original triangle of this mesh.
For the rest of the parameters refer to VRayDisplacementMod.- displacement_tex_color
- displacement_tex_float
- displacement_amount
- displacement_shift
- keep_continuity
- map_channel
- object_space_displacement
- use_bounds
- min_bound
- max_bound
- resolution
- precision
GeomHair
- TODO
GeomMeshFile
file- Path to the vrmesh or abc file to load.object_path- When using Alembic, the starting object path string.
Textures and UVWGenerators
TexSky
- sun - A reference to a SunLight instance. All sky parameters are taken from the Sun plugin, unless sun_dir_only is set to true.
- sun_dir_only - Only take the position and direction of the Sun. Use the TexSky parameters for everything else.
A.2. Other plugins
CameraDome
EffectLens
GeomParticleSystem
mesh- A mesh plugin to use for some types of instances, depending onrender_type.render_type- 3=multipoints; 4=multistreak; 6=points; 7=spheres; 8=sprites; 9=streak. The default is 7.colors- ColorList with a color for each particle.positions- VectorList with the particle positions.velocities- VectorList with velocities for motion blur. The values are in world units per frame.
For the rest of the parameters for particular particle types, check the parameter list as described in Debugging and help.
VRayClipper
Volumetric plugins
The information from this page is also available at User Guide V-Ray Application SDK.