This page provides information about the Bump material in V-Ray for Revit.


Overview


The Bump Material gives the ability to add bump map and normal map effects when using any material.

Simply apply a Bump Material to an object to add additional bump or normal map functionality. Stacking multiple Bump Materials together can create a more complex surface material by allowing the use of several bump and or normal maps together easily.

One of the common use cases of the Bump material is to produce a Round Edges effect for other materials with already existing Normal or Bump mapping. The correct workflow is the following:

  1. Have a material with set up Bump or Normal mapping;
  2. Create a Bump material set to Bump Texture Channel mode and connect an Edges texture for the rounded corners effect;
  3. Slot the first material into the Bump material to achieve the combined effect.


UI Options


The Bump material settings are organized in Basic and Advanced modes. You can switch the mode from the toggle button under the Preview Swatch.

Add Layer and Add Attribute buttons are provided for some V-Ray materials, including Bump. You can select an additional layer that can add up to the appearance of the material. For more information, see the Layers section and the Attributes section.

Holding down Ctrl while having the Add Attribute or Add Layer menu open, allows selecting multiple entries without closing the dropdown.

The context menu of the Color slot provides options to Copy and Paste, as well as to Reset the color.

A Reset option is provided in the context menu of each Number Slider. You can reset the slider value to the default one.


Parameters


Base – Allows the user to select the base material to which the bump/normal effect is added.


Bump


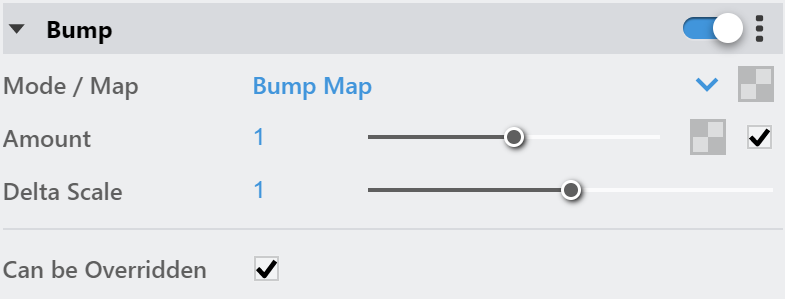
Mode / Map – Allows the user to specify whether a bump map or a normal map effect is added to the base material.

Bump Map – A height map should be used.
Bump Texture Channel
– Most commonly used for the Round Edges effect (Edges texture used as bump).
Normal Map
RGB map should be used. If a Bitmap texture is slotted its color space must be set to Rendering Space (Linear).

Normal Map Type – Specifies the normal map type. This options is available when Normal Map is selected as Mode/Map.

Tangent Space – Uses tangents set to each individual face.
Object Space – Uses each object's local coordinates.
Screen Space – Uses a flat projection along the camera direction.
World Space – Uses world coordinates.

Amount – A multiplier for the bump/normal map.

Delta Scale – It specifies a scale for sampling the bitmap when Bump Map is selected. The exact value is calculated automatically by V-Ray, but can be scaled here.


Example: Bump vs Generic material with bump


In this example, bump maps are used for the surface of the table. Both Generic and Bump materials can control the strength of the bump map by using a multiplier. The Bump material has a higher multiplier value than the Generic bump map.


Override Control


Can be Overridden – When enabled, the material can be overridden when you enable the Opaque override option in the Global Overrides tab of Appearance Manager.


Attributes


The Attributes available for the Bump material are as follows.


Translucency


Bump


Outline


Displacement


Raytrace Properties


Override


Material ID


Layers


The Layers available for the Bump material are as follows.

VRay Mtl

Emissive

Diffuse Coat

Reflective Coat

Flakes 2

Stochastic Flakes