This page provides an introductory QuickStart guide to using V-Ray for Nuke.
Overview
In this tutorial we are going to set up and render a simple scene using the V-Ray plugin for Nuke. This exciting new plugin gives you the ability to generate realistic reflections, refractions, subsurface scattering and image-based lighting directly in Nuke.
First, we are going to create a simple comparison scene between the Nuke Scanline renderer and the V-Ray renderer inside of Nuke. Later on we will explore some materials and apply them to the geometry and look at how to add some V-Ray lights such as the VRay Light Dome. We'll then move on to adding some V-Ray render elements such as a MultiMatte, a Zdepth pass and a Specular, Reflection and Diffuse pass. We will then render this out to an EXR node and check out the render layers we have created.
To follow this tutorial, you will need to have the V-Ray for Nuke plugin installed. This tutorial is a companion to go along with the QuickStart video posted on our YouTube channel.
Tutorial Assets
To download the files used in this tutorial, please click on the button below.

Due to licensing issues, the Road_A.hdr file used in the tutorial video is not included in the downloadable assets. Instead, please use one of the provided HDR images in its place.
Tutorial Steps
1) Set up comparison rendering
First, let's set up a comparison scene between the V-Ray Renderer node and the standard Nuke Scanline renderer so we can compare the two as we go through the techniques in this tutorial. To see the comparison, let's create a CheckerBoard and connect this to a Card with values set as shown in the image below.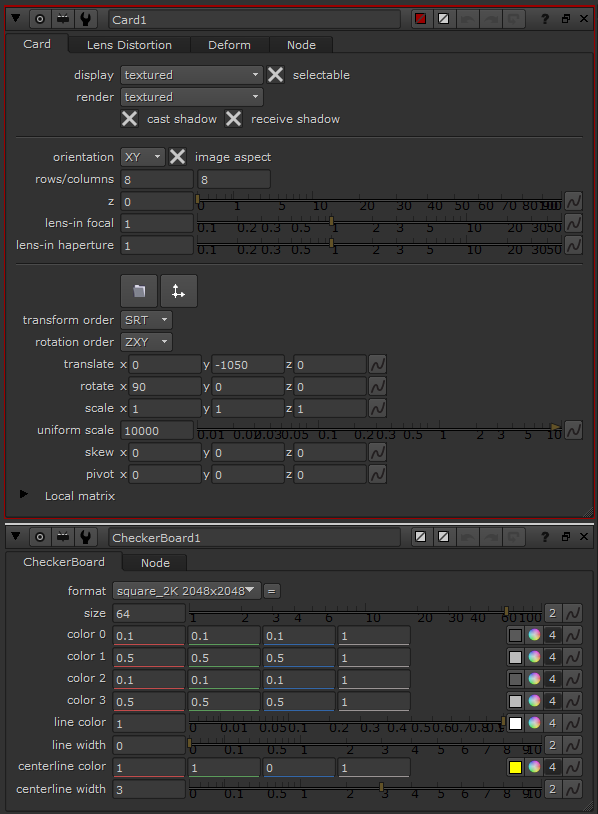
We bring in the geometry using the ReadGeo node and then add a Scene node named Geom. Connect the Geom node to the Card (to which the checkerboard is connected) and the ReadGeo node. To this we connect a Nuke ScanlineRender node and then add and connect the Camera node with the values shown.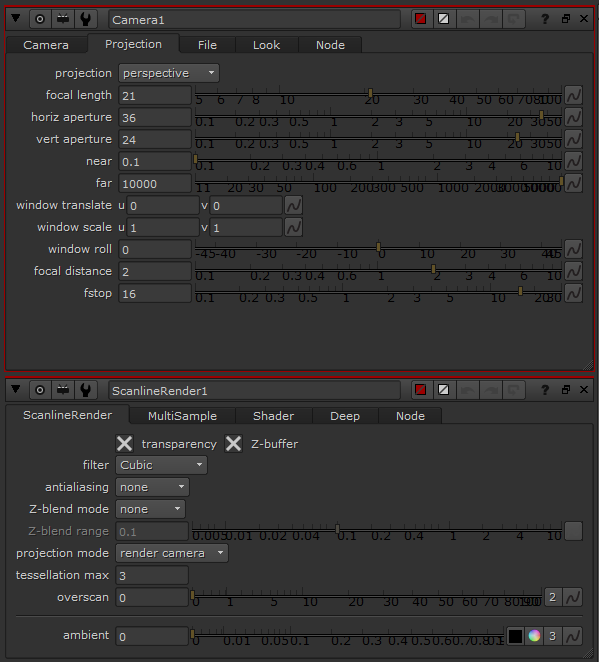
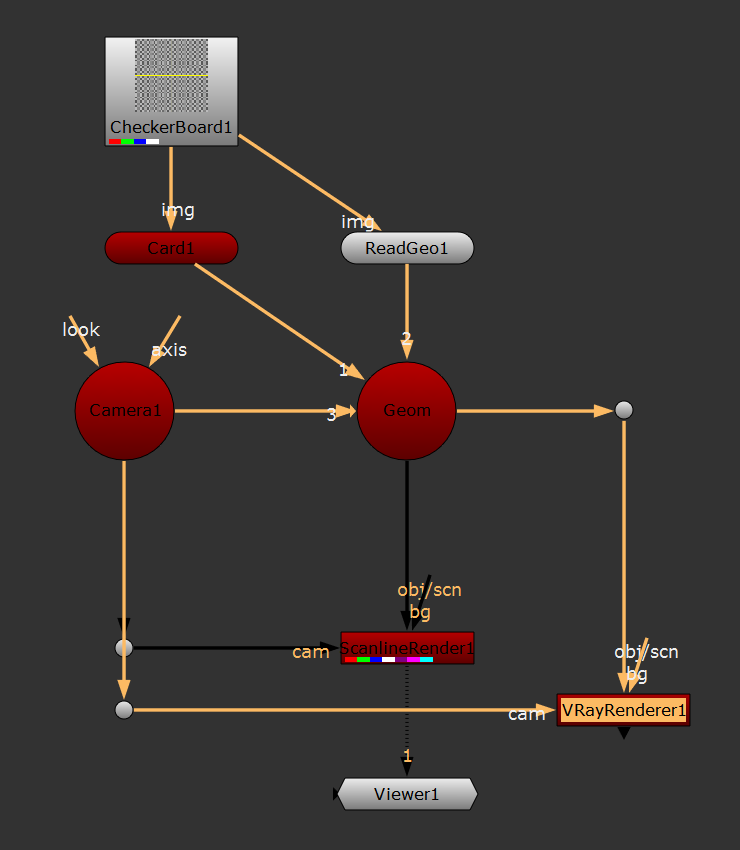
You should now be able to see a very simple Scanline renderer setup. To set up a V-Ray rendering for comparison we are going to keep everything the same, using the same values but simply connecting a VRayRenderer node to both the scene and the camera. In order to have a true ability to compare, we must change the VRayRenderer filter mode to Cubic (as shown) so that it matches the Scanline renderer. If you switch between the results of the Scanline render and the VRayRenderer node, you will see that V-Ray for Nuke gives far cleaner results.
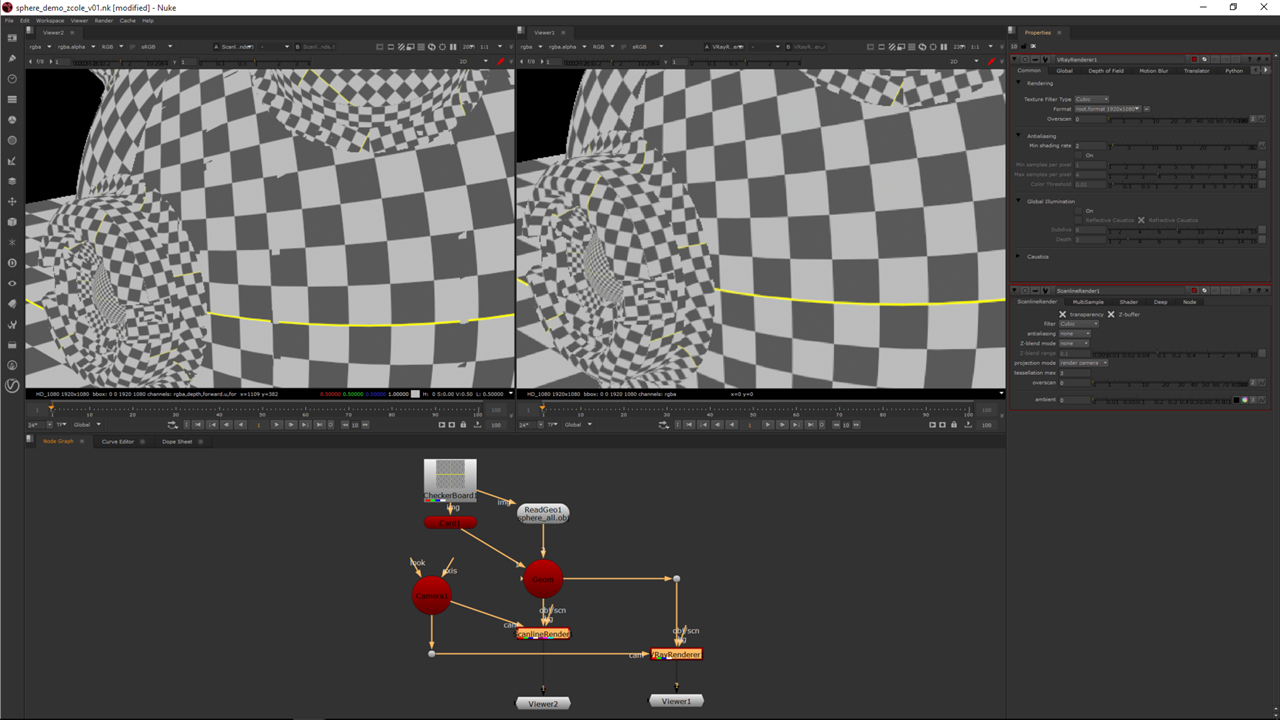 Scanline render on the left; V-Ray render on the right
2) Add a material
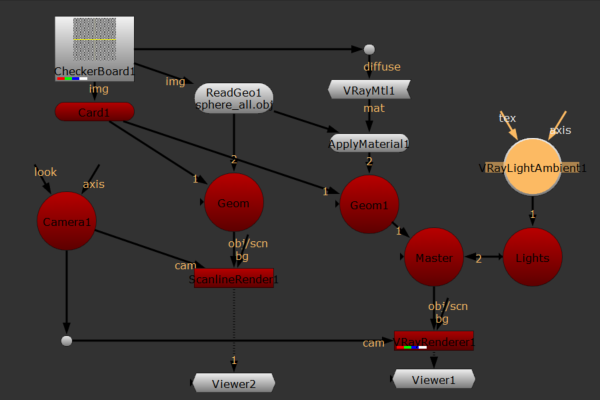
Let's add a little more complexity to the scene. Copy the existing Scene node, place the copy to the right of your current nodes, and connect it to both the Card node and the ReadGeo node. Also connect it to your VRayRenderer node.
Let's add a V-Ray material to the scene by adding in the VRayMtl node. Connect this node to the checkerboard which will cause the checkerboard to act as a diffuse color texture. To have the material applied to geometry, we must create an ApplyMaterial node and connect it to the VRayMtl node and ReadGeo node. Also connect it to the new scene (which has been automatically named Geom1).

If you take a look at the V-Ray rendering now, you'll notice that the geometry appears as completely black because there are no lights to illuminate the texture in the rendering. The Nuke Scanline renderer uses an ambient light, which is why you can see the texture in the Nuke rendering.
3) Add ambient light
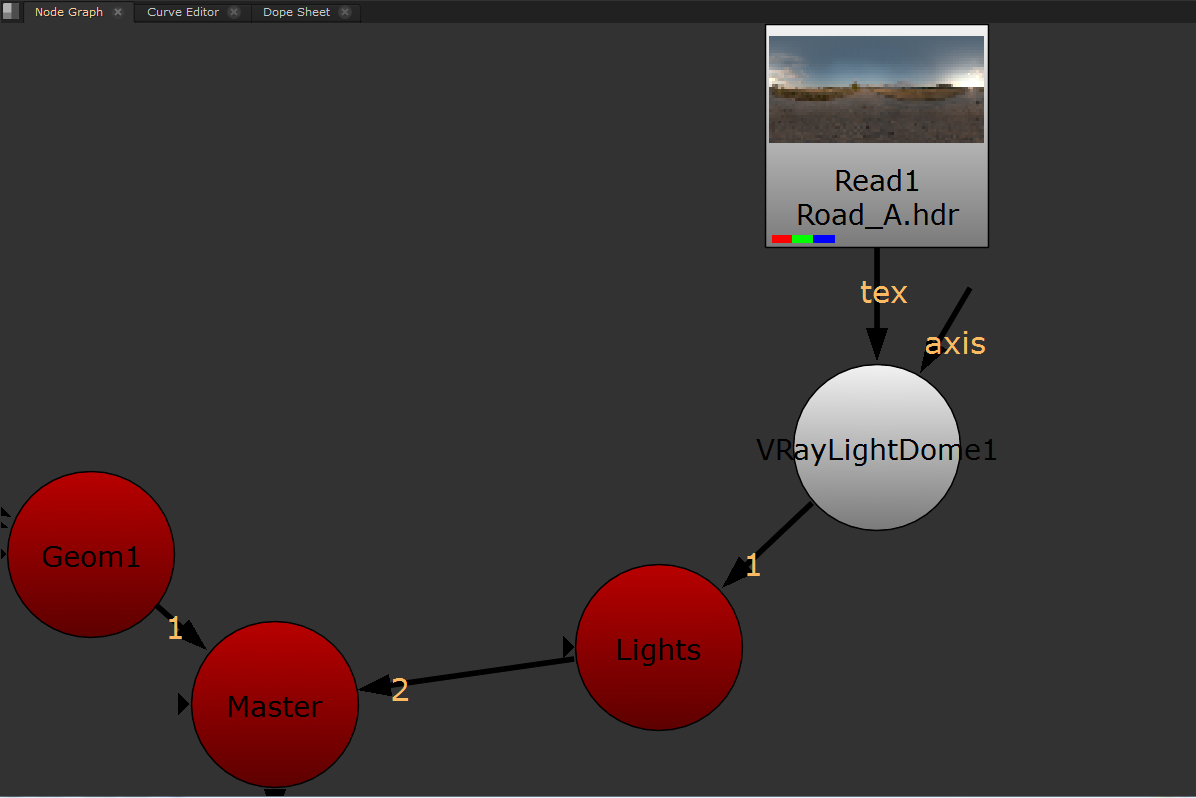
We are going to add a V-Ray light ambient light to match the V-Ray rendering's lighting more closely to the Nuke Scanline rendering. Create a VRayLightAmbient node, and also a new scene named Lights so we can keep things well organized. Under the Geom1 scene, create another scene named Master Scene and connect the scene named Lights to it. You'll now notice that the V-Ray rendering is lit, and you can see the texture.
 V-Ray ambient light added to scene
4) Add ambient occlusion
We are now going to take a look at some lighting techniques that can be used in your renderings in Nuke.
Ambient occlusion is a shading and rendering technique used to calculate how exposed each point in a scene is to ambient light. In scenes with open sky this is done by estimating the amount of visible sky for each point, while in indoor environments only objects within a certain radius are taken into account and the walls are assumed to be the origin of the ambient light. The result is a diffuse, non-directional shading effect that casts no clear shadows but that darkens enclosed, occluded and sheltered areas and can affect the rendered image's overall tone. It is often used as a post-processing effect.
We don't need the textures active on the geometry when making an ambient occlusion, so disconnect the CheckerBoard texture from both the Card node and the VRayMtl node.
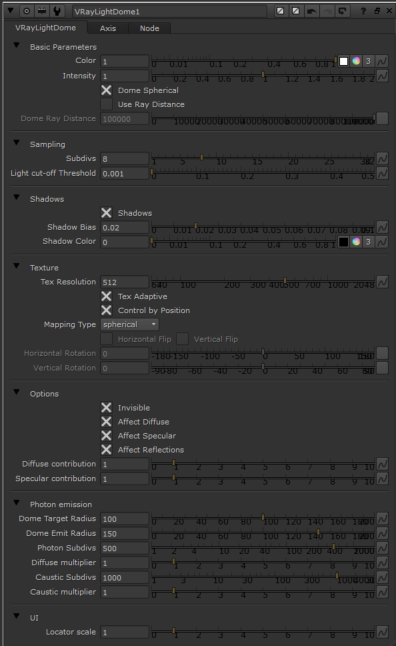
Add a VRayLightDome node, which will create a V-Ray light dome for us. Connect this to the Lights scene instead of to the VRayLightAmbient node.
By default, the VRayLightDome is set to be the upper half of a white sphere that gives an even light and is also visible in the rendering. If you don't wish to have it in your rendering, check the Invisible checkbox under the Options section. When this option is checked, the light dome is still active and visible to the diffuse, specular and reflection colors but is invisible to the camera. The VRayLightDome can also be set to use a full sphere instead by checking the Dome Spherical checkbox under Basic Parameters.
Ambient occlusion using a VRayLightDome with no textures, light dome set to visible to camera
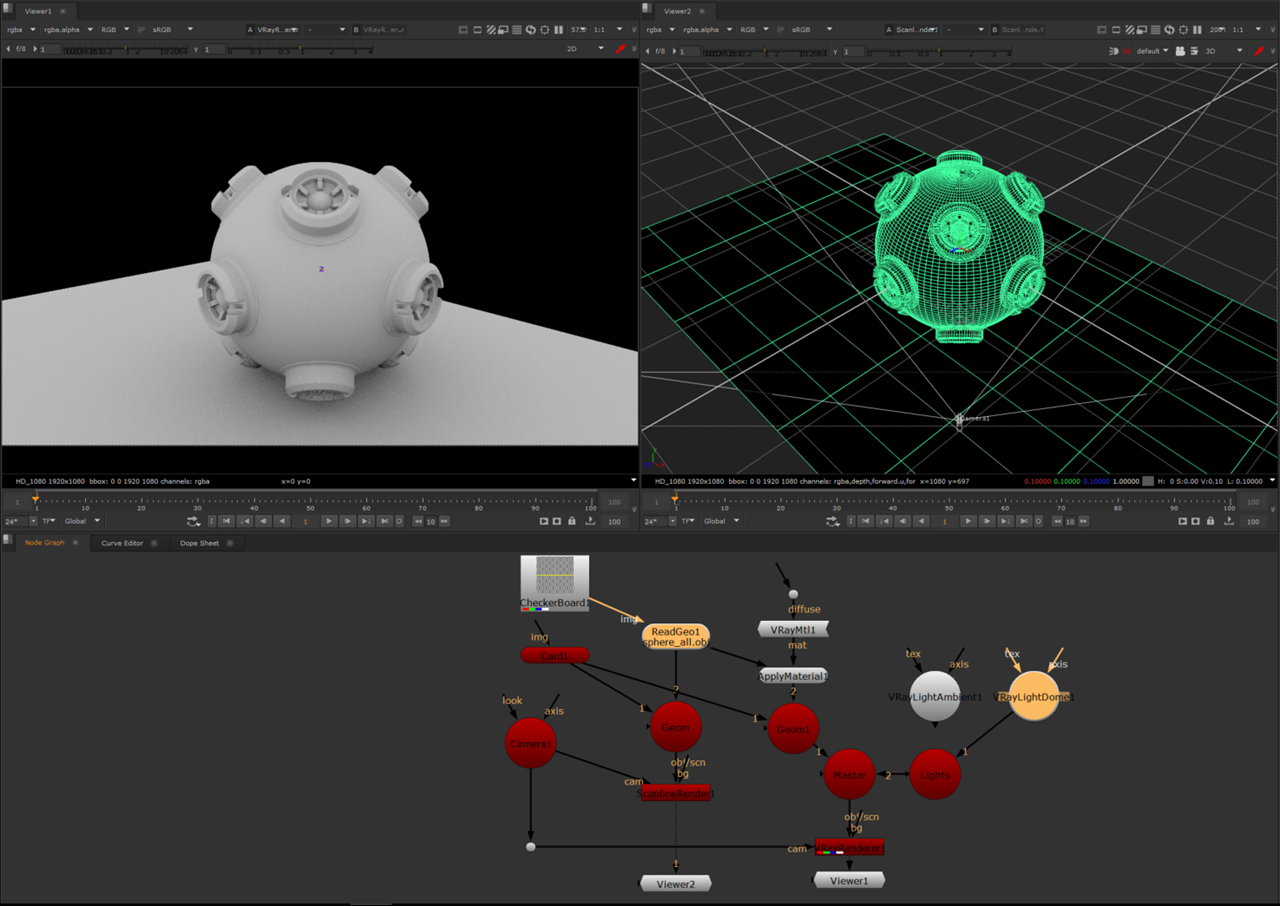
VRayLightDome set to be invisible to camera
5) Add HDR texture
We can now add an HDR texture to light the scene by bringing the HDR into a Read node and connecting it to the Tex input of the VRayLightDome. This makes the HDR the texture for the VRayLightDome and allows us to have highly accurate lighting based on the HDR image. The HDR at this point is visible in the background the same way the light dome was when we used the same node for the ambient occlusion setup. So if, for example, we were using a plate that we were lighting to, we would again check the Invisible checkbox in the VRayLightDome.
 HDR lighting using an HDR on the VRay Light Dome as a texture
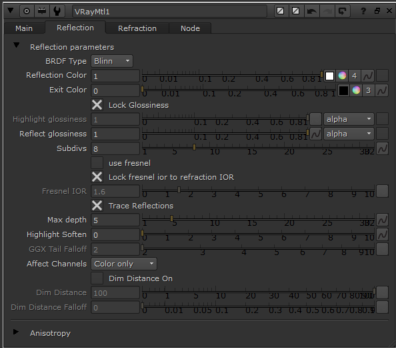
Right now the white geometry looks rather flat and dull, so let's make it more reflective by going to the VRayMtl node and making some simple changes. With the VRayMtl node active, make sure you are on the Reflection tab and change the Reflection Color parameter to a value of 1. Now you have a wonderful reflective material, and that both the HDR and the ground geometry are visible in your reflections.
 A reflective VRay material assigned to the geometry
6) Assign multiple materials
Let's change the material assignments for the geometry so we can make things a little more interesting. With your AssignMaterial node active, you will see a dropdown box named Filter. We can make use of this option to assign different materials to different parts of the model.
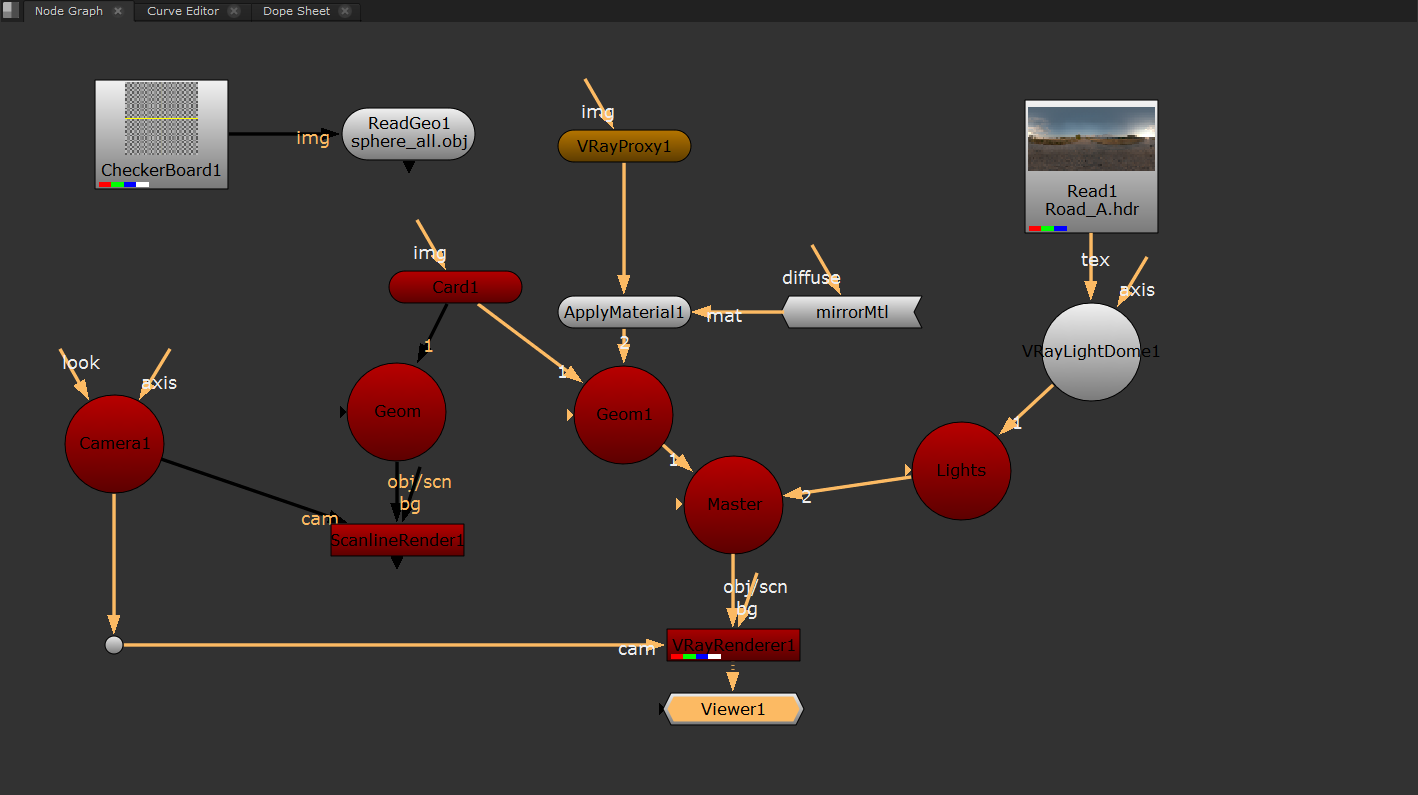
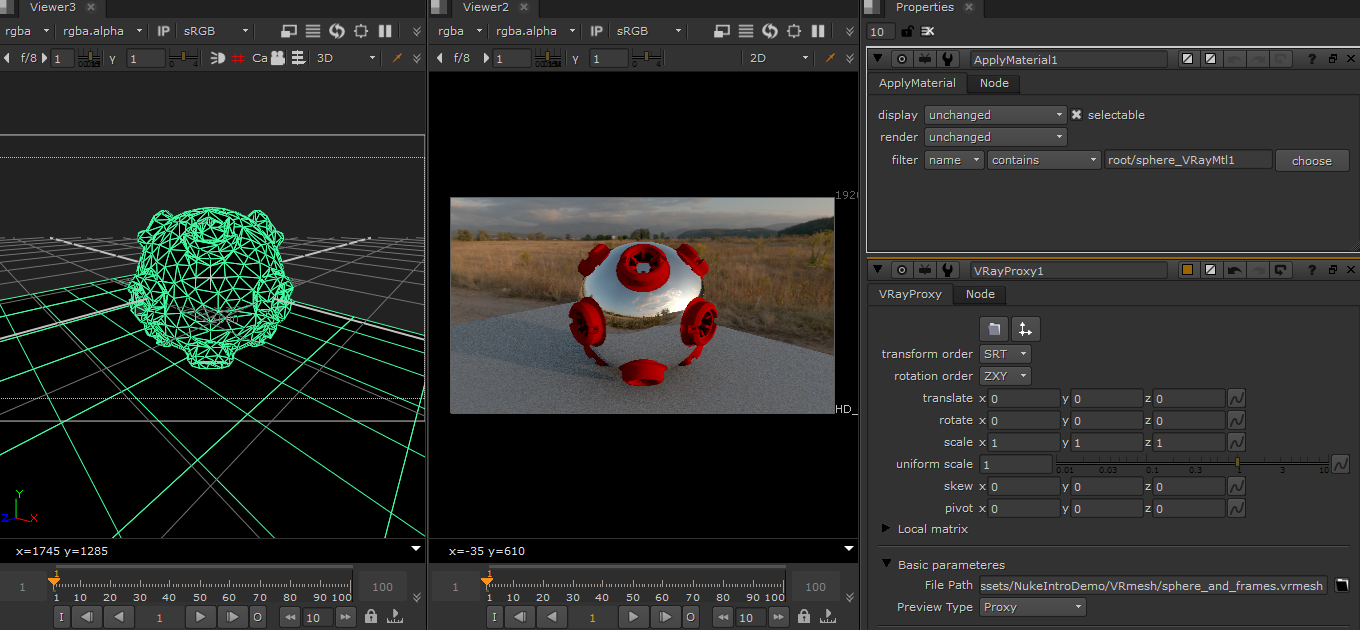
To start the process, create a VRayProxy node and load in the model. The VRayProxy node can load in VRMesh and Alembic files. It also gives us a lower resolution version of the model for ease of use in the display while the full high-resolution version is used at render time.
Connect the VRayProxy node directly to the ApplyMaterial node. If you go back to the ApplyMaterial node, you can assign the materials by clicking on the Filter dropbox, then clicking Name and Choose.
 Swapping the ReadGeo node for a VRayProxy node
You will see a window pop up with the geometry objects in the scene that have names assigned to them (these names were assigned prior to use in Nuke). To apply the reflective material we've just set up to just the sphere part of the model, select Sphere. The other parts of the model no longer have the reflective material on them as we have specifically told Nuke that we only want that material on the sphere part itself.
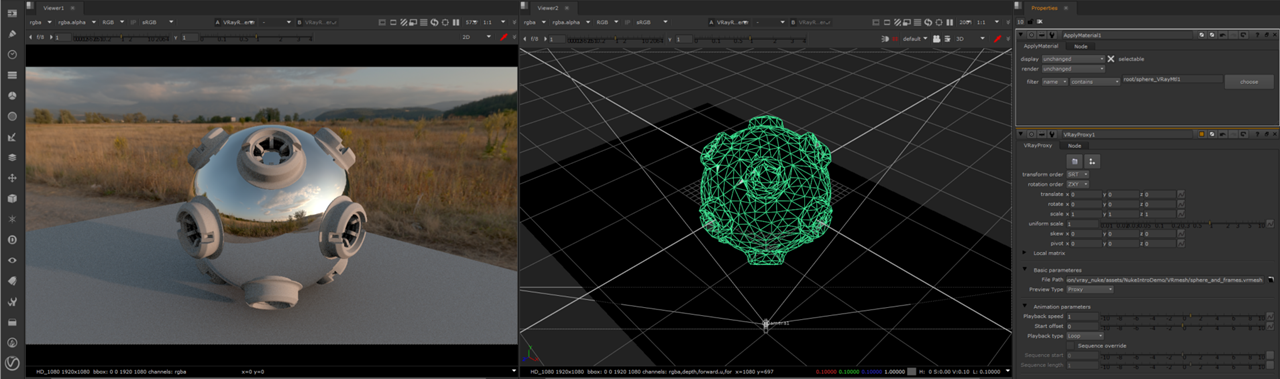 Assigning the reflective material to just the sphere part of the model
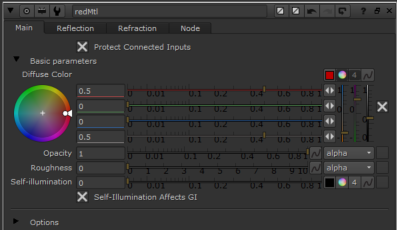
The base material is currently assigned to everything that we haven't specifically told Nuke to apply the reflective material to. To make a new material for the base color, create another VRayMtl node. To keep things organized, name the first VRayMtl node we created (the reflective shiny one) to VRayMtlReflective, and the second VRayMtl node VRayRed. Change the Diffuse Color of VRayRed to a red color with a value of 0.5, 0, 0, 0.5.
Making and assigning the red V-Ray material
Add an ApplyMaterial node just below the VRayProxy node and connect the VRayRed node to this. Just as we did before, we go to the Filter dropdown box, choose Name, then click the Choose button, only this time we pick the non-sphere parts.
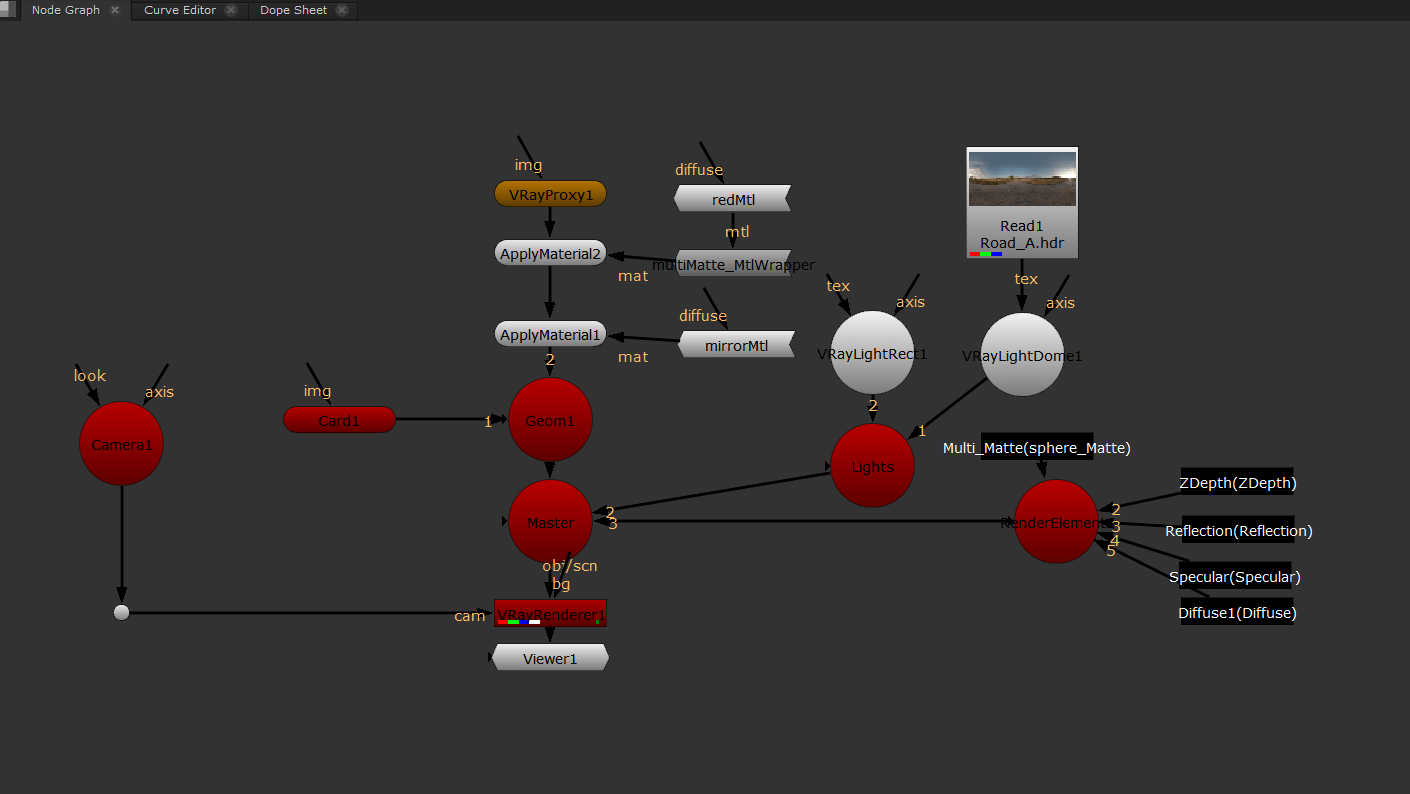
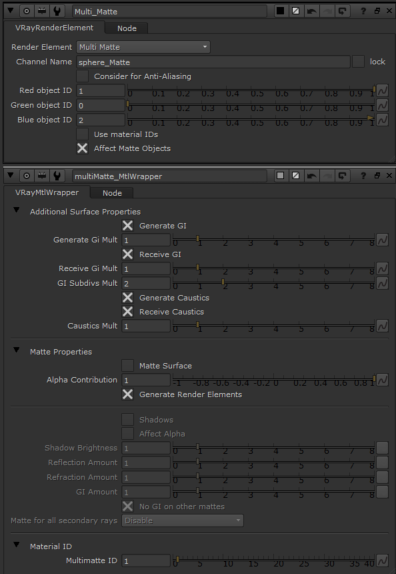
Then add in a VRayMtlWrapper node just below the VRayRed node. In the Material ID section of the VRayMtlWrapper node's parameters, set the Multimatte ID to a value of 1. This allows us the ability to isolate and control these areas. Rename the VRayRenderElement node (not the scene) to Multi_Matte to save any confusion later.
 Red Multimatte setup
7) Set up render elements
Let's set up some V-Ray render elements for the render. Create a VRayRenderElement node and then create a new scene and name this VRayRenderElements. With the VRayRenderElements scene active, click on the Render Elements dropdown box and set it to MultiMatte, and set the value of the red object ID to 1. Also check the Use Material IDs checkbox.
Then connect the VRayRenderElements scene to the Master Scene. When you look at your rendering in the viewer, you should see a Multi_Matte option with the protruding parts as a solid red color.
Let's set up another multi matte for the sphere part itself, but using a different color. Create another VRayMtlWrapper under the VRayMtlMirror node (which contains the reflective shiny material) and set the Multimatte ID parameter to 2. We then go back to the Multi_Matte node and set the value for the blue channel to 1 as well. In your viewer, when Multi_Matte is active, you will see the sphere itself as blue and the protruding parts as red.
8) Set up rectangular light
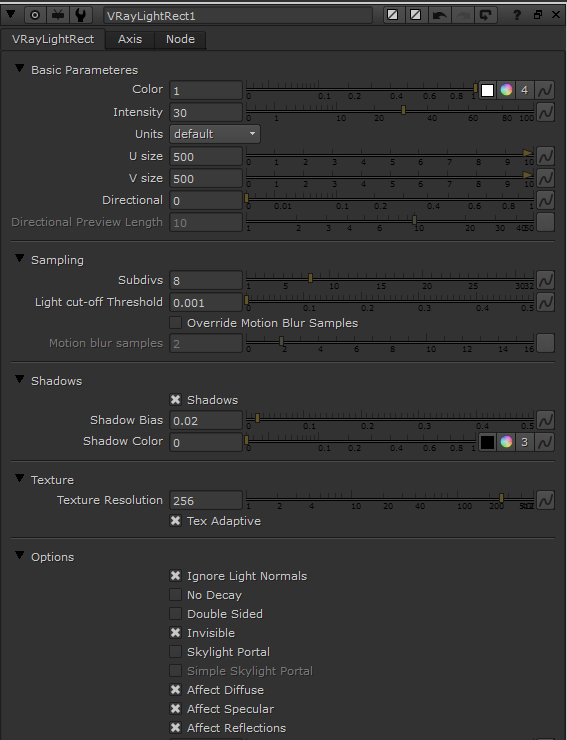
Let's explore another light, the V-Ray rectangular light. Create a VRayLightRect and connect it to the Lights scene. You can control this light via a large number of parameters, but for now let's just start by changing the U size and V size to 500 each. You can then interactively change the position and angle in your Nuke scene to place it exactly where you want or need the light source to be. This light source gives you shadows, and it is also visible in the reflections and in renderings unless you check the Invisible checkbox under the light's Options section.
V-Ray rectangular light
If we want a more of a studio lighting setup, we can disconnect the HDR from the VRayLightDome texture (and maybe even make this once again invisible). You could even disconnect the light dome and see just the contribution of the VRayLightRect when used on its own.
9) Prepare for render elements
Now that we've gone over the basics of setting up a V-Ray for Nuke scene, we can move on to rendering elements that can be used in post-production.
Connect the VRayLightDome back up, and add a few more VRayRenderElements. Remember that each one will need to be connected to the VRayRenderElements scene.
10) Set up Zdepth element
Let's start with a Zdepth element. Set the first VRayRenderElement to a Render Element of Zdepth and rename it ZDepth. Set the Depth White to 1 and the Depth Black to 0, and make sure the Depth Clamp checkbox is unchecked. This provides a true depth from camera.
Don't worry if the depth image appears to be mainly a single color, as this is a floating point. By hovering over the pixels, you will see the actual values change. You can view the Zdepth render pass by changing to it in your viewer.
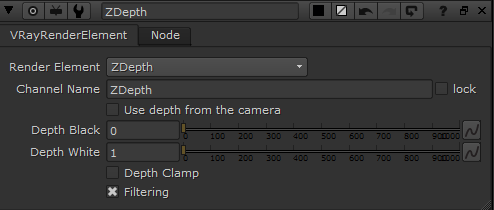 Zdepth pass and settings
11) Set up Specular, Reflection and Diffuse elements
Creating the Specular, Reflection, and Diffuse VRayRenderElements is easy and the parameters that can be changed are minimal. These are fairly traditional and commonly used passes. Name each one accordingly and connect them to the VRayRenderElements scene the same as you did with Zdepth.
Rename Multi_Matte node to SphereMatte to keep things well organized while we progress. Keeping your Nuke scripts well organized also means that it is easier for anther artist to pick up a script in production and be able to make sense of it.
Add a Write node to your scene and set it as shown in the image to render as an OpenEXR, making sure the Channels are set to All. This will add all the channels to the EXR so they can be accessed from a single image file. Click Render to render the image to the location specified.
If you bring back the image you've just rendered into a Read node, you will be able to view each of the channels via the dropdown above the viewer. You should see the following list of layers:
Rgb
Rgba
Diffuse
Reflection
Specular
Sphere_matte
Zdepth
Congratulations! You've just set up a simple scene with V-Ray for Nuke, with render elements that can be used for further post-processing.