In this tutorial we show how Phoenix works together with tyFlow.
We generate particles using tyFlow. When bombs hit the ground, bounced particles are procedurally created.
tyFlow's particles contain velocity data and Phoenix can use this data as a source for fire and smoke to produce realistic explosion plumes.
The structure of this tutorial is very similar to another tutorial - Artillery Explosion. However, in this article, we put more attention on the pyro shader and add more details to the fire components. The explosion and rising dust are set to different RGB colors. Together with the color gradient in the volumetric shading, we get colorful and rich result in the final shading.
We take advantage of the Time Base - Particle Age, a powerful feature of the Fire/Smoke Source. It allows you to animate the emission of fluid based on the age of each individual particle.
This simulation requires tyFlow v0.16089 (Beta), Phoenix 4.0010Official Release and V-Ray Next Official Release for 3ds Max 2015 at least. If you notice a major difference between the results shown here and the behavior of your setup, please reach us using the Support Form.
Press the Download button below to get an archive with the start and end scenes.
This download package does not contain the HDRI maps used in the scene. However, you can download the HDRI maps (quarry_02, made by Sergej Majboroda) from the HDRIHeaven website.
Scale is crucial for the behavior of any simulation. The real-world size of the Simulator in units is important for the simulation dynamics.
Large scale simulations appear to move slower, while mid-to-small scale simulations have lots of vigorous movements.
When you create your Simulator, you must check the Grid rollout where the real-world extents of the Simulator are shown. If the size of the Simulator in the scene cannot be changed, you can cheat the solver into working as if the scale is larger or smaller by changing the Scene Scale option in the Grid rollout.
The Phoenix solver is not affected by how you choose to view the Display Unit Scale - it is just a matter of convenience.
As the focus of this tutorial is a large-scale simulation, setting the units to Meters is a reasonable choice.
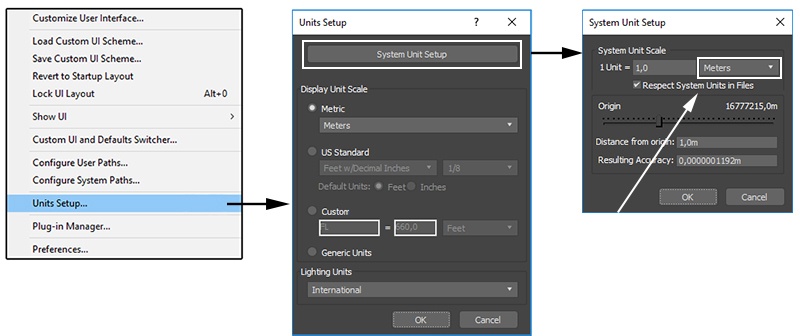
Go to Customize → Units Setup and set Display Unit Scale to Metric Meters. Also, set the System Units such that 1 Unit equals 1 Meter.