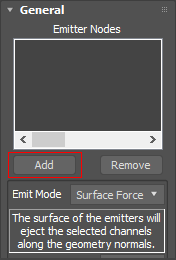
With the Fire/Smoke Source object selected, go to the Modify Panel and click the Add button located under the Emitter Nodes list, then select the Sphere.
This way the sphere will be selected as an emitter.
UI Text Box
size
medium
type
note
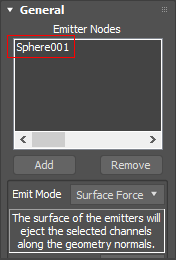
The Source node is where we control the Emitter properties, like the Emit Mode ant the Outgoing Velocity. The sphere is the actual emitter of the fluid inside the Simulator.
Column
width
15%
Column
width
45%
Section
Column
width
40%
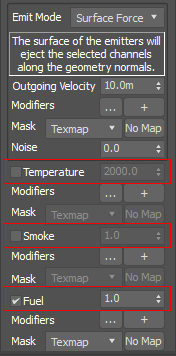
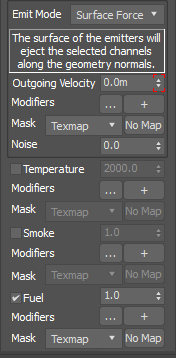
Within the Fire/Smoke Source menu, we will disable Temperature and Smoke, as they will not be needed for this demonstration. Make sure Fuel is enabled.
Column
width
60%
Section
Column
width
40%
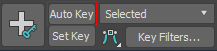
Since we are creating an explosion that will use a large amount of fuel very quickly, we will need to increase the Outgoing Velocity. The higher this number, the more fluid will be generated per second. In order to create the short but powerful burst of fluid, we will animate the Outgoing Velocity number.
Make sure you're at Frame 0, turn on Auto Key, and change the Outgoing Velocity value to 2000.
Column
width
60%
Section
Column
width
40%
Move to Frame 1 and change the Outgoing Velocity to 0.0, then turn off Auto Key.
Column
width
60%
Section
Column
width
40%
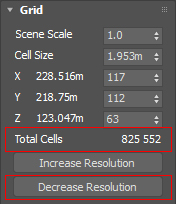
Select the Simulator. In the Modify Panel under the Grid rollout are located the parameters to control the resolution of the volume grid, which greatly affects the look and performance of the simulation.
Currently, there are about 6 million Total Cells. To save on simulation time during the iteration process, click Decrease Resolution several times until the Total Cells are around825,000.
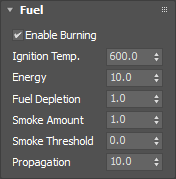
Click the Start Simulation icon, and notice that the explosion does not happen. Select the Fire/Smoke Simulator and navigate to the Fuel rollout. Select Enable Burning.
Column
width
60%
Section
Column
width
40%
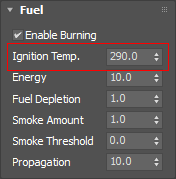
Once again, if you click Start Simulation, you will see that the explosion is still absent. This is due to the Ignition Temperature being set at 600.0. This temperature is rather high. By default, Phoenix FD uses 300.0 as a default ambient temperature. Change the Ignition Temperature to a value slightly lower: 290.0.
Column
width
60%
Section
Column
width
40%
Start the simulation and you will see a puffy preview. To see the explosion more clearly, navigate to the Preview rollout and turn on the GPU Preview by clicking Enable in Viewport.
Column
width
60%
Section
Column
width
40%
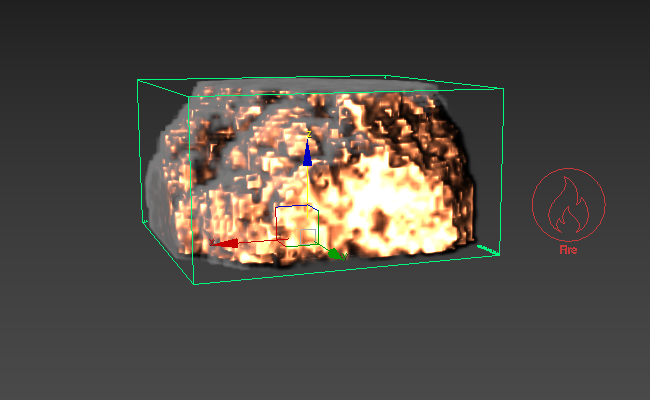
Currently, the explosion is being cut off at the top and sides by the Simulator's Grid.
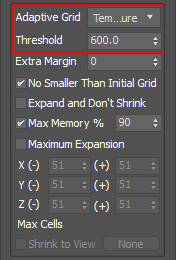
Adjust this in the Grid rollout by turning on Adaptive Grid by Temperature. Lower the Threshold temperature to 600.0 to ensure expansion based on the temperature of the fluid inside when it meets the specified threshold.
UI Text Box
size
medium
type
note
If you experience clipping of your smoke, set adaptive to Smoke with a Threshold of 0.02.
Column
width
60%
Section
Column
width
40%
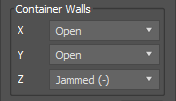
To prevent the explosion from expanding the bottom, go to Container Walls and select Jammed (-) in the Z axis. This will act as a floor.
Column
width
60%
Section
Column
width
40%
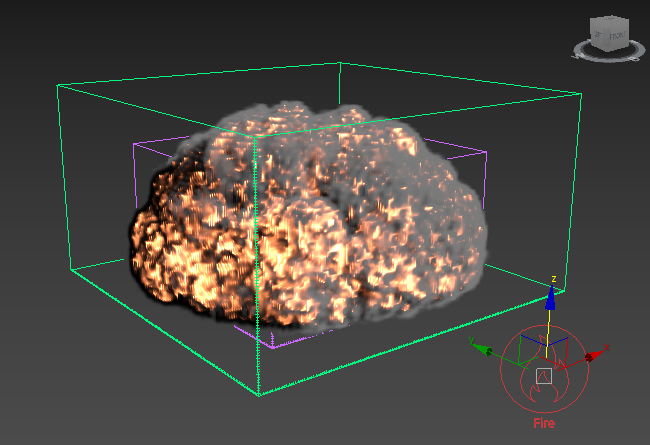
Start the simulation. The resulting explosion looks very uniform.