Versions Compared

Key

  • This line was added.
  • This line was removed.
  • Formatting was changed.

This page provides assistance for creating minidump dump files.

Steps to Report a Problem

...

If you encounter an issue that is not included in the Troubleshooting page, create a minidump file that will be useful for the Chaos Group Support team when tackling the issue.In the sections below, you will find information on how to create a minidump fileany crashes, a VRay.dmp file might be very useful for our Support Team as it contains information that helps troubleshooting and fixing the issue.
Below you can find detailed steps on where to find the needed file or how to generate it.


Collecting the

...

Dump File when Created Automatically

...

What is the minidump file?

...

...

How to get the minidump file?

When the app crashes, a minidump file is automatically created in its designated folder. When using the app on Windows, the minidump file is stored in the %temp% folder by default.


Collecting the

...

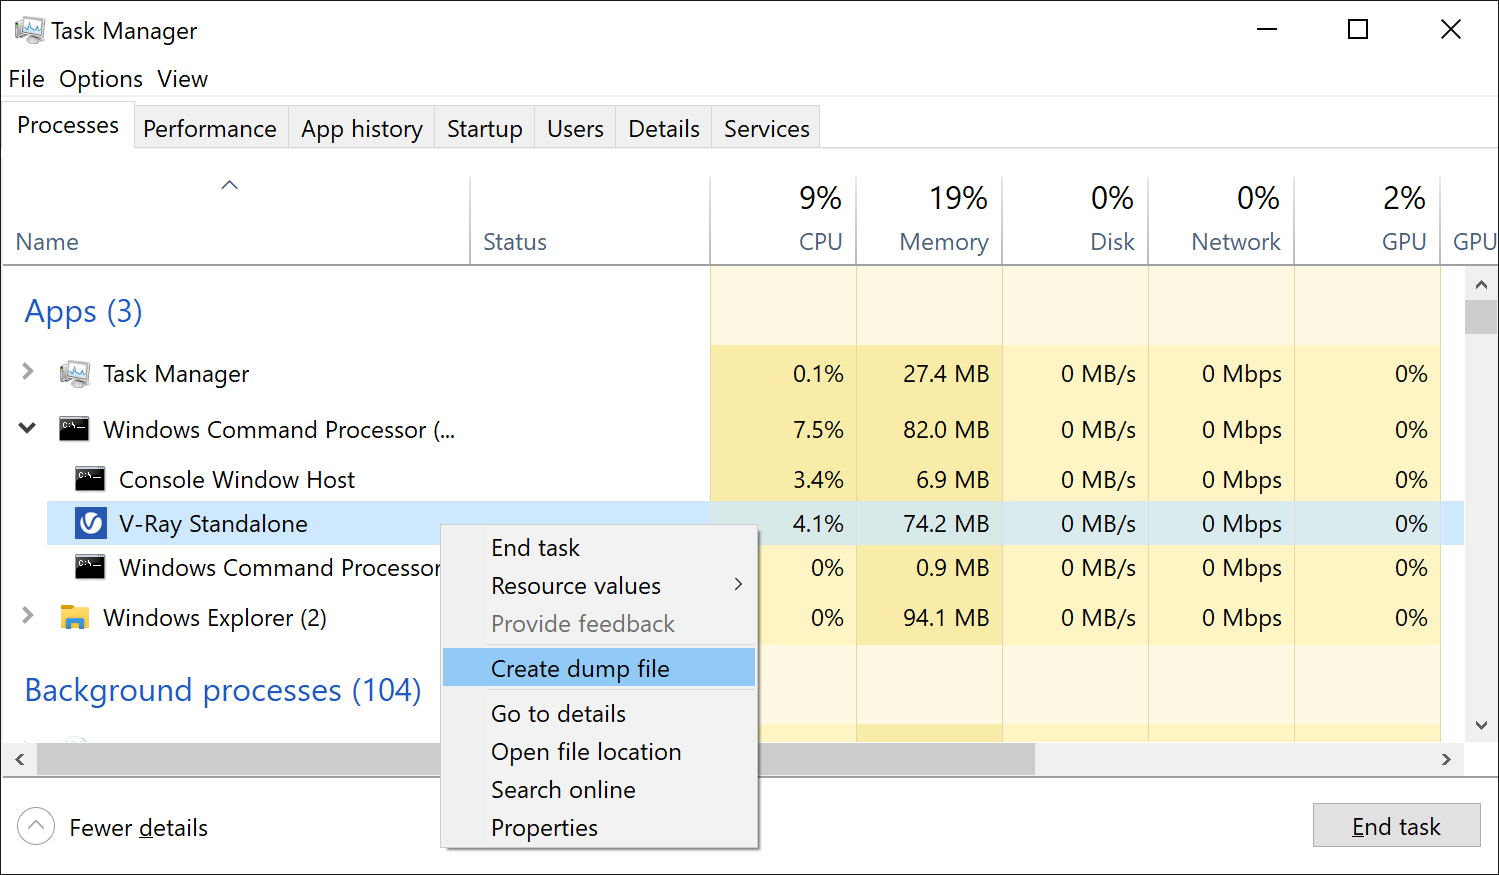
Dump File when Not Created Automatically

...

...

If your V-Ray application crashes, a crash dump file, is automatically created.

...

Tabs Container
directionhorizontal
Tabs Page
titleWindows


  1. Open the standard Windows Task Manager from the Start Menu.
  2. Right-click on the V-Ray application in the Processes tab to select the Create dump file option, while the V-Ray app displays the notification that unexpected error has occurred.


3. The crash dump file is created in the temporary Temp folder.


Tabs Page
titleMac OS


The crash dump files are stored either in the /Library/Logs/DiagnosticReports (system-wide) or ~/Library/Logs/DiagnosticsReports (user-wide) directories, depending on the type of the process that has led to the crash.

Another crash dump file named core.<pid> (where <pid> stands for the PID of the crashed process) must be created in the /cores directory. In order to create this second crash dump file, activate the full core dumps via the ulimit -c unlimited command which makes the core dump files size unlimited. Also make sure to have write permissions for the /cores directory.

In case the /cores directory is hidden in Finder, you can show the hidden files via the defaults write com.apple.finder AppleShowAllFiles TRUE command.


Tabs Page
titleLinux


You should make the size of the core dump files unlimited via the ulimit -c unlimited command. If the core dump files are not disabled in any other way, this should be sufficient to create a core.<pid> dump file in the current working directory or in the /var/lib/systemd/coredump directory, if using systemd. Here, <pid> stands for the PID of the crashed process.

In case no core dump file has been created, the following configuration files must be checked based on the Linux distribution used:

  • (non-systemd GNU Linux distributions - CentOS 6.x and others): Make sure that there is either no /etc/sysctl.d/50-coredump.conf file or it has a valid configuration value for the kernel.core_pattern. If you are uncertain, just remove the line from the file. This action may require root access.

  • (systemd based GNU Linux distributions - CentOS 7, Fedora and others): Make sure that there is no limit for the storage in /etc/systemd/coredump.conf.d/custom.conf by confirming that the [Coredump] Storage=none configuration lines are not present.