Versions Compared

Key

  • This line was added.
  • This line was removed.
  • Formatting was changed.

This page provides a tutorial on creating a Fire Tornado simulation with Phoenix FD in 3ds Max.

Overview


UI Text Box
sizemedium
typeinfo

This is an Intermediate Level tutorial. Even though no previous knowledge of Phoenix FD is required to follow along, re-purposing the setup shown here to another shot may require a deeper understanding of the host platform's tools, and some modifications of the simulation settings.

Section
Column
width40%

Requires Phoenix FD 3.11.00 Official Release and V-Ray Next Official Release for 3ds Max 2015+. If you notice a major difference between the results shown here and the behaviour of your setup, please send an email to support@chaosgroup.com

The instructions on this page guide you through the process of creating a Fire Tornado effect using Phoenix FD and 3ds Max.

The Download button below provides you with an archive containing the end scene, as well as a Phoenix FD Render Settings preset that you can use to quickly set up the volumetric shading options for the fire tornado simulation.


UI Button
sizelarge
icondownload
titleDownload Project Files
urlhttps://drive.google.com/uc?export=download&id=109v0uyIgvVNogp1YQbtsDoDMLSYhpwL7

Column
width60%

Videoautoplayloop
0PhoenixFD_FireTornado_FinalRender.mp4
1100%
2100%
3true
4false
5true

Units Setup


Section
Column
width40%

Scale is crucial for the behavior of any simulation. The real-world size of the Simulator in units is important for the simulation dynamics. Large-scale simulations appear to move more slowly, while mid-to-small scale simulations have lots of vigorous movement. When you create your Simulator, you must check the Grid rollout where the real-world extents of the Simulator are shown. If the size of the Simulator in the scene cannot be changed, you can cheat the solver into working as if the scale is larger or smaller by changing the Scene Scale option in the Grid rollout.

The Phoenix FD solver is not affected by how you choose to view the Display Unit Scale - it is just a matter of convenience.

The fire tornado effect we're creating is about 6 meters in height so we choose to view the units as Centimeters.

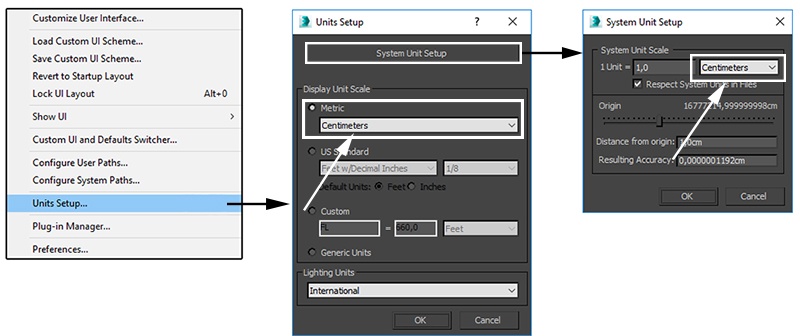
Go to Customize -> Units Setup and set Display Unit Scale to Metric Centimeters.

Also, set the System Units such that 1 Unit equals 1 Centimeter.

Column
width60%


Scene Layout


...

Section
Column
width40%

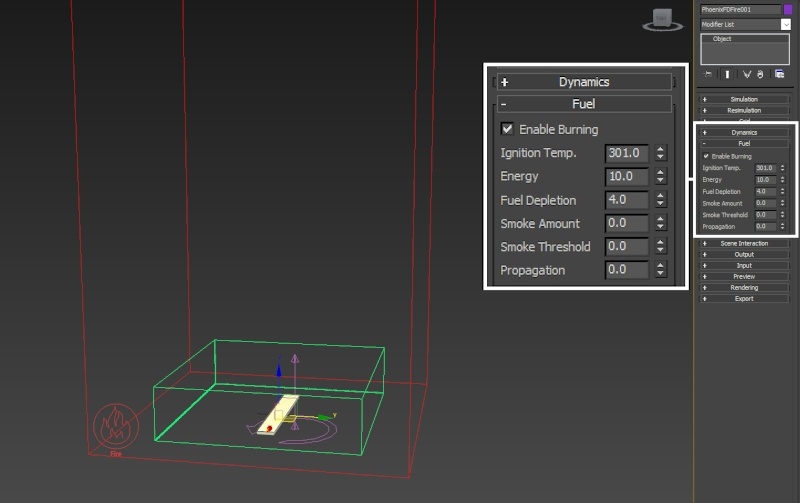
Select the Phoenix FD Simulator and open the Fuel tab.

Select Enable Burning. This will tell the Simulator to convert the Fuel emitted by the Source into temperature and smoke based on the options below.

Set Ignition Temp. to 301. The ignition temperature specifies the minimum Temperature channel value that will ignite the fuel. Don't set this below 301 - 300 is the ambient temperature of the Simulator - if you do this, the Fuel will ignite instantly upon emission. You can find out more about Phoenix Grid Channel Ranges here.

Set Energy to 10 - the energy parameter controls how much Temperature is created by the process of burning.

Set Fuel Depletion to 4 - the higher this parameter is, the faster the fuel will burn out. Think of it this way - a piece of rubber can burn for a long time while a similarly sized piece of paper will last much shorter before turning into ash.

Set Smoke Amount, Smoke Threshold and Propagation to 0. The Smoke Amount and Threshold govern the emission of Smoke during the process of burning. We're not interested in creating smoke with this simulation so we disable it.

Propagation controls the strength of expansion of the volumes as a consequence of the ignition. An explosion would have a much higher propagation rate (the fireball will expand much further) than a burning match.

Column
width60%

...