![]()
Page History
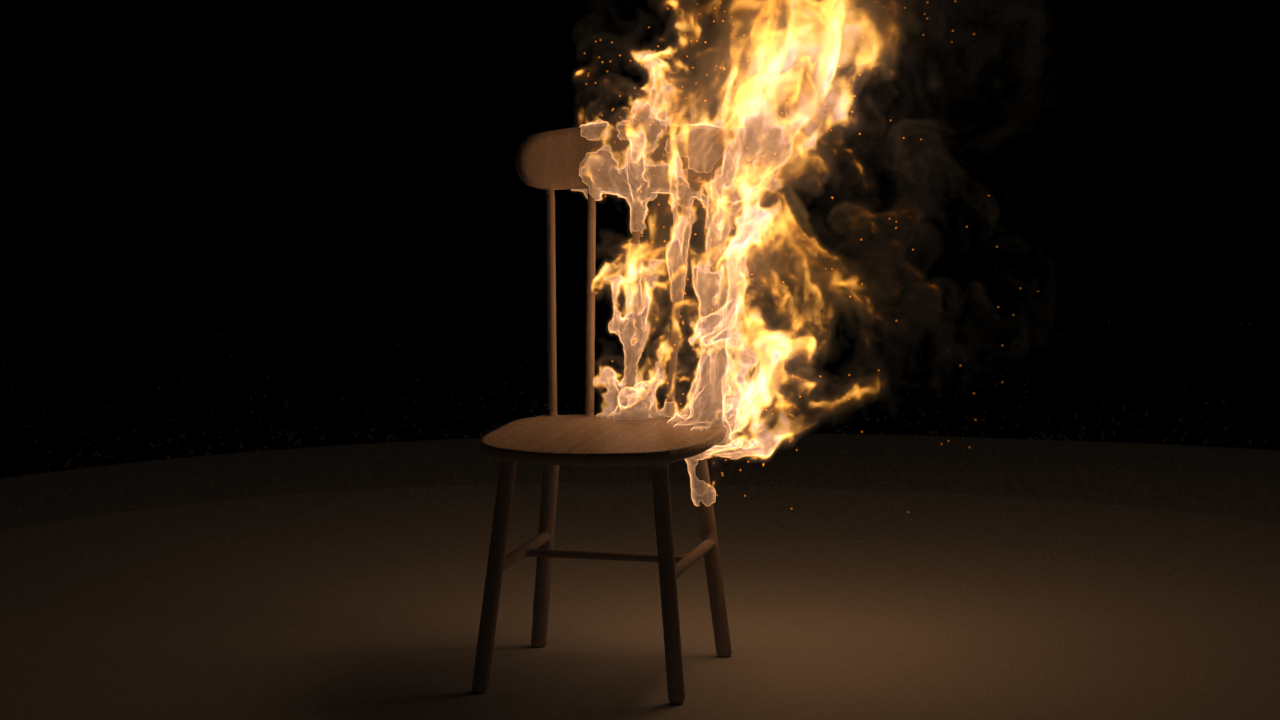
This page provides a tutorial on creating a Burning Chair simulation with Chaos Phoenix FD in 3ds Max.
| HTML |
|---|
<style>
.tooltip {
position: relative;
display: block;
border-bottom: 1px dashed black;
}
.tooltip .tooltiptext {
visibility: hidden;
width: 400px;
background-color: #555;
color: #fff;
text-align: center;
border-radius: 6px;
padding: 5px 25px;
position: absolute;
z-index: 1;
left: 50%;
margin-left: 15px;
opacity: 0;
transition: opacity 0.3s;
display: block
}
.tooltip:hover .tooltiptext {
visibility: visible;
opacity: 1;
}
</style>
<script type="text/javascript">
AJS.toInit(function(){
var toolbar_page = "https://docs.chaosgroup.com/pages/viewpage.action?pageId=23694081";
var fireSimulator_page = "https://docs.chaosgroup.com/pages/viewpage.action?pageId=23693597";
var fireSource_page = "https://docs.chaosgroup.com/pages/viewpage.action?pageId=23693882";
var particleShader_page = "https://docs.chaosgroup.com/pages/viewpage.action?pageId=23693898";
var plainForce_page = "https://docs.chaosgroup.com/pages/viewpage.action?pageId=23693935";
var gridPreview_page = "https://docs.chaosgroup.com/pages/viewpage.action?pageId=23693676";
var gridResimulation_page = "https://docs.chaosgroup.com/pages/viewpage.action?pageId=23693609";
var gridGrid_page = "https://docs.chaosgroup.com/pages/viewpage.action?pageId=23693620"
var gridOutput_page = "https://docs.chaosgroup.com/pages/viewpage.action?pageId=23693665";
var gridFuel_page = "https://docs.chaosgroup.com/pages/viewpage.action?pageId=23693655";
var gridDynamics_page = "https://docs.chaosgroup.com/pages/viewpage.action?pageId=23693626";
var gridRendering_page = "https://docs.chaosgroup.com/pages/viewpage.action?pageId=23693685";
var gridSmokeOpacity_page = "https://docs.chaosgroup.com/pages/viewpage.action?pageId=23693733";
var gridSmokeColor_page = "https://docs.chaosgroup.com/pages/viewpage.action?pageId=23693727";
var gridFire_page = "https://docs.chaosgroup.com/pages/viewpage.action?pageId=23693706";
var gridInput_page = "https://docs.chaosgroup.com/pages/viewpage.action?pageId=23693669";
var gridResimulation_page = "https://docs.chaosgroup.com/pages/viewpage.action?pageId=23693609";
AJS.$("#Toolbar_info").load(toolbar_page + " #Toolbar_Overview");
AJS.$("#FireSimulator_info").load(fireSimulator_page + " #FireSmoke_Overview");
AJS.$("#FireSource_info").load(fireSource_page + " #FireSource_Overview");
AJS.$("#FireSource_OutVelocity_info").load(fireSource_page + " #FireSource_OutVelocity");
AJS.$("#FireSource_OutVelocity_Mask_info").load(fireSource_page + " #FireSource_OutVelocity_Mask");
AJS.$("#FireSource_OutVelocity_Mask_info2").load(fireSource_page + " #FireSource_OutVelocity_Mask");
AJS.$("#ParticleShader_info").load(particleShader_page + " #ParticleShader_Overview");
AJS.$("#PlainForce_info").load(plainForce_page + " #PlainForce_Overview");
AJS.$("#Preview_info").load(gridPreview_page + " #FireSmoke_Preview_Overview");
AJS.$("#Preview_enable_info").load(gridPreview_page + " #Preview_GPUPreview_Enable");
AJS.$("#Preview_lighting_info").load(gridPreview_page + " #Preview_GPUPreview_Lighting");
AJS.$('#GridResimulation_info').load(gridResimulation_page + " #GridResimulation_AmpResolution");
AJS.$("#GridGrid_info").load(gridGrid_page + " #FireSmoke_Grid_Overview");
AJS.$("#GridGrid_SceneScale_info").load(gridGrid_page + " #FireSmoke_Grid_SceneScale");
AJS.$("#GridGrid_CellSize_info").load(gridGrid_page + " #FireSmoke_Grid_CellSize");
AJS.$("#GridGrid_XYZ_info").load(gridGrid_page + " #FireSmoke_Grid_XYZ");
AJS.$("#GridGrid_AdaptiveGrid_info").load(gridGrid_page + " #FireSmoke_Grid_AdaptiveGrid");
AJS.$("#GridGrid_Threshold_info").load(gridGrid_page + " #FireSmoke_Grid_Threshold");
AJS.$("#GridGrid_ExpandAndDontShrink_info").load(gridGrid_page + " #FireSmoke_Grid_ExpandAndDontShrink");
AJS.$("#GridGrid_MaximumExpansion_info ").load(gridGrid_page + " #FireSmoke_Grid_MaximumExpansion");
AJS.$("#GridGrid_ExtraMargin_info").load(gridGrid_page + " #FireSmoke_Grid_ExtraMargin");
AJS.$("#FireSource_EmitterNodes_info").load(fireSource_page + " #FireSource_EmitterNodes")
AJS.$("#FireSource_EmitMode_info").load(fireSource_page + " #FireSource_EmitMode");
AJS.$("#FireSource_OutVelocity_info2").load(fireSource_page + " #FireSource_OutVelocity");
AJS.$("#FireSource_Fuel_info").load(fireSource_page + " #FireSource_Fuel");
AJS.$("#FireSource_Smoke_info ").load(fireSource_page + " #FireSource_Smoke");
AJS.$("#FireSource_Temperature_info").load(fireSource_page + " #FireSource_Temperature");
AJS.$("#FireSource_Particles_info").load(fireSource_page + " #FireSource_Particles");
AJS.$("#FireSource_ParticlesExport_info").load(fireSource_page + " #FireSource_ParticlesExport");
AJS.$("#FireSmoke_Output_Overview_info").load(gridOutput_page + " #FireSmoke_Output_Overview");
AJS.$("#FireSmoke_Output_Fuel_info").load(gridOutput_page + " #FireSmoke_Output_Fuel");
AJS.$("#FireSmoke_Output_Velocity_info").load(gridOutput_page + " #FireSmoke_Output_Velocity");
AJS.$("#FireSmoke_Fuel_Overview_info").load(gridFuel_page + " #FireSmoke_Fuel_Overview");
AJS.$("#FireSmoke_Fuel_EnableBurning_info").load(gridFuel_page + " #FireSmoke_Fuel_EnableBurning");
AJS.$("#FireSmoke_Dynamics_Overview_info").load(gridDynamics_page + " #FireSmoke_Dynamics_Overview");
AJS.$("#FireSmoke_Dynamics_TimeScale_info").load(gridDynamics_page + " #FireSmoke_Dynamics_TimeScale");
AJS.$("#FireSmoke_Dynamics_Cooling_info").load(gridDynamics_page + " #FireSmoke_Dynamics_Cooling");
AJS.$("#FireSmoke_Dynamics_SmokeDissipation_info").load(gridDynamics_page + " #FireSmoke_Dynamics_SmokeDissipation");
AJS.$("#FireSmoke_Dynamics_Vorticity_info").load(gridDynamics_page + " #FireSmoke_Dynamics_VorticityClassic");
AJS.$("#FireSmoke_Dynamics_Randomize_info").load(gridDynamics_page + " #FireSmoke_Dynamics_Randomize");
AJS.$("#FireSmoke_Dynamics_Conservation_Overview_info").load(gridDynamics_page + " #FireSmoke_Dynamics_Conservation_Overview");
AJS.$("#FireSmoke_Dynamics_Conservation_Method_info").load(gridDynamics_page + " #FireSmoke_Dynamics_Conservation_Method");
AJS.$("#FireSmoke_Dynamics_Conservation_Method_Buffered_info").load(gridDynamics_page + " #FireSmoke_Dynamics_Conservation_Method_Buffered");
AJS.$("#FireSmoke_Dynamics_Conservation_Quality_info").load(gridDynamics_page + " #FireSmoke_Dynamics_Conservation_Quality");
AJS.$("#FireSmoke_Dynamics_Conservation_UniformDensity_info").load(gridDynamics_page + " #FireSmoke_Dynamics_Conservation_UniformDensity");
AJS.$("#PlainForce_info2").load(plainForce_page + " #PlainForce_Overview");
AJS.$("#FireSmoke_Rendering_Overview_info").load(gridRendering_page + " #FireSmoke_Rendering_Overview");
AJS.$("#FireSmoke_Rendering_VolumetricOptions_info").load(gridRendering_page + " #FireSmoke_Rendering_VolumetricOptions");
AJS.$("#FireSmoke_SmokeOpacity_Overview_info").load(gridSmokeOpacity_page + " #FireSmoke_SmokeOpacity_Overview");
AJS.$("#FireSmoke_SmokeOpacity_BasedOn_info").load(gridSmokeOpacity_page + " #FireSmoke_SmokeOpacity_BasedOn");
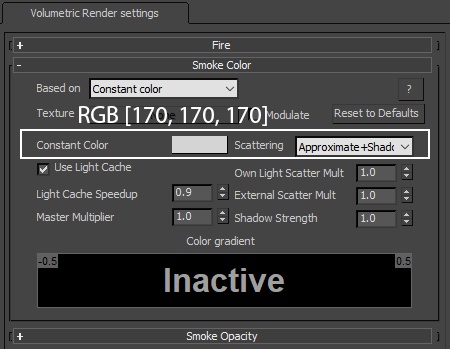
AJS.$("#FireSmoke_SmokeColor_Overview_info").load(gridSmokeColor_page + " #FireSmoke_SmokeColor_Overview");
AJS.$("#FireSmoke_SmokeColor_ConstantColor_info").load(gridSmokeColor_page + " #FireSmoke_SmokeColor_ConstantColor");
AJS.$("#FireSmoke_SmokeColor_Scattering_info").load(gridSmokeColor_page + " #FireSmoke_SmokeColor_Scattering");
AJS.$("#FireSmoke_SmokeColor_Scattering_Approximate_info").load(gridSmokeColor_page + " #FireSmoke_SmokeColor_Scattering_Approximate");
AJS.$("#FireSmoke_Fire_Overview_info").load(gridFire_page + " #FireSmoke_Fire_Overview");
AJS.$("#FireSmoke_Fire_FireOpacityMode_info").load(gridFire_page + " #FireSmoke_Fire_FireOpacityMode");
AJS.$("#FireSmoke_Fire_FireMultiplier_info").load(gridFire_page + " #FireSmoke_Fire_FireMultiplier");
AJS.$("#FireSmoke_Fire_LightPowerOnSelf_info").load(gridFire_page + " #FireSmoke_Fire_LightPowerOnSelf");
AJS.$("#FireSmoke_Input_Overview_info").load(gridInput_page + " #FireSmoke_Input_Overview");
AJS.$("#FireSmoke_Input_PlaySpeed_info").load(gridInput_page + " #FireSmoke_Input_PlaySpeed");
AJS.$("#FireSmoke_Input_FrameBlend_info").load(gridInput_page + " #FireSmoke_Input_FrameBlend");
AJS.$("#FireSmoke_Input_FrameBlend_Velocity_info").load(gridInput_page + " #FireSmoke_Input_FrameBlend_Velocity");
AJS.$("#FireSmoke_Resimulation_Overview_info").load(gridResimulation_page + " #FireSmoke_Resimulation_Overview");
AJS.$("#FireSmoke_Resimulation_EnableParticle_info").load(gridResimulation_page + " #FireSmoke_Resimulation_EnableParticle");
AJS.$("#FireSmoke_Resimulation_EnableGrid_info").load(gridResimulation_page + " #FireSmoke_Resimulation_EnableGrid");
AJS.$("#FireSmoke_Resimulation_AmpResolution_info").load(gridResimulation_page + " #FireSmoke_Resimulation_AmpResolution");
AJS.$("#FireSmoke_Resimulation_UseTimeBend_info").load(gridResimulation_page + " #FireSmoke_Resimulation_UseTimeBend");
AJS.$("#FireSmoke_Resimulation_TimeBendMethod_info").load(gridResimulation_page + " #FireSmoke_Resimulation_TimeBendMethod");
AJS.$("#FireSmoke_Resimulation_TimeBendMethod_SlowDown_info").load(gridResimulation_page + " #FireSmoke_Resimulation_TimeBendMethod_SlowDown ");
AJS.$("#FireSmoke_Resimulation_WaveletStrength_info").load(gridResimulation_page + " #FireSmoke_Resimulation_WaveletStrength");
AJS.$("#FireSmoke_Resimulation_AmpResolution_info2").load(gridResimulation_page + " #FireSmoke_Resimulation_AmpResolution");
});
</script>
|
Overview
Overview
| UI Text Box | ||
|---|---|---|
| ||
This is an Intermediate Level tutorial. Even though no previous knowledge of Phoenix is required to follow along, re-purposing the setup shown here to another shot may require a deeper understanding of the host platform's tools, and some modifications of the simulation settings. |
| Section | |||||||||||||||||||||||||||
|---|---|---|---|---|---|---|---|---|---|---|---|---|---|---|---|---|---|---|---|---|---|---|---|---|---|---|---|
|
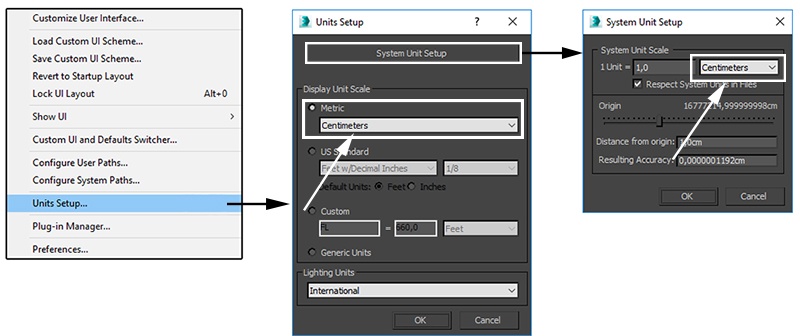
Units Setup
| Section | ||||||||||
|---|---|---|---|---|---|---|---|---|---|---|
|
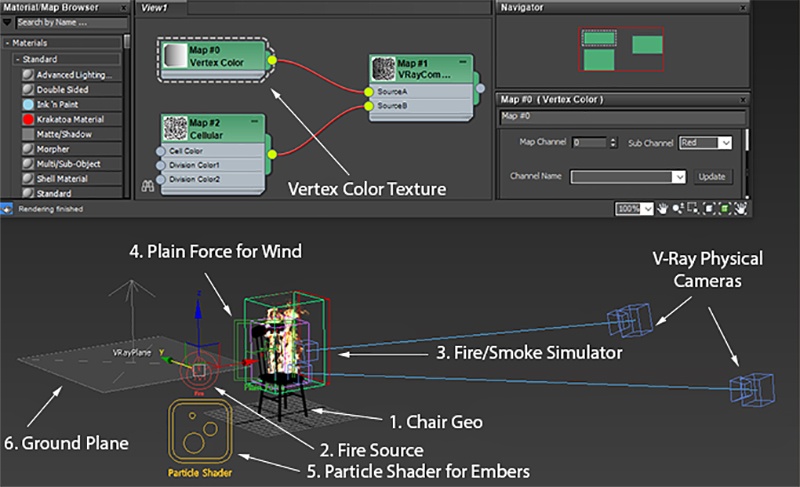
Scene Layout
| Section | |||||||||||||||
|---|---|---|---|---|---|---|---|---|---|---|---|---|---|---|---|
|
Scene Setup
| Section | ||||||||||
|---|---|---|---|---|---|---|---|---|---|---|
|

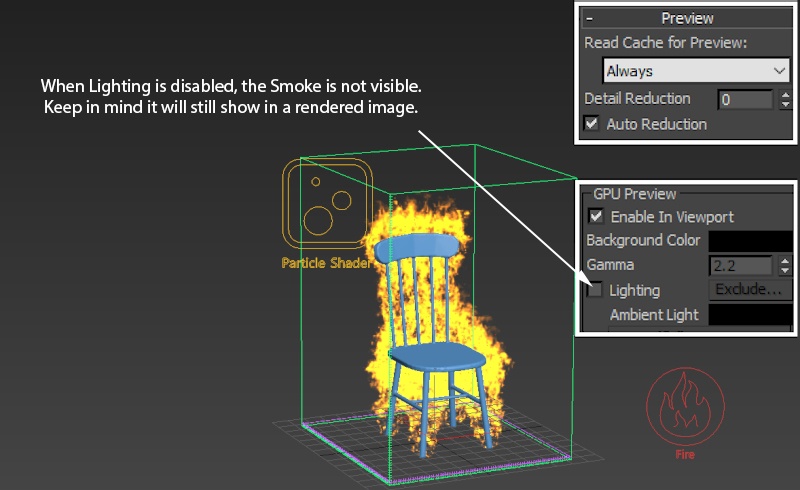
Phoenix Setup
| Section | ||||||||||
|---|---|---|---|---|---|---|---|---|---|---|
|

| Section | ||||||||||
|---|---|---|---|---|---|---|---|---|---|---|
|
| Section | |||||||||||||||||
|---|---|---|---|---|---|---|---|---|---|---|---|---|---|---|---|---|---|
|
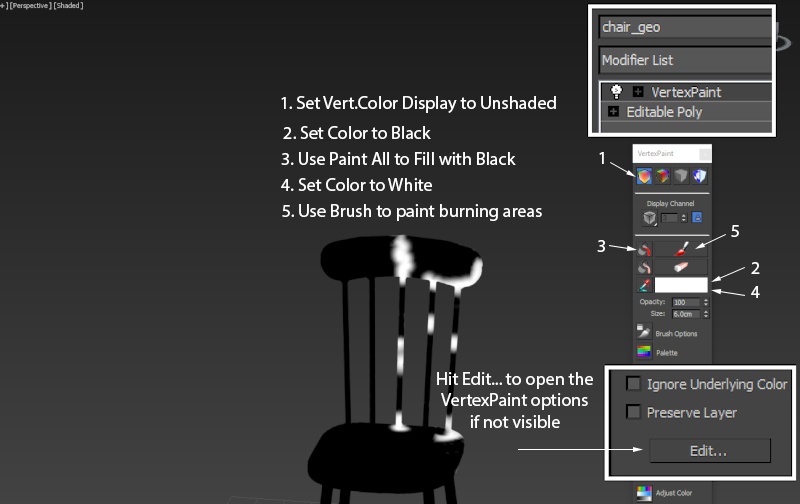
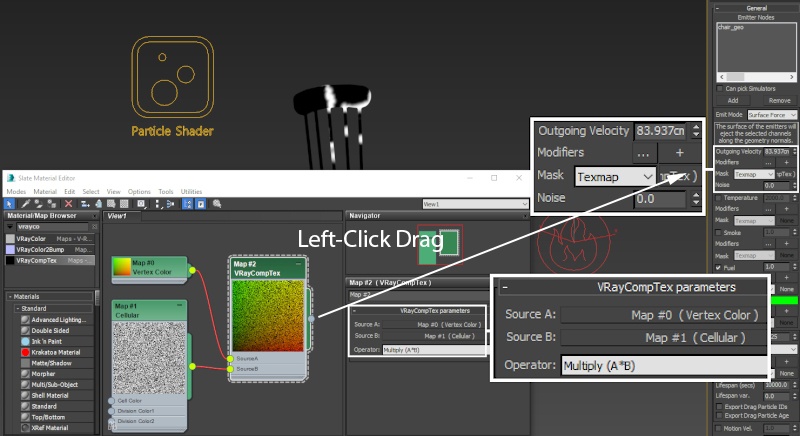
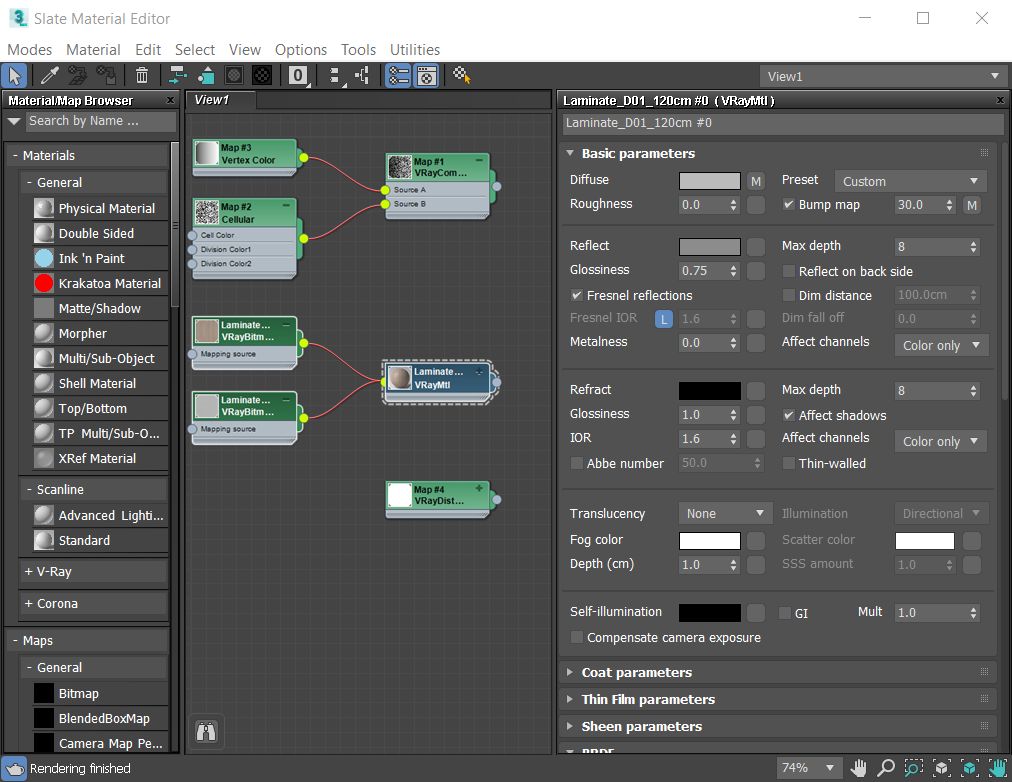
Varying the Emission with Vertex Color Texture
| Section | |||||||||||||||
|---|---|---|---|---|---|---|---|---|---|---|---|---|---|---|---|
|
| Section | ||||||||||
|---|---|---|---|---|---|---|---|---|---|---|
|
| Section | ||||||||||
|---|---|---|---|---|---|---|---|---|---|---|
|
| Section | |||||||||||||||||
|---|---|---|---|---|---|---|---|---|---|---|---|---|---|---|---|---|---|
|
| Section | ||||||||||
|---|---|---|---|---|---|---|---|---|---|---|
|
| Section | |||||
|---|---|---|---|---|---|
|
| Section | ||||||||||
|---|---|---|---|---|---|---|---|---|---|---|
|
| Section | |||||||||||||||
|---|---|---|---|---|---|---|---|---|---|---|---|---|---|---|---|
|

| Section | ||||||||||
|---|---|---|---|---|---|---|---|---|---|---|
|
| Section | |||||||||||||||||
|---|---|---|---|---|---|---|---|---|---|---|---|---|---|---|---|---|---|
|
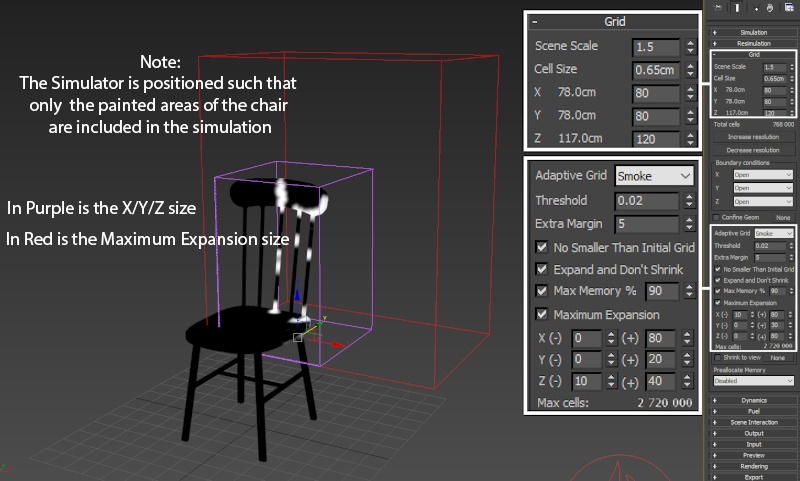
Phoenix Simulator Properties
| Section | ||||||||||
|---|---|---|---|---|---|---|---|---|---|---|
|
| Section | |||||||||||||||||
|---|---|---|---|---|---|---|---|---|---|---|---|---|---|---|---|---|---|
|
| Section | |||||||||||||||||
|---|---|---|---|---|---|---|---|---|---|---|---|---|---|---|---|---|---|
|
| Section | |||||||||||||||||
|---|---|---|---|---|---|---|---|---|---|---|---|---|---|---|---|---|---|
|
| Section | ||||||||||
|---|---|---|---|---|---|---|---|---|---|---|
|

| Section | |||||
|---|---|---|---|---|---|
|
| Section | |||||
|---|---|---|---|---|---|
|
| Section | |||||
|---|---|---|---|---|---|
|
| Section | |||||
|---|---|---|---|---|---|
|
| Section | |||||||||||||||||
|---|---|---|---|---|---|---|---|---|---|---|---|---|---|---|---|---|---|
|
| Section | |||||||||||||||
|---|---|---|---|---|---|---|---|---|---|---|---|---|---|---|---|
|
| Section | ||||||||||||||||||||||
|---|---|---|---|---|---|---|---|---|---|---|---|---|---|---|---|---|---|---|---|---|---|---|
|
Phoenix Render Settings
| Section | |||||||||||||||
|---|---|---|---|---|---|---|---|---|---|---|---|---|---|---|---|
|
| Section | ||||||||||
|---|---|---|---|---|---|---|---|---|---|---|
|
| Section | ||||||||||
|---|---|---|---|---|---|---|---|---|---|---|
|
| Section | ||||||||||
|---|---|---|---|---|---|---|---|---|---|---|
|
| Section | ||||||||||
|---|---|---|---|---|---|---|---|---|---|---|
|
| Section | ||||||||||
|---|---|---|---|---|---|---|---|---|---|---|
|
| Section | ||||||||||
|---|---|---|---|---|---|---|---|---|---|---|
|
| UI Text Box | ||||
|---|---|---|---|---|
| ||||
This is an Intermediate Level tutorial. Even though no previous knowledge of Phoenix FD is required to follow along, re-purposing the setup shown here to another shot may require a deeper understanding of the host platform's tools, and some modifications of the simulation settings. |
| Section | ||||||||||||||||||||
|---|---|---|---|---|---|---|---|---|---|---|---|---|---|---|---|---|---|---|---|---|
|
Units Setup
| Section | ||||||||||
|---|---|---|---|---|---|---|---|---|---|---|
|
Scene Layout
| Section | ||||||||||||||||||
|---|---|---|---|---|---|---|---|---|---|---|---|---|---|---|---|---|---|---|
|
Scene Setup
| Section | ||||||||||
|---|---|---|---|---|---|---|---|---|---|---|
|
Phoenix FD Setup
| Section | ||||||||||||
|---|---|---|---|---|---|---|---|---|---|---|---|---|
|
| Section | ||||||||||||
|---|---|---|---|---|---|---|---|---|---|---|---|---|
|
| Section | ||||||||||
|---|---|---|---|---|---|---|---|---|---|---|
|
| Section | ||||||||||
|---|---|---|---|---|---|---|---|---|---|---|
|
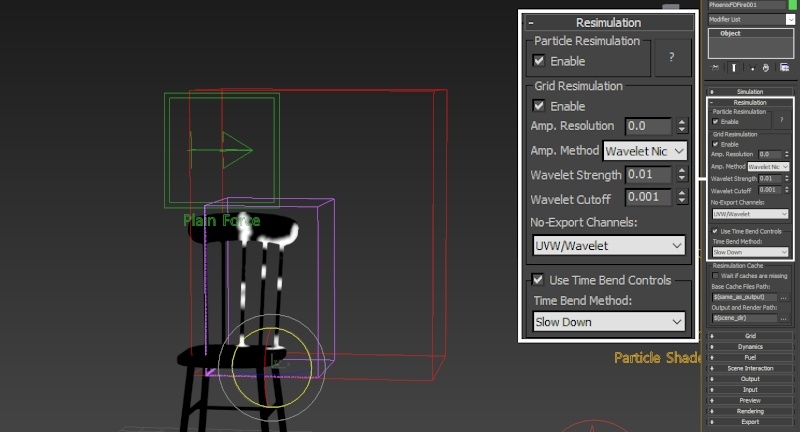
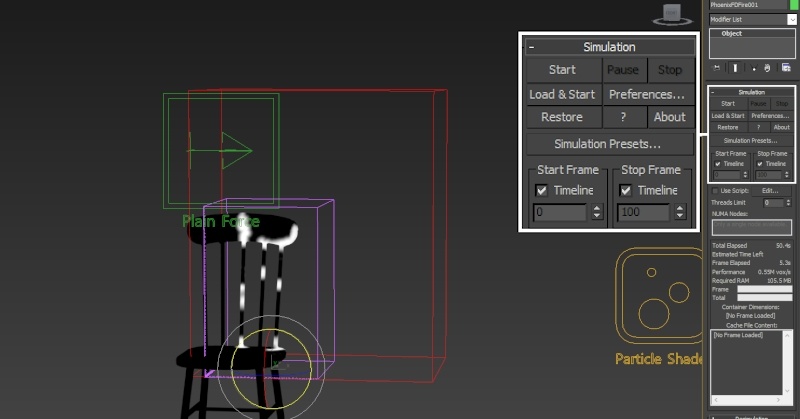
Retiming the Phoenix Simulation
| Section | |||||||||||||||||||||||||||||
|---|---|---|---|---|---|---|---|---|---|---|---|---|---|---|---|---|---|---|---|---|---|---|---|---|---|---|---|---|---|
|
Varying the Emission with Vertex Color Texture
| Section | |||||||||||||||
|---|---|---|---|---|---|---|---|---|---|---|---|---|---|---|---|
| |||||||||||||||
| Section | |||||||||||||||
|
| Section | ||||||||||||
|---|---|---|---|---|---|---|---|---|---|---|---|---|
|
| Section | ||||||||||
|---|---|---|---|---|---|---|---|---|---|---|
|
| Section | ||||||||||||||||||||||||
|---|---|---|---|---|---|---|---|---|---|---|---|---|---|---|---|---|---|---|---|---|---|---|---|---|
|
| Section | ||||||||||||||||||||||||
|---|---|---|---|---|---|---|---|---|---|---|---|---|---|---|---|---|---|---|---|---|---|---|---|---|
|
| Section | |||||
|---|---|---|---|---|---|
|
| Section | ||||||||||||||||||||||
|---|---|---|---|---|---|---|---|---|---|---|---|---|---|---|---|---|---|---|---|---|---|---|
|
| Section | ||||||||||||||||||||||||||
|---|---|---|---|---|---|---|---|---|---|---|---|---|---|---|---|---|---|---|---|---|---|---|---|---|---|---|
|
| Section | ||||||||||||
|---|---|---|---|---|---|---|---|---|---|---|---|---|
|
| Section | ||||||||||||||||||||||||
|---|---|---|---|---|---|---|---|---|---|---|---|---|---|---|---|---|---|---|---|---|---|---|---|---|
|
| Section | ||||||||||||||||||||
|---|---|---|---|---|---|---|---|---|---|---|---|---|---|---|---|---|---|---|---|---|
|
| Section | ||||||||||||||||||||||||
|---|---|---|---|---|---|---|---|---|---|---|---|---|---|---|---|---|---|---|---|---|---|---|---|---|
|
| Section | ||||||||||||||||||||||||
|---|---|---|---|---|---|---|---|---|---|---|---|---|---|---|---|---|---|---|---|---|---|---|---|---|
|
| Section | ||||||||||||||||||||||||
|---|---|---|---|---|---|---|---|---|---|---|---|---|---|---|---|---|---|---|---|---|---|---|---|---|
|
| Section | ||||||||||||
|---|---|---|---|---|---|---|---|---|---|---|---|---|
|
| Section | |||||
|---|---|---|---|---|---|
|
| Section | |||||
|---|---|---|---|---|---|
|
| Section | |||||
|---|---|---|---|---|---|
|
| Section | |||||
|---|---|---|---|---|---|
|
|
| Section | ||||||||||||||||||||
|---|---|---|---|---|---|---|---|---|---|---|---|---|---|---|---|---|---|---|---|---|
|
| Section | ||||||||||||||||||||||||
|---|---|---|---|---|---|---|---|---|---|---|---|---|---|---|---|---|---|---|---|---|---|---|---|---|
|
| Section | |||||||||||||||||||
|---|---|---|---|---|---|---|---|---|---|---|---|---|---|---|---|---|---|---|---|
|
| Section | |||||||||||||||||||||||||||||||
|---|---|---|---|---|---|---|---|---|---|---|---|---|---|---|---|---|---|---|---|---|---|---|---|---|---|---|---|---|---|---|---|
|
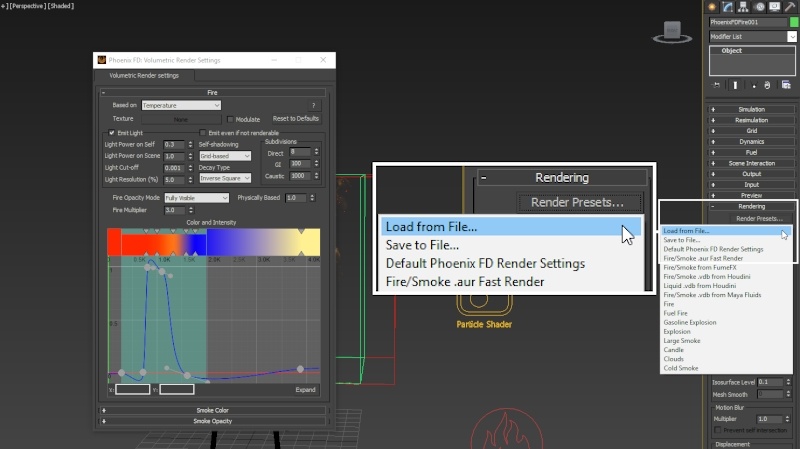
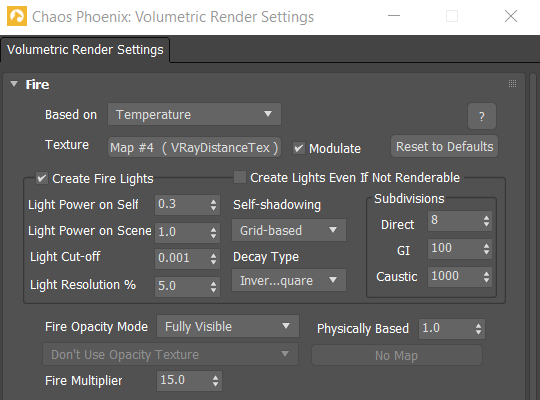
Phoenix FD Render Settings
| Section | |||||||||||||||||||
|---|---|---|---|---|---|---|---|---|---|---|---|---|---|---|---|---|---|---|---|
|
| Section | ||||||||||
|---|---|---|---|---|---|---|---|---|---|---|
|
| Section | ||||||||||||||
|---|---|---|---|---|---|---|---|---|---|---|---|---|---|---|
|
| Section | ||||||||||||
|---|---|---|---|---|---|---|---|---|---|---|---|---|
|
| Section | ||||||||||||
|---|---|---|---|---|---|---|---|---|---|---|---|---|
|
| Section | ||||||||||
|---|---|---|---|---|---|---|---|---|---|---|
|
| Section | ||||||||||
|---|---|---|---|---|---|---|---|---|---|---|
|
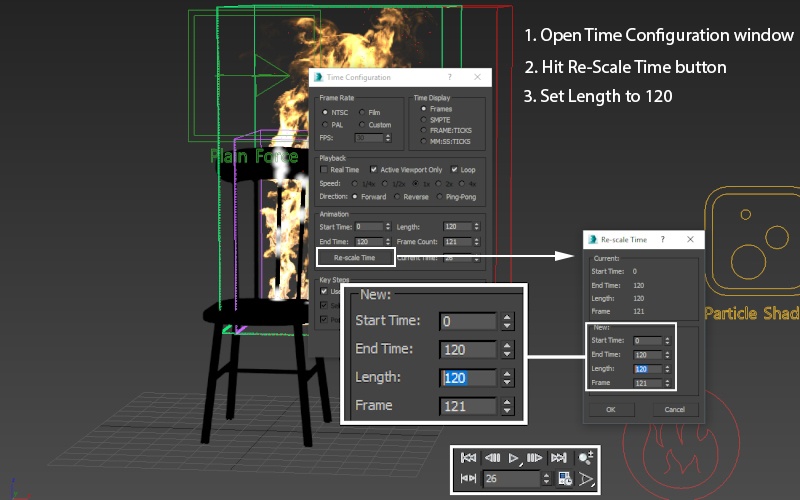
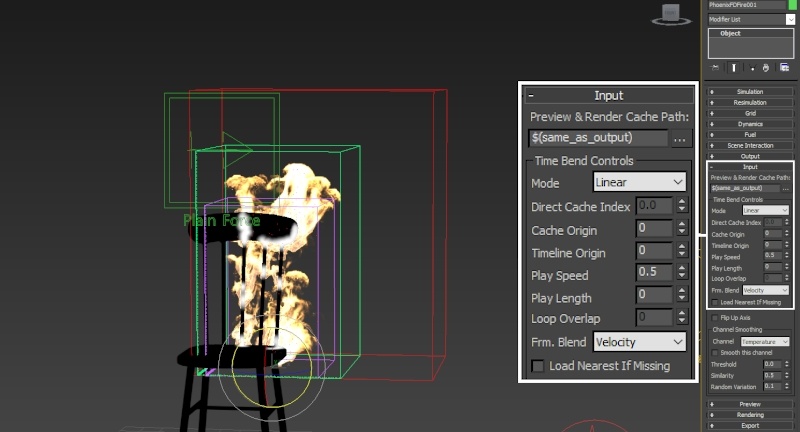
Retiming the Phoenix FD Simulation
| Section | |||||||||||||||||
|---|---|---|---|---|---|---|---|---|---|---|---|---|---|---|---|---|---|
|
| Section | |||||||||||||||||||
|---|---|---|---|---|---|---|---|---|---|---|---|---|---|---|---|---|---|---|---|
|
| Video | ||||||
|---|---|---|---|---|---|---|
| ||||||
|
| Section | |||||||||||||||||||||||||
|---|---|---|---|---|---|---|---|---|---|---|---|---|---|---|---|---|---|---|---|---|---|---|---|---|---|
|
| Section | |||||||||||||||||
|---|---|---|---|---|---|---|---|---|---|---|---|---|---|---|---|---|---|
|
| Section | ||||||||||
|---|---|---|---|---|---|---|---|---|---|---|
|
| Section | ||||||||||||||||||||||||||||||||||||||||||||||||||||||||||
|---|---|---|---|---|---|---|---|---|---|---|---|---|---|---|---|---|---|---|---|---|---|---|---|---|---|---|---|---|---|---|---|---|---|---|---|---|---|---|---|---|---|---|---|---|---|---|---|---|---|---|---|---|---|---|---|---|---|---|
|
| Section | ||||||||||||||||||||||||||
|---|---|---|---|---|---|---|---|---|---|---|---|---|---|---|---|---|---|---|---|---|---|---|---|---|---|---|
|
|
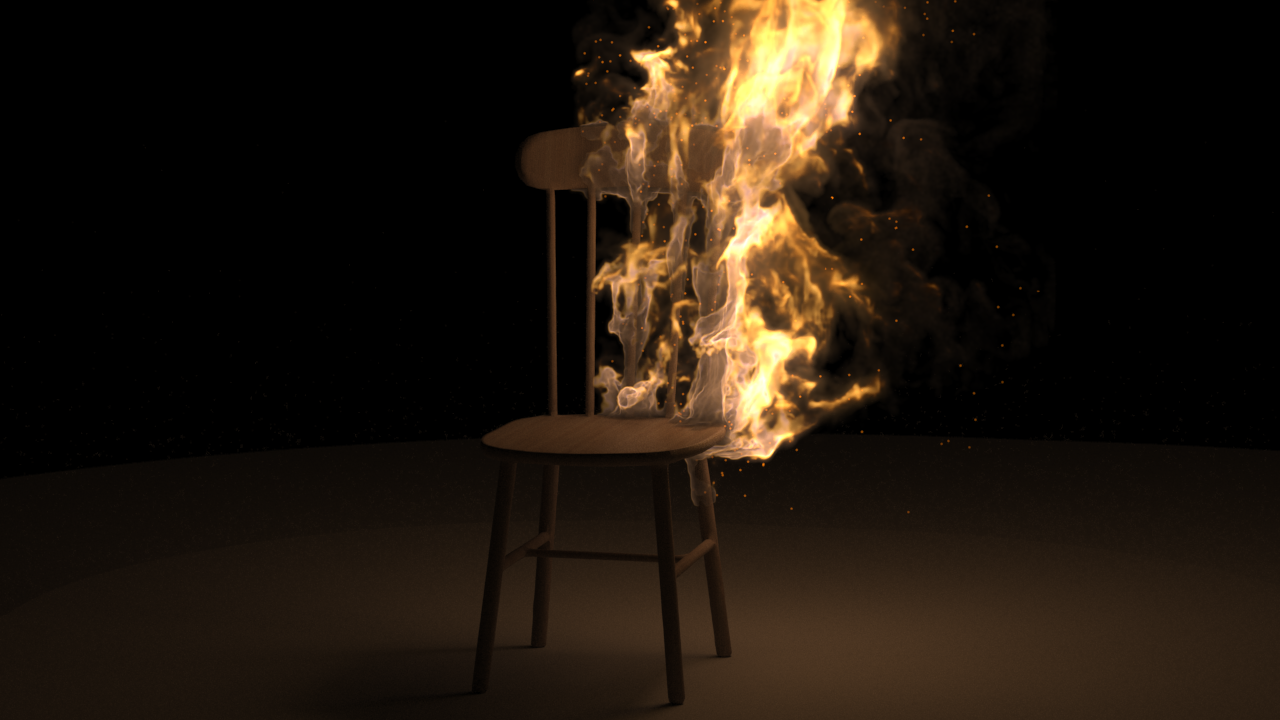
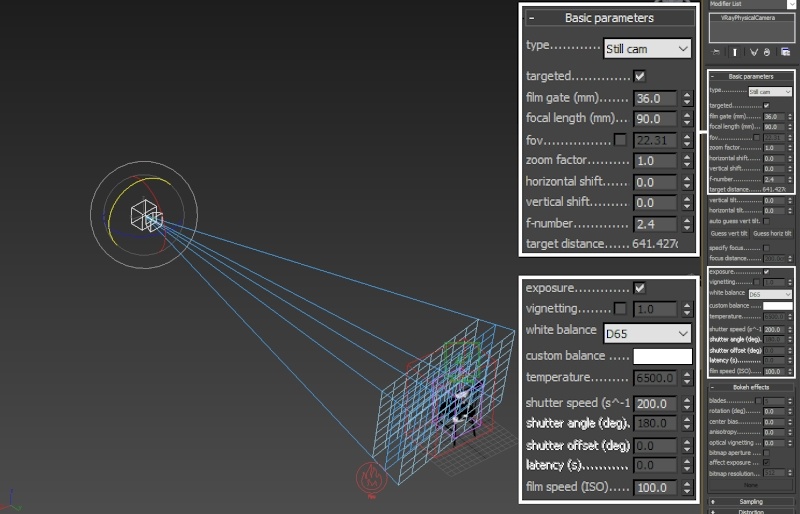
Camera and Lighting
| Section | ||||||||||
|---|---|---|---|---|---|---|---|---|---|---|
|
| 0 | burning_chair_ampRes_1.mp4 |
|---|---|
| 1 | 800 |
| 2 | 450 |
| 3 | true |
| 4 | false |
| 5 | true |
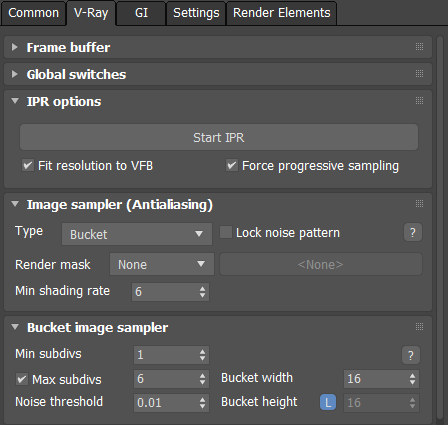
Render Settings
| Section | ||||||||||
|---|---|---|---|---|---|---|---|---|---|---|
|
| Section | ||||||||||
|---|---|---|---|---|---|---|---|---|---|---|
|
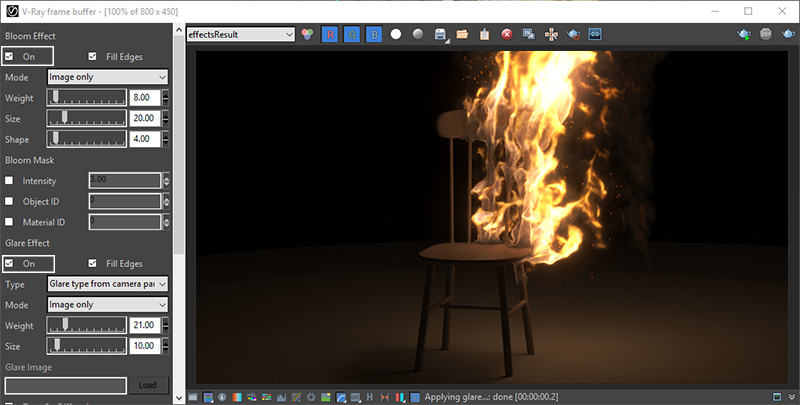
Camera and Lighting
| Section | ||||||||||
|---|---|---|---|---|---|---|---|---|---|---|
|
| Viewtracker | ||||
|---|---|---|---|---|
|
|
| Section | |||||||||||||||||
|---|---|---|---|---|---|---|---|---|---|---|---|---|---|---|---|---|---|
|