![]()
Page History
This page provides information on the Splash/Mist rollout.
Overview
...
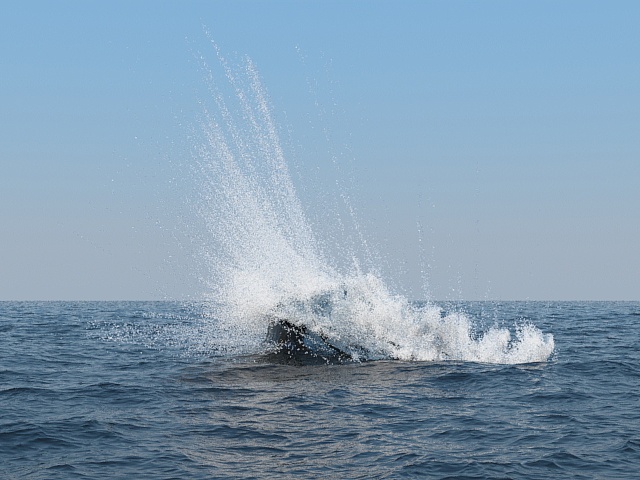
This The Splash/Mist rollout affects the simulation of Splash and Mist particles, and enables you to set the conditions for when Splash and Mist should be born automatically. The simulation of Splash and Mist particles can be used for creating effects like waterfalls, rivers, ocean waves and so forth.
| UI Text Box | ||
|---|---|---|
| ||
Note that the Phoenix Liquid Simulator can simulate different types of particles, including Liquid particles, as well as Secondary Particles such as Foam, Splash, Mist, and WetMap particles. These Secondary Particles exist so that you can achieve a variety of different liquid scenarios. In addition, Phoenix enables you to choose which particles to simulate, depending on your needs. |
Because Splash and Mist splash and mist simulation. Because these systems are closely related and share many properties, they their parameters are both controlled by a common user interface.from within this rollout. When the Splash/Mist rollout is enabled, the Liquid, Splash and Mist systems can be seen as a single system, with adaptive levels of detail.
The Splash and Mist particles adhere to rules determined by the parameter values in this rollout: Liquid can be converted into Splash, Splash can be converted into Mist or back into Liquid, and Mist can be converted into Liquid.
| UI Text Box | ||
|---|---|---|
| ||
Each particle type has its own life cycle, with rules for when and how they are born and die off. You can learn more about the life cycle of Splash and Mist particles, or how they are created or destroyed, by visiting the FLIP Particles Life Cycle docs page. |
The Splash/Mist rollout is A splash/mist rollout, separate from the liquid simulation, is provided in order to optimize memory and CPU usage. While normal While a normal liquid simulation can produce splash, and if you increase the resolution to incredible extreme values it will can produce mist as well, such a simulation would run slowly and consume an incredible amount of resources. Besides
In addition to saving on resources and rendering time, there is also another strong major advantage to controlling splash and mist separately from the liquid itself: different shaders can be used for splash/mist and the liquid.Splash and mist can be simulated in two different ways: as fully separated systems (non-physical mode), or as part of the liquid simulation (physical mode, the default). In physical mode, the liquid, splash and mist systems can be seen as a single system with adaptive levels of detail. Following certain rules, the liquid can be converted into splash, the splash can be converted into mist or back into liquid, and the mist can be converted into liquid.shading the Splash, Mist, and Liquid particles. To render Splash and Mist particles, you’ll need to use the Phoenix Particle Shader. The Particle Shader offers multiple render modes, which enable you to create various fine-tuned appearances for particles such as Foam, Splash and Mist, to achieve realistic looking effects.
| UI Text Box | ||
|---|---|---|
| ||
For example, to render Splash particles, you can choose from the Particle Shader’s various bubble mode options, such as the Splashes mode, so that the particles look like Splashes when rendered. Meanwhile, the Points or Fog mode can be a useful option for shading Mist particles. |
| UI Text Box | size | medium||
|---|---|---|---|
| |||
Note that Splash and Mist can be simulated in two different ways: either as part of a liquid simulation, by enabling the Splash/Mist Rollout (which is a physical mode), or they can also be simulated as fully separate systems by using a Source to emit Splash or Mist particles (which is a non-physical mode)Users of previous versions should note an important difference about splash regarding particle size. In version 2.2 the splash size was controlled directly, like the foam. While foam really needs direct size control, especially for the most popular usage of pouring a glass of beer or soda, the size and volume of a splash should be directly related to the amount of liquid being displaced rather than a user-specified value. In other words, in order to have a seamless transition between the splash and the liquid, the volume of the splash droplets must be equal to the volume of the liquid converted into splash. Phoenix 3.0 and newer simulates splashes according to this rule. Here is an image that may help visualize this process - FLIP Particles Life Cycle. |
| UI Text Box | size | medium|
|---|---|---|
| ||
UI Path: ||Select Select Liquid Simulator object| LiquidSim object| | > Modify panel > Splash/Mist rollout |
Parameters
...
| Section | |||||
|---|---|---|---|---|---|
|
...
Parameters

|
...
|
...
|
...
|
...
|
...
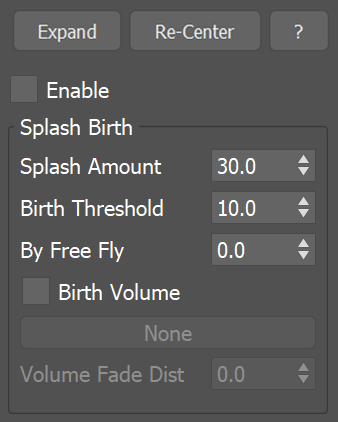
Splash Birth
...
Splash Amount | spbirth – Controls the amount of splash relative to the liquid. This value determines how many splash particles are equal to a single liquid particle in volume. This value also affects the particle size, where larger values decrease the size of splash particles. Note: This parameter is the nearest in functionality to the "birth rate" parameter in previous versions. For more information, see the Splash Amount example below.
Threshold | spbthres – Controls the condition for splash birth. The lower this value is, the more places on the liquid surface will produce splash.
By Free Fly | spfreefall – The probability of How likely a free falling /or flying liquid particle converting will turn into splash. At 0.0, no free falling/flying liquid is converted will not convert into splashes. The main usage of values above 0.0 is in waterfall simulations. It is not recommended that this parameter be changed to a value other than 0.0 for ocean simulations because the main body of liquid might sometimes be in a temporary state of free fallthis might create splashes over the ocean surface or even in air pockets under the water surface. For more information, see the By Free Fly example below.
Birth Volume | usespbconfgeom, spbconfgeom – When enabled, allows the splash to be born naturally by the simulation only inside a specified geometry object. The splash born inside the Birth Volume can travel outside the volume without a problem. The difference between this approach and spawning splash inside a volume manually from a Source object is that using a Birth Volume, the splash birth will follow the simulation criteria of the simulation and will look and behave more naturally.
| UI Text Box | size | medium|
|---|---|---|
| ||
By default, the birth volume geometry is not automatically converted to a non-solid and it will behave as a rigid body in your simulation. In this case, you can still use the Volume Fadeout can be used Fade Dist to expand an area around the object where Foam/Splash births are possible. You can convert the geometry to a non-solid from its PhoenixFD propertiesChaos Phoenix Properties in order to allow liquid to exist inside it as well. Also note that birth volumes will interact with the simulation even if they are hidden. If you wish, you can exclude the Birth Volume from the Scene Interaction rollout. |
Volume Fade Dist | spbconfgeomfade – Controls how far the splash particles will spawn around the specified Birth Volume geometry object.
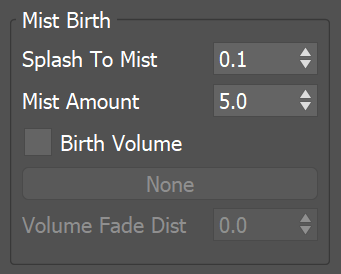
Mist Birth
...
| Section |
|---|
...
|
...
|
...
|
...
| ||||
| size | medium |
|
|---|
...
|
...
|
...
Foam on Hit
...
...
| Section | |||||
|---|---|---|---|---|---|
|
...
|
...
|
...
|
...
|
...
...
|
...
|
...
| UI Text Box | ||||
|---|---|---|---|---|
| ||||
For the Min. Age parameter to work, you need to Enable the export of the Age channel for your Splash particles from the Output menu of the Phoenix FD Simulator
|
...
|
...
|

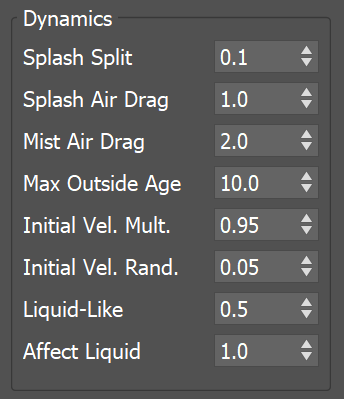
Dynamics
...
| Section | |||||
|---|---|---|---|---|---|
|
Properties

...
|
...
|
...
|
...
| UI Text Box | ||||
|---|---|---|---|---|
| ||||
For the Max Outside Age parameter to work, you need to Enable the export of the Age channel for your Splash particles from the Output menu of the Phoenix FD Simulator
|
...
|
...
|
...
|
...
|
...
| |||||||||
| medium |
|
...
|
| Anchor | ||||
|---|---|---|---|---|
|
...
Example: Splash Amount
...
| UI Text Box | |||
|---|---|---|---|
| medium |
| ||
The following video provides an example of Splash Amount parameter to show the differences between values of 0.0, 3.0, and 10.0. |
| Align | ||
|---|---|---|
| ||
|
Software used: Phoenix FD 4.30.01 Nightly (02 Oct 2020)
| UI Button | ||||||||
|---|---|---|---|---|---|---|---|---|
|
...
| Anchor | ||||
|---|---|---|---|---|
|
...
Example: By Free Fly
...
| UI Text Box | size | medium|
|---|---|---|
| ||
The following video provides examples to show the differences of By Free Fly values of 0, 0.6, and 1.0. |
| Align | ||
|---|---|---|
| ||
|
Software used: Phoenix FD 4.30.01 Nightly (02 Oct 2020)
| UI Button | ||||||||
|---|---|---|---|---|---|---|---|---|
|
...
| Anchor | ||||
|---|---|---|---|---|
|
...
Example: Foam on Hit
...
| UI Text Box | |||
|---|---|---|---|
| medium |
| ||
The following video provides examples to show the differences of Foam on Hit values of 0.0, 2, and 5.0. |
| Align | ||
|---|---|---|
| ||
|
Software used: Phoenix FD 4.30.01 Nightly (02 Oct 2020)
| UI Button | ||||||||
|---|---|---|---|---|---|---|---|---|
|
| Anchor | ||||
|---|---|---|---|---|
|
...
Example: Liquid-Like
...
| UI Text Box | size | medium||||
|---|---|---|---|---|---|
| |||||
The following video provides examples to show the differences of Liquid-Like values of 0, 2.0, and 100.0.
|
| Align | ||||||||||||
|---|---|---|---|---|---|---|---|---|---|---|---|---|
| ||||||||||||
Software used: Phoenix 5.10.00 Official Release
|
...
| UI Text Box | ||
|---|---|---|
| ||
Here is an example comparing Liquid-Like set to 0 an example of Liquid-Like parameter to show the differences between values of 0and 3. |
| Section | |||||||||||||||||||||
|---|---|---|---|---|---|---|---|---|---|---|---|---|---|---|---|---|---|---|---|---|---|
|
Note about Splash Particles before Phoenix 3.0
...
Users of previous Phoenix versions should note an important difference about splash regarding particle size.
In Phoenix 2.2, the splash size was controlled directly, like the foam. While foam really needs direct size control, especially for the most popular usage of pouring a glass of beer or soda, the size and volume of a splash should be directly related to the amount of liquid being displaced rather than a user-specified value.
In other words, in order to have a seamless transition between the splash and the liquid, the volume of the splash droplets must be equal to the volume of the liquid converted into splash. Phoenix 3.0 and newer simulates splashes according to this rule.
| UI Text Box | ||
|---|---|---|
| ||
Here is an image that may help visualize this process - FLIP Particles Life Cycle. |