Versions Compared

Key

  • This line was added.
  • This line was removed.
  • Formatting was changed.

...

Actions


UI Text Box
typeinfo

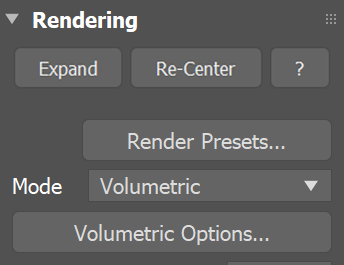
Volumetric shading settings are not stored within the caches themselves, so if you want to use the same render settings for another simulator or project, there is the option to save and load them as Phoenix Render Presets in the “.tpr” file format.

Section
Column
width55%

Expand – Opens a floating dialog that contains the selected rollout and automatically folds the command panel rollout.

Re-Center – Resets the position of the floating rollout.

? – Opens up the help documents for the Fire/Smoke Rendering.

Render Presets... – Opens a menu for loading and saving different presets, which contain the Phoenix Rendering Rollout settings for future use. The following options are available:

Fancy Bullets
typecircle
  • Load from File...
  • Save to File...
  • Default .aur Render Settings
  • Fire/Smoke .aur Fast Render
  • Fire/Smoke from FumeFX
  • Fire/Smoke .vdb from Houdini
  • Liquid .vdb from Houdini
  • Fire/Smoke .vdb from Maya Fluids
  • Fire
  • Fuel Fire
  • Gasoline Explosion
  • Explosion
  • Large Smoke
  • Candle
  • Clouds
  • Cold Smoke

Anchor
RenderMode
RenderMode

Mode | rendmode – Specifies the method for visualizing the grid content.

Volumetric – Visualizes the content as a standard 3ds Max atmospheric. This method is used mostly for fire and smoke.

Anchor
GeometryMode
GeometryMode
Volumetric Geometry – This method requires V-Ray. It produces the same result as the Volumetric option by using procedural geometry made up from multiple transparent layers. Used when rendering fire/smoke for exporting deep images and render elements such as normals, velocity, multi matte, etc. which would not be available in Volumetric mode. For more information on which render elements are supported in Volumetric and Volumetric Geometry mode, see V-Ray Render Elements Support.

UI Text Box
typenote

Approximate and Approximate+Shadows options for the Scattering parameter in the Smoke color window are not supported in Volumetric Geometry mode.

For a complete list of the supported Render Elements in both Volumetric and Volumetric Geometry mode, please check the V-Ray Render Elements Support page.

Volumetric Heat Haze – This method requires V-Ray. It produces the same result as the Volumetric Geometry option, and also adds a heat haze effect when used with the Heat Haze parameter. Note that you might need to increase the Max depth of a VRayMtl with refraction in case it intersects with the Heat Haze shader.

Anchor
ImplicitSurface
ImplicitSurface
Isosurface – This method requires V-Ray. It produces a procedural isosurface without polygons at render time using the Surface section options. Compared to the Mesh mode, the result is always smooth but will take longer to render. In case in Mesh mode your mesh is too jagged and edgy, and smoothing it out is too slow or impossible, this means you should switch to Isosurface mode instead. 
Mesh – The content is converted into a standard 3ds Max mesh using the Surface section options. This mode is mostly used for liquids, but can also be applied to thick smoke using a scatter material or to plumes of smoke to create effects such as large underwater bubbles.
Ocean Mesh – The grid content is extended to a flat area, fitting the camera's view. In most cases, this mode is used with a displacement texture such as the Phoenix FD Ocean Texture.
Cap Mesh – Only the upper liquid surface is rendered. This mode can be used for swimming pools and other placid liquid surfaces.

UI Text Box
typenote

The ocean surface can be generated only when the liquid touches the sides and the bottom of the grid, which act as a container for the liquid. The detail of the mesh extension around the simulator depends on the camera resolution - for each pixel of the viewport or the rendered image, one or several polygons are generated, depending on the Ocean Subdivisions option.

Div
stylemargin-top: 10px
idFireSmoke_Rendering_VolumetricOptions

Volumetric Options... – Opens the Volumetric Render settings window which contains the following rollouts:

  • Fire – Controls the emissive (fire) color of the volumetric shader, and the light emitted by the Simulator.
  • Smoke Color – Controls the diffuse color of the volumetric shader.
  • Smoke Opacity – Controls the transparency part of the volumetric shader.
UI Text Box
typeinfo

The Volumetric Render Settings provide Fire and Smoke shader controls that are designed to be straightforward and easy to use.

For example, there are simple color gradients and graph diagrams that you can tweak using curves, which also give enough flexibility to achieve a wide variety of different results. If you need more advanced controls, like the ability to multiply the data with textures, or mix a few grid channels, you can also do that with the available options in Phoenix as well.

These controls make it possible to shade a variety of different types of fire, smoke, and other volumetric scenarios, from candle flames to fireplaces, to cigarette smoke or massive explosions, as well as sci-fi content such as nebulae, and other effects entirely up to your imagination.

UI Text Box
typetip

For even more advanced control over the shading, you can use the Phoenix Grid Texture.

It reads from the simulation’s Grid Channels to generate a procedural texture, which can then be used to shade the simulation wherever colors are needed. The Grid Texture can be used with the volume shader to color or modulate the opacity of Fire and Smoke, using any of the supported Grid Channels (Smoke, Speed, RGB, etc.).

It can also be plugged into the texture slots of a material. For example, if you want to mix together liquids with multiple RGB colors emitted from different Liquid Sources, the Grid Texture can be used to read and transfer the RGB colors to the Liquid mesh's material for shading.

Column
width5%


Column
width40%


...