Versions Compared

Key

  • This line was added.
  • This line was removed.
  • Formatting was changed.

...

UI Text Box
typetip

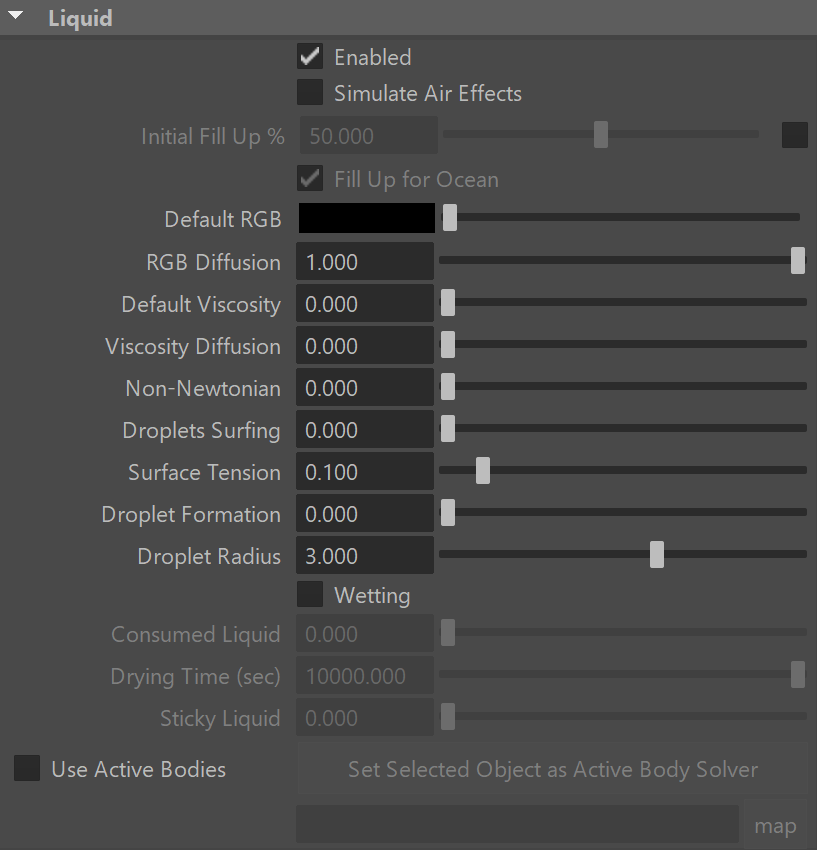
UI Path: ||Select PhoenixFDSim|| > Attribute Editor > Liquid rollout

...

Section
Column
width40%

Enabled liquid – When enabled, turns on liquid simulation.

Simulate Air Effects | liqSimAirEffects – When enabled, turns on the built-in air simulator for the areas in the simulation grid which are not full of liquid. The air velocity can be affected by the liquid movement, by Sources, or by fast moving obstacles inside the Simulator. In turn, the air velocity will affect and carry splash, mist, and foam particles. Note, however, that no matter how strong the air velocity is, it will not affect the liquid back. So for example you can use Simulate Air Effects when realistic mist is needed in waterfall setups, or stormy ocean scenes. The air simulation can dramatically increase the quality of splash and mist effects.

UI Text Box
typenote

The air effects stop affecting particles once they exit the simulator, thus altering the particle speed and direction around the simulator walls.

Initial Fill Up | liqFillUp – When enabled, the container is filled up with liquid when the simulation starts. This option determines the fill-up level, measured in % of the vertical Y size of the Grid. For liquid simulations using Confine Geometry, you can enable Clear Inside on the geometry and liquid will not be created at simulation startup in the voxels inside the geometry.

UI Text Box
typeinfo

The liquid created through the Initial Fill Up option will be initialized with the values set for the Default RGB and Default Viscosity parameters below.

Fill Up For Ocean | liqOceanFill – Changes the Open Container Walls of the simulator so they would act like there is an infinite liquid volume beyond them. Pressure will be created at the simulator walls in order to support the liquid, and if the surface of a wall below the Initial Fill Up level, or the bottom, gets cleared from liquid during simulation, new incoming liquid would be created. You can also animate the Simulator movement or link it to a moving geometry, and it would act like a moving window over an ocean that stays in place. This way you can simulate moving ships or boats that carry their Liquid Simulator along with them as they sail into an ocean, so you don't need to create one huge long Simulator along their entire path.

In order to eliminate air pockets between Solid geometry and the liquid mesh, this option will automatically set all Solid voxels below the Initial Fill Up level to contain Liquid amount of 1, even if they don't contain any Liquid particles.

 If you don't want this effect, enable Clear Inside from the Phoenix FD Attributes of the Solid geometry.  See the Fill Up For Ocean and Clear Inside example below.

UI Text Box
typewarning

All simulator walls must be set to Open for Fill Up For Ocean to take effect.

Default RGB liqDefaultRGB – The Simulator is filled with this RGB color at simulation start. The Default RGB is also used to color the fluid generated by Initial Fill Up, or by Initial Liquid Fill from the Phoenix FD Properties of a geometry - both of these options create liquid only at the start of the simulation. During simulation, more colors can be mixed into the sim by using a Phoenix FD Liquid Source with RGB enabled, or the color of existing fluid can be changed over time by using a Phoenix FD Mapper. If a Phoenix FD Liquid Source does not have RGB enabled, it also emits using the Default RGB value.

UI Text Box
typetip

The RGB Grid Channel or RGB Particle Channel export has to be enabled in the Output rollout for this parameter to take effect. 

RGB Diffusion | liqRGBDiffusion – Control how quickly the colors of particles are mixed over time during the simulation. When it's set to 0, each FLIP liquid particle carries its own color, and the color of each individual particle does not change when liquids are mixed. This means that if red and green liquids are mixed, a dotted red-green liquid will be produced instead of a yellow liquid. This parameter allows the colors of particles to change when the particles are in contact, thus achieving uniform color in the resulting mixed liquid. For more information, see the RGB Diffusion example below.

Anchor
Viscosity
Viscosity
Default Viscosity | liqViscosity – Determines the default viscosity of the liquid. Viscosity means how thick the liquid is. Liquids such as honey, syrup, or even thick mud and lava need to be simulated with high viscosity. On the other hand, liquid such as water, beer, coffee or milk are very thin and show have zero or very low viscosity. The Default Viscosity value is used when no viscosity information for the emitted liquid is provided to the Simulator by the Source. Also note that the effect of the viscosity works more strongly with more Steps Per Frame, and also when the grid resolution is lower. Increasing the grid resolution or reducing the Steps Per Frame can make viscous liquid thinner. For more information, see the Viscosity example below.

UI Text Box
typetip
  • All FLIP liquid particles are set to this viscosity value at simulation start. You should use higher viscosity for thicker liquids such as chocolate, cream, etc.
  • The Default Viscosity is also used for the fluid generated by Initial Fill Up, or by Initial Liquid Fill from the Phoenix FD Properties of a geometry - both of these options create liquid only at the start of the simulation.
  • If a Phoenix FD Liquid Source does not have Viscosity enabled, it also emits using the Default Viscosity value.
  • During simulation, liquids of variable viscosity can be mixed into the sim by using a Phoenix FD Liquid Source with Viscosity enabled.
  • The Viscosity Grid Channel export has to be enabled in the Output rollout for variable viscosity simulations to work.
  • The viscosity of existing liquid can be changed over time by using a Phoenix FD Mapper in order to achieve melting or solidifying of fluids.
  • You can shade the liquid mesh or particles using the fluid's viscosity with the help of the Phoenix Grid Texture or Particle Texture
  • It's important to note that using viscosity does not automatically make the liquid sticky. For example, molten glass is viscous, but not sticky at all. Stickiness can be enabled explicitly from the Wetting parameters section below. If Sticky Liquid is not enabled, even the most viscous fluid would slide from the surfaces of geometries or from the jammed walls of the Simulator.

Viscosity Diffusion | liqViscDiffusion – Phoenix supports sourcing of fluids with different viscosity (thickness) values. This parameter specifies how quickly they blend together. A low value will preserve the distinct viscosities, while a high value will allow them to mix together and produce a fluid with a uniform thickness.

Non-Newtonian | liqNonNewtonian – Modifies the viscosity with respect to the liquid's velocity to overcome the conflict between viscosity and wetting, where high viscosity of real liquids prevents wetting. Non-Newtonian liquids are liquids that behave differently at different velocities. This parameter accounts for this behavior by decreasing the viscosity in areas where the liquid is moving slowly, and retains a higher viscosity where the liquid is moving quickly. For example, to cover a cookie with liquid chocolate, high viscosity is needed in the pouring portion of the motion to obtain the curly shape of the chocolate as it lands on the cookie and begins to settle down. On the other hand, a smooth chocolate is needed to settle in over the cookie without roughness and holes. If the viscosity is high enough, the chocolate might look right during the pouring and settling motions but won't settle in to form a smooth thin layer over the cookie. This parameter decreases the viscosity where the liquid is moving slowly (over the surface of the cookie) while keeping the faster-moving stream tight and highly viscous. For more information, see the Non-Newtonian example below.

Droplets Surfing | liqDropletSurf – Affects the liquid and the splash particles, controlling how long a particle hovers on the surface before it merges with the liquid. The parameter is used mostly in ocean/wave simulations. For more information, see the Droplets Surfing example below.

Anchor
FillupForOceanClearInside

Column
width60%

Image RemovedImage Added


Example: Fill Up For Ocean and Clear Inside

...

UI Text Box
typeinfo

The simulation of wetting can be used in rendering for blending wet and dry materials, depending on which parts of a geometry have been in contact with the simulated liquid. Wetting can also change the behavior of a simulated viscous liquid and make it stick to geometries.

The wetting simulation produces a particle system called WetMap. Wetmap particles are created at the point of contact between the liquid and the scene geometry, and can be rendered using a Particle Texture map.

When used with a Blend Material, the Particle Texture acts as a mask to blend between two materials, for example, a wet material and a dry surface material. This way, geometry covered by WetMap particles can appear wet, and the rest of the geometry can appear dry.

...

You can then set the density and other Active Body properties in the Phoenix Node Properties menu for each Active Body object.

...