Versions Compared

Key

  • This line was added.
  • This line was removed.
  • Formatting was changed.

...

Div
stylemargin-top: 10px
idFireSmoke_Output_Overview

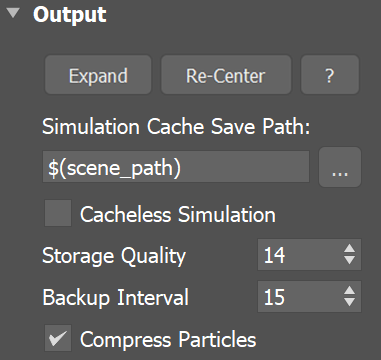
The Output rollout holds The Output rollout holds the controls for the simulation result.

When you start a simulation, the simulator will typically output an entire animation sequence, which is saved onto your hard drive by default. That sequence is saved as individual files, called caches, which contain raw simulation data for each timeline frame.

The Output rollout lets you set the save path for the cache files, manage what data is written to those cache files, and determine their compression.

Specifically, the cache data consists of grids and particles, which describe the fluid’s behavior. Grid Channels are written to each cache file, which represent the properties of the simulated fluid at that frame, such as Smoke, Temperature, Velocity, RGB and so forth.

In the Output rollout, you can choose which Grid Channels to export to the cache files, based on your needs. The values for those exported channels will then be contained in each of the voxels in the simulation grid.


UI Text Box
typeinfo

For example, to simulate multiple colors of smoke, you would want to export the Grid RGB Channel. That way, if each of your Fire Sources emits a different color of smoke, each Source's RGB color information would be saved to the simulator's cache files.

medium
UI Text Box
size
typetip

UI Path: ||Select Fire Smoke Simulator | FireSmokeSim object|| > Modify panel > Output rollout


Parameters


Image Removed

Parameters

...

Section
Column
width55%

Expand – Opens a floating dialog that contains the selected rollout and automatically folds the command panel rollout.

Re-Center – Resets the position of the floating rollout.

? – Opens up the help documents for the Fire/Smoke Output.

...

Anchor
CachePath
CachePath
Simulation Cache Save Path simoutput – This is the directory and the name template for the output cache files. It uses the

...

medium

 $(scene_path) macro by default, and there are also other available macros as listed below. To set up rendering and simulation cache paths manually, see How to change the default Phoenix paths on the Tips and Tricks page.

UI Expand
titleClick Here to Expand Additional $(VARIABLE) Information

$(scene_path) – $(data_dir)\$(scene)_Phoenix_frames\$(nodename)_####.aur
$(scene_dir) – $(data_dir)\$(scene)_Phoenix2_frames\ND$(handle)_$(nodename)_####.aur
$(implicit) – Same as $(scene_dir)
$(dir) – The scene directory.
$(data_dir) – The default directory where cache files are written. By default this is $(dir), meaning that the cache files are written next to the scene file, but it can be overridden with a custom directory from the Phoenix Global Preferences.
$(scene) – The scene file name.
$(handle) – A unique number of the node.
$(nodename) – The name of the node.
$env(<variable_name>) – An environment variable. See Using Environment Variables below.

#### is the frame number formatted with at least as many digits as the hash signs. If the frame digits are less than the hashes, the number is padded with zeroes to the left. For example:


Align
aligncenter
 

Result
Frame Number#######
11010001
1010100010
1000100010001000
UI Text Box
sizemedium
typenote

Since version 3.00.02, Phoenix

FD

can export VDB grid data. Check the How to export Phoenix FD simulation to OpenVDB format video.

Appending a .vdb extension after the Output Path tells Phoenix to write its data in the OpenVDB format.

Particle data can also be exported using the .aur or the .vdb format. Phoenix can convert particles from already simulated Phoenix

FD

.aur caches into the .prt format as a post-process using the 

PhoenixFD

Phoenix Export PRT Particles dialog or to .vdb format using the Cache Converter tool.

Note that due to the difference between the compression algorithms used by Phoenix

FD

's Aura format and the OpenVDB format, exported VDB caches may produce a slightly different result at render time compared to Aura caches when the Storage Quality is set to a value lower than 20 (i.e. Lossless).

Image Removed

Image Added

UI Text Box
size 
typeinfo

 Clicking the "..." button will open a menu with the following options:


Image Added

Browse - Opens a dialog

for choosing one of several cache file types. Phoenix FD can import *.f3d and *.vdb files from other fluid simulator software products. Supported file types are Phoenix FD *.aur, Field3D *.f3d and OpenVDB *.vdb.  See How to import and render simulations from FumeFX, Houdini and Maya for more information.  

where you can select where the simulation caches will be written to. The filename you type in must contain # signs so each simulation frame will be written to a differently numbered file. Also, you can choose between two file formats - AUR and VDB cache files. In order to write the simulation caches to VDB in the default simulation path, you can just edit the Simulation Cache Save Path to $(scene_path).vdb.

Delete Cache Files - Clears the cache files matching the provided Simulation Cache Save Path pattern.

Reset to Default - Resets the Simulation Cache Save Path to

the

default

value of $(scene_path)

.

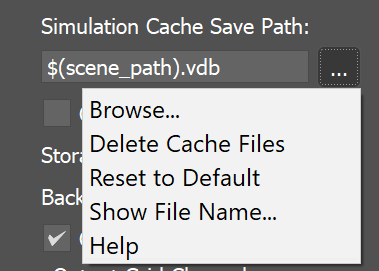
Show File Name - Evaluates the full disk path provided to the Simulation Cache Save Path parameter.

Help - Opens the Help page for the Output tab of the Phoenix FD Fire/Smoke Simulator.

...

Help - Opens this Help page.

Cacheless Simulation | cacheless – Only the last simulated frame will remain in RAM and no caches will be written to the storage. This will speed up simulations which are bound by slow reading or writing to the hard disk or by compression and decompression of the grid or particle data. You can use this option when iterating on the simulation settings in order to speed up your iterations. It can also be combined with the Render On Each Sim Frame option under the Simulation rollout, or the Save Images During Sim option of the extended GPU Preview viewport, so you will get a ready image sequence if you leave the simulation unattended and then return to check it.

Storage Quality | storage_quality – The output grid and particle channels are compressed by default in order to increase the performance (faster cache loading) and to avoid excessive memory consumption. This parameter can range from 8 to 20 - 8 is the smallest size, while 20 is the best quality and is uncompressed. If this value is set too low, different artifacts may start appearing depending on the type of scene. For grid channels, artifacts shaped like horizontal slices may appear in preview and rendering.

...

Column
width5%


Column
width40%

Image Added

...


Section

Example: Fire/Smoke compression artifacts 


...

Div
stylemargin-top: 10px
idFireSmoke_Output_BackupInterval

Backup intervalInterval | backup – The frame interval between two backups of the full simulation state. You can later continue a stopped simulation from such frames (see the Restore button). To make a Restore possible at every frame, set this parameter to 1. A value of 0 means no backup frames will be exported.

Div
stylemargin-top: 10px
idFireSmoke_Output_CompressParticles

Compress particlesParticles | prtcompress – Enables compression of the simulated particle systems when they are written to AUR cache files. VDB cache files exported from Phoenix do not support particle compression. Simulations with very high particle counts, such as 50 million or more, will produce large caches, so particle compression will help reduce the cache sizes significantly. If you are writing or reading the cache files over the network or to a disk drive, this could significantly speed up simulation and rendering. However, if you are writing the simulation caches to an SSD drive or other fast storage, and you can afford to have large cache files, then disabling the compression could actually speed up the simulation.

Anchor
OutputChannels
OutputChannels


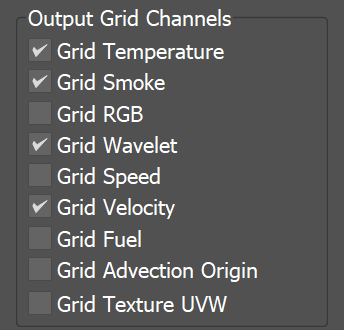
Output Grid Channels

...

medium
UI Text Box
size
typeinfo

Fluid properties are written inside Grid Channels. Here you can choose which Grid Channels will be exported to the cache files when running a simulation.

Each channel stores a type of value, such as Temperature, Velocity, and so forth, with its own range of possible values that is most efficient for that specific channel type (see the Grid Channel Ranges). Phoenix determines the fluid’s behavior at a given time, based on the content of these Grid Channels.

Choose which simulation channels will be saved to the created cache files. The

more channels are used, the slower the simulation runs and the larger the output files are. While scrolling the timeline, you can check which channels are present in the loaded cache file for the current frame, from

the 

the Cache File Content

 list

list in

the 

the Simulation rollout.

UI Text Box
typenote

Note that the

Div
stylemargin-top: 10px
idFireSmoke_Output_GridChannels

...

Section

...

Column

...

width

...

60%
Div
stylemargin-top: 10px
idFireSmoke_Output_Temperature

Grid Temperature


|


keep_

t – If this is a fire/smoke simulation, export the Temperature channel. If it's a liquid simulation, export the liquid amount which is needed so that you can mesh the liquid.

Div
stylemargin-top: 10px
idFireSmoke_Output_Smoke
Smoke 

Grid Smoke |


keep_

sm 

sm – Export the smoke density.

Div
stylemargin-top: 10px
idFireSmoke_Output_RGB
RGB 

Grid RGB keep_rgb – Export the RGB color.  You can use this for simulations where you are mixing different liquid colors or materials through a Phoenix FD Grid Texture.

Div
stylemargin-top: 10px
idFireSmoke_Output_Wavelet

Grid Wavelet keep_wavelet – Export the wavelet data of a fire/smoke simulation. You need this if you are going to resimulate a fire/smoke simulation in order to increase the resolution and add more detail using wavelet turbulence.

Div
stylemargin-top: 10px
idFireSmoke_Output_Speed

Grid Speed | keep_v – Export the speed of the simulation. You can use this for coloring the simulation at render time based on how fast different parts of the fluid move.

Div
stylemargin-top: 10px
idFireSmoke_Output_Velocity

Grid Velocity | keep_vxyz – Export the velocity of the simulation. The difference between the Speed and Velocity channels is that Velocity is a vector and takes 3 times more space in the cache file than the Speed channel. However, Velocity has direction and is needed for FireSmoke Resimulation and motion blur of the fire/smoke simulation or the liquid mesh. Because Speed can be calculated from the Velocity, it is not exported separately when Velocity is exported.

Div
stylemargin-top: 10px
idFireSmoke_Output_Fuel

Grid Fuel keep_fl – Export the fuel channel

. This needs to be enabled when simulating the process of Burning

.

Div
stylemargin-top: 10px
idFireSmoke_Output_AdvectionOrigin

Grid Advection Origin oadvpos – Export the advection origin of each voxel in the simulation. This is needed for the Precise Tracing Blend Method for retiming simulated sequences in the Input rollout.

Div
stylemargin-top: 10px
idFireSmoke_Output_AdvectionOrigin

Grid Texture UVW keep_texuvw – Export the Texture UVW channel. Enable this to generate texture mapping coordinates that follow the movement of the fluid. This way you can change the textures you want mapped over your fluid even after the simulation has ended, without the need to simulate again. For more information on TexUVW, please check the Texture mapping, moving textures with fire/smoke/liquid, and TexUVW page.

Column
width5%


Column
width35%

Image Added


Anchor
environmentVariables

Using Environment Variables with Phoenix Paths

...

There are path environment variables in every OS, and they can be used with Phoenix FD cache Phoenix cache file paths.

For example, to access environment variables in Windows 10 and Windows 8, follow these steps:

...

Using this, you can create a path (variable), give it a name, and use it for cache files in Phoenix FD.

For example, the path D:\PhoenixFD\Cache can be given the environment variable name "Cache". In the Phoenix Simulator Output rollout, you can specify the Output Path as the following:

...

Note that in order to reference environment variables, the following pattern must be used:

$env(<variable_name>)

...