Versions Compared

Key

  • This line was added.
  • This line was removed.
  • Formatting was changed.

HideElements
cssselector#tocVertical, #tocHorizontal

This page provides some useful tips for working with the Chaos Phoenix FD Active Bodies feature.

Overview


...

Section
Column
width100%40%

The Active Bodies feature in Phoenix FD allows for two-way interaction between scene geometry and the Phoenix FD simulation.

When an object is selected as an Active Body, the simulation both influences and is influenced by the Active Body's movement. This allows objects such as boats to float over a Phoenix FD ocean simulation and be affected by its waves, or objects placed on the ground to be washed away by flooding waters.

Objects selected as Active Bodies may also be animated in which case they will follow the animation while also being influenced by the Phoenix FD simulation. A speedboat simulation is a great example of this mutual interaction in action - the speedboat is heavily affected by the the water while also able to cut through the waves and produce large amounts of foam. You can balance between the influence of the animation and the fluid from an Active Body's right click properties' Original Animation Influence option.

UI Text Box
typeinfo

The Active Bodies simulation currently supports interaction between scene geometry and the Phoenix FD Liquid Simulator. Interaction between Active Bodies and the Phoenix FD Fire/Smoke Simulator is not supported.

Mutual interaction between the Active Bodies themselves is not supported yet.

UI Text Box
typenote

Phoenix FD 3.99 BETA known issues:

  • Active Bodies in a parent/child relationship may cause double transformations of the cloned Active Body object (e.g. a boat parented to an animated Null – if the Null is animated rather than the boat object itself, the boat clone will inherit the transformation twice).
  • Linking a simulator to an animated Active Body (as in the Ship in the Ocean tutorial) is not supported yet. For now, such setups require the Simulator to cover the entire path of the animated Active Body.


The Download button below provides you with an archive containing the start and end scenes.


ui-ui-button
sizelarge
icondownload
titleDownload Project Files
urlhttps://drive.google.com/uc?export=download&id=1OKdaZDW8KEC_BQvyz1ZX7vCsqExTQhUa


...

=1VX7YLZNgbAK2vFBnev4p4ciSStqnJMW8

Column
width60%
Align
aligncenter
HTML
<iframe width="720" height="480" src="https://www.youtube.com/embed/8e9fStVdyzQ?version=3&loop=1&playlist=8e9fStVdyzQ" frameborder="0" allowfullscreen></iframe>
UI Text Box
typewarning

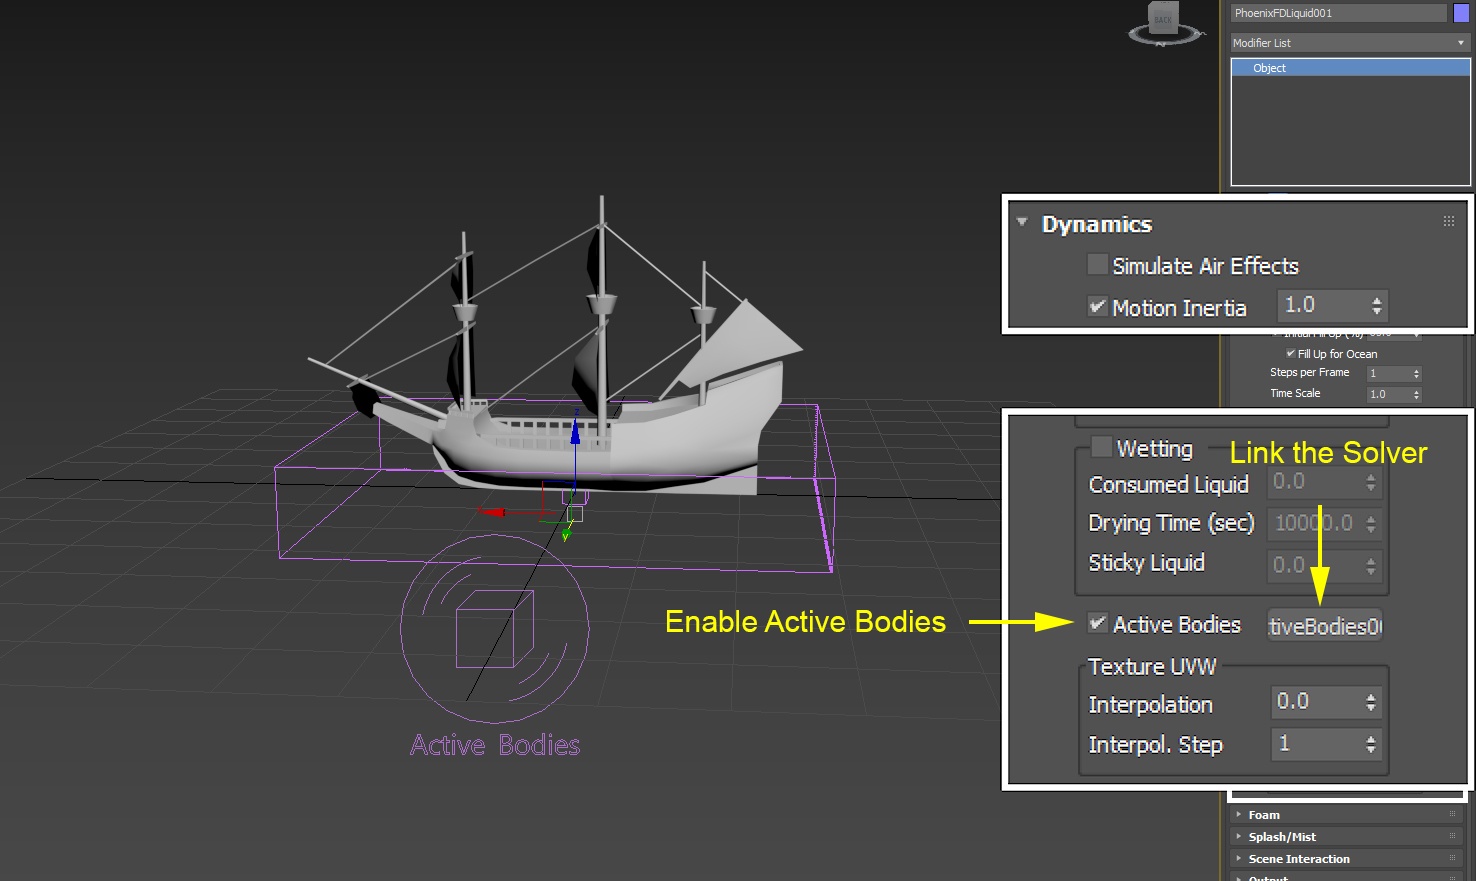
The Active Bodies simulation currently supports interaction between scene geometry and the Phoenix Liquid Simulator.

Interaction between Active Bodies and the Phoenix Fire/Smoke Simulator is not supported yet.


Setup Guide


...

Section
Column
width40%

 A Phoenix FD Liquid Simulation with Active Bodies consists of the following elements:

  1. A Liquid Simulator – used for the simulation of water.
  2. One or more scene objects – converted to Active Bodies at simulation time.
  3. An Active Body Solver – used to specify the scene objects which will be converted to Active Bodies and to set some global options for the Active Body simulation.
  4. A Center of Mass gizmo Gizmo – automatically generated for each object when included in the Active Body simulation through the solverSolver.
Column
width60%

Image Modified


...


Section
Column
width40%

To add an Active Bodies Body Solver, go to Command Panel Create → PhoenixFD → Active Bodies.

Add your scene geometry to the Active Bodies list.

Finally, link the Active Bodies Body Solver to the Phoenix FD Liquid Simulator from the Dynamics roll-out rollout.

UI Text Box
typeinfo

The Active Bodies Body Solver is separated from the Phoenix FD Simulator to allow extra flexibility when setting up the simulation. Multiple Liquid Simulators can be set up to use the same solverSolver, or alternatively, you can switch between several Active Body solvers Solvers with different settings and geometries with the same Simulator.

Column
width60%

Image Modified


...


...


Section
Column
width40%

When you start the simulation, the Active Bodies solver Body Solver will create a duplicate of your object and keyframe its Position and Rotation for every single frame.

A couple of things to note here:

  1. The ship is sinking - this happens because it's its Density too high. The Density of the Active Body can be tweaked from the original object's Phoenix FD Properties.
  2. The Center of Mass Gizmo is above the ship's deck, right at the base of the middle mast - the this is causing the ship to tilt to the side. Instead of relying on the Active Bodies solver Body Solver to guess the correct position for the Center of Mass gizmo, its position can be overriden overridden from the Phoenix FD Properties of the original object and tweaked manually.


UI Text Box
typewarning

The original geometry's visibility will be set to Bounding Box, and the duplicate will be shown in the Viewport instead.

When tweaking the Phoenix FD Properties of an object, take extra care to select the original, source object, rather than the clone. Existing clones are deleted when a simulation is re-started, thus any changes made in the Phoenix FD Properties window of the clone are lost.

Column
width60%
videoautoplayloop
Align
0001_base_sim0000.mp4
1100%
2100%
3true
4false
5true


aligncenter
HTML
<iframe width="720" height="480" src="https://www.youtube.com/embed/Q5zbvE_tLYE?version=3&loop=1&playlist=Q5zbvE_tLYE" frameborder="0" allowfullscreen></iframe>


...


Section
Column
width40%

To tweak the Density of the active bodyActive Body, right mouse button click on the original object and bring up the Phoenix FD Properties.

You can either manually type an exact value in the Specify Density parameter, or choose one of the provided Density presetsPresets.

UI Text Box
typeinfo

The Density of an object is its mass divided by its volume. Different materials have different densities, e.g. Wood is less dense than Water which allows it to float. Objects float above water because the upward force acting on them by the water (called Buoyancy) is stronger than the force of Gravity. How much an object sinks, and how far underwater it sinks before stabilizing depends on the object's density in relation to the density of the fluid it's floating over.

For example: the density of wood is 700kg/m3, or 70% of the density of water (1000 kg/m3). Therefore, assuming the object was a perfect sphere, 70% of it would sink below the surface, and 30% will stay above.

Column
width60%

Image Modified


...


Section
Column
width40%

With a lower densityDensity, the object does not now sink entirely underwater.

The erratic spinning of the ship is caused by the incorrectly placed Center of Mass gizmo Gizmo. Placing the Center of Mass somewhere close to the center of an object would make sense for a sphere but not for a ship which is usually bottom-heavy.

UI Text Box
typeinfo

The Active Bodies solver Body Solver will compute the Center of Mass of an object by looking at its volume. To simplify things, an assumption is made that all parts of the object have an equal weight.

In the case of a ship, however, this is not true. The masts and sails of a ship make up a large portion of its volume but contribute little to its total mass.

Column
width60%
videoautoplayloop
Align
0002_tweak_density0000.mp4
1100%
2100%
3true
4false
5true


aligncenter
HTML
<iframe width="720" height="480" src="https://www.youtube.com/embed/rKOgej54vjA?version=3&loop=1&playlist=rKOgej54vjA" frameborder="0" allowfullscreen></iframe>


...


Section
Column
width40%

To tweak the Center of Mass gizmo, select Select the Center Of Mass Gizmo parented under the original object and enable the Override Center of Mass toggle under its Phoenix FD Properties.For this example, the gizmo is placed place it at the origin (0, 0, 0).

UI Text Box
typeinfo

The Center of Mass of a real object is a point in space where force can be applied to move the object in a straight line, without changing its orientation. For example: pushing a rectangular plank of wood floating over lake along its center of mass would move it in a straight line. However, pushing the plank along one of its corners would also cause it to tilt or rotate.

Column
width60%

Image Modified


...


Section
Column
width40%

Right mouse button click on the original object and bring up the Phoenix Properties and enable the Override Center of Mass toggle.

UI Text Box
typewarning

By default, this option is disabled. Running the simulation will reset the Center of Mass back to the center of the object.

Column
width60%

Image Added

...


...


Section
Column
width40%

Now that the Center of Mass is placed at the bottom, the ship is no longer capsizing.

It is clear, however, that the specified density Density is too high, causing the ship to sink too far below the surface.

UI Text Box
typeinfo

There is no magic formula to determine what the density/mass of your Active Body should be. You can try looking up the real-world weight of an object similar to the one being simulated and use that as a starting point.

The behavior of Active Bodies is fairly consistent between low and high resolution simulations so setting things up at a low resolution, where the simulation is fast to compute, is preferable.

Column
width60%
videoautoplayloop
Align
0003_tweak_centerOfMass0000.mp4
1100%
2100%
3true
4false
5true


aligncenter
HTML
<iframe width="720" height="480" src="https://www.youtube.com/embed/2PoRwHFGnfg?version=3&loop=1&playlist=2PoRwHFGnfg" frameborder="0" allowfullscreen></iframe>


...


Section
Column
width40%

Select the original object and reduce the Density from the Phoenix FD Properties to make the ship lighter.

In this example, the Density is set to 250.

Column
width60%

...


...


Section
Section
Column
width40%

With a lower Density, the ship is no longer sinking.

The ship is changing orientation in seemingly calm waters - this is caused by the Friction with the Fluid parameter in the Phoenix FD Properties.

The Friction with the Fluid option controls how strongly the water particles will affect the Active Body. You can increase it when simulating small scale objects that need both positional and rotation influence from the water. You can think of the fluid friction as a 'drag' force applied to the Active Body by the liquid in the simulation.

Column
width60%

Videoautoplayloop
0004_reduceDensity_0000.mp4
1100%
2100%
3true
4false
5true


Section
Column
width40%

The Friction with the Fluid parameter is set to 0 to disable it.

Column
width60%

Image Removed


Column
width40%

The ship is no longer being dragged along by the water but is still generally affected by it now that Friction with the Fluid is disabled - this is desired behavior.

Note that from the video to the right, it appears the ship is quite front-heavy. This is caused by the placement of the Center of Mass Gizmo. If required, you could take advantage of this behavior to simulate an unbalanced Active Body – to achieve this, you would place the Center of Mass Gizmo's to the side or exaggerate its front/back location.

In this case, the ship is in perfectly calm waters and should not be swinging so heavily up and down. Because it appears front-heavy, the Center of Mass should be pulled back.

Column
width60%
videoautoplayloop
Align
0005_disable_fluidFriction_0000.mp4
1100%
2100%
3true
4false
5true


aligncenter
HTML
<iframe width="720" height="480" src="https://www.youtube.com/embed/g1ebUZ2QQ0E?version=3&loop=1&playlist=g1ebUZ2QQ0E" frameborder="0" allowfullscreen></iframe>


...


Section
Column
width40%

In this example, the Center of Mass Gizmo of the original geometry is placed at [ (-2.5, 0, 0 ]).

Column
width60%

Image Modified

...


...


Section
Column
width40%

The ship is now behaving as expected.

You may continue this setup by adding a Phoenix FD Wave Force with an a Phoenix Ocean Texture to generate waves in the simulatorthe Simulator.

The Wave Force produces real simulated waves inside the Simulator. This is an alternative to the render-time displacement you can achieve when plugging a Phoenix Ocean Texture under the Displacement section of the Rendering rollout of a Simulator, which can't interact with submerged objects. The Wave Force is also driven by a Phoenix FD Ocean Texture and allows you to control how strictly the fluid will follow the pure ocean texture or how much freedom the fluid will have to splash and swirl around.

Column
width60%
videoautoplayloop
Align
0006_moveCenterOfMassBack_0000.mp4
1100%
2100%
3true
4false
5true


aligncenter
HTML
<iframe width="720" height="480" src="https://www.youtube.com/embed/DeLz3e5UHAw?version=3&loop=1&playlist=DeLz3e5UHAw" frameborder="0" allowfullscreen></iframe>

...