![]()
Page History
This page provides information on setting up V-Ray Swarm through a silent installation and removing V-Ray Swarm through a silent uninstallation.
Page Contents
| Table of Contents | ||
|---|---|---|
|
Overview
A silent installation allows you to complete V-Ray installation without user input during the process using a predefined set of options. To set up a silent installation, you need to perform two steps: creating an .xml file and running the installer.
You can remove V-Ray from your machine similarly through a silent uninstall.
Creating the .xml file
Run the installation file from the command prompt with the -gui=0 argument
vrswrm-installer-win.exe -gui=0
Follow the instructions of the install and set-up the installation the way you want to have it on all machines This will create a file named config.xml in the folder of the installation file.
Running the installer
In the second step you run the installer with the following command:
| Code Block |
|---|
vrswrm-installer.exe -configFile="config.xml" -gui=0 |
This will cause the installer to read the variable values from the .xml file and do the installation without user input. If you do not specify the '-quiet=1' option, the installer will ask for a confirmation of each variable before proceeding.
Configuration File
The config.xml file holds configuration information about the settings of the installation. Below is an example of such a config file.
| Code Block | ||||
|---|---|---|---|---|
| ||||
<DefValues>
 <Value Name="REVERT_INSTALL" DataType="value">1</Value>
 <Value Name="REVERT_UNINSTALL" DataType="value">0</Value>
 <Value Name="SWARM_PORT" DataType="value">24267</Value>
 <Value Name="TTL_DEFAULT_VALUE" DataType="value">1</Value>
 <Value Name="AUTO_DISCOVERY" DataType="value">1</Value>
 <Value Name="STDROOT" DataType="value">C:\Program Files\Chaos Group\V-Ray\Swarm 1.4</Value>
 <Value Name="CONFIG_ROOT" DataType="value">C:\Program Files\Chaos Group\V-Ray\Swarm 1.4/config</Value>
 <Value Name="SHORTCUTS" DataType="value">1</Value>
 <Value Name="FIREWALL_EXCEPTION" DataType="value">1</Value>
 <Value Name="DISCOVERY_MASTER" DataType="value"></Value>
 <Value Name="DISCOVERY_ALTERNATE_MASTER_1" DataType="value"></Value>
 <Value Name="DISCOVERY_ALTERNATE_MASTER_2" DataType="value"></Value>
 <Value Name="INITIAL_CONFIGURATION_PATH" DataType="value"></Value>
 <LicServer>
  <Host>localhost</Host>
  <Port>30304</Port>
  <Host1></Host1>
  <Port1>30304</Port1>
  <Host2></Host2>
  <Port2>30304</Port2>
  <User></User>
 </LicServer>
</DefValues> |
Below is a description of the variables of the installer:
...
AUTO_DISCOVERY...
When set to 1 V-Ray Swarm will try to discover other nodes automatically. When set to 0 the DISCOVERY_MASTER variable should be set to the IP of the machine where the master node will run. Defaults to 1
...
DISCOVERY_MASTER...
Specifies The IP address of the machine which will be used as a master node (required if AUTO_DISCOVERY is set to 0)
...
Specifies the IP address of a machine, which will be used as a fallback master node if the primary master is not available (optional).
...
DISCOERY_ALTERNATE_MASTER_2...
INITIAL_CONFIGURATION_PATH...
SWARM_PORT...
TTL_DEFAULT_VALUE...
the process of submitting render jobs to Chaos Cloud rendering.
| UI Text Box | ||
|---|---|---|
| ||
Chaos Cloud rendering requires the installation of the Chaos Cloud client application. For more information, see the Installation of Chaos Cloud client page. |
Overview
...
You can submit render jobs to Chaos Cloud rendering either directly from your host 3D platform through the Chaos Cloud client or manually through any command line interface.
| UI Text Box | ||
|---|---|---|
| ||
Your Credits Balance is now displayed on each Chaos Cloud portal page. It is visible in the top right corner next to the login information. |
If you add a new version of a job that already exists within Chaos Cloud rendering, its upload is much quicker than the initial upload. Chaos Cloud rendering compares every new job and its assets to the existing ones, and if there is a match, the client app uploads only the changes. This is useful when you make a new iteration of an existing scene and/or are working in a team. It is useful to keep your jobs in Chaos Cloud rendering while you are still working on them.
If the job fails to upload for some reason, please consider uploading the scene(s) again, as it may take significantly less time. The parts of the scene which were previously uploaded will not be uploaded to Chaos Cloud again.
Chaos Cloud supports very large scenes – the total size of the .vrscene file and the files referenced by it can be up to 2 TB. The maximum output resolution is 4 gigapixels.
Submitting Render Jobs Through Host Applications
...
Depending on the platform you use, there is a Render in Chaos Cloud button that automatically sends and loads the scene in Chaos Cloud rendering.
Anchor HostApp HostApp
| Expand | ||
|---|---|---|
| ||
For more information on how to run a render job on Chaos Cloud rendering from V-Ray for 3ds Max, click here. For more information on how to run a render job on Chaos Cloud rendering from V-Ray for Maya, click here. For more information on how to run a render job on Chaos Cloud rendering from V-Ray for Modo, click here. For more information on how to run a render job on Chaos Cloud rendering from V-Ray for Revit, click here. For more information on how to run a render job on Chaos Cloud rendering from V-Ray for SketchUp, click here. For more information on how to run a render job on Chaos Cloud rendering from V-Ray for Rhino, click here. For more information on how to run a render job on Chaos Cloud rendering from V-Ray for Houdini, click here. For more information on how to run a render job on Chaos Cloud rendering from V-Ray for Cinema 4D, click here. For more information on how to run a render job on Chaos Cloud rendering from V-Ray for Blender, click here. For more information on how to run a render job on Chaos Cloud rendering from V-Ray for Unreal, click here. |
| Multiexcerpt | ||||||||||||||||||||||||||||||||
|---|---|---|---|---|---|---|---|---|---|---|---|---|---|---|---|---|---|---|---|---|---|---|---|---|---|---|---|---|---|---|---|---|
| ||||||||||||||||||||||||||||||||
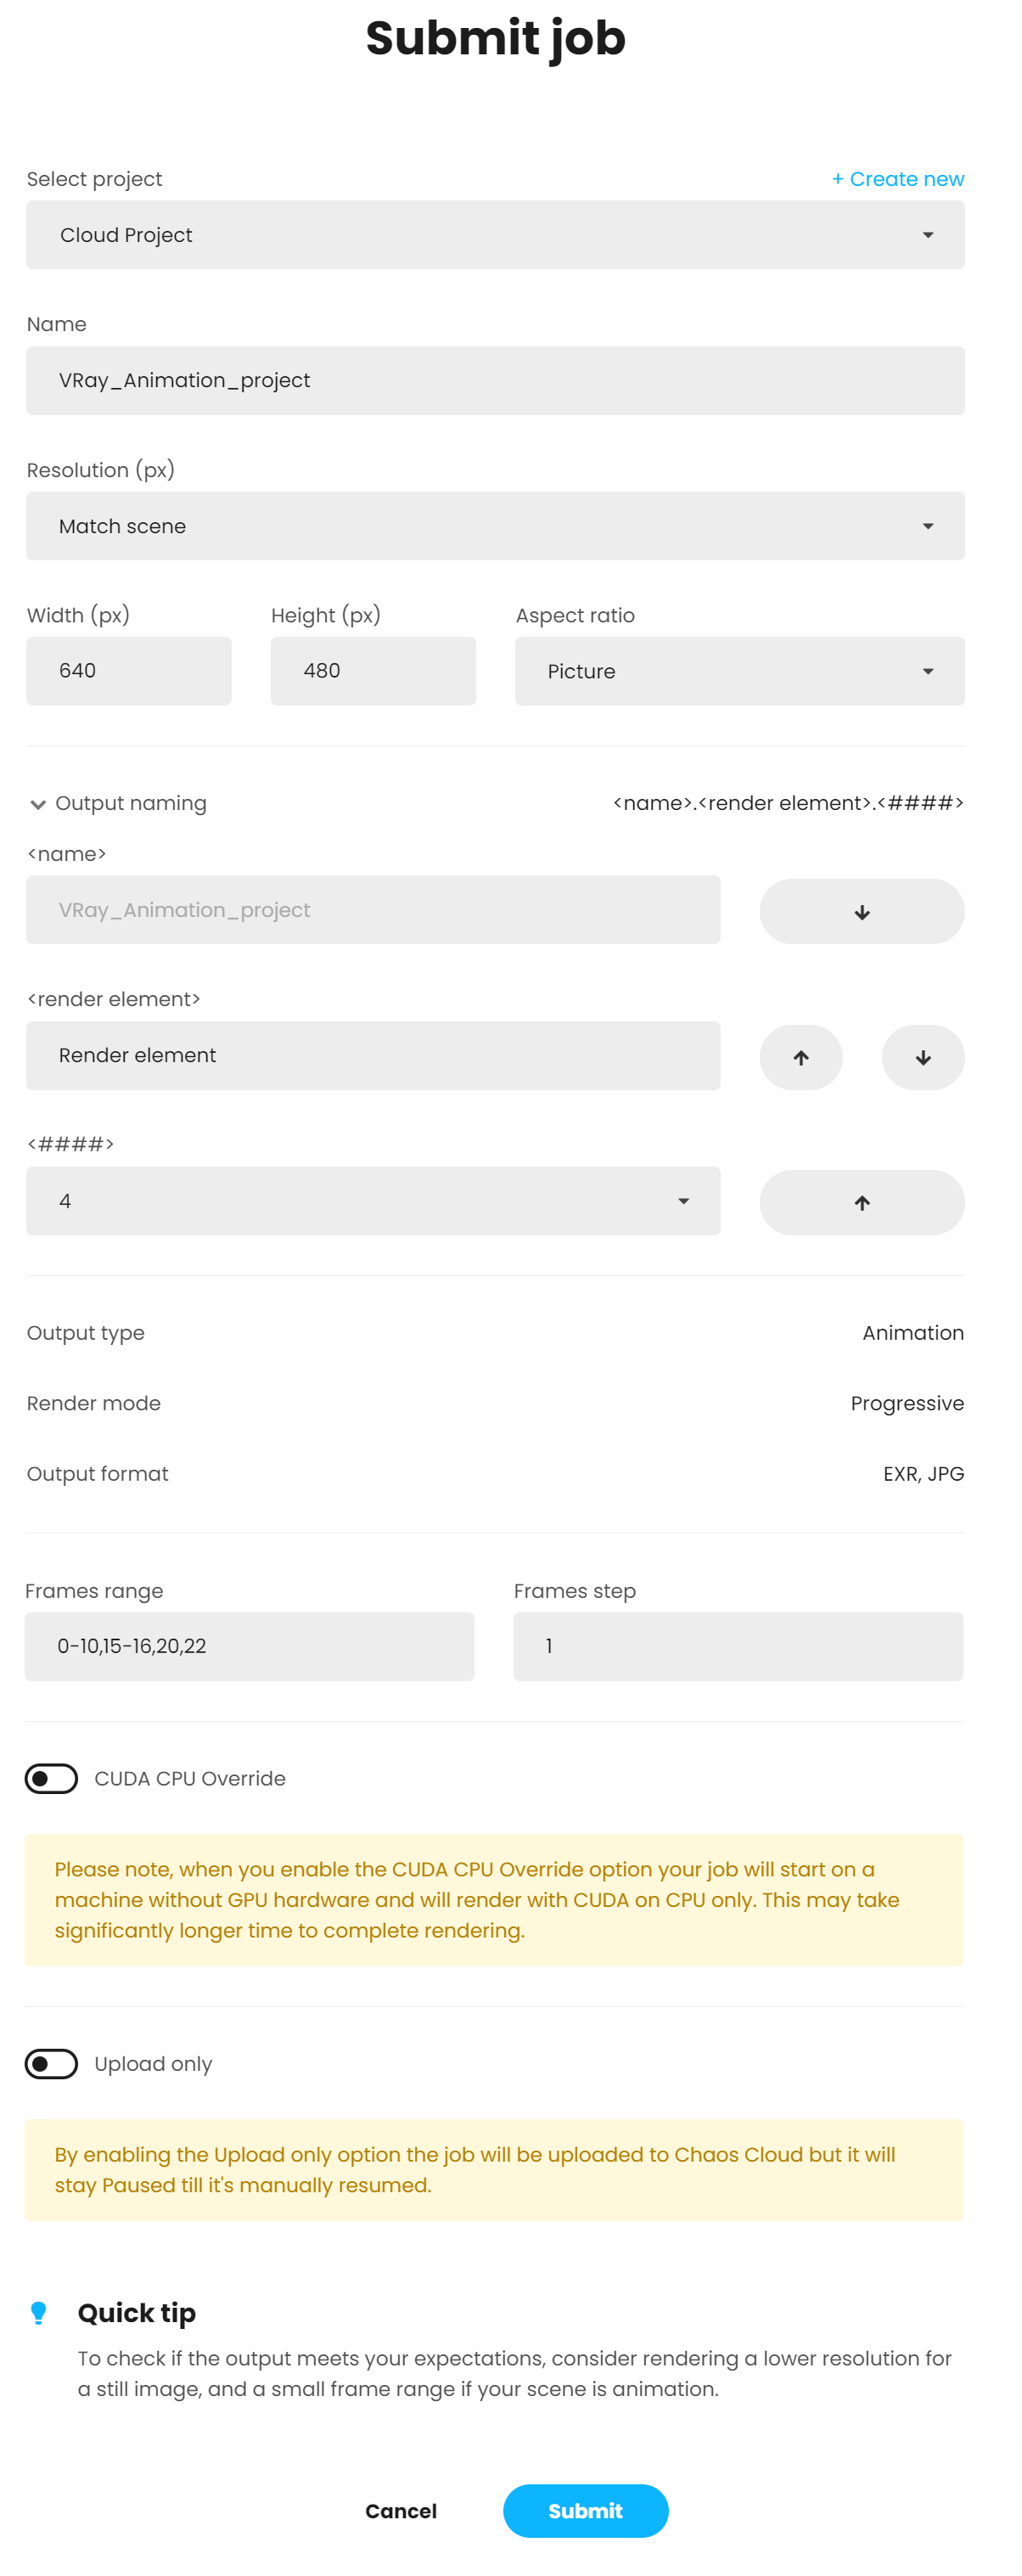
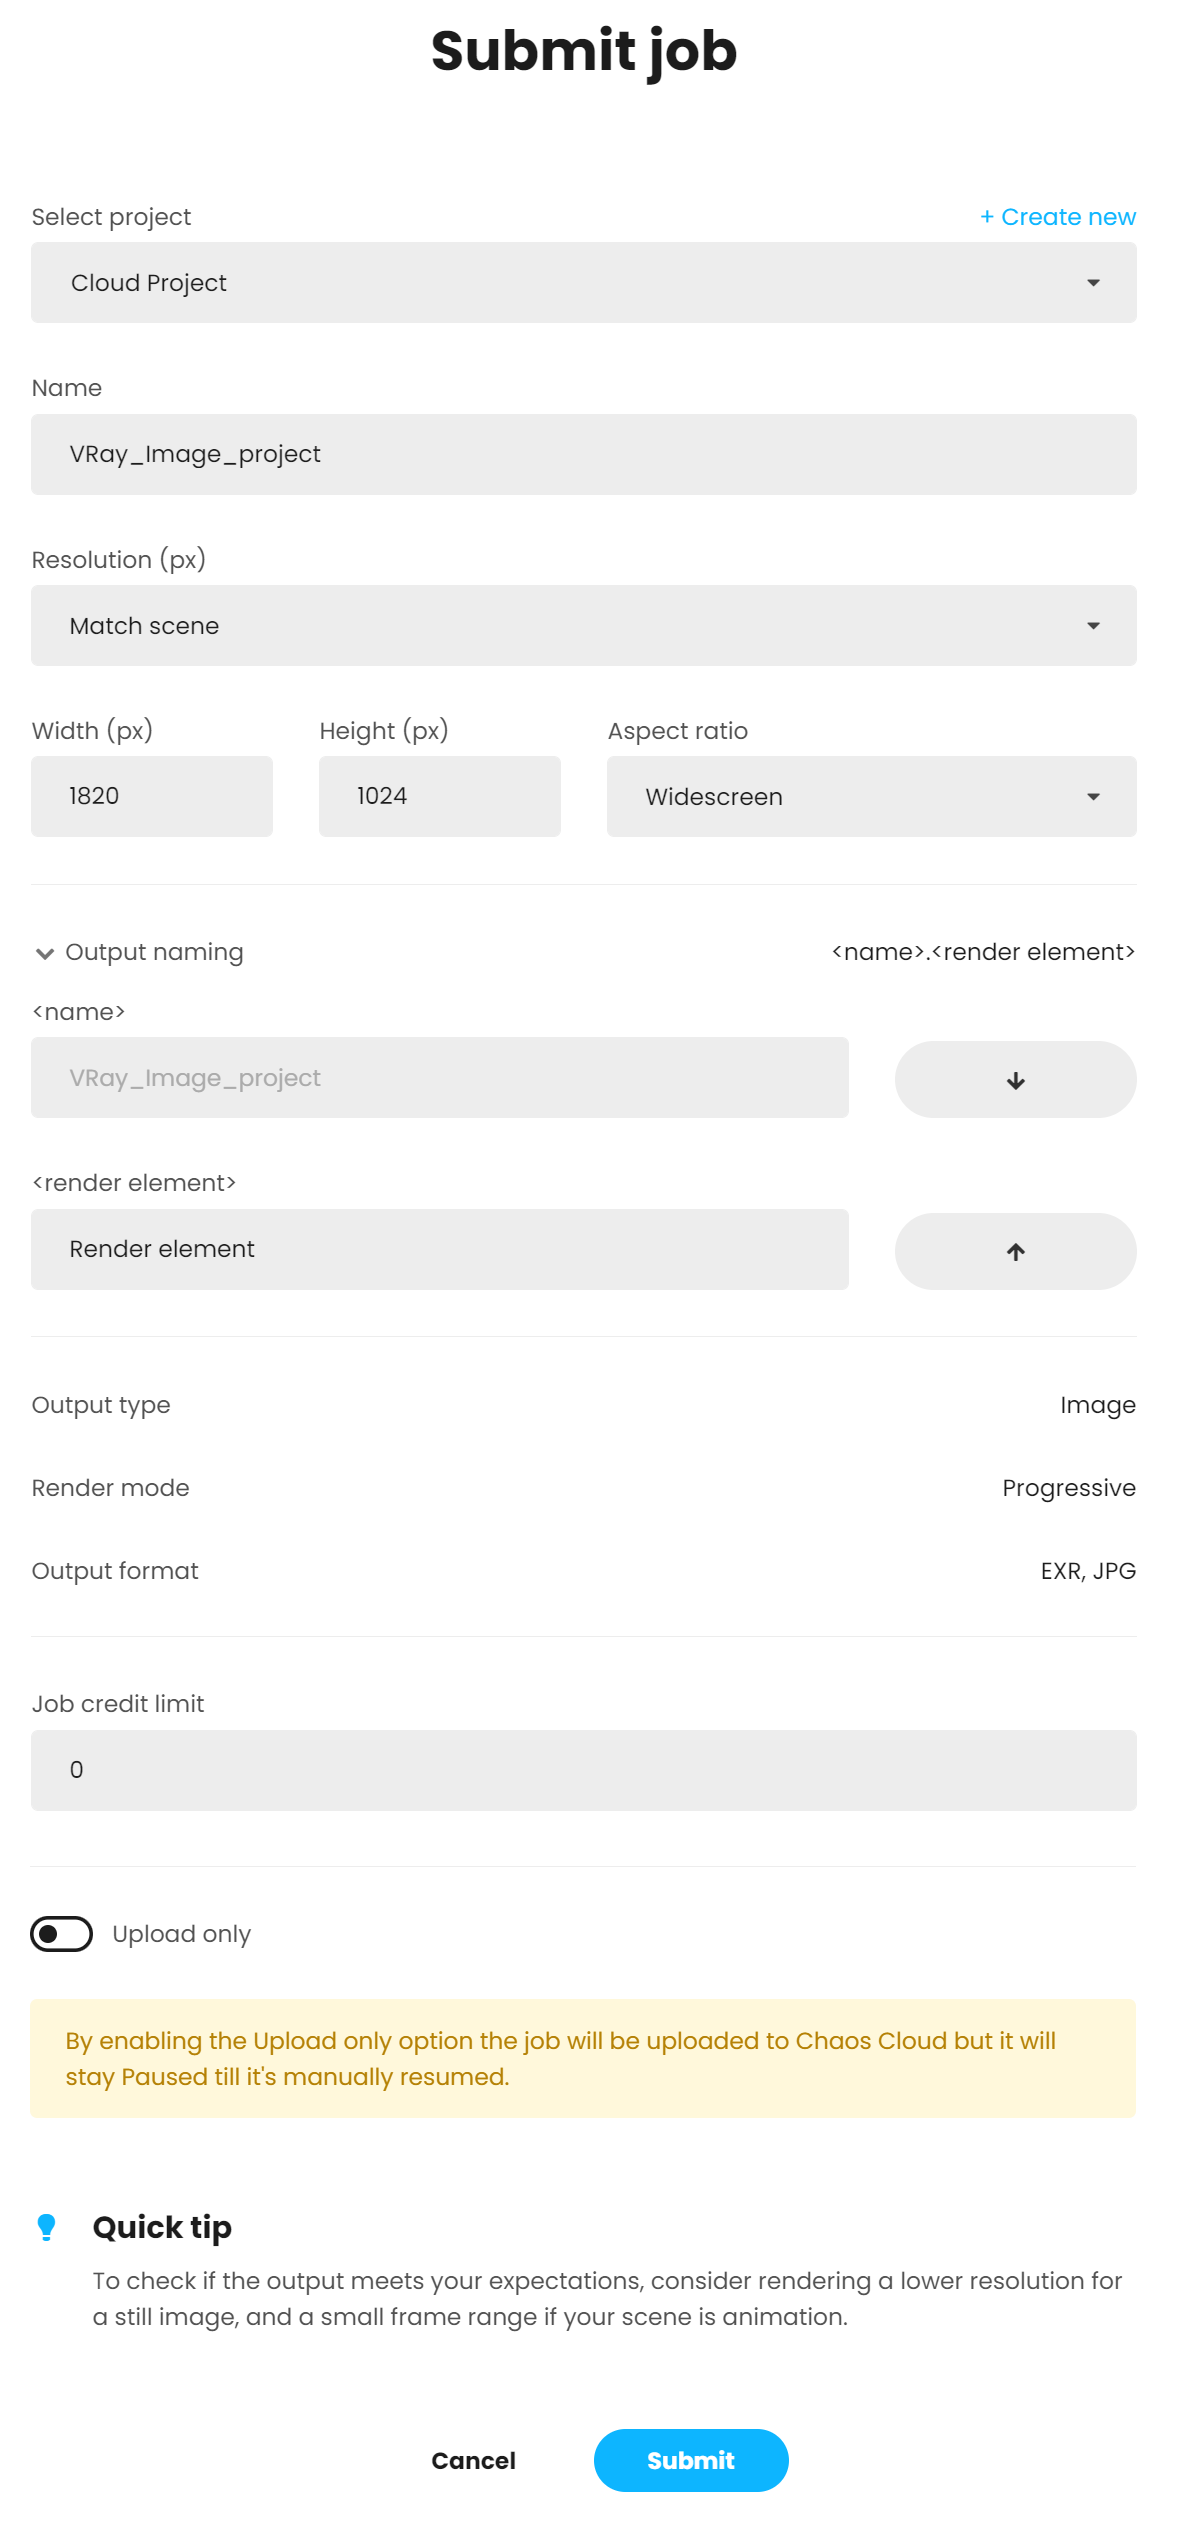
Once the scene is successfully analyzed, you have to finalize some of the settings of the render job before it starts rendering in Chaos Cloud rendering.
The output image types that you are able to download by rendering in Chaos Cloud are JPG and the file type you have specified in the settings of your scene. These settings are customized in the 3D application you use for designing your scene. If you don’t specify anything in the 3D application, Chaos Cloud rendering generates an EXR image beside the JPG one. If you have enabled the Include additional JPG output toggle in the Options page, Chaos Cloud rendering generates an additional high-quality JPG file for your output at no extra cost. * - see the Known Issues section for a disclaimer. When submitting a render job requesting TIFF and/or TGA images as a result, the results might be unexpected as not all TIFF and TGA settings are exported to Chaos Cloud rendering.
When rendering animations, Frame Range and Frame Step parameters appear. Frame range – Specifies a frame range to be rendered. You can specify non-sequential animation frames, e.g. 1-3,7,9,12-15. Frame step – Specifies a frame step in the frame range for rendering. For example, writing 8 in the Frame step box will render every eighth frame, hence the eighth, the sixteenth, the twenty-fourth, etc. Note that the first frame is always rendered.
The cost for rendering a still image job can be limited by using the Job Credit Limit setting. For more information, see the Credit Limit section. By enabling the Upload only option, the job is uploaded to Chaos Cloud rendering, but it stays Paused until manually resumed. The Chaos Scans material library is hosted in Chaos Cloud rendering and is kept up-to-date. This means that Chaos Scans materials do not have to be uploaded each time, making scene submission significantly faster. When ready, click the Submit button. When you are presented with the following message, your render job is submitted successfully, and it will start rendering in the cloud. If there are available resources in the cloud, Chaos Cloud will start rendering immediately. Otherwise, your job will join a queue and will automatically start to render when resources become available.
Clicking on View Job redirects you to the Projects tab of Chaos Cloud. There you can monitor the status of your render jobs, download them, organize them in projects, resubmit, or delete them. For more detailed information on these topics, see the Managing render jobs in Chaos Cloud page.
When the Include additional JPG output option is disabled, this is not reflected in the Submit and Clone job screens. This does not mean that the option is still active. This is a known issue which will be fixed. Render Engine OverridesWhen rendering a V-Ray GPU job, the CUDA CPU Override option allows you to override the render engine to render with CUDA on CPU only. This can be useful when:
When Chaos Cloud rendering detects that there is no GPU hardware available, it shows a warning that asks you whether you want to wait for GPU hardware and gives you an option to use another command which:
Output Naming ConventionUpon job submission, you can choose the naming convention of the output file(s). You can find the following options in the Output naming panel: <name> – Specifies the main name of the output. <render element> – Specifies the position of the render element(s) in the naming convention, if there are such. <###> – Specifies the padding of the frame's number. This option is available only for animated jobs. Using the arrows, you can move the position of each name component to customize the output name(s). |


Submitting Render Jobs Through the Chaos Cloud Standalone Application Anchor vcloud_app_submit vcloud_app_submit
| vcloud_app_submit | |
| vcloud_app_submit |
...
Jobs can also be submitted easily through the Standalone Chaos Cloud rendering application in one of two ways. To do so, you will first need to have your scene exported as a .vrscene file from your host platform.
| UI Text Box | |||||
|---|---|---|---|---|---|
|
1) Navigate to the location of ccloud.exe or ccloud and launch it:
Windows – %appdata%\Chaos Group\Cloud\Client\ccloud.exe
macOS –/Applications/ChaosGroup/Cloud/Client/ccloud
Linux – $HOME/.ChaosGroup/vcloud/client/ccloud.bin
Chaos Cloud rendering will automatically start in your web browser and prompt you to submit a .vrscene file.
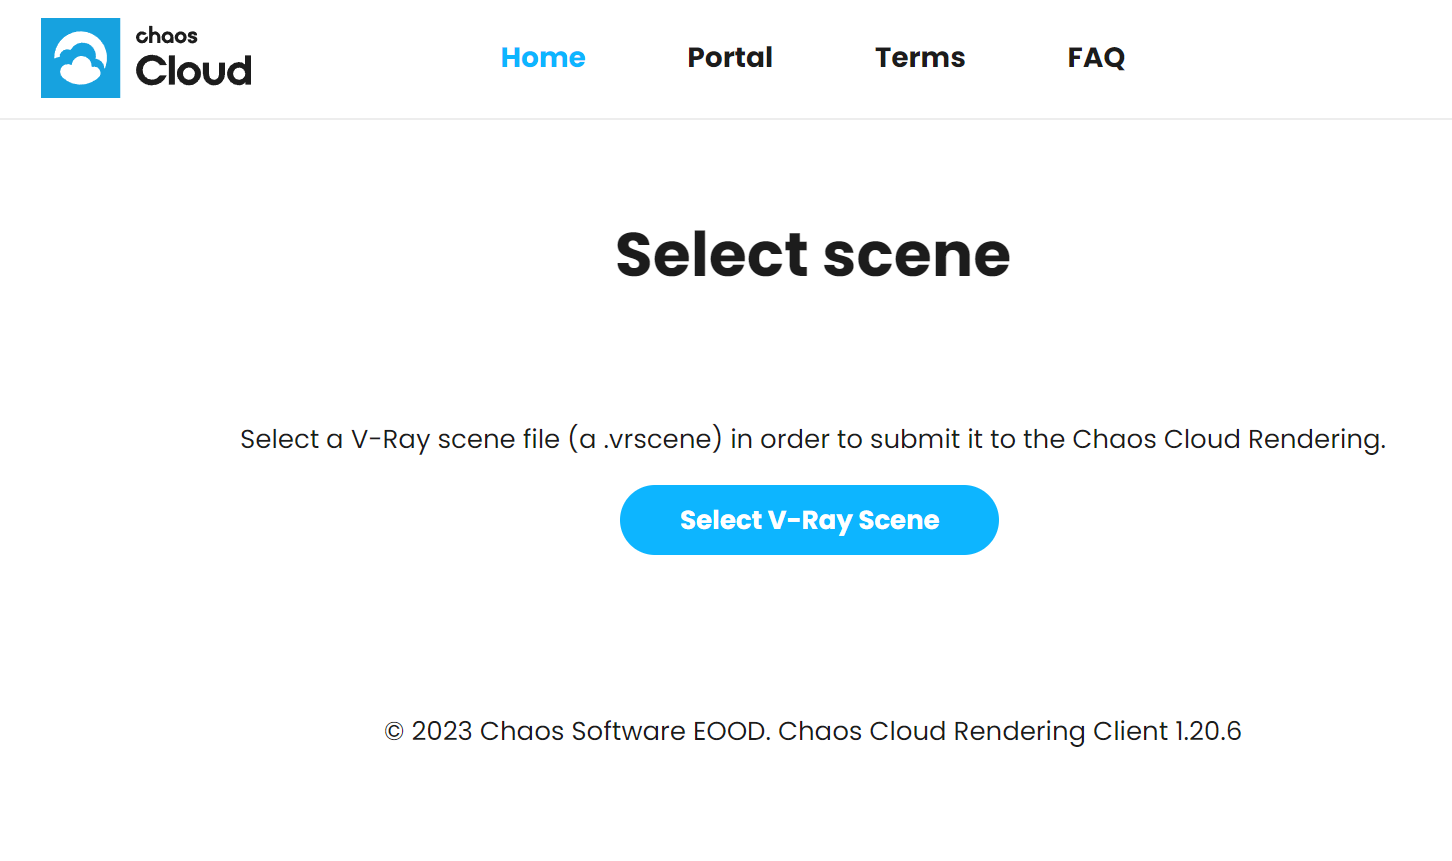
Use the Select V-Ray Scene button to open the operating system's native file locator and locate the .vrscene file.
After you select a .vrscene file for rendering, you are presented with the Submit job window from the previous section. Set the final render settings and click Submit.
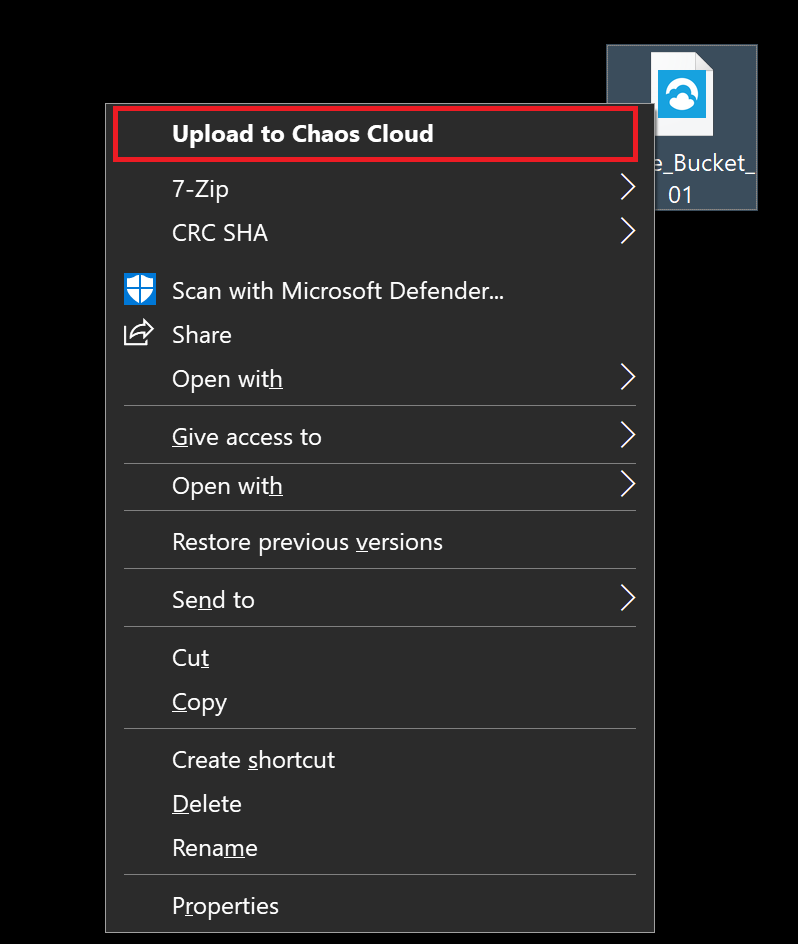
2) The Chaos Cloud client application also integrates with Windows context menu upon installation. If you are using Windows OS, you can submit jobs directly by right-clicking on a .vrscene file.
| UI Text Box | ||
|---|---|---|
| ||
This method only works if the Chaos Cloud client app is the default application associated with .vrscene files. If you can't see the command, it might be because some other software is set as the default one. |
Submitting Render Jobs Through the Chaos Cloud Application (Command Line) Anchor vcloud_cli vcloud_cli
| vcloud_cli | |
| vcloud_cli |
...
Another way of submitting jobs through the Chaos Cloud Application is by using command line interface. To use the interface, you first need to have your scene exported as a .vrscene file from your host platform.
| UI Text Box | |||||
|---|---|---|---|---|---|
|
To submit jobs through the Chaos Cloud Application by using the command line interface, run the following command with ccloud or ccloud.exe:
| Code Block |
|---|
ccloud job submit --sceneFile="path to .vrscene file" |
This command will only work if you have selected a project as your Default Project from the web-interface of Chaos Cloud. If you haven't, then the project name must also be specified, with the addition of the following command:
| Code Block |
|---|
ccloud job submit --sceneFile="path to .vrscene file" --project="name of Chaos Cloud Project" |
| UI Text Box | ||
|---|---|---|
| ||
Keep in mind that ccloud is not added automatically to the system path. You need to navigate to its location, depending on the OS of your choice. By default: Windows – %appdata%\Chaos Group\Cloud\Client\ccloud.exe |
This is one of the possible ways of operating Chaos Cloud rendering through command line interface. For a full list of commands, see Managing render jobs in Chaos Cloud rendering or run the "help" command with ccloud or ccloud.exe.
| Anchor | ||||
|---|---|---|---|---|
|
Footnotes
...
| Fancy Bullets | ||
|---|---|---|
| ||
|
Swarm-Config.json Silent uninstallation
Users can get this file from the working directory, which is:
| Fancy Bullets | ||
|---|---|---|
| ||
|
If V-Ray Swarm is uninstalled, a copy of this file is stored in:
Example swarm-config.json file:
| Code Block | ||||
|---|---|---|---|---|
| ||||
{
  "vray": {
    "port": 20208,
    "numberOfThreads": 0,
    "overrideLicense": false,
    "envVars": {
      "var1": "var1value",
"var2": "var2value"
    },
    "licenseServer": {
      "host": "127.0.0.1",
      "port": 30304,
      "port1": 30304,
      "port2": 30304
    }
  },
  "tags": [
    "Default", "Tag1", "Tag2"
  ],
  "discover": {
    "autoDiscover": false,
    "masterNodes": ["10.10.10.10:24267"]
  }
} |
There is another config file, the config.yaml, which is in the install directory, is loaded when V-Ray Swarm loads. The discovery options and network settings are overridden if there is runtime configuration (swarm-config.json) or there is provided a path to configuration to load (configFilePath: some/path).
| Note |
|---|
Once V-Ray Swarm is installed direct editing of config.yaml and swarm-config.json is discouraged, since this is not the intended workflow. |
...
vray.port...
The network port on which the V-Ray standalone should listen for a request. Equivalent to the portNumber command-line option. Defaults to 20208
...
vray.numberOfThreads...
The number of threads that V-Ray Standalone should use. When set to 0 V-Ray will use the number of threads equal to the number of logical processors. Defaults to 0
...
If set to false the system-wide vrlclient.xml file will be used for license information. If set to true the licenseServer entry will be used to generate vrlclient.xml file for V-Ray Standalone to use. Defaults to false
...
vray.envVars
...
licenseServer...
tags...
discover.autoDiscover
...
Silent uninstallation
You can use a command to perform a silent uninstall. In order to do that you need to know the full path of the folder containing V-Ray additional files and the exact name of the product, you want to uninstall. Then you can execute the following command:
| Code Block |
|---|
"<STDROOT>\uninstall\installer.exe" -uninstall="<STDROOT>\uninstall\install.log" -uninstallApp="<PRODUCT_NAME>" -gui=0 -quiet=1 |
where <STDROOT> is the destination folder and <PRODUCT_NAME> is the product name i.e. “V-Ray Swarm”
For example, the following command will uninstall V-RaySwarm:
| No Format |
|---|
| "C:\Program Files\Chaos Group\V-Ray Swarm\uninstall\installer.exe" -uninstall="C:\Program Files\Chaos Group\V-Ray Swarm\uninstall\\install.log" -uninstallApp="V-Ray Swarm" -gui=0 -quiet=1 |