Versions Compared

Key

  • This line was added.
  • This line was removed.
  • Formatting was changed.

This page provides a tutorial on creating a Dust Devil simulation with Chaos Phoenix in 3ds Max.

Overview


UI Text Box
typeinfo

This is an Intermediate Level tutorial. Even though no previous knowledge of Phoenix is required to follow along, re-purposing the setup shown here to another shot may require a deeper understanding of the host platform's tools, and some modifications of the simulation settings.

Section
Column
width40%40%

This tutorial includes two sets of files in separate folders.

For Phoenix 4 users, we have included updated files for use with Phoenix 4.41.02 Nightly Build ID 31210 (from 18th January 2022) and V-Ray 5 Update 2.2 (5.20.02) for 3ds Max 2018 or later.

Otherwise, if using Phoenix 3, the previous version of the files are available requiring Requires Phoenix 3.11.00 Official Release and V-Ray Next Official Release for 3ds Max 2015+. If you notice a major difference between the results shown here and the behavior of your setup, please reach us using the Support Form.

The instructions on this page guide you through the process of creating a Dust Devil effect using Phoenix and 3ds Max.

We start off the tutorial by creating a poly plane and using the Large Scale Smoke preset to generate the Phoenix Source and Simulator. The funnel shape of the dust devil is achieved through the use of an animated 3ds Max Vortex force. A large-scale Phoenix Turbulence force is used to further break-up the smoke shape. Finally, we tweak the Volumetric Rendering parameters of the Phoenix Simulator for a final render. A Time-Bend Resimulation guide is also provided as an extra option at the end of this tutorial.

The Download button below provides you with an archive containing the start and end scenes, as well as a Phoenix Render Settings preset that you can use to quickly set up the volumetric shading options for a basic smoke simulation.


UI Button
sizelarge
icondownload
titleDownload Project Files
urlhttps://drive.google.com/uc?export=download&id=1JBmcdrRJLyIC8CZxgHAVFIi8I2teVuFk1Ro-zFWyQXxW_3IqKHZw_8geQOethCMVX

Column
width60%

Videoautoplayloop
0dust_devil_render.mp4
1100%
2100%
3true
4false
5true


Units Setup


Section
Column
width40%

Scale is crucial for the behavior of any simulation. The real-world size of the Simulator in units is important for the simulation dynamics. Large-scale simulations appear to move more slowly, while mid-to-small scale simulations have lots of vigorous movement. When you create your Simulator, you must check the Grid rollout where the real-world extents of the Simulator are shown. If the size of the Simulator in the scene cannot be changed, you can cheat the solver into working as if the scale is larger or smaller by changing the Scene Scale option in the Grid rollout.

The Phoenix solver is not affected by how you choose to view the Display Unit Scale - it is just a matter of convenience.

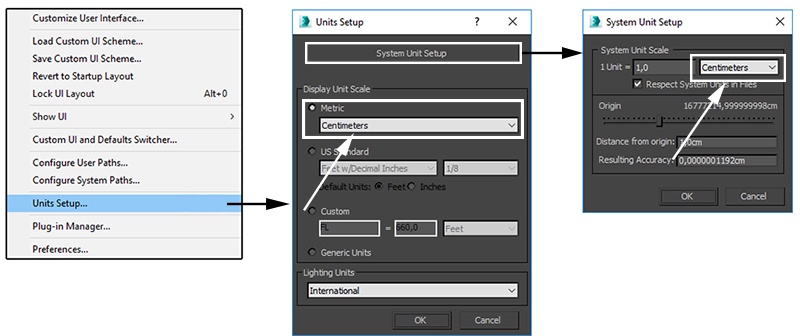
The dust devil effect we're creating is about 1 meter in height so we choose to view the units as Centimeters.

Go to Customize → Units Setup and set Display Unit Scale to Metric Centimeters.

Also, set the System Units such that 1 Unit equals 1 Centimeter.

Column
width60%


Scene Layout


...

Section
Column
width40%

Create a Helpers → Phoenix FD → PHXTurbulence.

If you are working with Phoenix 4.41 or later, set the Turbulence Strength to 40.

If you are using an earlier version prior to Phoenix 4.41, you can set the Turbulence Set Strength to 250.

Next, no matter which supported version of Phoenix you are using, set the Turbulence Size to 900 and Fractal Depth to 5.

The Strength is self-explanatory - the higher the strength, the stronger the effect of the turbulence force on the simulation.

The Size is increased to 900 to get large-scale swirls. You can compare this to the Simulator size in the Grid rollout. The Fractal Depth works like a layering option. A fractal depth of one will give you a single noise layer. A fractal depth of two will give you 2 layers - the first with a Strength of 250 and whichever Strength value you used and a Size of 900, and a second one multiplied on top with half the Strength and Size of the previous. In other words, the higher the Fractal Depth is, the more layers there are in the noise, and the more detail there is.

You may preview the Turbulence by including it in the Preview → Forces Preview Set. Don't forget to disable the GPU Preview because it overrides the Voxel Preview and the Forces won't show up in the Viewport.

Column
width60%

...

Section
Column
width40%

For the final image, a few adjustments have been made to get a prettier render.

The V-Ray Sky texture is disabled from the Environment and Effects window (hit 8 to open it) → Background → Use Map.

The Sun Filter Color is set to White, and the Color Mode to Override. Instead of relying on the Sun's color to give a sand-like appearance to the Smoke, the Smoke Color parameter is tweaked instead.

A Dome Light with default White color and Intensity of 0.2 is used to illuminate the areas of the smoke which are in shadow.

Finally, the Vortex Force was tweaked to make the smoke disperse more. The Axial Drop and Orbital Speed are set to 6, and Radial Pull to 1.5.

Column
width60%