Versions Compared

Key

  • This line was added.
  • This line was removed.
  • Formatting was changed.

This page provides a tutorial on creating a lava simulation with Chaos Phoenix FD in 3ds Max.

Overview

...

medium
UI Text Box
size
typeinfo

This is an Advanced Level tutorial. The workflow for setting up the shot, and the Phoenix FD settings involved in the simulation are explained in detail. However, creating a production quality shot of a similar nature may require some tweaks to the lighting, materials and/or the Phoenix FD simulation.

Section
Column
width48%

This simulation requires Phoenix FD 4.10 Official Release and V-Ray Next Official Release for 3ds Max 2017 at least. If you notice a major difference between the results shown here and the behavior of your setup, please send an email to support@chaosgroup.com.


The instructions on this page guide you through the process of using Phoenix FD's Variable Viscosity capabilities in order to simulate molten lava or metal cooling and hardening over a period of time.

The Download button below provides you with an archive containing the scene files.


UI Button
sizelarge
icondownload
titleDownload Project Files
urlhttps://drive.google.com/uc?export=download&id=1JrRk-yVCS0FEnl69ivILr_7R2o4Dlv24

Column
width52%
HTML
<iframe width="800" height="450" src="https://www.youtube.com/embed/-Z-Erc1aISk?version=3&loop=1&playlist=-Z-Erc1aISk" frameborder="0" allowfullscreen></iframe>

...

Section
Column
width40%

Scale is crucial for the behavior of any simulation. The real-world size of the Simulator in units is important for the simulation dynamics. Large-scale simulations appear to move more slowly, while mid-to-small scale simulations have lots of vigorous movement. When you create your Simulator, you must check the Grid rollout where the real-world extents of the Simulator are shown. If the size of the Simulator in the scene cannot be changed, you can cheat the solver into working as if the scale is larger or smaller by changing the Scene Scale option in the Grid rollout.

The Phoenix FD solver is not affected by how you choose to view the Display Unit Scale - it is just a matter of convenience.

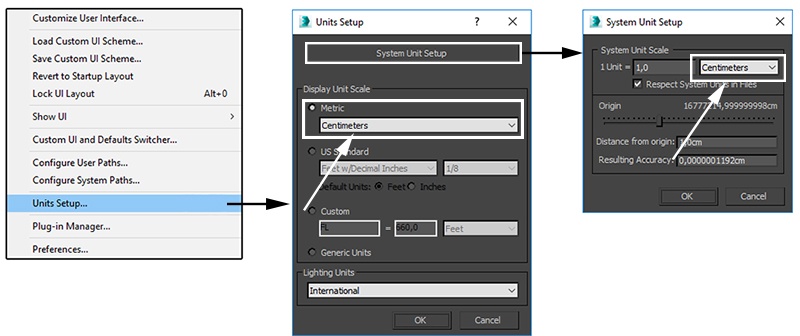
Go to Customize → Units Setup and set Display Unit Scale to Metric Centimeters.

Also, set the System Units such that 1 Unit equals 1 Centimeter.

Column
width60%

...

Section
Column
width40%

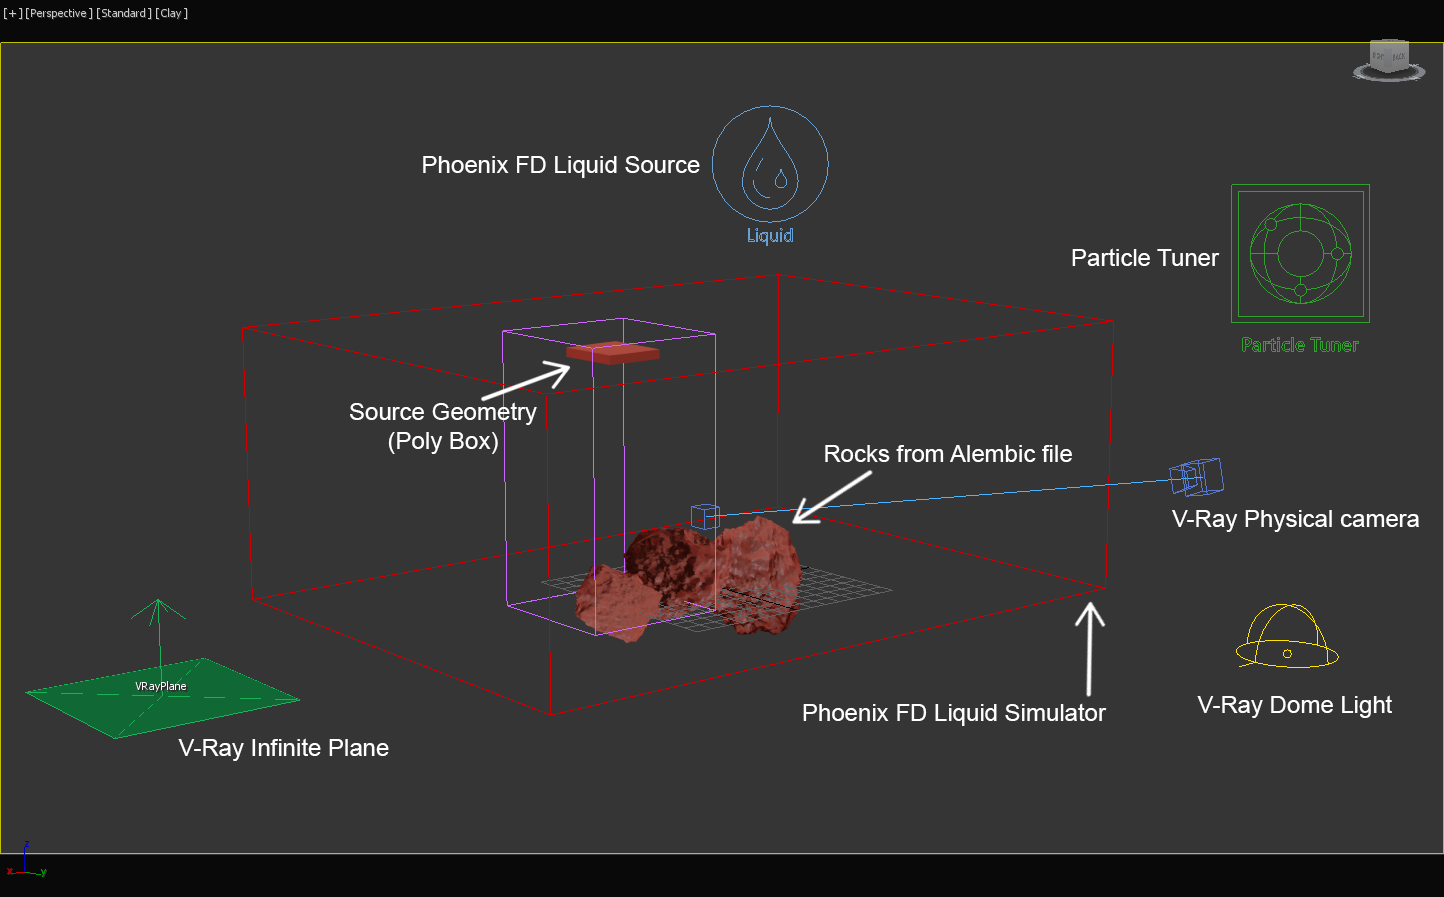
The final scene consists of the following elements:

  1. AStandard Primitives → Box used as the source geometry for the liquid. An animated Noise modifier is applied to the geometry to break up the emission.
  2. A set of rocks provided with the rocks.abc file.
  3. A Phoenix FD Liquid Source with the Box in its Emitter Nodes list. The Source is in Surface Force mode and Noise is enabled for extra randomization.
  4. Phoenix FD Liquid Simulator with some tweaks in the Grid, Dynamics and Rendering rollouts.
  5. Particle Tuner used to tweak the Viscosity of the liquid during the simulation.
  6. V-Ray Physical camera with minor tweaks for final rendering.
  7. A V-Ray Dome Light.
  8. V-Ray Plane used as an infinite ground surface.

Column
width60%

...

Section
Column
width40%

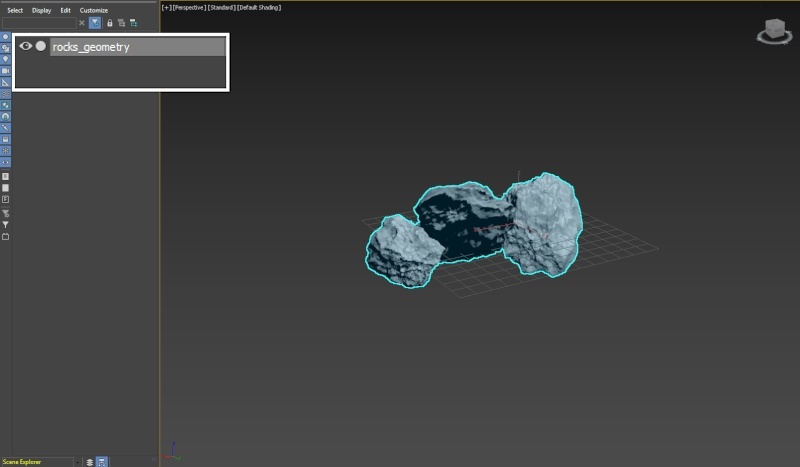
Import the rocks.abc geometry by going to File → Import → Import...

We start off with pre-built geometry to save time setting up the scene. Feel free to use your own personal models.

medium
UI Text Box
size
typeinfo

The size of the bounding box of the three rocks used in this example is:

X/Y/Z: [ 155/60/75 ].

Column
width60%

...

Section
Column
width40%

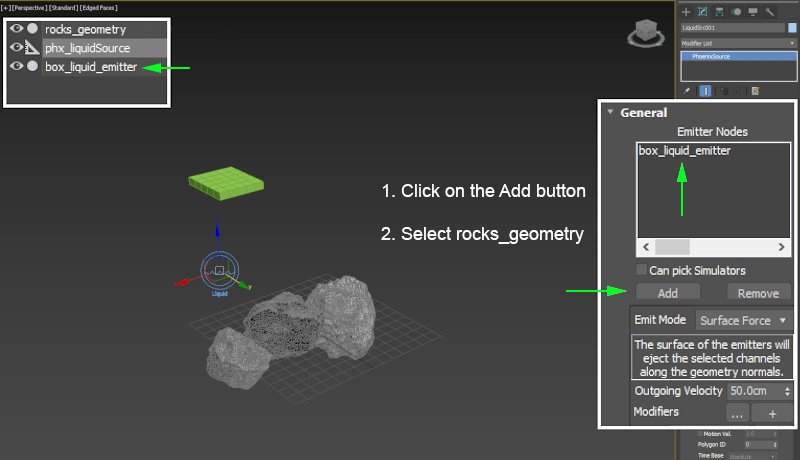
Add a Helpers → Phoenix FD → Liquid Source. The Liquid Source is a Phoenix FD helper node used to tell the Simulator which objects in the scene will emit, how strong the emission will be, etc.

Add the Box geometry to the Emitter Nodes list. For the time being leave all other options at their default values.

Column
width60%

...

Section
Column
width40%

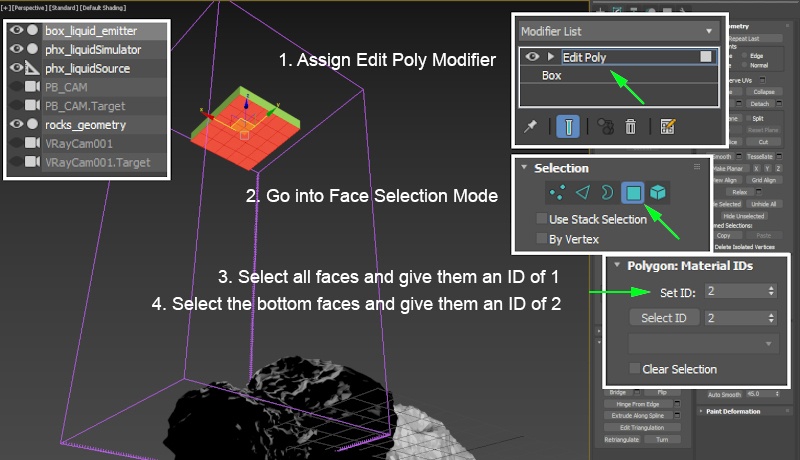
The Phoenix FD Source nodes can use the Polygon IDs of an object to limit the emission only to those faces which share a certain ID.

Assign an Edit Poly modifier to the Box geometry and go into Face Selection mode.

Select all faces and give them an ID of 1.

Then, select only the bottom faces which will be used for emission of liquid and assign them an ID of 2.

medium
UI Text Box
size
typenote

The cameras on the screenshot to the right have been added to the scene to generate the Viewport Previews. The final camera setup will be discussed in the Rendering section of this tutorial.

Column
width60%

...

Section
Column
width40%

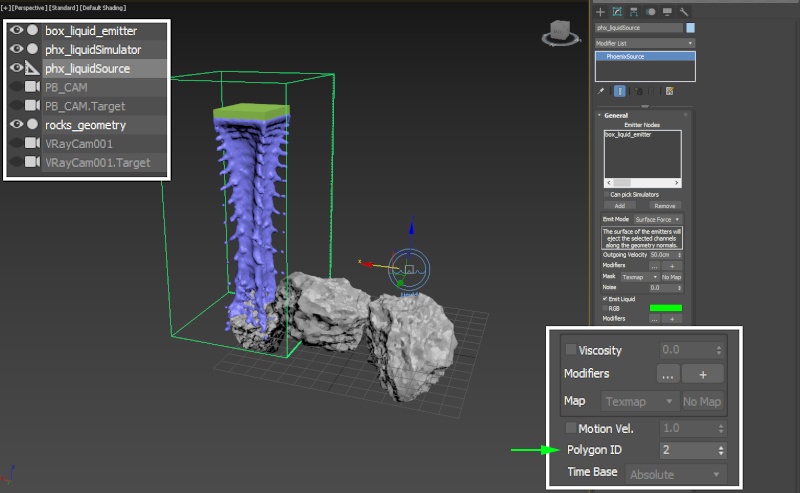
Set the Polygon ID parameter of the Phoenix FD Liquid Source to 2 so that only the faces with this ID are used for emission.

Column
width60%

...

Section
Column
width40%

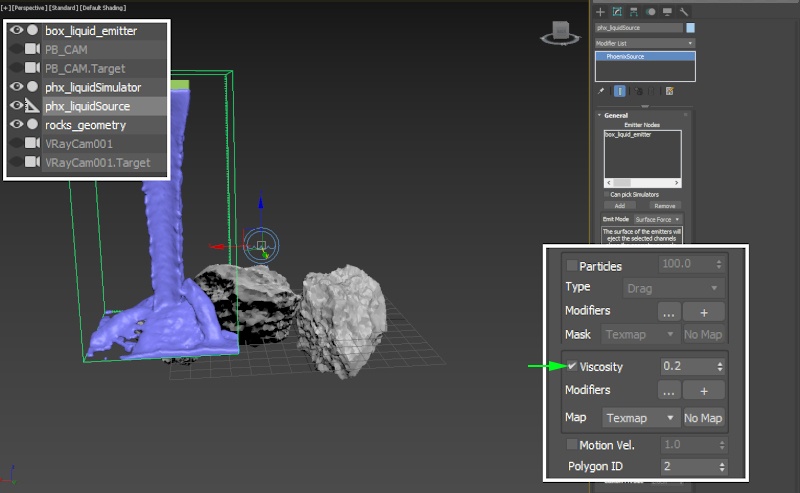
Select the Phoenix FD Liquid Source and set Viscosity to 0.2.

Viscosity emulates thickness - the higher this value is, the more the liquid will resemble thick mud, honey or in this case - lava.

Column
width60%

...

Section
Column
width40%

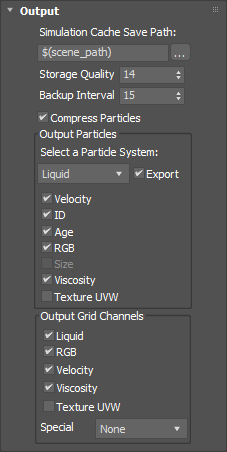
Under the Output rollout of the Phoenix FD Simulator, enable the export of the Viscosity Grid Channel.

Also enable the export of the Viscosity Liquid Particle Channel.

Outputting those channels is required for the calculation of Viscosity for the liquid to work.

Enable the RGB Channel. This is required for the simulation of the RGB channel to work.

Make sure to also enable the Velocity Channel. The Velocity Grid Channel is used when rendering with Motion Blur.

Enable the Age Channel. This channel is used by the Particle Tuner, so it can randomize the viscosity by the age of the liquid particles.

Column
width60%

...

Section
Column
width40%

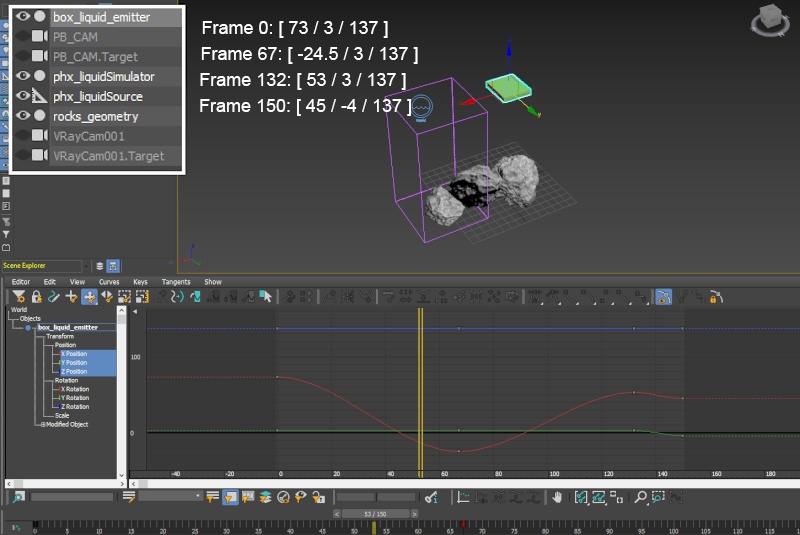
Animate the Box geometry with the following keyframes:

Frame 0: [ X: 73 | Y: 3 | Z: 137 ]
Frame 67: [ X: -24.5 | Y: 3 | Z: 137 ]
Frame 132: [ X: 53 | Y: 3 | Z: 137 ]
Frame 150: [ X: 45 | Y: -4 | Z: 137 ]


Column
width60%


...


Section
Column
width41%

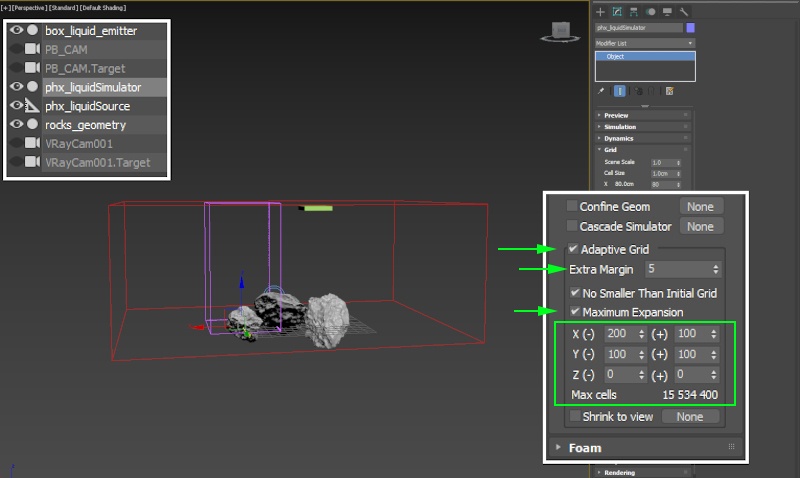
Enable Phoenix FD Simulator → Grid → Adaptive Grid and Maximum Expansion. The red box in the screenshot to the right is a preview of the Maximum Bounds for the simulation. Adaptive Grid is a huge time saver - the initial grid is dynamically expanded to accommodate the movement of the liquid, cutting down on both processing time and memory. If you notice any clipping, increase the Extra Margin to a value of 5 - 10. This will add a few extra voxels at the borders during adaptation.

The Adaptive Grid Maximum Expansion settings are X: [ 200, 100 ], Y: [ 100,100 ] and Z: [ 0, 0 ].

Column
width59

...

Section
Column
width40%

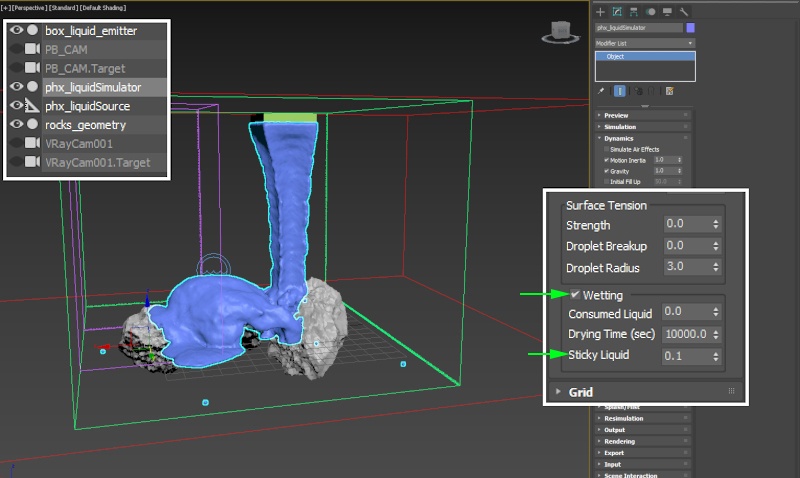
Enable Phoenix FD Simulator → Dynamics → Wetting. When Wetting is enabled, Phoenix FD generates another set of particles called WetMap particles. Those particles are created at the point of contact between the liquid and the scene geometry and can be used to drive shaders (through a Phoenix FD Particle Texture) or specify where the liquid should try to adhere to. You can disable Wetting for a specific object in your scene from its Chaos Phoenix FD Per-Node Properties.

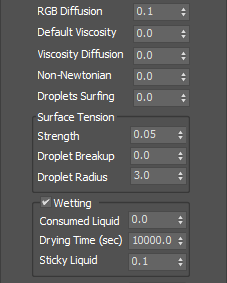
Set Sticky Liquid to 0.1. The lava will now try to adhere to the rocks.

Column
width60%

...

Section
Column
width40%

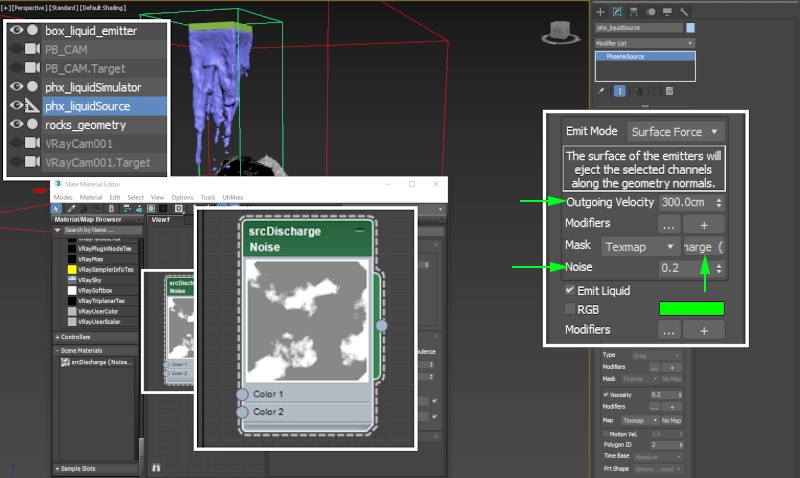
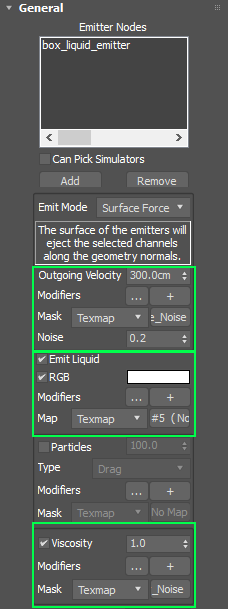
Select the Phoenix FD Liquid Source and set the Noise parameter to 0.2. This option works as a multiplier on the Outgoing Velocity - some areas of the emission geometry will emit with a higher Outgoing Velocity while other areas will be weaker.

Click on the "No Map" button to the left of Mask and plug a Noise texture.

Finally, increase the Outgoing Velocity to 300 - this value is completely arbitrary and can be modified based on the requirements of your setup.

Column
width60%

...

Section
Column
width40%

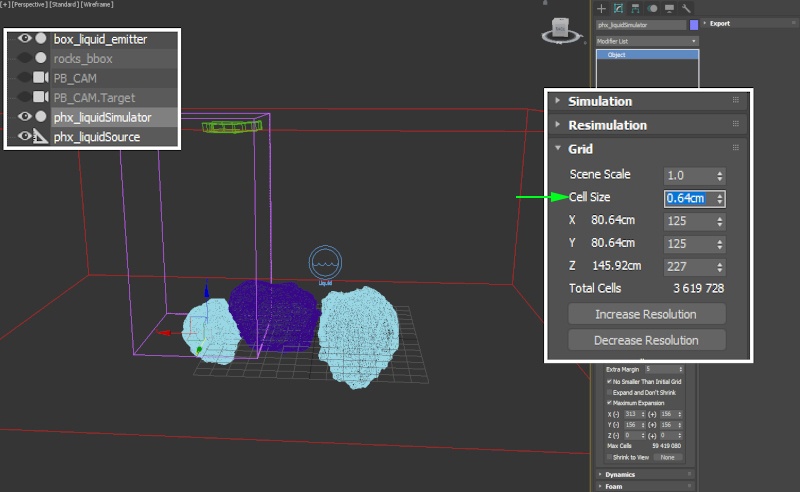
Reduce the Phoenix FD Simulator → Grid → Cell Size to 0.64 so the extra detail provided by the Noise texture can come through.

Column
width60%

...

Section
Column
width40%

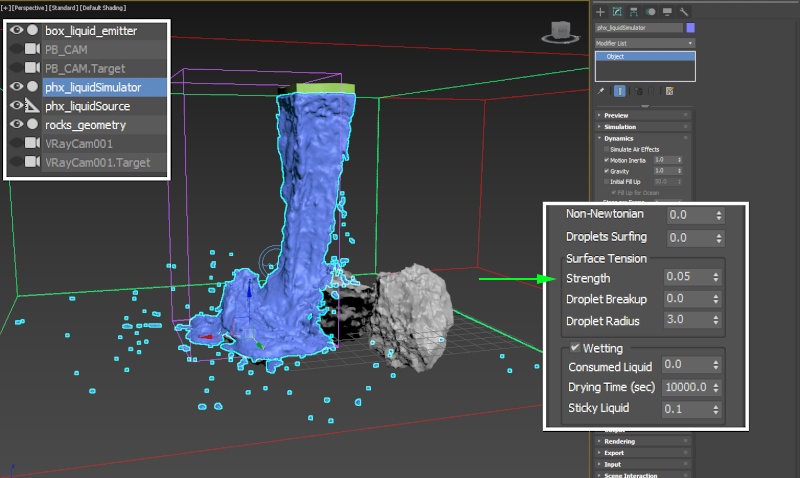
Increase the Phoenix FD Simulator → Dynamics → Surface Tension to 0.05. Surface Tension helps keep the liquid together.

Column
width60%

...

Section
Column
width40%

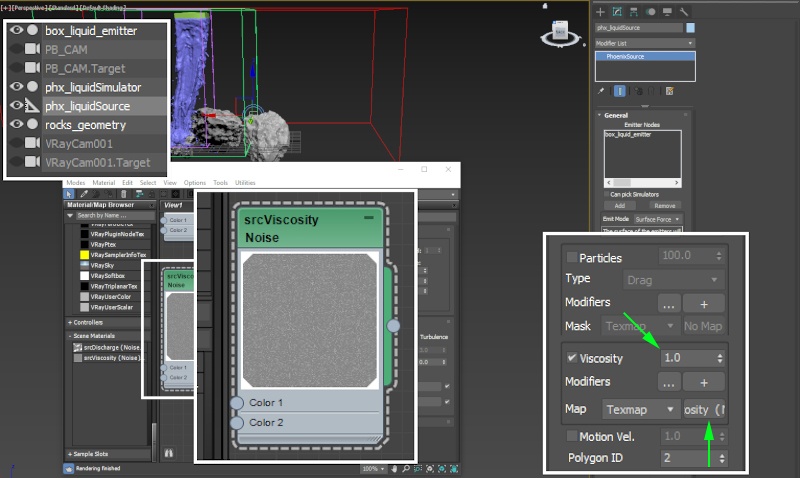
Click the No Map under Phoenix FD Liquid Source → Viscosity → Map. Add a Noise texture from the pop-up menu.

Increase the Viscosity parameter to 1.0. Usually a value of 1.0 is way too high but since the Noise texture has high-frequency detail, with most of the values in the texture much below 1.0, the final result will be significantly lower after the Viscosity is multiplied by the provided texture map.

Column
width60%

...

Section
Column
width40%
size
UI Text Box
mediumtypeinfo

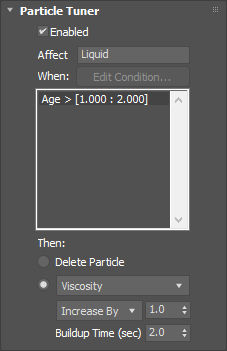
In this section of the tutorial, we look into the process of using a Particle Tuner to increase and randomize the viscosity of the lava over time. Real-world lava solidifies as it cools down and we want to replicate this behavior.


The Particle Tuner assesses all particles in the simulation and changes their values if they pass a certain condition.

In this example we will raise the viscosity of particles as their age increases.

The conditions can be very simple, but you can also build more complex conditions with the Particle Tuner's expression operators.


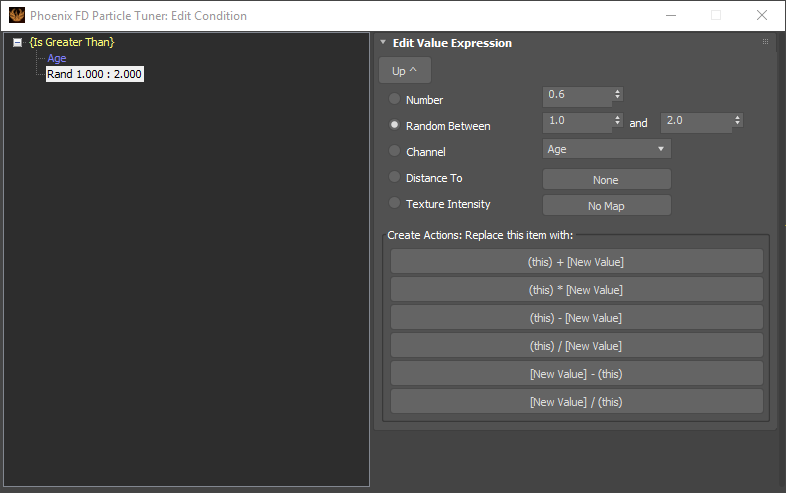
In this case the Particle Tuner expression tree is created as follows:


  • If the Age of a particle is Greater Than a Random value Between 1.0 and 2.0 seconds
  • Then the Viscosity is set to Increase By 1.0

  • Over the Buildup Time which is set to 2.0 seconds.

Column
width60%


...

Section
Column
width40%

There are many stray particles flying all over the place as the lava collides with the rocks. Not only is this effect unnatural but it also drastically increases the simulation time by expanding the Adaptive Grid to its maximum extents.

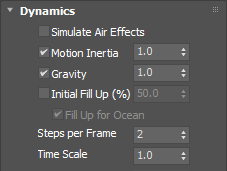
Increase the Phoenix FD Simulator → Dynamics → Steps Per Frame to 2 to remedy this.

Increasing the Steps Per Frame will usually produce calmer fluids but will increase the simulation time. Each simulation step kills fine details, and thus for maximum detail it's best to use the lowest possible SPF that runs without any of the issues mentioned above. You can find more information on Steps Per Frame here.

Column
width60%

...

Section
Column
width40%

Click the No Map under Phoenix FD Liquid Source → RGB → Map. Add a Noise texture from the pop-up menu.


At this point you should have three different Noise textures, added in the Texmaps' slots for Outgoing Velocity, RGB and Viscosity.

Column
width60%

...


Section
Column
width40%

Set Phoenix FD Simulator → Dynamics rollout → RGB Diffusion to 0.1.

The RGB Diffusion parameter controls how quickly the colors of particles are mixed over time during the simulation. When set to 0, each liquid particle carries its own color, and the color of each individual particle does not change when liquids are mixed. This means that if red and green liquids are mixed, a dotted red-green liquid will be produced instead of a yellow liquid. This parameter allows the colors of particles to change when the particles are in contact, thus achieving uniform color in the resulting mixed liquid. For more information, see the RGB Diffusion example.

Column
width60%

...

Section
Column
width40%

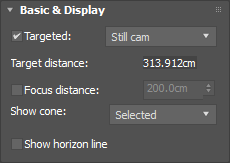
Add a Command Panel Cameras → V-Ray → VRayPhysicalCamera.

The exact position of the Camera is X/Y/Z: [ 2/318/108 ].

The exact position of the Camera Target is X/Y/Z: [ 16/11/44 ].

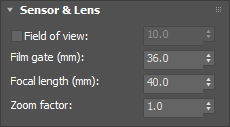
The Film Gate is set to 36.0.

The Focal Length is set to 40.0.

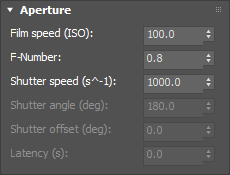
The Aperture → Film speed (ISO) is set to 100.

The Aperture F-Number is set to 0.8.

The Aperture Shutter Speed is set to 1000.

Both Depth of Field and Motion Blur are Enabled.

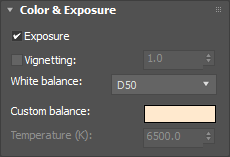
Color & Exposure White Balance is set to D50.

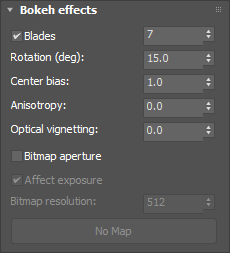
Bokeh Effects Blades is Enabled, with a value of 7. Rotation is set to 15, with a Center Bias of 1.

size
UI Text Box
mediumtypeinfo

 The The V-Ray Settings → Rendering Output Width/Height is set to 960/540 for the example renders below.

Column
width60%

...

Section
Column
width40%

For the solid lava (the one with high viscosity), assign a V-Ray Material to the Phoenix FD Simulator and rename it to coldSolidLava. This material is the base for the final Complex Lava material we create in the next section.

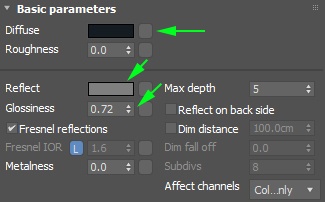
Set the Diffuse to RGB [ 1, 2, 3 ].

Set the Reflect to RGB [ 55, 55, 55 ].

Set the Reflection Glossiness to 0.72.

Reduce the Bump to 15 under the Maps rollout of the V-Ray Material.

Column
width60%

...

Section
Column
width40%

To start off, create a V-Ray Blend Material and assign it to the Phoenix FD Simulator. Rename it to liquidLava.

Create a V-Ray Material and plug it into the Base input of the liquidLava Blend Material. Rename it to coldLiquidLava.

Set the Diffuse Color to RGB [ 1, 2, 3 ].

Column
width60%

...

Section
Column
width40%

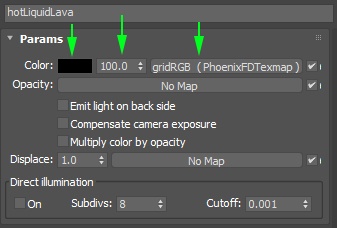
Create a V-Ray Light Material and plug it into the Coat 1 input of the liquidLava Blend Material. Rename it to hotLiquidLava.

Set the Color to RGB [ 0, 0, 0 ] - we use a Phoenix FD Grid Texture reading the simulation RGB Channel to drive the color of the emitted light.

Set the Color Multiplier to 100 - this will affect the intensity of the emitted light.

Column
width60%

...

Section
Column
width40%

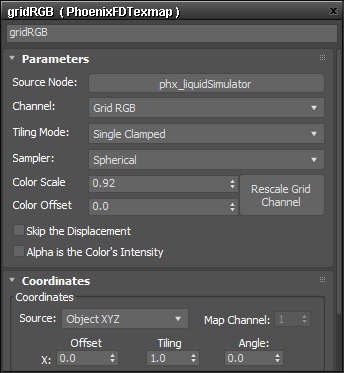
Create a Phoenix FD Grid Texture and plug it into the hotLiquidLava Light Material's Light Color input. Rename it to gridRGB.

Click the Pick a Phoenix Simulator button next to the Source Node parameter and select your Phoenix FD Simulator from the pop-up menu. The name of the button should change according to the name of the simulator once you hit the OK button.

Set the Channel to Grid RGB - this is the channel the texture will read from the cache files.

Set the Sampler to Spherical. You can think of the sampling process as Anti-Aliasing - the Box sampler will give you a rough texture, the Linear will try to smooth the colors and the Spherical will produce the smoothest result. Note that Spherical is 20-30% slower than Linear so make sure to check if the additional sampling at the expense of render time is worth with your setup.

Set the Color Scale to 0.92. This value multiplies the color output values of the Grid Texture. In our case we use it to achieve more complex shader of the lava.

Column
width60%

...

Section
Column
width40%

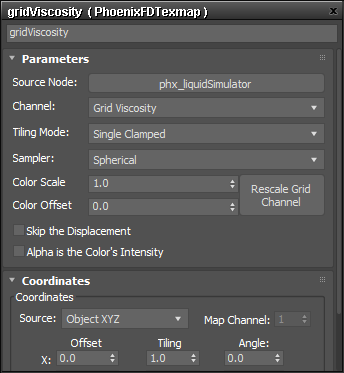
Create a Phoenix FD Grid Texture and rename it to gridViscosity.

Click the Pick a Phoenix Simulator button next to the Source Node parameter and select your Phoenix FD Simulator from the pop-up menu. The name of the button should change according to the name of the simulator once you hit the OK button.

Set the Channel to Grid Viscosity - this is the channel the texture will read from the cache files.

Set the Sampler to Spherical. You can think of the sampling process as Anti-Aliasing - the Box sampler will give you a rough texture, the Linear will try to smooth the colors and the Spherical will produce the smoothest result. Note that Spherical is 20-30% slower than Linear so make sure to check if the additional sampling at the expense of render time is worth with your setup.

Column
width60%


...