The exported hair is loaded through a V-Ray Proxy and a V-Ray Hair Next Material is assigned to it.
Anchor
1.1
1.1
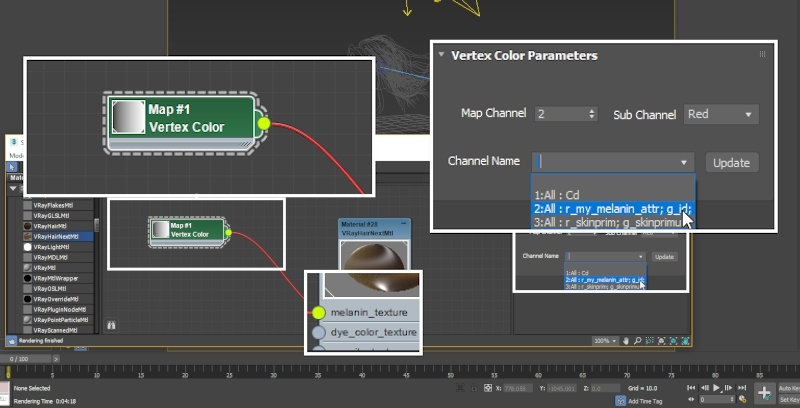
A Vertex Color 1 texture is piped into the melanin_texture parameter of the Hair material.
You need to press the Update button after applying the material and assigning the texture for the custom attributes stored in the Alembic file to show up.
Opening the Channel Name drop-down lists all attributes stored in the Alembic file. In this case, my_melanin_attr is a float so we need to specify the Sub Channel parameter as well. In this case it's Red but that may differ in your scene so make sure to take note of the prefix r_ , g_ and b_ which specify what Sub-Channel should be set for the chosen attribute (ie. Red for r_, Green for g_ and Blue for b_).
You can now press Render and everything should work right out of the box.
Column
width
60%
...
Section
Column
width
40%
UI Text Box
size
medium
type
tip
The Alembic file can store per-frame attributes. This allows you to drive any exposed parameter on any V-Ray node with a per-frame @custom_attribute.
You could, for instance, whiten the hair of a character over a set range of frames by stating f@my_melanin_attr = fit(@Frame, 0, 20, 0.7, 0); in an Attribute Wrangle node.
The video to the right shows the result of f@ml = fit01( rand( f@my_class + @Frame), 0.1, 0.8); where @my_class is produced with a Connectivity SOP on the Guides and transferred to the generated hair.
This is essentially producing a random @ml value for each guide curve. This is then mapped to the melanin_texture parameter on the V-Ray Hair Next material.
Column
width
60%
Videoautoplayloop
0
ch03_splines_seq_final.mp4
1
100%
2
100%
3
true
4
false
5
true
Footnotes
...
Anchor
1
1
1 – The 1 – The use of Vertex Color texture can be changed with either VRayUserColor or VRayUserScalar textures when reading color sets and attributes of an alembic.