![]()
Page History
This page provides an introductory QuickStart guide to using V-Ray for NUKENuke.
Page Contents
Table of Contents style circle
Overview
...
In this tutorial we are going to set up and render a simple scene using the V-Ray plugin for NUKENuke. This exciting new plugin gives you the ability to generate realistic reflections, refractions, subsurface scattering and image-based lighting directly in NUKENuke.
First, we are going to create a simple comparison scene between the NUKE Nuke Scanline renderer and the V-Ray renderer inside of NUKENuke. Later on we will explore some materials and apply them to the geometry and look at how to add some V-Ray lights such as the VRay Light Dome. We'll then move on to adding some V-Ray render elements such as a MultiMatte, a Zdepth pass and a Specular, Reflection and Diffuse pass. We will then render this out to an EXR node and check out the render layers we have created.
To follow this tutorial, you will need to have the V-Ray for NUKE Nuke plugin installed. This tutorial is a companion to go along with the QuickStart video posted on our YouTube channel.
...
| Widget Connector | ||
|---|---|---|
|
Tutorial Assets
...
To download the files used in this tutorial, please click on the button below.
...
| Note |
|---|
Due to licensing issues, the Road_A.hdr file used in the tutorial video is not included in the downloadable assets. Instead, please use one of the provided HDR images in its place. |
Tutorial Steps
...
1) Set up comparison rendering
First, let's set up a comparison scene between the V-Ray Renderer node and the standard NUKE Nuke Scanline renderer so we can compare the two as we go through the techniques in this tutorial. To see the comparison, let's create a CheckerBoard and connect this to a Card with values set as shown in the image below.
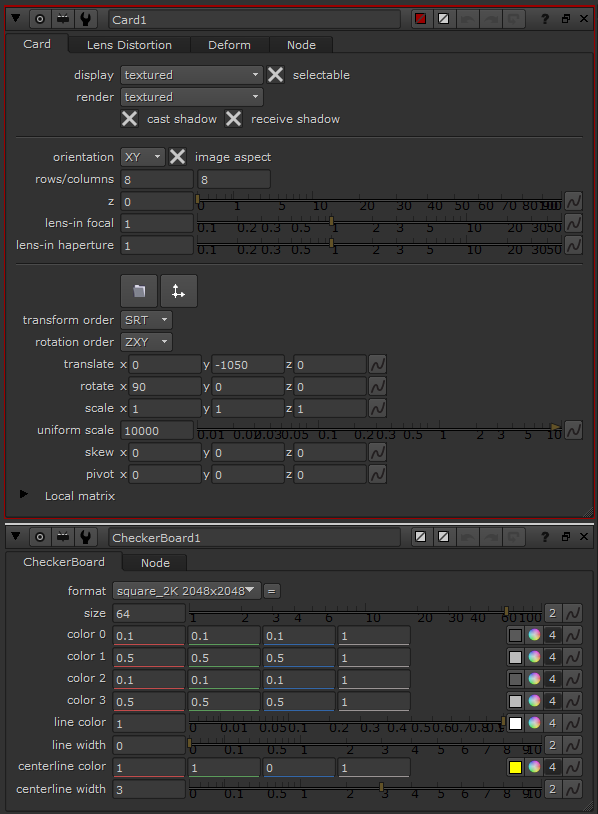
We bring in the geometry using the ReadGeo node and then add a Scene node named Geom. Connect the Geom node to the Card (to which the checkerboard is connected) and the ReadGeo node. To this we connect a NUKE Nuke ScanlineRender node and then add and connect the Camera node with the values shown.
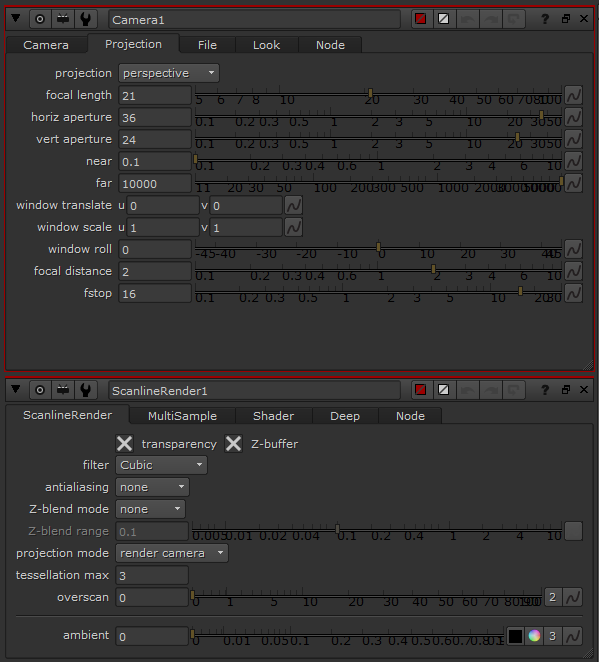
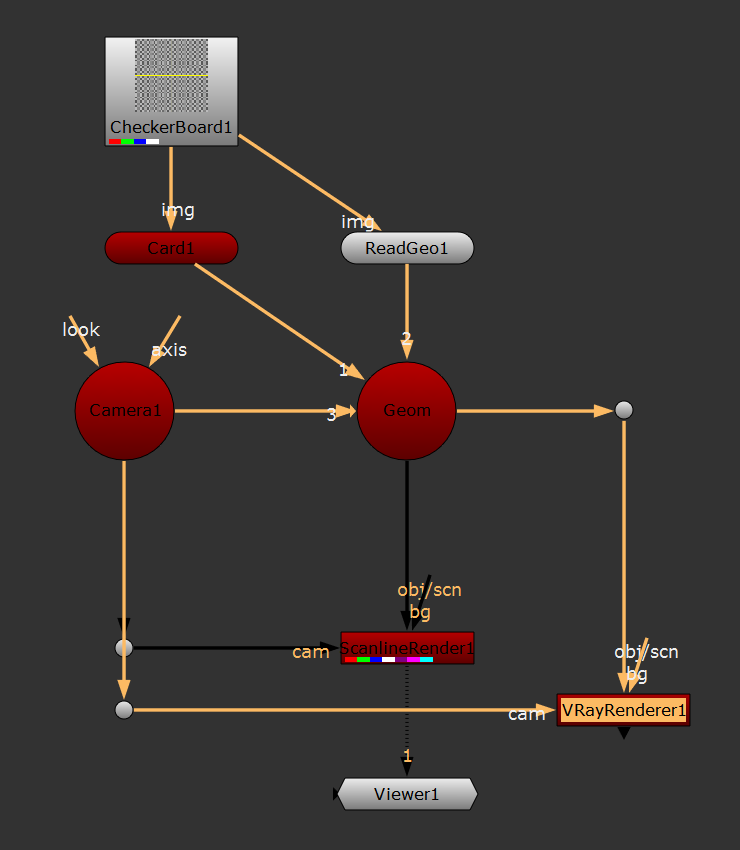
You should now be able to see a very simple Scanline renderer setup. To set up a V-Ray rendering for comparison we are going to keep everything the same, using the same values but simply connecting a VRayRenderer node to both the scene and the camera. In order to have a true ability to compare, we must change the VRayRenderer filter mode to Cubic (as shown) so that it matches the Scanline renderer. If you switch between the results of the Scanline render and the VRayRenderer node, you will see that V-Ray for NUKE Nuke gives far cleaner results.
...
If you take a look at the V-Ray rendering now, you'll notice that the geometry appears as completely black because there are no lights to illuminate the texture in the rendering. The NUKE Nuke Scanline renderer uses an ambient light, which is why you can see the texture in the NUKE Nuke rendering.
3) Add ambient light
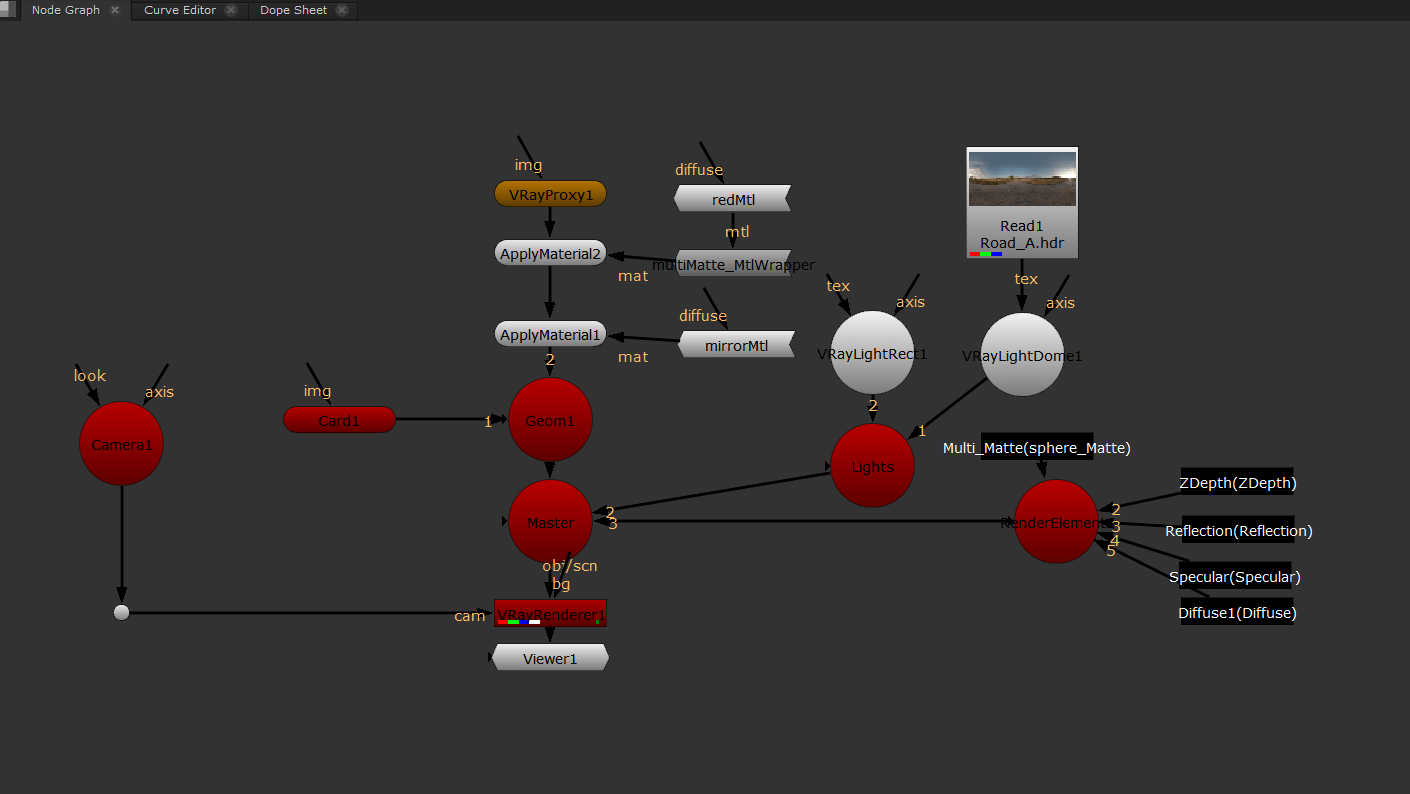
We are going to add a V-Ray light ambient light to match the V-Ray rendering's lighting more closely to the NUKE Nuke Scanline rendering. Create a VRayLightAmbient node, and also a new scene named Lights so we can keep things well organized. Under the Geom1 scene, create another scene named Master Scene and connect the scene named Lights to it. You'll now notice that the V-Ray rendering is lit, and you can see the texture.
...
We are now going to take a look at some lighting techniques that can be used in your renderings in NUKENuke.
Ambient occlusion is a shading and rendering technique used to calculate how exposed each point in a scene is to ambient light. In scenes with open sky this is done by estimating the amount of visible sky for each point, while in indoor environments only objects within a certain radius are taken into account and the walls are assumed to be the origin of the ambient light. The result is a diffuse, non-directional shading effect that casts no clear shadows but that darkens enclosed, occluded and sheltered areas and can affect the rendered image's overall tone. It is often used as a post-processing effect.
...
You will see a window pop up with the geometry objects in the scene that have names assigned to them (these names were assigned prior to use in NUKENuke). To apply the reflective material we've just set up to just the sphere part of the model, select Sphere. The other parts of the model no longer have the reflective material on them as we have specifically told NUKE Nuke that we only want that material on the sphere part itself.
...
The base material is currently assigned to everything that we haven't specifically told NUKE Nuke to apply the reflective material to. To make a new material for the base color, create another VRayMtl node. To keep things organized, name the first VRayMtl node we created (the reflective shiny one) to VRayMtlReflective, and the second VRayMtl node VRayRed. Change the Diffuse Color of VRayRed to a red color with a value of 0.5, 0, 0, 0.5.
...
Let's explore another light, the V-Ray rectangular light. Create a VRayLightRect and connect it to the Lights scene. You can control this light via a large number of parameters, but for now let's just start by changing the U size and V size to 500 each. You can then interactively change the position and angle in your NUKE Nuke scene to place it exactly where you want or need the light source to be. This light source gives you shadows, and it is also visible in the reflections and in renderings unless you check the Invisible checkbox under the light's Options section.
...
Now that we've gone over the basics of setting up a V-Ray for NUKE Nuke scene, we can move on to rendering elements that can be used in post-production.
...
Rename Multi_Matte node to SphereMatte to keep things well organized while we progress. Keeping your NUKE Nuke scripts well organized also means that it is easier for anther artist to pick up a script in production and be able to make sense of it.
...
Congratulations! You've just set up a simple scene with V-Ray for NUKENuke, with render elements that can be used for further post-processing.
...