![]()
Page History
...
The Input rollout determines the path of the input files for rendering and preview, as well as the playback effects. Note that some playback settings require a fractional input frame, in which case the frame is blended between the previous and the next one.
| UI Text Box | ||||
|---|---|---|---|---|
| ||||
To set up rendering and simulation cache paths manually, see Chaning the Default Phoenix Paths in the Tips and Tricks page. |
| UI Text Box | size | medium|
|---|---|---|
| ||
UI Path: ||Select Liquid Simulator | LiquidSim object|| > Modify panel > Input rollout |
...
Parameters
...

| Anchor | ||||
|---|---|---|---|---|
|
| UI Expand | |||||||||||||||||||||||||
|---|---|---|---|---|---|---|---|---|---|---|---|---|---|---|---|---|---|---|---|---|---|---|---|---|---|
| |||||||||||||||||||||||||
$(same_as_output) [nodeName] – The same path that is set in the Output rollout would be used for loading the preview and render caches. When a node name is specified, its output is passed to the current input. signs can be used to specify the cache frame number with at least as many digits as the pound signs. If the number of frame digits is less than the number of pound signs, the number is padded with zeroes to the left. For example:
| |||||||||||||||||||||||||
| UI Text Box | ||||
|---|---|---|---|---|
| ||||
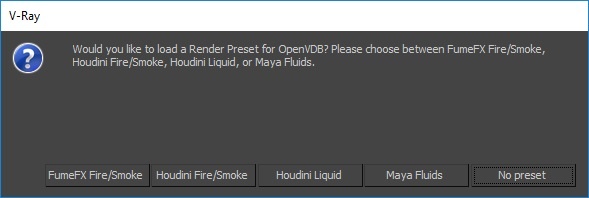
The default rendering settings are tuned to Phoenix FD simulations, and they might not work well for imported 3rd party cache files.
|
| UI Text Box | |||
|---|---|---|---|
| |||
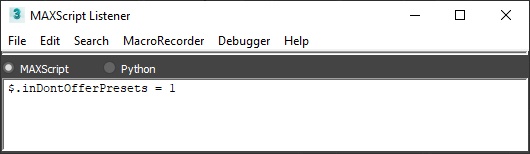
You can suppress showing of the dialogues offering presets using the inDontOfferPresets attribute of the Simulator. Setting inDontOfferPresets to 1, as shown in the image below, will disable the presets pop-up window displayed when a VDB or Field3D cache files are loaded.
|
| UI Text Box | ||||||||||||||||||||||
|---|---|---|---|---|---|---|---|---|---|---|---|---|---|---|---|---|---|---|---|---|---|---|
| ||||||||||||||||||||||
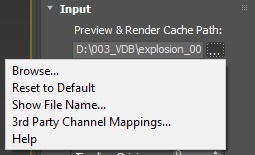
Clicking the "..." button will open a menu with the following options:
Browse – Opens a dialog for choosing one of several cache file types. Phoenix FD can import *.f3d and *.vdb files from other fluid simulator software products. See How to import and render simulations from FumeFX, Houdini and Maya.
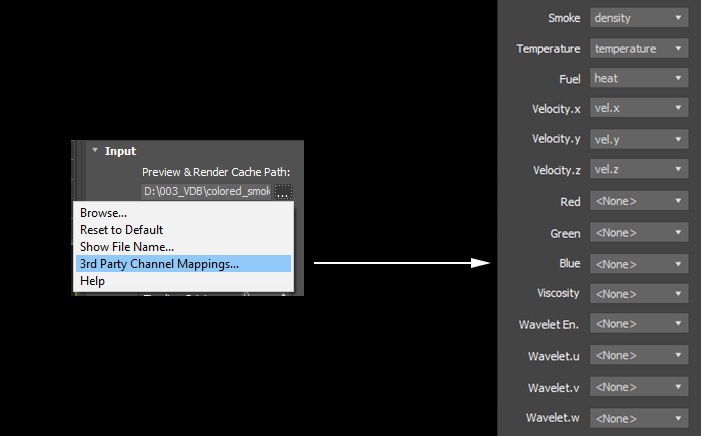
Reset to Default – Resets the cache path to the default value of $(same_as_output). Show File Name... – Evaluates the full disk path provided to the Simulation Cache Save Path parameter. 3rd Party Channel Mappings... – This option is available when a .f3d or .vdb cache is loaded. It launches the Channel Mappings dialog for mapping 3rd party cache channels. See the Channel Mappings section below for more information. Help - Opens this Help page.
|

...
This section contains playback options you can use for retiming a simulation after it has already finished. Using these, you can speed up, slow down or animate the motion of the simulated sequence. When retiming an existing simulation from this section without re-simulating, additional RAM might be used, and loading a new timeline frame may take longer when the frame must be obtained by creating a new one between two adjacent cache files. We will refer to the process of creating an intermediate frame from two caches as Blending. Some of the settings in this section might require specific grid or particle channels to be saved to the cache files during simulation from the Output rollout.
| UI Text Box | size | medium|
|---|---|---|
| ||
In order to blend particles, you must enable the export of the Particle ID channel from the Output rollout of the simulator. |
...
Interpolation – Simple linear interpolation suitable for slow simulations. This is the fastest method but it does not capture movement well and may produce flickering.
Velocity – Velocity-based interpolation. Produces better results, but works more slowly. Captures well the movement of the fronts of the plumes, but does not work well for smoke moving backwards, and also may produce flickering. It requires an exported grid velocity channel from the Output rollout.
Precise Tracing - Improved Velocity based interpolation for Fire and Smoke simulations. Captures fire/smoke plume movement very well and can handle very low Play Speeds. Requires an exported grid Velocity channel, as well as Advection Origin channel from the Output rollout.
| UI Text Box | |||
|---|---|---|---|
| |||
Frame Blending is better suited for simulations without much variety in velocity. For more chaotic simulations, it is better to run a Resimulation using Time Bend controls. Time Bend Resimulation will calculate a better intermediate result for each frame and store it in new cache files that can later be loaded faster, as opposed to Frame Blending which re-launches every time the timeline frame changes. However, for very slow moving simulation the Precise Tracing method produces better looking results than Time Bend Resimulation. For more information, see How to slow down a simulation, animate the time-scale, etc. |
...
| Section | |||||||||||||||||||
|---|---|---|---|---|---|---|---|---|---|---|---|---|---|---|---|---|---|---|---|
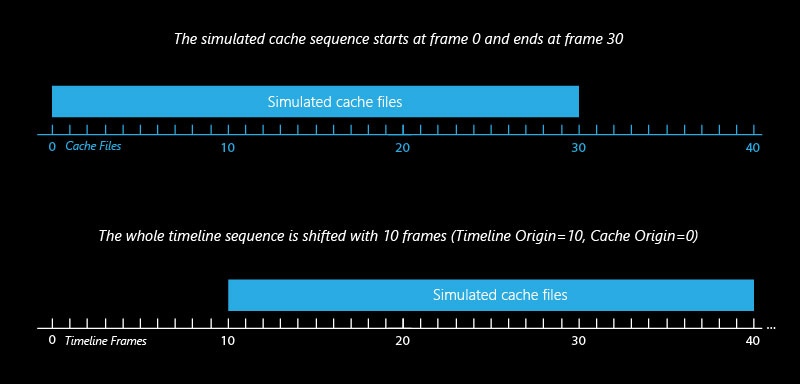
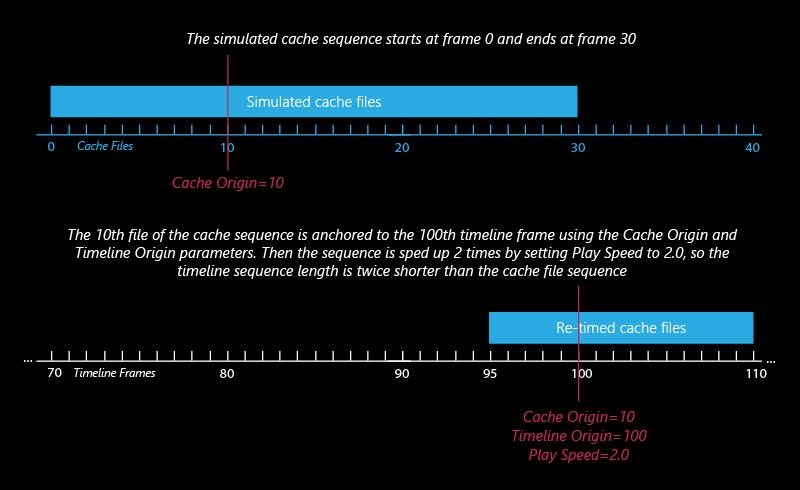
Example: Timeline Origin
|
...
| Section | |||||||||||||||||||
|---|---|---|---|---|---|---|---|---|---|---|---|---|---|---|---|---|---|---|---|
Example: Cache Origin and Play Speed
|
...
| Section | |||||||||||||||||||
|---|---|---|---|---|---|---|---|---|---|---|---|---|---|---|---|---|---|---|---|
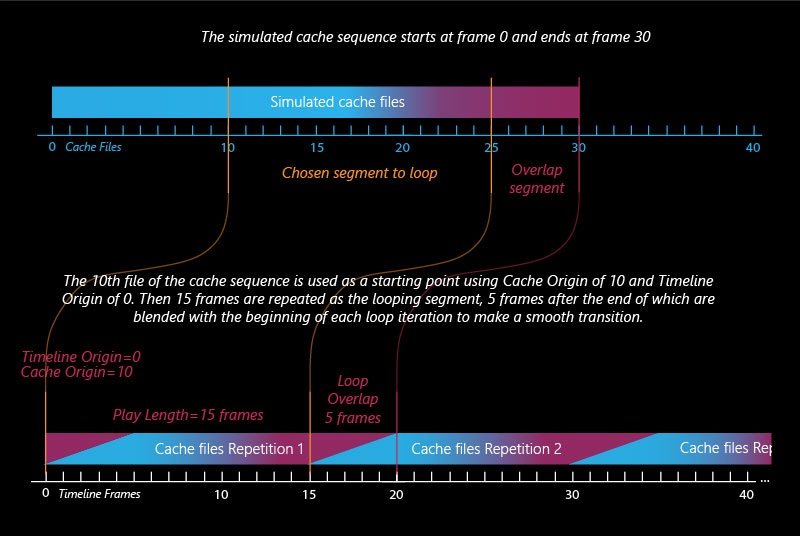
Example: Looping a Simulation
|
...
Grid Channel Smoothing
...
| UI Text Box | ||||
|---|---|---|---|---|
| ||||
Grid Smoothing is performed after the cache file is loaded for the current frame, so for large grids it could cause significant lag after changing frames. To prevent this from occurring, switch it off during the design process and re-enable it again before rendering. |
...
Different applications use different channels and might have different names for them. When loading f3d/vdb files, Phoenix tries to automatically make the conversion to the supported channels. If a channel is not mapped by default, a channel can be manually set from the dropdown menu. It can be accessed from the Cache Path menu when a 3rd party cache is loaded (e.g. .f3d or .vdb files).
| Section |
|---|
|
All mappings are kept in a single string parameter, accessible by the name "usrchmap". An example mapping string is:
...