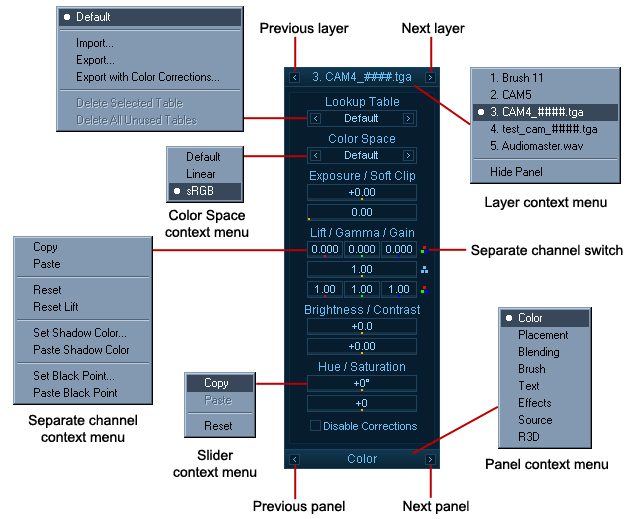
Lookup Table – Pdplayer supports 1D and 3D lookup tables (LUTs). To use a lookup table right click on the Lookup Table chooser and pick one from the list. You can also import your own lookup tables. The supported formats are Autodesk .3dl, Nucoda .cms and Iridas .cube. 3dl tables are assumed to have 12 bits of output (range 0…4095). .3dl and .cube are assumed to contain sRGB values by default whereas .cms is assumed to be linear. Pdplayer comes with a set of commonly used Lookup tables that can be found in “installation folder”\LUTs (Figure 27).
Figure 27. Import LUT
Color Space - allows you to control the color space for the particular layer. You can choose from three different options Default, Linear and sRGB. You can cycle through them with the arrows on both sides of the value or right click and choose a color space from the context menu.
Exposure/Soft Clip - these sliders control the Exposure and Soft Clip levels for the current layer. You can change the values either by clicking on the slider and dragging or by double clicking on it and entering a value in the box. The first slider controls the Exposure and it can take values between minus infinity and plus infinity. An exposure of + 1 means that the image will be two times brighter and exposure of -1 means that the image will be two times darker. The second slider controls the Soft Clip levels and it can take values equal to or larger than zero.
Lift /Gamma / Gain – these sliders allow you to control the Lift, Gamma and Gain values for the current layer. You can change these values for the Red, Green and Blue channel simultaneously or click on the Separate channel switch to edit them independently.
The next two sliders control the Brightness and Contrast levels. Both can take values between minus infinity and plus infinity and you can change them by clicking on the slider and dragging or by double clicking on it and entering a value in the box.
The last two sliders control the Hue and Saturation respectively. Hue can take values between -180 and 180 degrees and Saturation can take values between -100 and plus infinity. Both values can be changed by clicking on the slider and dragging or by double clicking on it and entering a value in the box.
Finally there is the Disable Corrections checkbox. You can use this option to quickly toggle between the original image and the one with the color corrections applied to it. You can toggle this option with the short key Shift + C.
You can right click on any slider to bring the Slider context menu. From it you can copy/paste and reset its value.