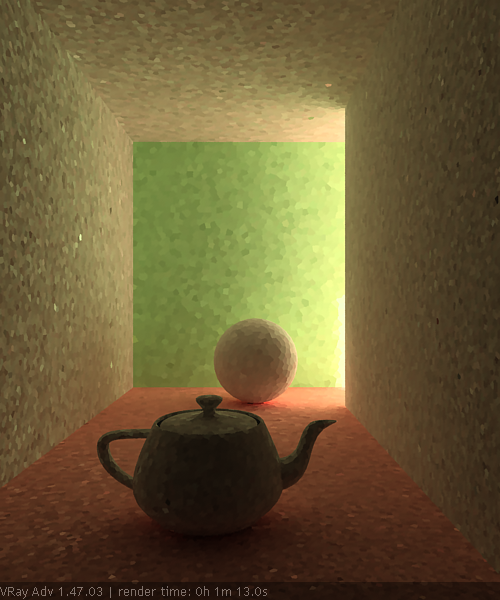
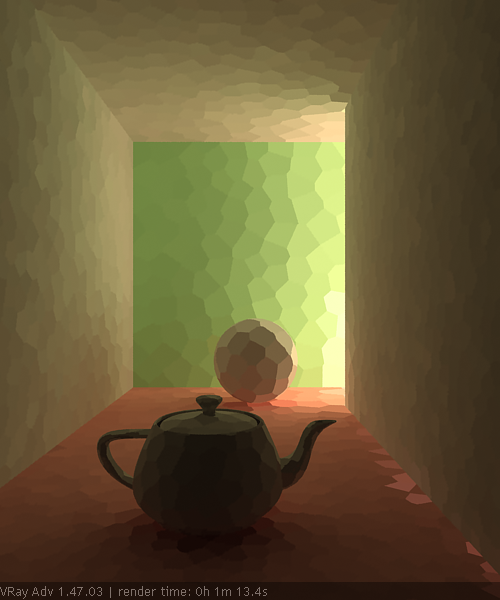
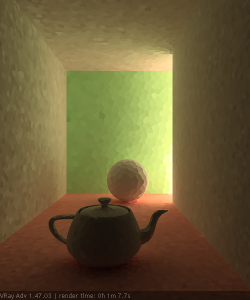
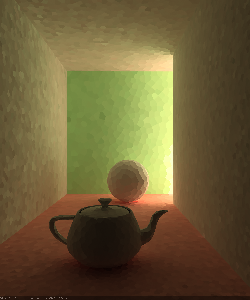
The Subdivs parameter controls the number of rays that are shot into the scene and the "noise" quality of the light cache samples.
Here is a scene rendered with different settings for the Subdivs parameter (all other settings are the same).
As we add more samples, the noise is reduced, but the render times increase. When the Subdivs parameter is increased twice, the light cache takes approximately 4 times as long to calculate.
Section
border
true
Column
width
330px
Image RemovedImage Added
Subdivs = 500
Column
width
330px
Image RemovedImage Added
Subdivs = 1000
Column
width
330px
Image RemovedImage Added
Subdivs = 2000
Section
border
true
Column
width
100%
Sample size - this determines the spacing of the samples in the light cache. Smaller numbers mean that the samples will be closer to each other, the light cache will preserve sharp details in lighting, but it will be more noisy and will take more memory. Larger numbers will smooth out the light cache but will lose detail. This value can be either in world units or relative to the image size, depending on whether or not the World scale option is checked or not.
Section
Column
width
100%
Info
Anchor
Sample size
Sample size
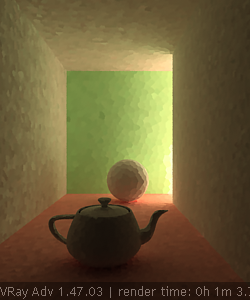
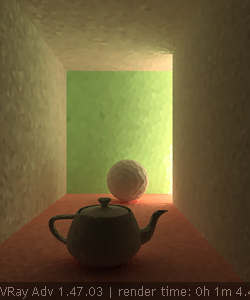
Example: The Sample Size Parameter
The Sample size parameter controls the size of the individual light cache samples. Smaller values produce a more detailed lighting solution, but are noisier and take more RAM. Larger values produce less detail, but take less RAM and may be faster to calculate.
Here is a scene rendered with different values for the Sample size parameter. All other values are the same.
Note the light leak from the wall on the right in the last image - this is because samples from the other side of the wall are quite large (because of the ScreenScale) and end up being used on the side facing the camera (compare this with the WorldScale in the above example).
Note the difference in the noise level between the samples.
Section
border
true
Column
width
330px
Image RemovedImage Added
Sample size = 0.01
Column
width
330px
Image RemovedImage Added
Sample size = 0.02
Column
width
330px
Image RemovedImage Added
Sample size = 0.0
Section
border
true
Column
width
100%
Scale - this option determines the units of the Sample size and the Filter size:
Scene - the units are fractions of the final image (a value of 1.0 means the samples will be as large as the whole image). Samples that are closer to the camera will be smaller, and samples that are far away will be larger. Note that the units do not depend on the image resolution. This value is best suited for stills or animations where the light cache needs to be computed at each frame.
World - the sizes are fixed in world units everywhere. This can affect the quality of the samples - samples that are close to the camera will be sampled more often and will appear smoother, while samples that are far away will be noisier. This value might work better for fly-through animations, since it will force constant sample density everywhere.
Section
Info
Example: The Scale Parameter
The Scale parameter determines whether theSample size and Filter size parameters are in screen space or world space.
In the table below, the Screen scale was used, and the scene was rendered with different image and world sizes. The Sample size was constant for all images - the default 0.02.
As you can see, we always get the same number of light cache samples for all cases, regardless of resolution or scene size - in fact, when scaled to the same size, the images look identical. This is why the ScreenScale is applicable to the large variety of scenes.
Section
border
true
Column
Column
Scene scaled down to 50%
Column
Normal scene
Column
Scene scaled up to 200%
Section
border
true
Column
Resolution 250x300
Column
Image RemovedImage Added
Column
Image RemovedImage Added
Column
Image RemovedImage Added
Section
border
true
Column
Resolution 500x600
Column
Image RemovedImage Added
Column
Image RemovedImage Added
Column
Image RemovedImage Added
Section
border
true
Column
Resolution 1000x1200
Column
Image RemovedImage Added
Column
Image RemovedImage Added
Column
Image RemovedImage Added
Section
border
true
Column
width
100%
Store direct light - when this option is on, the light cache will also store and interpolate direct light. This can be useful for scenes with many lights and irradiance map or direct GI method for the primary diffuse bounces, since direct lighting will be computed from the light cache, instead of sampling each and every light. Note that only the diffuse illumination produced by the scene lights will be stored. If you want to use the light cache directly for approximating the GI while keeping the direct lighting sharp, uncheck this option.
Show calc. phase - turning this option on will show the paths that are traced. This does not affect the calculation of the light cache and is provided only as a feedback to the user. This option is ignored when rendering to fields - in that case, the calculation phase is never displayed.
Adaptive sampling - when this option is on V-Ray will store additional information about the incoming light for each light cache sample, and try to put more samples into the directions from which more light is coming. This may help to reduce the noise in the light cache, particularly in the case of caustics.
Use camera path - when this option is on V-Ray will calculate the light cache samples for the entire camera path, instead of just the current view, in the same way as this is done for the Fly-through mode. This is useful when rendering animations with moving objects where the camera also moves and the light cache needs to be in Single frame mode. In this case, setting the Use camera path option on will help to reduce any flickering, as the GI sample positions on static geometry will not change.
Reconstruction Parameters
These parameters control how the light cache is used in the final rendering, after it has been calculated.
Prefilter - when this is turned on, the samples in the light cache are filtered before rendering. Note that this is different from the normal light cache filtering which happens during rendering. Prefiltering is performed by examining each sample in turn, and modifying it so that it represents the average of the given number of nearby samples. More prefilter samples mean a more blurry and less noisy light cache. Prefiltering is computed once after a new light cache is computed or loaded from disk.
Prefilter samples - this parameter controls the number of samples taken during prefiltering.
Filter Type- this determines the type of render-time filter for the light cache. The filter determines how irradiance is interpolated from the samples in the light cache.
None - no filtering is performed. The nearest sample to the shaded point is taken as the irradiance value. This is the fastest option, but it may produce artifacts near corners, if the light cache is noisy. You can use pre-filtering (see below) to decrease that noise. This option works best if the light cache is used for secondary bounces only or for testing purposes.
Nearest - this filter looks up the nearest samples to the shading point and averages their value. This filter is not suitable for direct visualization of the light cache, but is useful if you use the light cache for secondary bounces. A property of this filter is that is adapts to the sample density of the light cache and is computed for a nearly constant time. The Interpolation samples parameter determines how many of the nearest samples to look up from the light cache.
Fixed - this filter looks up and averages all samples from the light cache that fall within a certain distance from the shaded point. This filter produces smooth results and is suitable for direct visualization of the light cache (when it is used as the primary GI engine). The size of the filter is determined by the Filter size parameter. Larger values blur the light cache and smooth out noise. Typical values for the Filter sizeare 2-6 times larger than the Sample size. Note that Filter size uses the same scale as the Sample size and its meaning depends on the World Scale check box.
Interpolation Samples - when the Filter Type is set to Nearest this parameter determines how many of the nearest samples to look up from the light cache.
Filter Size - when the Filter Type is set to Fixed this parameter determines the size of the filter. The units of the value is determined by the state of the World scale parameter.
Use light cache for glossy rays - if this option is on, the light cache will be used to compute lighting for glossy rays as well, in addition to normal GI rays. This can speed up rendering of scenes with glossy reflections quite a lot.
Depth - this parameter determines the length of the light paths to be traced. It is important to note that even though in Light cache the depth is limited, due to the recursive nature of this method there will be longer paths in the end result.
Use retrace threshold - when enabled, this option improves the precision of the global illumination in cases where the light cache will produce too large error. This is especially obvious with the Use light cache for glossy rays option, or near corners where light leaks might be possible because of the light cache interpolation. For glossy reflections and refractions, V-Ray dynamically decides whether to use the light cache or not based on the surface glossiness and the distance from it so that the errors due to the light cache are minimized. Note that this options may increase the render time.
Retrace threshold - specifies a threshold for the distance.
Info
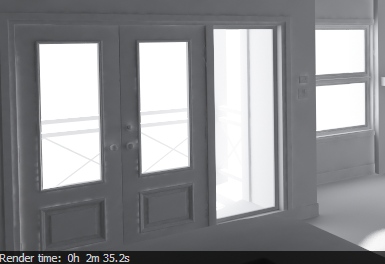
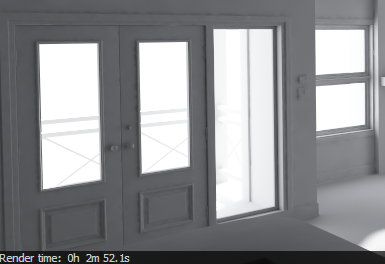
Example: The RetraceThreshold Parameter
The first set of images shows how the Retrace thresholdparameter can be used to reduce light leaks due to the light cache interpolation. The scene is an interior scene with parts of the exterior visible. The bright light cache samples from the exterior blend with the darker samples from the interior causing light leaks when the irradiance map is calculated. The Retrace threshold option (with the default value of 1.0) successfully resolves the problem at the expense of slightly increased calculation time for the irradiance map.
Section
border
true
Column
width
50%
Image RemovedImage Added
Without retracing, light cache samples from the bright exterior are mixed with the dark samples in the exterior causing light leaks.
Column
width
50%
Image RemovedImage Added
With light cache retracing enabled, the light leaks are successfully eliminated at the expense of slightly longer irradiance map calculation time.
Section
border
true
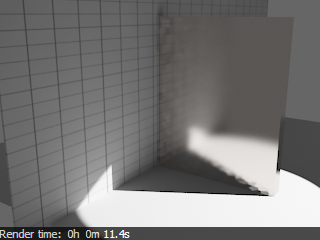
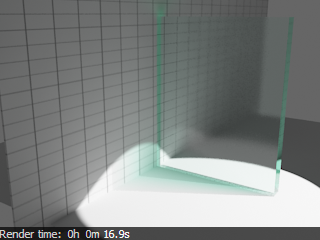
The second scene in this example shows how the Retrace threshold option can be used to improve the appearance of glossy reflections and refraction with theUse light cache for glossy rays option. In this case, V-Ray dynamically decides whether to use the light cache or not, based on the glossiness of the surface and the distance from it.
Section
border
true
Column
width
50%
Image RemovedImage Added
Column
width
50%
Image RemovedImage Added
Section
border
true
Column
width
50%
Image RemovedImage Added
Column
width
50%
Image RemovedImage Added
Section
border
true
Column
width
50%
Without retracing, the light cache samples are clearly visible in the glossy reflections and refractions.
Column
width
50%
With light cache retracing enabled, V-Ray is able to dynamically decide whether to use the light cache or not, leading to a much better result.