This page provides an overview of the Common tab of the VRayRenderer node.
Overview
The Common tab of the VRayRenderer provides access to image filtering and Antialiasing options that are the primary means of render quality and speed control for V-Ray. As well, Caustic light calculation, such as light bending through glass, can be enabled here.
The tab is broken up into three rollouts.
- Rendering – This rollout contains options to set the size of the rendered image and define the type of Aliasing used.
- Antialiasing – Parameters in this tab control V-Ray's render quality. This can have a large effect on fine-tuning render times.
- Caustics – This rollout contains controls for enabling and fine tuning how the renderer handles Caustic lighting effect calculations during rendering.
UI Path: ||Select VRayRenderer|| > Properties Panel > Common tab
Rendering
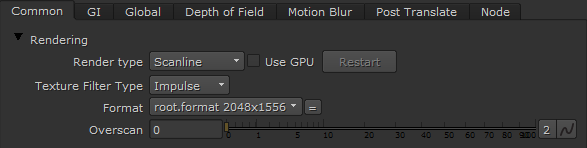
Render Type – Specifies the rendering type that will be used by V-Ray.
Scanline – The default scanline CPU engine is used. If the Use GPU option is turned on - the GPU render engine will be used for for scanline stripe 'bucket' rendering.
Progressive – The CPU progressive engine is used. This engine does not require a graphics card and supports many of the regular V-Ray renderer features, including procedural textures and complex materials. If the Use GPU option is turned on a GPU progressive engine based on the NVIDIA CUDA platform will be used.
Use GPU – Switches between CPU and GPU render engine. The GPU engine uses NVIDIA graphics cards that support CUDA and is the recommended engine for NVIDIA GPUs. It can be very fast depending on hardware, but has limited abilities with regards to shaders.
Restart – Restarts the rendering while in Progressive render mode.
Texture Filter Type – Used to select the filtering algorithm to use when remapping pixels from their original positions to new positions. This can help avoid problems with image quality, particularly in high contrast areas of the frame, where highly aliased or jagged edges may appear if pixels are not filtered and retain their original values.
Impulse – Remapped pixels carry their original values.
Cubic – Remapped pixels receive some smoothing.
Keys – Remapped pixels receive some smoothing, plus minor sharpening (as shown by the negative -y portions of the curve).
Simon – Remapped pixels receive some smoothing, plus medium sharpening (as shown by the negative -y portions of the curve).
Rifman – Remapped pixels receive some smoothing, plus significant sharpening (as shown by the negative -y portions of the curve).
Mitchell – Remapped pixels receive some smoothing, plus blurring to hide pixelation.
Parzen – Remapped pixels receive the greatest smoothing of all filters.
Notch – Remapped pixels receive flat smoothing (which tends to hide moire patterns).
Lanczos4, Lanczos6, and Sinc4 – Remapped pixels receive sharpening which can be useful for scaling down. Lanczos4 provides the least sharpening and Sinc4 the most.
Format – The format to which you want to output the image sequence. If the format does not yet exist, you can select new to create a new format from scratch. The default setting, root.format, resizes the image to the format indicated in the Project Settings.
Overscan – The maximum additional pixels to render beyond the left/right and top/bottom of the frame. Rendering pixels beyond the edges of the frame can be useful if subsequent nodes need to have access outside the frame. For example, a Blur node or LensDistortion node down the node tree may produce better results around the edges of the frame if overscan is used.
Progressive Rendering Settings

Max Render Time (sec) – Since the progressive engine uses progressive path tracing it would never stop rendering unless specified otherwise. This option allows the user to specify a maximum render time in seconds.
Samples limit – Allows the user to limit the maximum quality achieved by the Progressive sampler, by specifying a maximum number of rays traced for each pixel. Once the specified number has been reached V-Ray will stop rendering.
Noise limit – Specifies the noise threshold for the Progressive sampler. Once the threshold is met for a certain part of the image, V-Ray will stop sampling it and will reassign rendering power to a part of the image that requires more sampling.
Progressive Rendering Settings (Advanced)
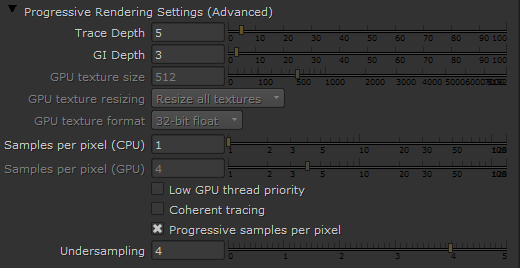
Trace Depth – Represents the maximum number of bounces that will be computed for reflections and refractions. The individual material reflection/refraction depth settings are still considered, as long as they don't exceed the value specified here.
GI Depth – The number of bounces for indirect illumination. Other GI settings (e.g. whether GI is enabled or disabled) are taken from the production V-Ray renderer.
GPU texture size – When GPU Resize textures is enabled this value specifies the resolution to which the textures will be resized. This also controls the resolution for baking unsupported procedural textures to bitmaps so they can be loaded into memory.
GPU Resize Textures – Determines how textures' resolution/size will be handled to help optimize memory usage. This parameter is only effective when Type is set to Open CL or CUDA. The possible values are:
Resize all textures – Adjusts the size of high-resolution textures to a smaller resolution in order to optimize render performance.
Full size textures – Textures are loaded at their original size.
GPU Texture Format – The amount of bits per channel used to store the material texture information into memory. You can choose between 8 bit, 16 bit and 32 bit.
Samples per pixel (CPU) / Samples per pixel (GPU) – The number of rays that are traced for each pixel during one image pass. The greater the value, the smoother the picture from the very beginning of the rendering with GI, but interactivity may be significantly diminished. Increasing this value also reduces amount of data transferred from the render servers back to client machine.
Low GPU thread priority – When enabled, V-Ray will try to lessen their use of GPUs working on displaying graphics to the monitor(s) in order to give them more resources to complete other processes and tasks for the OS. This is done by using a lower value for Ray bundle size for those GPUs with attached displays (Samples per pixel is still the same for all GPUs). This can affect overall performance, and the render speed might be reduced. It is recommended to utilize a separate GPU for the display, if possible.
Coherent tracing – Improves the rendering speed at the cost of a visually unpleasant intermediate result.
Progressive samples per pixel – When enabled, V-Ray starts rendering the image with a lower Rays Per Pixel value and then progressively increases it. This allows us to speed up the initial preview of the image.
Undersampling – When enabled, V-Ray starts rendering the image at a lower resolution in order to speed up the initial preview. Later the image is rendered at its final resolution.
Antialiasing
Parameter details and information on how V-Ray handles Antialiasing can be found on the Image Sampler | Antialiasing page.
Caustics
Parameter details and information on how V-Ray handles Caustics can be found on the Caustics page.