This page provides information about running simulations outside the Chaos Phoenix user interface.
Overview
A simulation can be run on the local machine or on a different machine on the network in a way that it doesn't access the user interface of 3ds Max and will only require a Simulation License. If you have several Simulation Licenses, you could run several simulations on several different network machine without engaging a GUI License. Phoenix needs to be installed on every such machine. You can use this functionality to simulate one scene while you prepare another scene on a different machine, or simultaneously run copies of the same scene with slightly different simulation settings on several machines, so you would be able to quickly find the best settings.
Note that distributed simulations in which different parts of the same simulation are calculated simultaneously across several machines are currently not implemented.
Simple Submission of Simulations without a GUI License
Phoenix provides a simple interface for submitting scenes for simulation using Backburner or Thinkbox Deadline. You can download the latest version of the submitter here:
PhoenixFDSimSubmission3dsMax.zip
You need to extract the archive into the 'Scripts' sub-directory of your 3ds max installation, e.g. C:\Program Files\Autodesk\3ds Max XXXX\scripts\. It will create a PhoenixFD menu from which you can launch Phoenix's Backburner or Deadline submitters:

Before starting, it's important that you change the Output directories of the simulators to an absolute path on your machine (starting with the drive name, e.g. C:\ or D:\) if you will be doing local Backburner or Deadline simulation, or if you intend to run the simulation of a scene on a different machine, you must set the Output paths to a shared directory on the network using a network-visible UNC output path (a path that starts with \\). The reason for this is because by default Phoenix writes the cache files in the same directory where the scene file is, using the $(scene_path) keyword. However, at the start of a Backburner or Deadline simulation, the scene file may be copied by the render manager to a different location, e.g. C:\Users\user\AppData\Local\backburner\Jobs\, or to the Deadline Repository directory. By setting the cache path to an absolute local path or to a shared folder on the network, or to a mapped network drive, you make sure that the cache file sequence will be generated where you actually intend, otherwise you might have to look for the simulation result in any of the directories that the render manager might create.
You must have the 3ds Max Load/Save Scene Scripts option enabled from Customize → Preferences → MAXScript → Startup in order for the Phoenix submission scripts to work correctly.
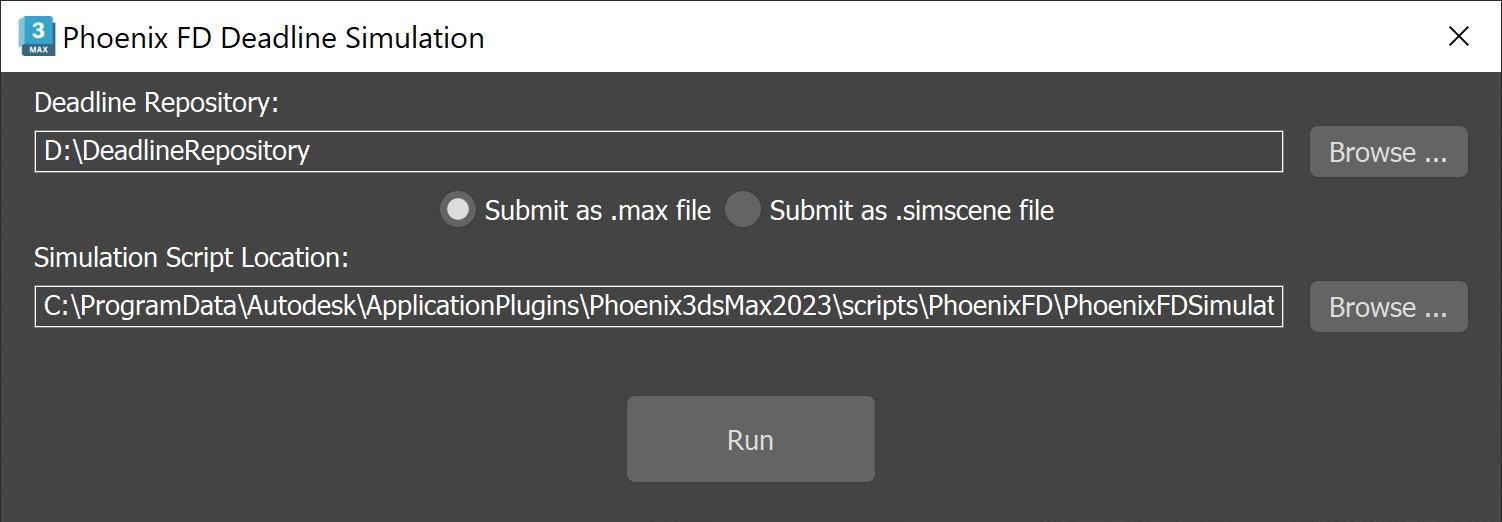
Phoenix Deadline Simulation
Using the Phoenix Deadline submitter you can either submit your 3ds Max scenes through Deadline or submit a Phoenix Standalone simulation by submitting a .simscene file.
When using the .simscene method you don't need to have 3ds Max installed on the Deadline Worker node. You can find more about the Phoenix Deadline plugin here.
Phoenix's Deadline submitter will run the selected Phoenix Simulator(s) in the scene. If there are no selected Simulators, then all available simulators will be submitted for simulation. Before you run the simulation, you only need to select the location of the Deadline Repository.
Phoenix Backburner Simulation
Phoenix's Backburner submitter will run all Phoenix Simulators in the scene sequentially. Before you run the simulation, you only need to fill in the name or IP address of the Backburner Manager.
In order to run a Phoenix simulation through Backburner, you need to be aware that you can have only one version of Backburner installed at a time.

Advanced Custom Scripting for Simulations without a GUI License
You may tweak or extend the default Phoenix simulation submission by altering the default simulation MAXScript files in the scripts/PhoenixFD sub-directory of 3ds Max. Additionally, you can alter the framework and build custom submission tools, by using Phoenix's MAXScript interface and 3ds Max's 3dsmaxcmd.exe, Backburner, Thinkbox Deadline or other render managers. There are many ways to do this and you can pick one of the following examples that suits your workflow the best.
Since the commonly used render managers such as Backburner or Thinkbox Deadline are primarily designed to render scenes instead of simulating them, you need to use a custom script to run the simulation. The simplest MAXScript file that will run a Phoenix simulation contains only these two lines of code:
A_StartSim $'PhoenixFDFire001'
A_Wait $'PhoenixFDFire001'
You should replace PhoenixFDFire001 with the actual name of the simulator in your scene and save the script file to a place where you can use it later. This example script will start the simulation and then wait for it to finish before returning control to the render manager. You can check the Phoenix MAXScript Reference for more info on these commands and other commands you can use. You may extend this script with other custom processing, running several simulators in the same scene one after another, etc.
If you want to start several simulators, you need to wait for each one to finish before starting the next one. The following script simulates the selected Phoenix simulator, or if there is no selected simulator, it runs all simulators in the scene one after the other:
--If there are selected simulators, use only those
PhoenixFDObjectsAll = for o in selection where classof o == LiquidSim or classof o == FireSmokeSim or classof o == PHXSimulator collect o
if PhoenixFDObjectsAll.count == 0 do( --Otherwise, use all PhoenixFD simulators
	PhoenixFDObjectsAll = for o in objects where classof o == LiquidSim or classof o == FireSmokeSim or classof o == PHXSimulator collect o
)
-- Filter out the hidden particle group nodes from the actual simulators:
PhoenixFDObjectsToSim = #()
for i=1 to PhoenixFDObjectsAll.count do(
	local phxUserPropGroup = getUserProp PhoenixFDObjectsAll[i] "phxgroupname"
	local phxUserPropSysId = getUserProp PhoenixFDObjectsAll[i] "phx_system_id"
	if phxUserPropGroup==undefined and phxUserPropSysId==undefined do(
		append PhoenixFDObjectsToSim PhoenixFDObjectsAll[i]
	)
)
-- Start the simulation
print PhoenixFDObjectsToSim
for i=1 to PhoenixFDObjectsToSim.count do(
	A_StartSim(PhoenixFDObjectsToSim[i])
	A_Wait(PhoenixFDObjectsToSim[i])
)
Here is the script download link: PhoenixFDSimulate.ms
Setting up a Simulation using Thinkbox Deadline
You can pass the script above or an extended version of it to Deadline in several different ways, depending on whether you want to run it from inside 3ds Max or from an external application.
Submitting a Simulation from Deadline Monitor
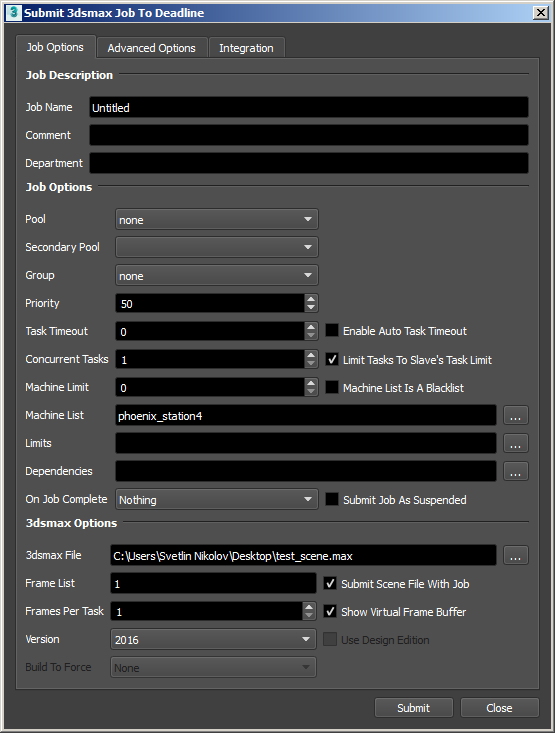
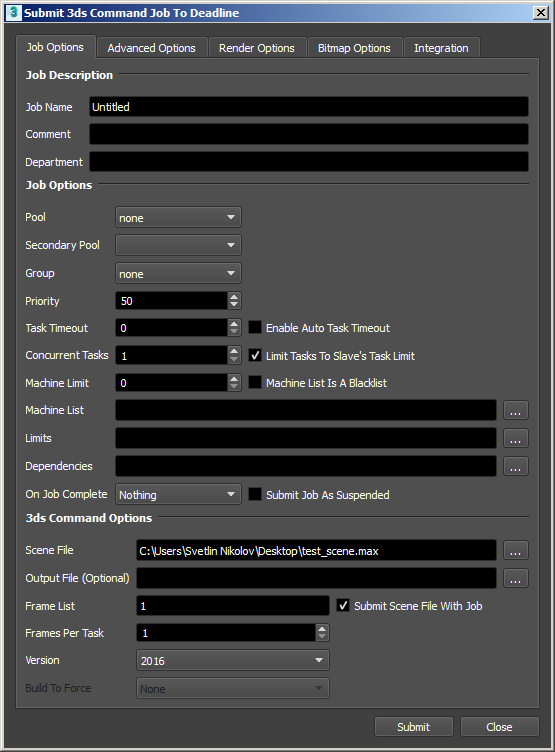
You can run a simulation in a saved 3ds Max scene in several different ways. Using the Deadline Monitor application, you can create a 3dsmax Submission or a 3ds Command Submission. You should select the MAXscript file as a Post-Load Script or a Pre RenderScript File respectively, depending on the submission type:
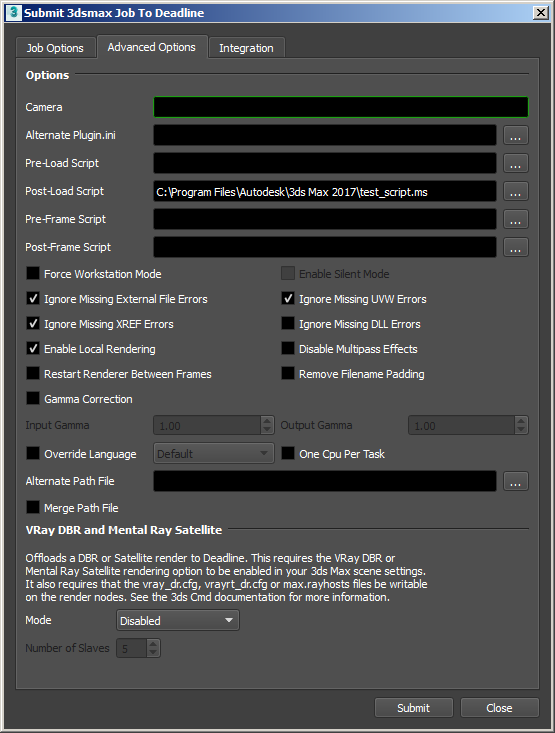
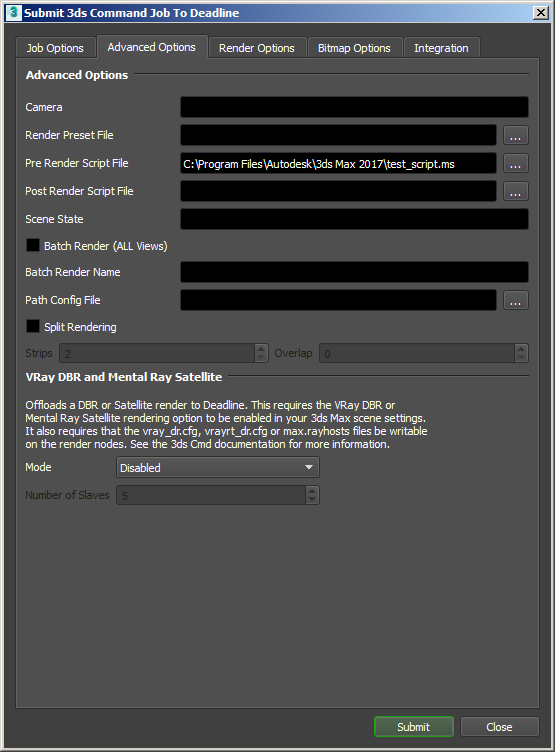
You should also select your scene file, check Submit Scene File With Job and fill out the Frame List. If you intend to just run the simulation, you may set the Frame List to just a single frame and reduce the resolution in order to make it take as little time as possible.
You should be careful not to force Workstation mode from Deadline, otherwise, the simulation would consume a Phoenix GUI license as well.
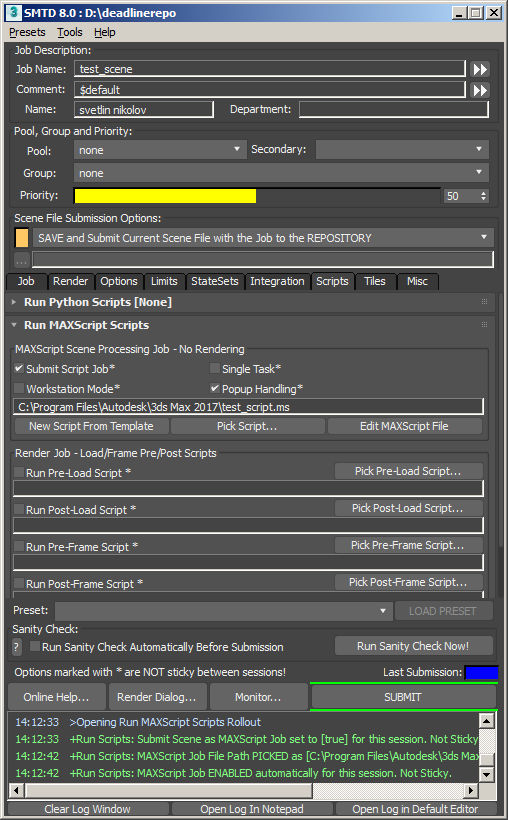
Submitting a Simulation from 3ds Max using Deadline SMTD
Deadline could also be launched directly from 3ds Max by using its SMTD integration. There you must enable Submit Script Job and you could place the MAXscript file as a general script or as a Post-Load Script.
Note that SMTD may not work if the 3ds Max Save strings in legacy non-scene files using UTF8 option is not enabled from the Customize > Preferences > Files dialog. Please consult Deadline's 3ds Max FAQ if you have any issues.
Submitting a Simulation of a Selected Simulator from 3ds Max with MAXScript
Another way to launch a simulation using Deadline directly from inside 3ds Max is by using the following two scripts:
For this to work, you need to modify the scripts substituting the path your Deadline repository in Submit2DL.ms at this line:
local theNetworkRoot = @"H:\DeadlineRepository"
You also need to place PhoenixFDSubmissionMS.ms in a directory if your choice and set the path to it in Submit2DL.ms file at the line that states:
local MAXScriptFile = @"H:\PhoenixFDSubmissionMS.ms"
After these prerequisites are met, you can execute Submit2DL.ms and the selected simulator in the scene will be simulated - there is no need to substitute the name of the simulator or the name of the scene in the scripts. Additionally, you could manually connect this script to a toolbar button for easier execution.
Setting up a Simulation Using Backburner
Submitting a Simulation from the command line
You can also run a simulation that uses only a Simulation license and doesn't require a Chaos Phoenix GUI or 3ds Max GUI licenses via 3dsmaxcmd.exe. It is an executable located in the root of your 3ds Max installation directory, along with 3dsmax.exe which is used to run 3ds Max in GUI mode.
In order to run 3ds Max in console mode, you need Backburner installed. This applies even if you are not going to use it over the network. You can have only one version of Backburner installed at a time, and it needs to match the version of 3ds Max that you will use to run the simulation, e.g. Backburner 2016 will work only with 3ds Max 2016.
After you have saved the max script in an *.ms file, you need to execute the following command line in order to start the simulation:
3dsmaxcmd.exe -v:5 -o:test.bmp -prerenderscript:PhoenixFDSimulate.ms test_scene.max
You should replace test.bmp with a path to the rendered images, PhoenixFDSimulate.ms with the path to the MAXScript file containing the simulation commands, and test_scene.max with the path to your 3ds Max scene file that contains your Phoenix setup.
Running this command will simulate the scene and at the end of simulation will render using the settings you have saved in your scene or with any overrides you may specify using the command line. After the MAXScript executes, the scene will render. If you don't need the render output, please make sure to save the scene with rendering of just one frame on a very low resolution - rendering is a step that cannot be skipped by Backburner, but can be worked around in order to not take long.
You can send the simulation over the network to another machine that runs a Backburner Sever and a Backburner Manager by simply adding the -submit switch, followed by the IP or the name of the Backburner manager:
3dsmaxcmd.exe -v:5 -o:test.bmp -prerenderscript:PhoenixFDSimulate.ms -submit:11.22.33.44 test_scene.max
Setting up a Simulation Using Royal Render
Royal Render 8.0 includes a submission script that allows it to calculate Phoenix simulations over a render farm to help generate cache files quicker. This is a "simulation only" job and will not render images with the script.
Note that distributed simulations in which different parts of the same simulation are calculated simultaneously across several machines are currently not implemented.
It's important to remember to set your Output Simulation Cache Save Path to a shared location that all network computers on the farm can access.
Submitting a Simulation Job with Royal Render
Use any of the Submit Scene options from the RRender menu in 3ds Max to open the rrSubmitter window.
If you have multiple layers in the jobs table, check on the first one listed.
Make sure the Software drop-down is set to 3dsmax and Renderer is set to PhoenixFD with the proper version number for your installation.
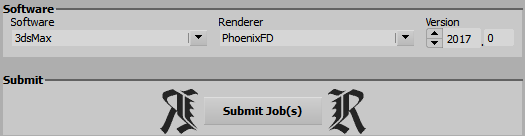
Even though Royal Render will not render images during the simulation job, you must set the Image Directory and Filename to begin the job.
Royal Render does not check the output of the simulation so you should assign the job to workstations (farm clients) that will not be aborted by artists or other jobs running on the farm.