Overview
The parameters in this rollout control the representation of the fluid’s caches in the viewport, showing a preview of what the fluid is doing. These preview controls can give you a sense of what is going on with your simulation, and whether it needs tweaking, before you decide to start rendering.
The viewport will typically display Fire/Smoke simulations as a Voxel Preview, which uses 2D triangles to emulate the shape of the volume. You can choose to preview specific Grid Channels, for example, only the Temperature or Smoke. You can also preview the simulation’s Velocity, to see how Phoenix forces or standard 3ds Max forces affect the simulation.
Meanwhile, the Particle Preview section lets you to control the visibility of different Particle Types, such as Drag particles emitted from a Fire Source, and manage their preview color.
Keep in mind that the Voxel and Particle preview parameters are all independent from rendering. They do not affect the render settings or Volumetric shading.
UI Path: ||Select Fire Smoke Simulator object|| > Modify panel > Preview rollout
Parameters
General
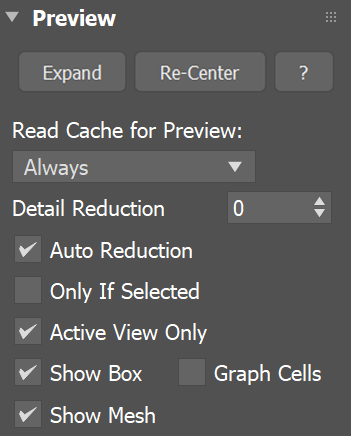
Expand – Opens a floating dialog that contains the selected rollout and automatically folds the command panel rollout.
Re-Center – Resets the position of the floating rollout.
? – Opens up the help documents for the Fire/Smoke Preview rollout.
Read Cache for Preview | prv_read_cache – Allows to completely disable reading of cache files in order to speed up the viewport and the simulation. When cache files are not read, neither voxels and particles, nor the grid bounding box or the Cache File Content under the Simulation rollout will be shown. This way scrolling the timeline would be quick as there will be no access to hard disk or the network. If you still need to see the grid bounding box and the Cache File Content info, you could leave this option to Always, and instead disable all voxel preview options, the Mesh Preview, GPU Preview and all particle previews. The intended use for this parameter is as a last step performance optimization - once you're done tweaking your setup and you're ready to commit to a high-resolution, overnight simulation, disable the preview of cache files.
Always – Cache files are always read by the preview.
Disable During Sim – Cache files are read only when the simulation is stopped. This would speed up the simulation and is good for overnight simulations where you don't need to watch the simulation constantly.
Don't Preview Caches – Cache files are never read for the preview. They will only be read during rendering, or in case any of the Phoenix tools requires them - e.g. the Particle Shader, the Grid Texture, etc.
Detail Reduction | prv_dwnsmp – Decreases the grid and particle detail in the preview. A value of 0 means no reduction. Increase this value if the interface starts to lag due to the simulation being very large. Note that this parameter does not affect the Mesh preview.
Auto Reduction | prv_autoreduct – Enables automatic adjustment of the Detail Reduction parameter to improve display performance. The preview detail will be reduced up to a point where the preview will display fast without blocking the interface. Note that the detail will only decrease automatically, but will not increase. This option works only for the Voxel and Particle previews.
Only if Selected | show_only_sel – When enabled, the viewport preview is only drawn if the Simulator is selected.
Active View Only | prv_avonly – When enabled, only the selected viewport shows the content of the Simulator.
Show Box | showgrid – Shows the bounding box of the Simulator. The green outline is drawn based on the settings in the Grid rollout while the red outline displays the bounds of the currently loaded cache file.
Graph Cells | gridcells – Shows a lattice with the cell sizes on the sides of the Simulator's box or the Slice Preview.
Show Mesh | showmesh – When enabled, shows the Isosurface as a mesh. The Isosurface is defined in the Surface section of the Rendering rollout. This mode overrides the Voxel Preview mode. Note that if Mode is set to Ocean Mesh in the FireSmoke Rendering settings, the surface is generated in the viewport with low mesh resolution in order not to slow down the user interface significantly.
GPU Shaded Preview
The Phoenix GPU Preview shows a detailed Viewport Preview for Fire/Smoke simulations, by shading the Simulator directly inside the viewport, using the current Volumetric Options.
The preview works in real time, so you can use it to quickly preview how changing volumetric options and curves affects the look of the simulation. You can analyze their effect on the simulation’s appearance and make further iterations, without having to render.
The GPU Preview can also be used as an extremely basic renderer, since it can automatically save out images during simulation. This can be a useful and fast way to do a previsualization of your sequence, and review your simulation in motion.
Note that the GPU Preview is not a replacement for rendering. In order to display in real time, the preview ignores Displacement, as well as any volumetric texture mapping of the Fire or Smoke. There are also some limitations as to how it displays volumes when geometries intersect the sim, or are inside the grid.
Finally, all lights are treated as directional, so using dome lights, area lights or global illumination would produce different render results than the GPU Preview. If you need to iterate on the final look of the simulation with complex lighting setups, you should use V-Ray GPU IPR, or another interactive rendering solution.
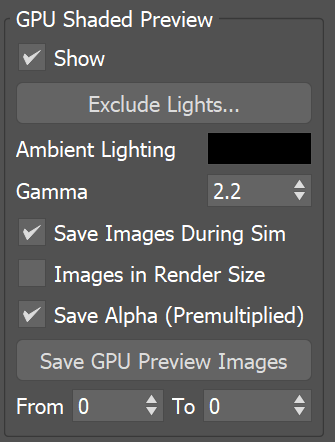
Show | gpu_viewport – [3ds Max 2015 and later] When enabled, the GPU preview can be directly seen inside the viewports together with all other scene objects and there is no need to create a dedicated viewport. Note that geometries that intersect the Simulator box or are inside the Simulator might appear completely behind the entire fluid or in front of it.
Exclude Lights – Launches the GPU Preview Light Include/Exclude List window which can be used to specify which light sources will be used for lighting.
Ambient Light | gpu_ambient – Specifies the color of the ambient light.
Gamma | gpu_gamma – Specifies the gamma for the GPU preview. When Enable In Viewport is turned on, this parameter is ignored and the 3ds Max gamma setting is used.
Save Images During Sim | gpu_save – When enabled, automatically saves the preview of each newly simulated frame as a .png file in the same folder as the simulation output caches.
Images in Render Size | gpu_img_rend_sz – When enabled, the resolution of the saved preview images will be based on the Output Size set up in the Render Settings window.
Export Alpha (Premultiplied) | gpu_alpha – When enabled, the .png file contains an alpha channel that can be used for compositing. Note that the color is already multiplied by the alpha.
Save GPU Preview Images – Renders a whole sequence from the already existing simulation into a series of .png images in the same folder as the simulation output caches. The From and To values specify the frame interval for the sequence, and the animation controls from the Input panel will apply (play speed, looping, etc.).
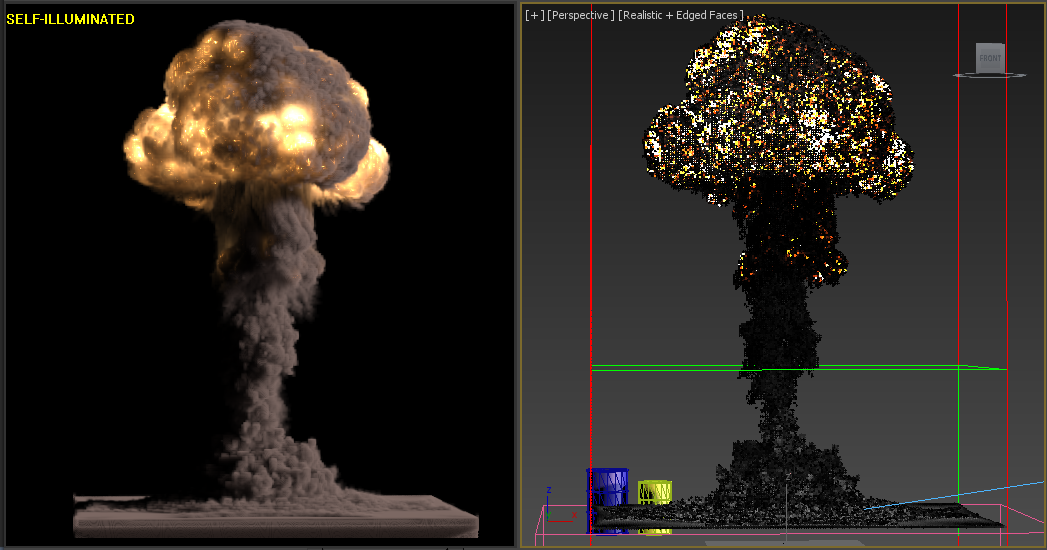
Here is how the GPU Preview looks next to the voxel preview of a Phoenix Simulator.
In 3ds Max 2015 and later, the real-time GPU Preview of fire and smoke can be directly shown inside the viewport next to all other objects by just turning on the Enable In Viewport option.
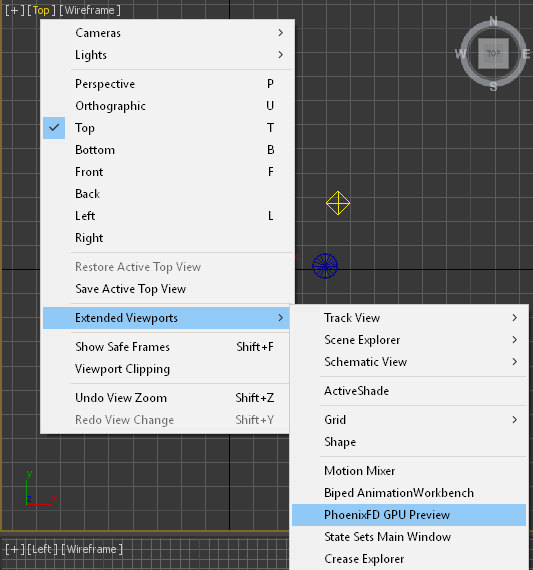
Alternatively, GPU Preview can also be enabled in an Extended Viewport. The Phoenix GPU Preview extended viewport shows the selected Simulator node and uses the parameters of the selected viewport. To enable it, right-click the viewport type and select Extended Viewports → Phoenix FD GPU Preview.
To disable Extended GPU Preview or change the background color of the viewport, use the right-click menu.
Background Color | prv_gpu_color – Allows changing the background color of the Extended GPU Preview.
Switch Viewport - Allows to turn off the Extended GPU Preview and enable one of the other 3ds Max viewports.

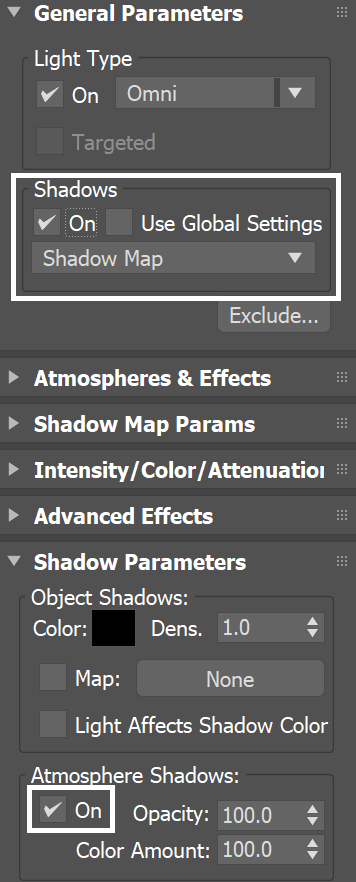
In order to get proper shading for the smoke, the light source has to have shadows enabled, including atmospheric shadows. Otherwise, the smoke will be rendered as flat and featureless.
V-Ray lights have these settings enabled by default.
A 3ds Max light, such as an Omni light, must have its Shadows On, Shadow type set to VRayShadow (or Ray Traced Shadows if using the default Scanline renderer), and Atmosphere Shadows On.
Particle Preview
The parameters here control the visualization of Particle Types generated by the Simulator. Phoenix can only preview the Particle Types present in the cache file for the current frame, such as Drag particles emitted using a Fire Source.
You can specify a Particle Channel to use as a basis for adjusting the particle preview color, using the Scale Color By option. If you export the Velocity particle channel when emitting Drag particles, you could then set the Scale Color By option to Speed, so that the faster the particles move, the whiter they appear in the preview.
You can find more info on Particle Channels from the Particle Channel Ranges page.
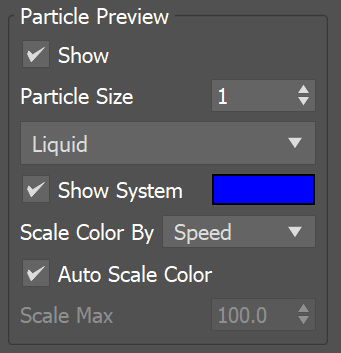
Show | prv_particles, prv_prt_name – Enables the preview of particles. The controls below affect the visualization of the currently selected particle group.
Particle Size | viewPartSize – Sets the size of the particles in the viewport. Note that all particles are drawn with the same size.
Show System | show_prt_face – When enabled, the particle system will be visible in the Simulator preview. You can choose the Particle System to edit from the dropdown menu.
Preview Color | prv_prt_color_face – Specifies the default color of the particles. Moving particles are displayed as a blend between their default color and white, based on the selected Scale Color By channel. Note that if the particle system has an RGB channel exported, it will be used in place of the Preview Color.
Scale Color By | prv_prt_colscale_chan_face – Specifies the particle channel used for adjusting the particle preview color.
- No Scaling – All particles will be the same color - the one specified by Preview Color.
- Speed – The faster the particles move, the whiter they will appear. The preview is only affected by the Scale Max option if the particle system has the Velocity channel export enabled.
- Size – The larger the particles are, the whiter they will appear. The preview is only affected by the Scale Max option if the particle system has the Size channel export enabled.
- Age – The older the particles are, the whiter they will appear. The preview is only affected by the Scale Max option if the particle system has the Age channel export enabled.
- Viscosity – The higher the viscosity the particles, the whiter they will appear. The preview is only affected by the Scale Max option if the particle system has the Viscosity channel export enabled.
Auto Scale Color | prv_prt_awspeed_face – When enabled, automatically calculates Scale Max based on the Min/Max range of the selected Scale Color By particle channel, assuming the respective channel export has been enabled in the Output rollout for the selected particle system.
Scale Max | prv_prt_wspeed_face – When Auto is disabled, allows you to specify a constant value at which the particle preview color becomes pure white. Particles with a Scale Color By channel value higher than the specified Scale Max are also pure white. You can also find more info about the usual particle channel maximum values on the Particle Channel Ranges page.
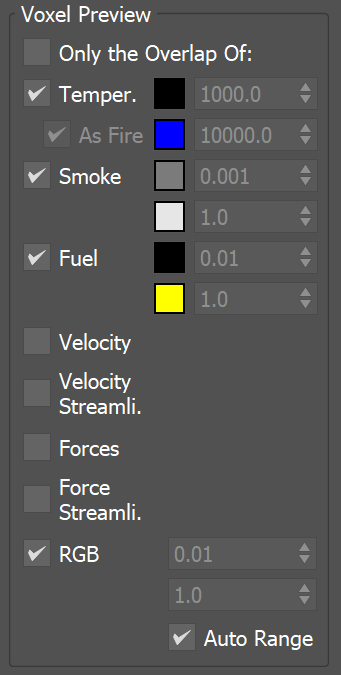
Voxel Preview
The Voxel Preview displays the Grid Channel content of each cell. Phoenix can only preview the channels present in the cache file for the current frame. All enabled channels are drawn if their content is between the corresponding thresholds.
To see the list of available channels and their ranges for an input sim cache, go to the Cache File Content section of the Simulation rollout. You can also find more info on the Grid Channel Ranges page.
Note that you can also specify the Voxel Preview value range for any Grid Channel, if you disable the Auto Range option.
For example, you could enable only Smoke, and specify the range to be between 0.7 and 1.0, so that you can see where the smoke is getting thicker. Grid Smoke Channel values that are below 0.7, or above 1.0, would not appear in the preview at all.
Only the Overlap Of: | prv_and – When enabled, shows only the cells where the following selected channels overlap.
Temperature | prv_temperature, prv_t_threshold, prv_t_threshold2, prv_t_color, prv_t_color2 – Enables the representation of the temperature.
As Fire | prv_plank_t – When the temperature is in Kelvins, e.g. when coming from a Phoenix simulation, the voxel colors come from a physically correct black body radiation model. In this mode the custom color for the temperature are disabled. Check the Grid Channel Ranges for more info.
Smoke | prv_smoke, prv_smoke_threshold, prv_smoke_threshold2, prv_smoke_color, prv_smoke_color2 – Enables the representation of the smoke.
Fuel | prv_fuel, prv_fuel_threshold, prv_fuel_threshold2, prv_fuel_color, prv_fuel_color2 – Enables the representation of the fuel.
Velocity | prv_velocity, prv_v_threshold, prv_v_threshold2, prv_v_color, prv_v_color2 – Enables the representation of the velocity.
Velocity Streamlines | viewVelStreamlines, viewVelStreamlinesThreshold, viewVelStreamlinesThreshold2, viewVelStreamlinesColor, viewVelStreamlinesColor2 – Traces the velocity field of the cache files to generate a streamline preview.
As Rainbow | viewVelStreamlinesColorCurve – Represents the Velocity Streamlines in rainbow colors, where red is the fastest, green is medium speed and blue is the slowest.
Lines Length | viewVelStreamlinesMaxIterations – Signifies the maximum length of each streamline in the preview. Adjusting the value will provide you with a guide/preview of the velocity field's motion. The Streamline's length is measured in voxels and at the lowest setting, the Streamlines will be no larger than a voxel.
The Velocity Preview is inactive when the Forces Preview is enabled, and vice versa. Similarly, the Velocity Streamlines Preview is inactive when the Force Streamlines Preview is enabled, or the other way around.
Forces | prv_forces, prv_f_threshold, prv_f_threshold2, prv_f_color, prv_f_color2, prv_force_list – Enables preview of how Phoenix forces or standard 3ds Max forces will affect the simulation. This preview can be shown even without any loaded simulation.
Force Streamlines | viewForceStreamlines, viewForceStreamlinesThreshold, viewForceStreamlinesThreshold2, viewForceStreamlinesColor, viewForceStreamlinesColor2 – Enables a streamline preview of how Phoenix forces or standard 3ds Max forces will affect the simulation. This preview can be shown even without any loaded simulation.
As Rainbow | viewForceStreamlinesColorCurve – Represents the Force Streamlines in rainbow colors, where red is the fastest, green is medium speed and blue is the slowest.
Lines Length | viewForceStreamlinesMaxIterations – Signifies the maximum length of each streamline in the preview. Adjusting the value will provide you with a guide/preview of the force field's motion. The Streamline's length is measured in voxels and at the lowest setting, the Streamlines will be no larger than a voxel.
Use the Add or Remove buttons to select which forces will be previewed. Unlike other voxel preview channels which use the size of the loaded cache, the Forces preview can also work without a loaded cache and will use the grid size of the Simulator.
Additionally, some Phoenix and standard 3ds Max forces such as the Drag force are not supported yet, and are shown as if their velocity is always 0 and will not be visible. In addition, forces that act differently depending on the quantity of content in the grid (e.g. amount of liquid, smoke, or no content) are not yet supported by the preview.
RGB | prv_uvw, prv_uvw_threshold, prv_uvw_threshold2 – Enables the representation of the RGB channel.
Auto Range | prv_autorange – When enabled, automatically adjusts the preview ranges of visible channels for the current frame so that important data is always visible and the preview is always quick.
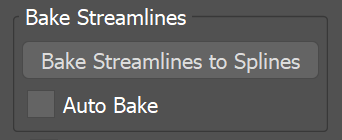
Bake Streamlines
Bake Streamlines to Splines – Button for converting the currently shown Streamline preview (either Velocity Streamlines or Force Streamlines) into native 3ds Max splines. The baked splines can be rendered like any regular 3ds Max spline - through enabling the rendering in the Rendering rollout of the spline settings or via applying a Hair and Fur modifier over the spline.
Auto Bake | autoBakeStreamlineCurvesOnPreviewChange – Enables automatic Streamlines to Splines baking on any change in the Streamlines Preview. While the Auto Bake option is enabled you don't have to press the Bake Streamlines button in order for scene changes to be applied to the splines and changing the timeline frame will update the baked splines. This allows for rendering animations when using the Hair and Fur modifier over the spline.
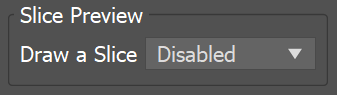
Slice Preview
The Slice preview displays only a single slice of voxels which can be convenient for debugging and fine-tuning a simulation.
Draw a Slice | prv_sect – When enabled, only a voxel-thick cross-section of the grid is visible. This works for voxels, particles, and velocity streamlines, but not for the GPU Preview or the Mesh Preview. It allows for a better view of occluded details and can help when previewing very rich data such as velocity fields, or in order to see underwater cavities.
Along Axis X, Y, Z | prv_sect_axis – Specifies the axis along which the grid will be sliced.
Disabled – Turns the Draw Just a Slice feature off.
Slice Level | prv_sect_lvl – Specifies the offset of the slice from the bottom center of the grid in voxels.
Slice Width | prv_sect_width – Specifies the width of the slice in voxels.